PreSonus 16×16 AVB-to-Dante Bridge AVB-D 16 Owner’s Manual
Overview
Introduction
Welcome to a whole new world of possibilities! The AVB-D 16 is your bridge between an AVB network and Dante network. This 16×16 bridge converts 16 channels of audio from AVB to Dante and 16 channels of audio from Dante to AVB. It has a built-in asynchronous sample rate converter (ASRC) to ensure your media clock remains solid and reliable on both networks. Additionally, the ASRC allows you to operate each side of the network at different sample rates. For example, you can have the AVB network running at 48kHz and the Dante network at 96kHz.
AVB-D 16 works like any other audio endpoint on either your StudioLive Series III AVB network or your Dante network. This means that when the AVB audio data reaches the bridge, it’s translated to Dante and vice versa. Other data, such as control data, is not passed through the bridge. For this reason it’s important to ensure you’ve properly set up your AVB and Dante networks with the devices and computers you’ll need on each side respectively.
PreSonus Audio Electronics is committed to constant product improvement, and we highly value our customers and their creative endeavors. We appreciate the support you have shown us by purchasing your AVB-D 16 and are confident that you will enjoy for years to come!
About This Manual
We suggest you spend some time with this manual before beginning to work with your AVB-D 16 and familiarize yourself with their features, functions, and proper connection procedures. This will facilitate configuring your AVB and Dante networks to intercommunicate and make the process go as smoothly as possible.
This manual describes the functions of the AVB-D 16 with StudioLive Series III digital mixers. More information about AVB Networking best practices and configurations can be found in the PreSonus AVB Networking Guide, and we highly recommend that you review this document as well, to avoid any difficulty in creating your AVB network. This manual covers basic connection and use case configurations only. For more complex routing examples, please review the PreSonus AVB Networking Guide.
Throughout this manual, you will find Power User Tips. These suggestions provide useful information on getting the most out of your AVB-D 16 as well as explanations of various useful audio terminology. Thank you, once again, for purchasing our product. We are confident that you will enjoy your new AVB-D 16.
Note: When using your AVB-D 16 with any StudioLive Series III Ecosystem product, every product on the network will require the latest firmware and Universal Control version for proper functionality. Please log into your My PreSonus user account and update all associated software for your PreSonus StudioLive Series III Ecosystem AVB products before proceeding.
What’s in the box
In addition to to a Quick Start Guide, your AVB-D 16 package contains the following:
- AVB-D 16 16×16 AVB-to-Dante bridge

- Power Supply

What Else You Need
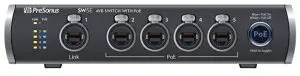
- AVB Switch. The PreSonus SW5E AVB PoE Switch is fully compatible with all PreSonus AVB products and third-party AVB devices that adhere to the 1722.1 AVB standard. For a complete list of compatiblethird-party AVB switches, please visit www.presonus.com.
- Ethernet Cable. PreSonus requires a CAT5e or CAT6 Ethernet cable for all AVB devices. These can be acquired at most electronics dealers or www.presonus.com.
- PreSonus StudioLive Series III Ecosystem Product. All PreSonus StudioLive Series III mixer models, NSB-series stage boxes, and EarMix 16M personal monitor mixers are fully compatible with the 1722.1 AVB standard and the AVB-D 16. At this time, third-party AVB mixers are not supported.

Companion PreSonus Products
Welcome to the PreSonus Ecosystem! As a solutions company, we believe the best way to take care of our customers (that’s you) is to ensure that you have the best possible experience from the beginning of your signal chain to the end. In order to achieve this goal, we’ve prioritized seamless integration throughout every design phase of these products from day one. The result is systems that communicate with each other as intended— straight out of the box—without excessive configuration hassle.
For more information on how our PreSonus AVB networking devices play so wellwith one another, please review the StudioLive™ Series III AVB Networking Guide.
StudioLive™ Series IIIAVB Networking Guide
Connections and Controls
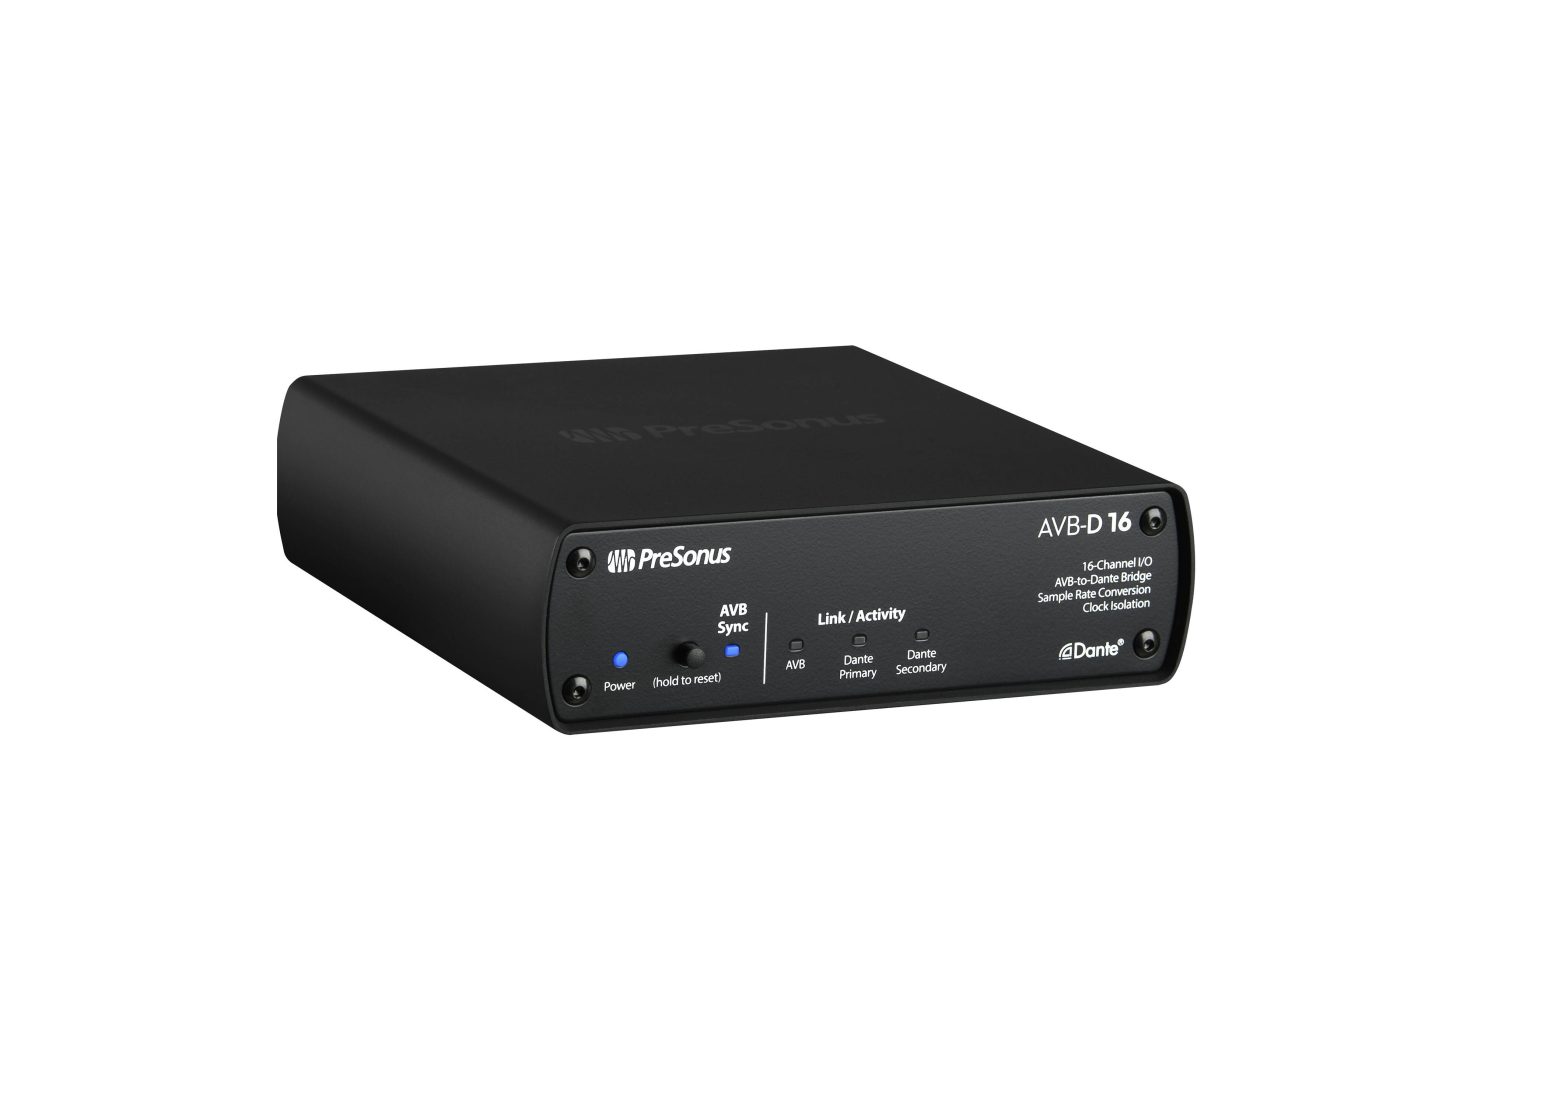
Front Panel

- Power LED. Illuminates when the unit is powered on and blinks when the unit is performing a firmware upgrade.
- Reset Button. Press and hold for 5 seconds to revert the unit to factory firmware.
- AVB Sync LED. Illuminates solid when the unit is receiving properly synced to AVB media clock and blinks if its not properly synced to AVB media clock.
- AVB Network Activity LED. Flashes as AVB Network activity is detected.
- Dante Network Activity LED. These LEDs will flash when network activity is detected on their respective Dante networks.
Rear Panel
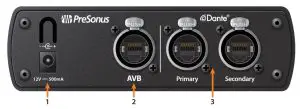
- Power Inlet. This is the connection for your AVB-D 16 power supply.
- AVB Network. This locking EtherCON connector can be usedto connect your AVB-D 16 to your AVB network.
- Dante Network. Use the Primary locking EtherCON connector to connect your AVB-D 16 to your Primary Dante network. Use the Secondary locking EtherCON connector for your Secondary or Redundant Dante network. When running a non-redundant Dante network, only the Primary connection should be used.
Network Setup
The AVB-D 16 bridges between two different audio network protocols: AVB and Dante. PreSonus recommends configuring each protocol as separate networks before using the AVB-D 16 to bridge them. This means that both the AVB and Dante networks should exist on their own switches and devices. Dante devices should not be connected to the AVB network switches and vice versa.
While it is technically possible to have the two networks co-exist on the same switches, it brings with it certain technical challenges that could result in adverse conditions. Part of what makes AVB so stable and reliable is the bandwidth reservation that AVB switches automatically manage to prioritize AVB traffic. Since Dante audio does not have this prioritization it could be interrupted by the AVB traffic. For advanced systems that require shared switches you’ll need to both ensure the switches are AVB compatible and configure separate VLANs for the Dante ports. Refer to the Audinate guides for this advanced VLAN setup for Dante networks. https://www.audinate.com/learning/technical-documentation
Recommended Network Setup Example

Managing Each Network
The AVB-16 D does not pass network data between the AVB and Dante networks, only audio. This means that managing network routing and clocking must be done independently. AVB network management for StudioLive Series III ecosystem products can be done from the Touch Display on the StudioLive Series III mixers or from UC Surface connected to the AVB Network using a Mac or Windows computer. The Dante network management must be done on a computer running the Dante Software Control application that is connected to the Dante network. A computer connected to the AVB network will not be able to see and manage devices on the Dante network and vice versa. Similarly, when using a single computer for network management, it cannot be connected to both networks concurrently.
Note: When using AVB-D 16 alone with NSB-series stage boxes or EarMix 16M, you must use a third party AVDECC controller to route the audio to and from your device. At this time, UC Surface requires a StudioLive Series III mixer to be connected to support AVB Network routing.
Updating Firmware
Firmware updates for the AVB-D 16 must be done using the UC Surface software installed on a computer that is connected to the AVB network. Firmware updates can not be done from the Dante network connections.
- Download the latest firmware version from your MyPreSonus account.
- Connect a computer to the same AVB network as the AVB-D 16 either wired or wirelessly.
- Launch UC Surface on the computer and select the AVB-D 16 from the device list.
- Select the Update Firmware button and choose the update file from the browser window.
- When the firmware update is complete the AVB-16 D will reboot itself. Once complete, verify the firmware version to ensure that the firmware is updated correctly.
AVB Network Setup
Making connections and adjusting settings for the AVB network is done using a StudioLive Series III console mixer or UC Surface running on a Mac or Windows computer. This can be done from the mixer touch screen or from UC Surface.
When using AVB-D 16 alone with NSB-series stage boxes or EarMix 16M, you must use a third party AVDECC controller to route the audio to and from your device. At this time, UC Surface requires a StudioLive Series III mixer to be connected to support AVB Network routing.
IMPORTANT: The AVB-D 16 derives its AVB media clock from incoming audio stream 1. You must have an AVB stream from the master StudioLive Series III mixer connected to audio stream 1 of the AVB-D 16 in order for it to clock properly. Failure to do this will result in audio pops and clicks.
Method 1: Console Mixer Touch Display Setup
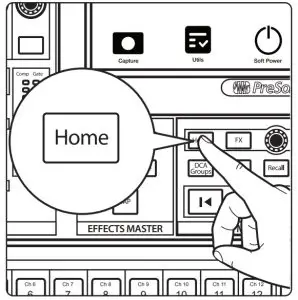
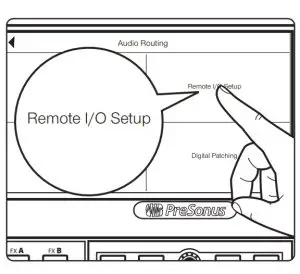
- Press the Home button on the mixer.
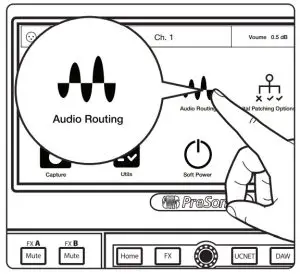
- Select Audio Routing from the touch screen.
- Select Remote I/O Setup from the touch screen.
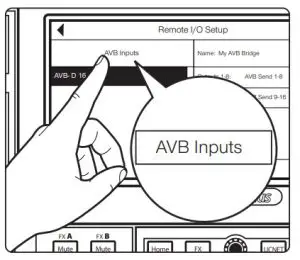
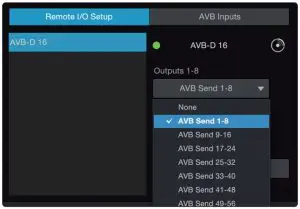
- On the Remote I/O Setup screen you will see the AVB-D 16 in the list of devices on the left hand side of the screen. If you have any NSB-series stage boxes, EarMix 16M or other StudioLive Series III mixers connected to the same AVB network, you will also see them in the list. Select the AVB-D 16. Once the AVB-D 16 is selected, you’ll see the setting options on the right hand side of the touch screen.If you have more than one AVB-D 16 on the network, touch the Identify icon to flash the LEDs on the front panel to ensure you’ve selected the correct unit you’d like to set up.
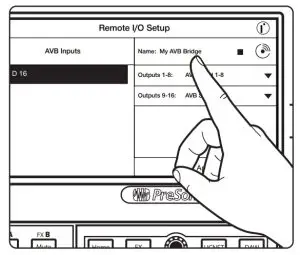
- Touch the name to give the AVB-D 16 a unique name. This will be the name of the unit on the AVB side of the network. NOTE: This name will not show on the Dante network.
- Select the drop down menu for Outputs 1-8 to choose an AVB stream to send to the AVB-D 16. Note that you must have a stream connected here to ensure the AVB-D 16 is receiving a proper media clock. Repeat for channels 9-16.
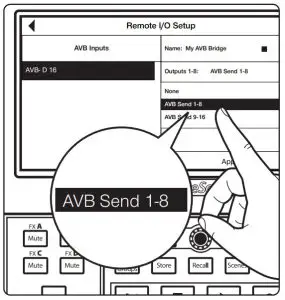
- Select the AVB Inputs button at the top left of the touch screen to route audio from the AVB-D 16 to the StudioLive Series III mixer.
- On the AVB Inputs screen select an incoming stream from the list of the left hand side of the screen. Choose an available AVB stream from the list on the right to route that stream to the input currently selected on the left. If you don’t see the stream on the right you may need to scroll further down the list using the encoder in the master control area of the mixer.
 If you have more than one AVB-D 16 on the network, touch the Identify icon to flash the LEDs on the front panel to ensure you’ve selected the correct unit you’d like to set up.

Your AVB-16 D is now set up and ready to use with your StudioLive Series III ecosystem!
Method 2: UC Surface Setup
- With UC Surface connected to the StudioLive Series III mixer, select the Settings gear icon in the top right to open the mixer settings.
- Select the Network tab to open the Network settings view.
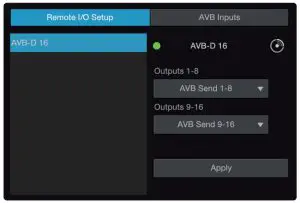
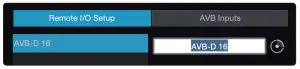
- In the top right area of this view, select the Remote I/O Setup tab. On the Remote I/O Setup view you will see the AVB-D 16 in the list of devices on the left hand side of the area. If you have any NSB-series stage boxes, EarMix 16M or other StudioLive Series III mixers on the AVB network, you will also see them in the list. Select the AVB-D 16.
- With the AVB-D 16 selected you’ll see the setting options on the right hand side of the Remote I/O Setup area. If you have more than one AVB-D 16 on the network, select the Identify icon to flash the LEDs on the front panel to ensure you’ve selected the correct unit you’d like to set up.
- Select the name to give the AVB-D 16 a unique name. This will be the name of the unit on the AVB side of the network. This name will not show on the Dante network.
- Select the drop down menu for Outputs 1-8 (stream 1) to choose an AVB stream to send to the AVB-D 16. Note that you must have a stream connected here to ensure the AVB-D 16 D is receiving a proper media clock. Repeat for channels 9-16 (stream 2).
- Select the AVB Inputs tab at the top of this area to route audio from the AVB-D 16 to the StudioLive Series III mixer. On the AVB Inputs screen select an incoming stream from the list of the left hand side of the screen. Choose an available AVB stream from the list on the right to route that stream to the input currently selected on the left. If you don’t see the stream on the right you may need to scroll further down the list.


Your AVB-D 16 is now set up and ready to use with your StudioLive Series III ecosystem!
Dante Network Setup
When connected to a Dante network, the AVB-D 16 will function just like any other Dante device. In order to set it up and route audio to and from your AVB-D 16, you’ll need to use the Dante Software Controller application. B sure your computer running the Dante Software Controller is connected to the same network as the Dante side of the AVB-D 16. As previously mentioned, Dante setup can not be done from the AVB connections of the AVB-D 16.
For details on how to setup your Dante network please refer to the Audinate documentation.https://www.audinate.com/learning/technical-documentation
Technical Information
To mount your AVB-D16 to a rack shelf, use a M5x0.8 screw that is 6-10mm in length depending on the thickness of your shelf.
Specifications
Digital Audio
| AVB Audio Network Port | EtherCON™ |
| AVB Audio Sample Rate | 44.1kHz, 48kHz |
| Dante Audio Network Ports (Primary and Secondary) | EtherCON™ |
| Dante Audio Sample Rate | 44.1kHz, 48kHz, 88.2kHz, 96kHz |
Power
| Input Voltage Range | 100-230 VAC (+/- 10%) |
Physical
| Dimensions (H x D x W) | 1.69” x 5.9” x 5.7” (42.9mm x 149.9mm x 144.8mm) |
| Weight | 1.63lbs (0.74kg) |
Added bonus: PreSonus’ previously Top Secret recipe for…
Andouille & German Red Cabbage Po-Boys
Ingredients:
- 1 small Onion
- 3 Tbsp. fresh Ginger
- 1 small head Red Cabbage
- 1 tsp Salt
- 3 Tbsp. Honey
- ¼ cup Red Vinegar
- 12 oz Andouille or Bratwurst Sausage sliced lengthwise
- ¼ lb. Muenster Cheese
- Creole or German Mustard to taste
- 1 loaf French Bread
Cooking Instructions:
- Heat 2 tablespoon vegetable oil in large skillet. Add onions and ginger, then cook them for about 3 minutes until onions begin to wilt. Add cabbage, vinegar, and honey, and then cook for about 5 minutes. Add salt to taste and set aside.
- Heat oil in a skillet till hot. Add sausage cut side down till nice and brown, turn and cook for about 5 minutes till thoroughly cooked.
- Slice bread lengthwise, lay a bed of cabbage, then sausage, and cheese on top. Toast under the broiler or in a hot oven till cheese is melted and bread is crisp.
- Spread mustard on bread. Sandwich can then be cut into 2-3 pieces and shared (or not if you’re really hungry).
BONUS: Extra cabbage can be used as a condiment with meat, eggs, sandwiches, etc.
 report this ad
© 2020 PreSonus Audio Electronics, Inc. All Rights Reserved. AudioBox, CoActual, DigiMax, Eris, FireStudio, Nimbit, PreSonus, QMix, Riff to Release, Sceptre, StudioLive, Active Integration, and XMAX are trademarks or registered trademarks of PreSonus Audio Electronics, Inc. Capture, Impact, Mixverb Presence, RedLightDist, SampleOne, Studio One, and Tricomp are trademarks or registered trademarks of PreSonus Software Ltd. Mac and Mac OS are registered trademarks of Apple, Inc., in the U.S. and other countries. Windows is a registered trademark of Microsoft, Inc., in the U.S. and other countries. Other product names mentioned herein may be trademarks of their respective companies. All specifications subject to change without notice…except the recipe, which is a classic.
References
[xyz-ips snippet=”download-snippet”]