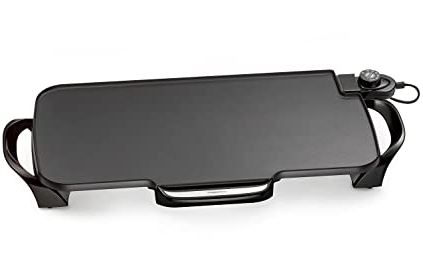
PRESTO 22-inch Electric Griddle with removable handles

- An extra-large cooking surface makes enough for the entire family.

- Control Master® heat control maintains the proper cooking temperature automatically.
- A textured ceramic cooking surface provides enhanced nonstick performance and easier cleaning.
- Slide-out drip tray for quick cleanups.
- Removable handles for easy cleaning and compact storage.
INSTRUCTIONS
This is a Listed appliance. The following important safeguards are recommended by most portable appliance manufacturers.IMPORTANT SAFEGUARDS
To reduce the risk of personal injury or property damage when using electrical appliances, basic safety precautions should always be followed, including the following:
- Read all instructions.
- WARNING! To reduce the risk of fire, do not plug in with handles removed.
- Be sure that handles are assembled and fastened properly before using this appliance. See instructions regarding handles on page 2.
- Do not touch hot surfaces. Use handles or knobs.
- To protect against electrical shock, do not immerse heat control, cord, or plug in water or other liquid.
- Close supervision is necessary when any appliance is used by or near children.
- Unplug from outlet when not in use and before cleaning. Allow cooling before putting on or taking off parts, and before cleaning the appliance.
- Do not operate any appliance with a damaged cord or plug or in the event the appliance malfunctions or has been damaged in any manner. Return the appliance to the Presto Factory Service Department for examination, repair, or electrical or mechanical adjustment.
- The use of accessory attachments not recommended by the appliance manufacturer may cause injuries.
- Do not use outdoors.
- Do not let the cord hang over the edge of the table or counter or touch hot surfaces.
- Do not place on or near a hot gas or electric burner or in a heated oven.
- It is recommended that this appliance not be moved when it contains hot oil or other hot liquid. If it must be moved when it contains hot oil or other hot liquid, use extreme caution.
- Always attach heat control to the appliance first, then plug the cord into the wall outlet. To disconnect, turn the control to OFF then remove the plug from the wall outlet.
- Do not use appliances other than intended use.
SAVE THESE INSTRUCTIONSTHIS PRODUCT IS FOR HOUSEHOLD USE ONLY.
Important Cord InformationThis appliance has a polarized plug (one blade is wider than the other). To reduce the risk of electric shock, this plug is intended to fit into a polarized outlet only one way. If the plug does not fit fully into the outlet, reverse the plug. If it still does not fit, contact a qualified electrician. Do not attempt to modify the plugin anyway.
A short power-supply cord (or cord set) is provided to reduce the risk resulting from becoming entangled in or tripping over a longer cord. Extension cords may be used if care is properly exercised in their use.
If an extension cord is used, the marked electrical rating of the extension cord should be at least as great as the electrical rating of the appliance. The extension cord should be arranged so that it will not drape over the countertop or tabletop where it can be pulled on by children or tripped over unintentionally.
Connect the power supply cord to a 120VAC electrical outlet only.
Before the First Use
Remove all packing material. Set the handles, drip tray, and heat control aside. Wash the griddle in warm, soapy water, rinse, and dry. Do not immerse the Control Master heat control in water or let it come in contact with any liquid. Before using this griddle, the handles must be attached as instructed below:1. Place the griddle cooking surface side down on a flat surface (Fig. A).2. Position one of the handles, feet side up, over the griddle so that the two handle holes are directly over the latch clip catches. The latch clip levers will rest on the catches.3. Pull the latch clips back beyond the catches (Fig. B) and push the handle down until it is firmly seated against the griddle. Release the latch clips to lock the handle into place. To be sure the handle is securely attached, check that both latch clips are under the edge of the latch clip catches (Fig. C).4. Repeat steps 2 and 3 with the other handle.
How To Use
NOTICE: This griddle is not intended to be used as a warming tray, hot plate, or for heating any cookware. Using this product for purposes different from those specified in the instruction manual may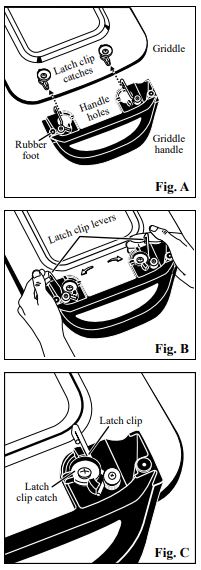 cause damage to the product and will void the product warranty.
- Place an assembled griddle on a dry, level, heat-resistant surface away from walls, cabinets, and other objects.NOTICE: To prevent possible heat damage to your countertop, place a heat-resistant counter protector, such as aluminum foil, under the griddle; take care not to place the foil under the griddle’s legs. Slide drip tray onto tracks.
- Insert the Control Master heat control probe into the griddle so the two electrical pins on the griddle are fully inserted into the heat control. Connect the cord to a 120VAC electrical wall outlet only.
- Turn Control Master heat control to the desired temperature (see page 3). Preheat griddle. The pilot light goes off when the selected temperature is reached (approximately 5 to 10 minutes).NOTE: Occasionally you may hear a pop or clicking sound while the griddle is preheating. This is due to the expansion of the metal as it heats and is normal. You may also notice this sound as the unit cools down.
- Prepare food for cooking. Because the griddle features a ceramic nonstick surface, food may be prepared with little or no oil.NOTICE: Avoid using no-stick cooking sprays as they may cause the cooking surface to become tacky.
- Place food on griddle and cook according to the temperature-timetable (page 3). Heat should be adjusted according to personal preference and the particular food being cooked. During cooking, the pilot light will go on and off indicating the desired temperature is being maintained.For best results use heat-resistant nylon, plastic, or wooden utensils. Do not use metal utensils as they may scratch the ceramic nonstick surface. Do not cut foods on the cooking surface.
- Turn heat control to OFF when cooking is completed. Unplug heat control from the wall outlet, then from the appliance. Allow griddle to cool before removing the drip tray and before cleaning.
Care and Cleaning
To disassemble the griddle handles for cleaning and storage: Initially, place the griddle cooking surface side down on the counter. Remove each of the handles by pulling the latch clips back until the clips clear the edge of the latch clip catches (Fig. B). While holding the clips back, lift the handle from the griddle. With practice, you will be able to open the clips and remove the handles while the griddle is in an upright position.After each use, remove heat control and wash the griddle in warm, soapy water. Make sure to also clean the underside, as necessary. Rinse and dry thoroughly. Do not use steel wool or abrasive kitchen cleaners. Do not immerse Control Master heat control in water or let it come in contact with any liquid.
NOTICE: To maintain the appearance of the griddle, do not wash it in the dishwasher. Washing it in the dishwasher will cause the nonstick properties of the ceramic coating to slowly diminish. In addition, the decorative trim and the bottom of the griddle will likely discolor due to the caustic nature of the dishwashing detergent. A gray residue may also form on the trim and griddle bottom and may transfer onto towels and/or skin.
In time, the nonstick finish may darken over the heating element. To minimize or remove this discoloration, sprinkle baking soda over the discolored area. Add enough water to make a paste. Allow the paste to sit for several minutes and then scour with a plastic scouring pad, such as Scotch-Brite* Dobie* Cleaning Pad, or a damp cloth. Wash and dry thoroughly. Repeat the procedure, if necessary.
IMPORTANT: To ensure the continued accuracy of the Control Master heat control, avoid rough handling in use and storage.

*Scotch-Brite and Dobie have registered trademarks of 3M Company. Presto is not affiliated with this company. 3
References
[xyz-ips snippet=”download-snippet”]