USER MANUAL
Turkey FryerProFry™ electric rotisserie
- Indoor electric turkey fryer cooks a moist and flavorful turkey in about an hour.
- Motorized rotisserie continually rotates the turkey in and out of the oil for perfect results.
- Basket replaces rotisserie for deep frying chicken, fish, fries and more.
For a helpful HOW-TO video, visit : www.GoPresto.com/turkey or scan thisQR code.
Visit us on the web at www.GoPresto.com
This is a Listed appliance. The following important safeguards are recommended by most portable appliance manufacturers.
IMPORTANT SAFEGUARDS
To reduce the risk of personal injury or property damage, when using electrical appliances, basic safety precautions should always be followed, including the following:
- Read all instructions.
- Indoor, countertop use only. Do not use outdoors.
- Follow all instructions for thawing and removal of moisture/ice before cooking. See detailed instructions “How to Prepare a Whole Turkey for Frying” on pages 7 and 8.
- See detailed instructions on page 15, step 4 for draining a turkey after frying, and see page 6 for instructions on draining a chicken after frying.
- Do not touch hot surfaces. Use handles. Always use potholders when handling a hot rotisserie.
- Be sure rotisserie is properly connected and skewer is locked in place. See detailed instructions on pages 10 through 13. Failure to lock skewer can result in release of the rotisserie assembly during use, which may result in severe burns.
- Be sure handle is properly assembled to basket and locked in place. See detailed assembly instructions on page 16. Failure to securely attach the basket handle can result in the release of the basket during use, which may result in severe burns.
- To protect against electrical shock or burns, do not immerse control assembly, cord, or plug in water or other liquid.
- Close supervision is necessary when any appliance is used near children.
- Do not let children handle or put electrical cords or plugs in their mouths.
- Always insert the control assembly in the removable pot before plugging the unit into the wall outlet. Allow unit to cool completely before removing the control assembly.
- Always attach magnetic plug end to appliance first, then plug cord into the wall outlet. To disconnect, turn all controls to OFF, then remove plug from wall outlet and then from appliance.
- Cover should not be used when frying turkey, french fries, or other high moisture foods. Ensure both the cover and removable pot are completely dry after washing and before use.
- Unplug from outlet when not in use and before cleaning. Allow to cool before putting on or taking off parts and before cleaning the appliance.
- Do not operate any appliance with a damaged cord or plug or in the event the appliance malfunctions or has been damaged in any manner. Return the appliance to the Presto Factory Service Department for examination, repair, or electrical or mechanical adjustment. See page 24 for contact information.
- The use of accessory attachments not recommended by the appliance manufacturer may cause injuries. Use only genuine Presto™ accessories and replacement parts.
- Do not use a cracked removable pot, a basket having a loose or weakened handle, or a loose or damaged locking tab on the lifting handle locking plate.
- Do not let cord hang over edge of counter or touch hot surfaces.
- Do not place on or near a hot gas or electric burner or in a heated oven.
- It is not recommended that this fryer be moved when it contains hot oil or other hot liquid. If it must be moved when it contains hot oil or other hot liquid, always use handles on base and use extreme caution.
- Do not use appliance for other than intended use.
SAVE THESE INSTRUCTIONSThis product is for household use Only.
WARNING FOR CALIFORNIA RESIDENTS!
State of California Proposition 65 requires that we include the following warning: This product contains a chemical known to the State of California to cause cancer and birth defects or other reproductive harm.
Important Cord and Plug Information
A short power supply cord is provided to reduce the risk resulting from becoming entangled in or tripping over a longer cord.DO NOT USE WITH AN EXTENSION CORD.Do not allow the cord to run underneath or around the unit. The magnetic cord may not detach easily if the cord is positioned in this fashion.
Connect the power supply cord to a 120VAC electrical outlet only.
Before First Use
• Read the instructions thoroughly before use.• Remove all packing material and become familiar with the various parts of the turkey fryer (Fig. 1A). The accessory box included with your turkey fryer should contain the following parts:
- Skewer
- Lifting handle assembly
- Cover handle
- Basket handle
- Pivot handle assembly
- Magnetic cord
- Attach the cover handle as instructed below and shown in Fig. 3.
- Become familiar with the rotisserie assembly instructions (pages 10 through 13) and basket handle assembly instructions It is recommended you practice assembling these parts prior to using them.
- Wipe the control panel with a damp cloth. Carefully clean the heating element with hot, soapy water, taking care not to immerse the control panel in water. Caution! To avoid electrical shock, never immerse the control panel, cord, or plug in water or wash in a dishwasher. Lift the removable pot out of the base and wash the pot, rotisserie assembly, cover, and fry/steam basket according to the cleaning instructions found on page 23, steps 3 through 5.
Cover Handle Assembly
The cover handle consists of the handle, base plate, and two screws that are partially threaded into the handle (Fig. 2). Attach the handle to the cover as follows:
- Using a Phillips screwdriver, separate the base plate from the cover handle by removing the two screws from the bottom of the handle. Set the screws aside.
- Position the base plate on top of the cover so the slot on the base plate aligns with the pocket on the cover (Fig. 3).
- Fit the tab on the handle into the slot on the base plate and then into the cover pocket.
- While holding the handle in place, turn the cover over and secure the handle using the two screws provided. Notice: Continuing to tighten, once secure, can result in stripping of screws or cracking of handle or cover.
The fryer is equipped with a sensor which will automatically shut the unit off if it is overheated. Overheating can occur if the unit is heated without or with an insufficient amount of oil or water. It can also occur when using solid fat or older oil that has become thick. Should the unit shut off, unplug and allow the unit to cool. Determine what caused the overheating and correct it, e.g., if you planned to deep fry and there is no oil in the fryer, add oil. Then, with the tip of a Phillips screwdriver, press the red RESET button on the back of the control panel (Fig. 4). The unit will not operate until it is reset.
Before frying a turkey, it is recommended that you do a “dry run” to make sure the turkey is centered on the rotisserie and will fully rotate (see page 13). When doing the dry run, the temperature control knob should be off to prevent overheating. If you accidentally heat the unit during the dry run, it will overheat and it will be necessary to reset the unit as described above.
Important Safety Information
Warning! Burn Hazards
- Hot oil can cause serious and painful burns. This appliance should not be used by children. Close supervision is necessary when any appliance is used near children. Never leave turkey fryer unattended.
- Oil and water do not mix. The combination can be dangerous. Accordingly, before pouring oil into the removable pot, be sure that the pot and all parts are completely dry. In addition, before placing food in fryer, always remove ice crystals and excess moisture from food by patting dry with paper towels. Turkey is a high moisture food and must be thawed completely and dried thoroughly before frying. When the oil is heated, any water droplets in the oil superheat, becoming a volatile steam that can cause hot oil to spatter, boil over, or even erupt out of the deep fryer. Hot oil can cause severe burns!Refer to the section “How to Prepare a Whole Turkey for Frying” on pages 7 and 8. Uncooked potatoes also contain a high percentage of moisture and extreme caution must be used when frying. Follow the special frying instructions in step 1 on page 17 and in the Homemade French Fries recipe on page 19.
- Use caution when frying doughs, such as beignets, donuts, dumplings, hushpuppies, and fritters. These foods may develop air bubbles during heating, which may burst and cause burns. Use a slotted spoon or tongs, rather than a fork, to turn food during frying and to remove food from oil.
- Use caution when frying flour tortillas. Flour tortillas contain air bubbles. During frying, oil can become trapped within these bubbles. If not properly drained, the bubbles can burst and cause burns. Accordingly, after frying, carefully raise the tortillas out of the vegetable oil and allow to drain for approximately 30 seconds.
- It is important to fully drain the oil out of a turkey or chicken cavity after frying. If allowed to remain in the cavity, oil may be hot and result in burns. To drain a turkey, follow step 4 on page 15. To drain a chicken before removing it from the basket, lift the basket to the drain position. Then, with the drain hooks resting on the rim of the removable pot, push down on the basket handle to tilt the front end of the basket up (Fig. 5). This will allow oil to drain out of the cavity of the chicken.
Warning! Electrical Hazards
To avoid the risk of electrocution or severe disfiguring electrical burns:
- Do not let the control panel, cord, or plug come in contact with water or other liquid.
- Do not let children handle or put electrical cords or plugs in their mouths.
- Never use the turkey fryer without the removable pot.
Important Fryer Guidelines
- Use fryer only on a clean, dry, level, and stable surface, away from the edge.
- Never preheat or use the fryer without oil or with an insufficient amount of oil. Failure to fill the removable pot with oil to the TURKEY fill line, also referred to as the minimum fill line, will cause overheating and damage to the product. The minimum amount of oil for this fryer is 1 gallon (4 quarts). Also, never exceed the maximum (MAX) fill line. Using more than the maximum amount of oil may cause the oil to boil over the top of the fryer. The maximum amount of oil for this fryer is 1.3 gallons (about 5¼ quarts). The TURKEYand MAX fill lines are embossed inside the removable pot (Fig. 6).
- When deep frying foods, you may use vegetable oils, such as peanut, canola, corn, sunflower, or soybean. Peanut oil is highly recommended for frying because of its high smoke point. Refined olive oil can also be used, but avoid extra virgin olive oil, as it has a low smoke point.
- Do not use solid fat (shortening, butter, margarine, lard). Solid fat will not melt uniformly and will cause the unit to overheat resulting in the reset button tripping. In addition, solid fat will cause severe smoking and solidify once it has cooled, making it very difficult to remove or insert the control assembly.
- Avoid preheating oil longer than necessary and turn off the fryer once the last batch of food has been removed. The longer oil is heated, the more it deteriorates.
- Always remove plug from wall outlet and then from turkey fryer when unit is not in use.
- Always allow fryer to cool completely before removing any parts, before removing oil, and before cleaning.
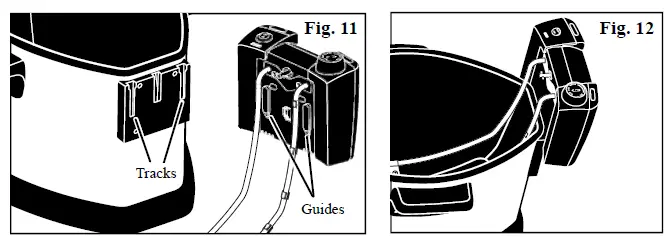
- If unit fails to preheat:1. Check cord assembly to assure magnetic plug is attached to the appliance and the cord is plugged into the wall outlet.2. Check to see that both guides on the front of the control panel are properly positioned in the tracks on the back of the base (see Fig. 11 and Fig.12).3. The reset button may have tripped. See “Reset Button” section on page 5. Before plugging the unit back in, make sure there is sufficient oil or water in the fryer, or if the oil is old, replace the oil with fresh oil.
- If the unit stops heating, see #1 and #3 above.
How to Prepare a Whole Turkey for Frying
For a helpful How-To video, visit www.GoPresto.com/how/prep/
Important : The frozen tag weight of a whole turkey should not exceed 15 pounds.
If frying a fresh whole turkey, the weight of the turkey should not exceed 12½ pounds.
- Completely thaw turkey before frying using one of these methods:a. The safest method of thawing is in the refrigerator. You will need to allow one day of thawing for every 4 pounds of weight. Once thawed, the turkey can safely be kept in the refrigerator for another two days.b. A second and faster method is to thaw the turkey in cold water. Leave the turkey in its original wrapping and submerge it in a sink or large container full of COLD water. Change the water every 30 minutes, replacing it with fresh cold water. Allow 30 minutes of defrosting time per pound. Once the turkey has thawed, cook it immediately.
- Open turkey wrapping and remove turkey, allowing excess moisture to drain away.
- Pull out pop-up thermometer (if provided) and discard.
- Remove gravy packet (if provided), neck, and giblet package from turkey cavity or neck area.
- Cut away excess skin and fat at the neck area following the contour of the breast. You will be removing a sizable amount of skin and fat, as is illustrated in Fig. 7.
- After removing the neck skin and fat, you will find a white, triangle-shaped piece of fat attached just above the neck stub. Using your index finger and thumb, pull out this piece of fat and discard. Removal of this fat allows the oil to circulate through the turkey during frying.
- If turkey legs are secured with a plastic or metal clip (hock lock), remove this and discard. Some brands will secure the legs in a pocket of skin. Remove the legs from the pocket and cut away the skin to expose the tail.
- Cut away tail and excess skin and fat around the tail so they do not interfere with the rotisserie (Fig. 8). This also aids in the circulation of the oil.
- Dry Turkey Completely. Use paper towels to dry the outside and cavity of the turkey. Lift the legs and wings away from the body and be sure to dry between all the creases. If you feel ice crystals under the skin, additional thawing is necessary.
Note: Do not stuff turkey for deep frying.
- Using butcher’s twine, truss the turkey* (Fig. 9) following the instructions below. A sample of twine is included with your turkey fryer. You can also use 100% cotton cooking twine. Avoid using anything containing silicone, as this may cause foaming.For a helpful How-To video, visit www.GoPresto.com/how/truss/
a. Cut two pieces of twine approximately 42 inches long and cut one piece of twine approximately 12 inches long.b. Position the turkey, breast side up, on the counter or on a tray. Center one piece of the longer twine under the turkey in the area below the wings. Tuck the tips of the wings in the creases between the legs and breasts and bring the ends of the twine up around the widest part of the wings. Tie the twine tightly using a surgeon’s knot, as shown in Fig. 10.To tie a surgeon’s knot, loop one end of the twine under the other two times (Fig. 10A). Then cinch it tightly. Finish by tying a half knot over the top (Fig. 10B). Cut off excess twine, so it does not become entangled during rotation. Reposition the wings as needed so the tips are under the twine.c. Center the remaining long piece of twine under the turkey in the area below the thighs. Bring the ends of the twine up around the widest part of the leg and thigh. Tie the twine as described in the previous step, making sure to cut off excess twine.d. Secure the legs for cooking; crisscross the knob ends and wrap and tie them tightly together using the shorter piece of twine. Cut off excess twine.
- After preparation, place turkey on a paper towel-lined cookie sheet or baking pan on the countertop to allow the turkey’s internal temperature to increase before frying. While turkey is resting, assemble the fryer and rotisserie.
When handling turkey, basic food safety precautions need to be observed:
- Wash hands thoroughly before and after handling raw turkey.
- Keep raw turkey and its juice away from other foods.
- Wash cutting boards, cookie sheet/baking pan, utensils, counters, etc. with hot, soapy water after contact with raw turkey. After washing, sanitize with a solution of 1 tablespoon chlorine bleach per gallon of water. Allow the surface to air dry.
- Keep raw turkey and fried turkey separate.
*If injecting the turkey with marinade, inject the turkey before tying it.
How to Inject a Turkey with Marinade
For a helpful How-To video, visit www.GoPresto.com/how/marinade/
- If desired, the turkey can be injected with marinade (see recipe below). Inject the turkey before trussing it. Use about 2 ounces of marinade for every 5 pounds of turkey. Do not inject more than 8 ounces of marinade for the entire turkey. Inject most of the marinade into each side of the breast muscle and smaller amounts into each leg/thigh. Avoid injecting the marinade just under the skin, as this could result in excessive oil popping and spattering.
- Do not use marinades that contain corn syrup, sugar, or honey as they will cause the exterior of the turkey to burn.
- If seasoning or injecting turkey with marinade, place the turkey on a clean cookie sheet or baking pan on the countertop for no more than 45 minutes. This will allow the marinade or seasoning to penetrate the turkey.
Recipes
Hot and Savory Beer Marinade
- 6 ounces beer
- ¼ cup olive oil
- 2 tablespoons Worcestershire sauce
- 2 tablespoons hot sauce
- 1 tablespoon soy sauce
- 2 teaspoons garlic powder
- 2 teaspoons onion powder
Whisk together beer, oil, Worcestershire sauce, hot sauce, soy sauce, garlic powder, and onion powder in a small bowl. Allow mixture to rest for 1 to 2 hours. Fill a needle injector with the marinade. Inject about 2 ounces of marinade into each side of the breast and 1 ounce into each leg/thigh for a 15 pound turkey. For best results, insert needle at different angles through the same hole when injecting marinade. Wipe off any marinade that comes out.
Allow turkey to rest for 45 minutes at room temperature. Truss turkey according to directions on page 8. Attach turkey to rotisserie and fry according to directions (pages 14 and 15).
Cajun Poultry Rub
- 3 tablespoons paprika
- 1 tablespoon plus 1 teaspoon cumin
- 1 tablespoon plus 1 teaspoon garlic powder
- 2 teaspoons salt
- 2 teaspoons black pepper
- 2 teaspoons oregano
- 1 teaspoon onion powder
- 1 teaspoon cayenne pepper
Combine all ingredients in a small bowl. Rub spice mixture generously over entire turkey and inside the cavity. Also rub spice mixture between the skin and breast. To do this, gently work your fi ngers between the skin and breast meat at both ends of the breast to loosen the skin. Once the skin is loosened, use your fi ngers to rub the mixture between the skin and breast meat. Truss turkey according to directions on page 8. Refrigerate turkey, covered, for at least 2 hours or overnight to allow seasoning to penetrate.
Attach turkey to rotisserie and fry according to directions.
How to Assemble Turkey Fryer
- Position base in center of a clean, dry, level, and stable surface. Always use the handles on the base when lifting ormoving the appliance. Never lift or move the appliance using the control assembly.
- Position the removable pot in the fryer base so the word “REAR” is on the opposite end of the drain brace (Fig. 6, page 7).
- Attach the control assembly to the fryer base by aligning the two guides on the front of the control panel with the two tracks on the exterior of the base (Fig. 11). Slide the control assembly down (Fig. 12) as far as it goes, making sure both guides are in the tracks.
NOTE: The appliance will operate only when both guides are properly positioned in the tracks
How to Use Rotisserie
The rotisserie must be used whenever cooking a whole turkey in the fryer. The rotisserie consists of three parts: The pivot handle assembly, the skewer, and the lifting handle assembly (Fig. 1B). Before frying a turkey, the skewer must be attached to the pivot plate on the pivot handle assembly. Only then can the turkey be pierced and the locking plate attached.
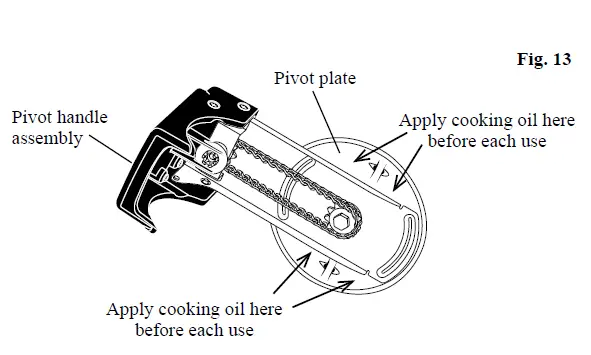
Each time you assemble the rotisserie, lubricate the chain side of the pivot plate (Fig. 13). Using a paper towel, apply a very light coating of cooking oil from the edge of the plate toward the center, about ½ inch. Be sure to rotate the plate as you apply oil, so that the entire circumference of the plate is lubricated.
How to Attach Skewer to the Pivot Handle Assembly
For a helpful How-To video, visit www.GoPresto.com/how/assemble/
The pivot handle assembly contains the handle with ProFry™ printed on it, the chain, and a plate which rotates, hereafter referred to as the pivot plate (Fig. 14). You will be attaching the skewer to the side of the pivot plate opposite of the chain, which contains two loops, a lock channel with hooks, and a lock spring. When assembled correctly, the skewer will be secured in the channel with the lock spring.
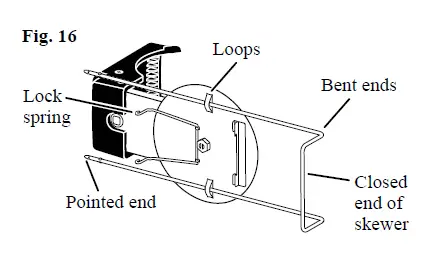
Step 1- Grasp the pivot handle with one hand. Rotate the pivot plate so the lock channel is opposite of and parallel to the handle (Fig. 14). Squeeze the ends of the lock spring together (Fig. 15) and rotate the spring so it rests against the plate, ends pointing toward the handle (Fig. 16).
Step 2- Using your other hand, grasp the closed end of the skewer, which should be facing toward you, and slide the pointed ends through the loops (Fig. 16). Continue sliding the skewer toward the handle until the bent ends touch the loops (Fig. 17).

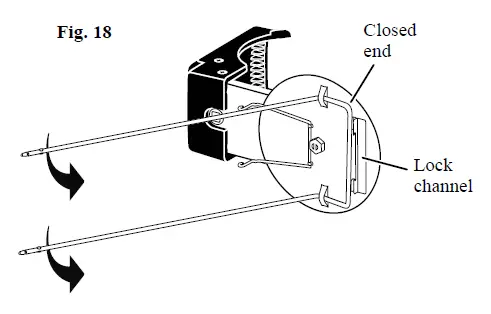
Step 3 – Carefully lift the skewer up and rotate it away from the handle (Fig. 18) until the closed end rests in the lock channel (Fig. 19).
Step – 4 Lock the skewer in place by returning the lock spring to its original position (Fig. 19). Squeeze the ends of the lock spring together and secure each side in its lock channel hook (Fig. 15, page 10). You are now ready to skewer the turkey.
How to Skewer the Turkey
For a helpful How-To video, visit www.GoPresto.com/how/skewer/
- Step 1 – Before skewering the turkey, use paper towels to dry anyadditional moisture that has accumulated in the turkey cavity.
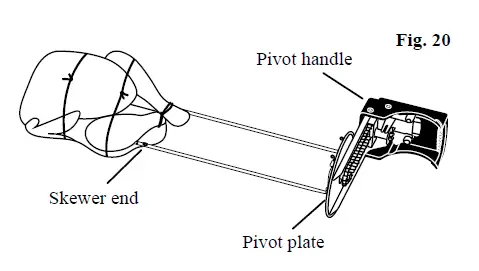
- Step 2 – Line the counter with paper (such as wax, parchment, or freezer). Place the turkey on the paper-lined counter, breast side facing up. Position the pivot handle assembly so the pivot plate is resting on the counter and the skewer ends are just beneath the turkey legs (Fig. 20).

- Step 3 – Lift the drumsticks slightly and center the skewer points beneath the legs. While keeping the skewer parallel with the counter, grasp the pivot plate and push the skewer straight through the middle of the turkey. Carefully push the skewer fully through the turkey’s length until the pointed ends protrude from the neck end (Fig. 21). Caution! To prevent injury, position hand on top of turkey breast; do not place hands near neck opening.
Note: Turkeys vary in shape. Some are fairly concentric, while some are lopsided. For the rotisserie to rotate completely, it is important the turkey be centered on the skewer, which can be a challenge with a lopsided bird.
After attaching the lifting handle assembly (see instructions on pages 12 and 13), it is highly recommended that you perform a “dry run” (see pages 13 and 14). This is to assure that the skewered turkey is centered on the rotisserie and will fully rotate when placed in the fryer.
How to Attach Lifting Handle Assembly to Skewered Turkey
For a helpful How-To video, visit www.GoPresto.com/how/lock/
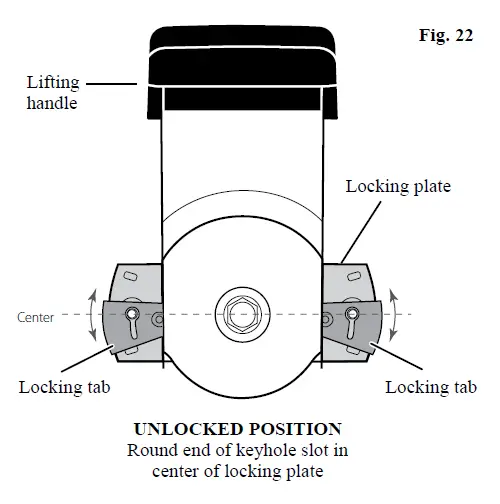
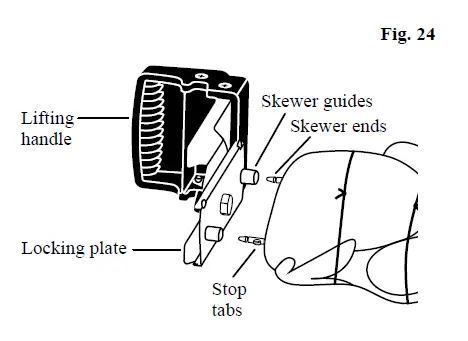
- Step 1 – Familiarize yourself with the lifting handle assembly.a. Hold the black lifting handle so the grip is toward you (Fig. 22).b. The lifting handle assembly contains the locking plate, which spins. There are metal locking tabs on each side of the plate that move up and down. Each tab has a keyhole slot (Fig. 23A and Fig. 23B). When both locking tabs are moved so the round end of the keyhole slots are in the center of the locking plate (Fig. 22), the plate is in the unlocked position and the skewers can be inserted or removed. If the locking tabs are positioned so the small end of both keyhole slots are in the center of the locking plate, the plate is in the locked position and the skewers cannot be inserted or removed.c. Look at the other side of the locking plate. There are two cylinder skewer guides on this side(Fig 24). You need to insert the ends of the skewer into these guides to lock the lifting handle in place on the rotisserie.
d. The draining hooks are used to drain the turkey after frying. These are located just under the locking plate on the metal base of the assembly (Fig. 25).e. There are two frying hooks in the black lifting handle. They fit over the rim of the removable pot and support the lifting handle while frying.
- Step 2 – Before attaching the locking plate to the skewer ends protruding from the turkey, make sure the locking tabs are in the unlocked position (Fig. 22). The round end of both keyhole slots should be in the center of the locking plate.
- Step 3 – Align the two skewer guides on the locking plate with the exposed skewer ends. Push the locking plate fully onto the skewer ends until the skewer’s stop tabs are against the skewer guides (Fig. 24).
- Step 4 – To lock the skewer into place, move both locking tabs so the small end of both keyhole slots are in the center of the locking plate (Fig. 23B, page 12).
- Step 5 – Always verify that the skewer is locked in place by firmly pulling on the lifting handle.
Perform a “Dry Run” (without oil in the fryer)To be sure the skewered turkey is centered on the rotisserie and will fully rotate when placed in the fryer, perform a “dry run” before adding oil to the fryer.
For a helpful How-To video, visit www.GoPresto.com/how/dryrun/
- Step 1 -Make sure the rotisserie engagement switch on the pivot handle is in the OFF position (Fig. 26). Also, make sure the motor button and the temperature control knob on the control panel are in the OFF position (Fig. 27).
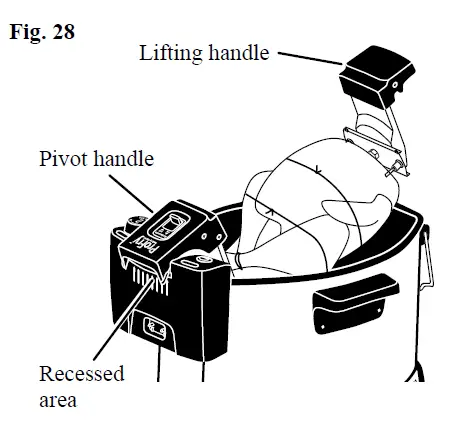
- Step 2 – Lift the skewered turkey using the pivot and lifting handles. Position the rotisserie over the fryer so the pivot handle, the one with the ProFry™ logo, is above the control panel. Lower the pivot handle into the recessed area of the control panel until it is resting securely in place (Fig. 28). Then, lower the lifting handle until the frying hooks rest on the fryer rim (Fig. 29). It is important that the hooks are placed over the rim. Otherwise, the rotisserie will not fully rotate.
- Step 3 – Attach the power cord to the fryer by aligning the magnetic plug end with the two electrical pins on the back of the control panel (Fig. 4, page 5). The plug can be attached in either direction.
- Step 4 – Plug the cord into a 120VAC electrical wall outlet only. Whenever the unit is properly connected, the power light will be illuminated.
IMPORTANT: The magnetic cord was designed to detach easily from the fryer. As a result, if it is bumped or touched during use it could possibly detach causing the unit to stop working. Avoid contact with cord during operation. If contact occurs, verify that the cord is still properly connected.
- Step 5 – Turn the motor button to the ON position and slide the rotisserie engagement switch to the ON position. The rotisserie will engage the motor and the turkey will begin to rotate (Fig. 30). Allow the turkey to rotate for 1 to 2 complete revolutions, making sure it rotates fully and does not come in contact with the inside of the fryer.
- Step 6 – If the turkey fully rotates, the skewer is properly centered and the turkey is ready for frying. If it does not fully rotate, it is not centered properly or the turkey was not tied properly. In either case, turn the motor button to the OFF position and push the rotisserie engagement switch forward to the OFF position. Sometimes, due to the tension of the rotisserie’s chain, the switch may be difficult to push. Any movement of the lifting handle (the handle opposite the switch) relieves the tension. Either slide the lifting handle from side to side on the rim of the fryer twice, or lift the handle up slightly from the rim and then lower it back down. Important : If you do not disengage the rotisserie’s engagement switch, you will be unable to lift the turkey out of the fryer and could damage the unit.
- Step 7 – Grasping both the pivot handle and the lifting handle, remove the turkey and rotisserie from the fryer and place on a paper towel-lined cookie sheet or baking pan.
- Step 8 – If the turkey did not rotate properly, check to see if the twine is pulled tight and retie if necessary. Then move the locking tabs on the lifting handle to the unlocked position and detach the handle from the skewer by pulling on the handle. Pull the skewer out of the turkey and reinsert it. This time when reinserting, pay special attention to properly centering the skewer. Reattach the lifting handle, return the assembly to the fryer, and try another “dry run.” Repeat until the turkey fully rotates.
If the turkey rotated fully, you are ready to begin frying the turkey.
Frying the Turkey
For a helpful How-To video, visit www.GoPresto.com/how/frying/
- Step 1 – Before pouring oil into the removable pot, be sure the pot and all parts are completely dry.
- Step 2 – Fill the removable pot with vegetable oil up to the Turkey line (Fig. 31). This will require 1 gallon (4 quarts) of oil. (See page 7 for recommended types of oil.) Although only 1 gallon of oil is needed to fry a turkey, if desired, the removable pot can be filled to the MAX line.
- Step 3 – Place the cover on the fryer with the cover vents towards the control panel. See important cord information in step 4 on page 13.
- Step 4 – Turn the temperature control knob to 375°. While oil is heating, the ready light will be on. If the light does not turn on, you may have inadvertently heated the unit during the dry run. You will need to press the reset button. See page 5 for instructions. Always make sure fryer and cord are out of reach of children.
- Step 5 – When the selected temperature is reached, the ready light will go out. (Preheat time is approximately 20 minutes.)
- Step 6 – After preheating fryer, remove cover. Then lift the drain brace so it is resting against the fryer rim (Fig. 32). Before attaching the rotisserie to the fryer, make sure the motor button on the control panel is in the OFF position.
- Step 7- Lift the skewered turkey using the pivot and lifting handles. Position the rotisserie over the preheated fryer. Lower the pivot handle, the one with the ProFry™ logo, into the recessed area on the control panel (Fig. 28, page 13). Once the pivot handle is securely resting in the recessed area, carefully lower the lifting handle and rest the draining hooks on the drain brace (Fig. 33).
If desired, the cover may be placed over the turkey before lowering it into the oil to reduce initial spattering. With the cover vents towards the ON/Off switch, place the cover so it rests on both handles (Fig. 34). 
- Step 8- When ready to lower the turkey, raise the lifting handle slightly and push the drain brace away so that it drops back to its original position. Then, very slowly lower the turkey into the fryer until the frying hooks on the lifting handle rest on the fryer rim (Fig. 29, page 13). It is important that the frying hooks are placed over the rim. Otherwise, the rotisserie will not fully rotate.
- Step 9- Turn the motor button to the ON position and slide the rotisserie engagement switch to the ON position. The rotisserie will engage the motor and the turkey will begin to rotate (Fig. 30). Warning! To prevent the risk of severe personal injury or property damage, use caution when cooking with hot oil.
- Step 10- If the cover was used when lowering the turkey into the oil, remove after 1 to 2 minutes. Do not cook the turkey with the cover on.
- Step 11- Begin timing. Allow approximately 4 minutes cooking time per pound of turkey (based on tag weight). For example, if the frozen turkey, as purchased, is 14 pounds, the frying time is roughly 56 minutes. Periodically check the turkey during the cooking period to make sure it is rotating properly. Occasionally, the rotisserie may reverse directions. This is normal.
- Step 12- When frying time has elapsed, allow rotisserie to rotate until the turkey is breast side up and turn the motor button to the OFF position. Insert a meat thermometer in the thickest part of the breast, without contacting the bone. The turkey is safely cooked if the internal temperature is 165°F. However, you may prefer to cook it to a higher temperature.
Removing Rotisserie from Fryer
- Step 1- Once the turkey’s internal temperature has reached 165°F or higher, turn the motor button OFF.
- Step 2- Turn the temperature control knob to OFF and remove plug from wall outlet and then from turkey fryer.
- Step 3- Push the rotisserie engagement switch forward to the OFF position. Sometimes, due to the tension of the rotisserie’s chain, the switch may be difficult to push. Any movement of the lifting handle (the handle opposite the switch) relieves the tension. Either slide the lifting handle from side to side on the rim of the fryer twice, or lift the handle up slightly from the rim and then lower it back down. Important : If you do not disengage the rotisserie’s engagement switch, you will be unable to lift the turkey out of the fryer and could damage the unit.
- Step 4- Raise the lifting handle with one hand and use your other hand to lift the drain brace so it is resting against the fryerrim. Carefully lower the lifting handle draining hooks onto the drain brace (Fig. 33). This is the drain position. Keep the turkey in this position for approximately 1 to 2 minutes to allow hot oil to drain from the turkey cavity. Meanwhile, line a large clean tray or cookie sheet with paper towels.
- Step 5- Grasping both the pivot handle and the lifting handle, carefully lift the turkey out of the fryer and set it on the paper towel-lined tray.
- Step 6- Allow turkey to rest for approximately 15 minutes before removing it from rotisserie.
- Step 7- Using hot pads or paper towels, move the locking tabs on the lifting handle to the unlocked position (Fig. 22, page 12) and pull the handle away from the skewer.
- Step 8- Hold the turkey firmly, using either a carving fork in the turkey breast or folded paper towels, and pull the skewer from the turkey.
- Step 9- Remove twine before carving turkey. Serve and enjoy.
- Step 10- Allow oil and fryer to cool completely before removing control assembly and before cleaning.
How to Use Fryer with Basket
- Step 1 Fill the removable pot with vegetable oil up to the MAX line (Fig. 31, page 14). You will need 1.3 gallons (about 5¼ quarts) of vegetable oil. The amount of oil must always be between the Turkey and MAX lines. Never exceed the MAX line.
- Step 2- Attach the power cord to the fryer and plug the cord into a 120VAC electrical wall outlet only. Always make sure fryer and cord are out of reach of children.
- Step 3- Place the cover on the fryer with the cover vents towards the control panel.
- Step 4- Turn the temperature control knob to the desired frying temperature (see page 18 for proper frying temperatures). The recommended setting for most frying is 375°. While oil is heating, the ready light will be on.
- Step 5- When the selected temperature is reached, the ready light will go out. (Preheat time is approximately 20 minutes.)
- Step 6- While oil is heating, assemble basket handle and prepare food for cooking.
How to Attach Basket Handle for Frying and Steaming
For a helpful How-To video, visit www.GoPresto.com/how/basket/
- Step 1- Familiarize yourself with the basket and handle parts (Fig. 35 and Fig. 36). Hold the handle in front of the basket bracket. Place one of the handle bars into one of the bracket guides so the lock tabs on the handle bar are below the bracket guide (Fig. 36).
- Step 2- Squeeze the handle bars together and fit the other handle bar into the opposite bracket guide. While squeezing the handle bars, pull the handle up so the lock tabs are above the bracket guides and the bottom of the handle is against and below the curved bracket tab. Release the handle. This is the locked position (Fig. 37).
Important : To insure against accidental detachment of handle from basket during use, always make sure the handle bars are securely in the bracket guides and the handle is pulled up to the locked position.
Frying with Basket
- Place basket on countertop and fill basket up to ⅔ full with food. (For homemade french fries, only fill basket ½ full.) Before deep frying, remove excess moisture from food by patting it dry with paper towels. Moist foods cause excess foaming and spattering.
- After preheating fryer, remove cover.
- Attach the filled fry basket to the rim of the removable pot using the drain hooks. When frying foods other than french fries or other high moisture foods, position cover over basket with cover vents away from basket handle. Slowly lower the filled basket into the preheated oil until the handle bars rest on the rim of the removable pot. If frying french fries or other high moisture foods, do not use cover. For crisper foods, fry without the cover.Warning! To prevent the risk of severe personal injury or property damage, use caution when cooking with hot oil.
- Begin timing. Refer to page 18 for recommended times.Caution! It is normal for steam to escape from the cover vents during frying. To prevent steam burns, keep well away from the vents.
- When frying time has elapsed, check that the food is golden brown. Then lift the basket and hook it onto the fryer rim to allow oil to drain from food.
- Carefully lift the basket out of the fryer and empty the food onto paper towels. Season to taste.
- If frying additional food, repeat steps 1 through 6. If ready light is on, allow oil to reheat until ready light goes out.
- When frying is completed, turn the temperature control knob to OFF and remove plug from wall outlet and then from turkey fryer. Allow the oil and fryer to cool completely before removing control assembly and before cleaning.
Helpful Hints for Frying with Basket
- Fry foods of equal size and thickness as they will fry more evenly and at the same speed.
- Do not fill the basket more than ⅔ full for most foods. For homemade french fries, do not fill basket more than ½ full. If too much food is fried at the same time, the food will not get crisp.
- Foods that are battered may stick to the basket; therefore, you may wish to fry these types of foods without the basket. If, however, you want to use the basket, lower the basket into the oil before placing battered foods in the oil. Coated or breaded foods can be fried with or without the basket. When using the fryer without the basket, a long-handled, heat-resistant scoop or tongs should be used to add and/or remove foods.
- Use only heat-resistant utensils in the fryer. Hot oil damages most plastic or rubber utensils. Do not leave metal utensils in the fryer as they will become hot and can cause injury.
Frying Timetable
Do not use cover while frying french fries and other high moisture foods. For crisper foods, fry without the cover. The following times are approximate and based on the maximum recommended amounts of food. Fill basket no more than ⅔ full for most foods. When frying homemade french fries, fill the basket only ½ full.
* Place chicken in basket breast side up and legs toward the basket handle. To prevent burns after frying a whole chicken, be sure to drain the cavity of the chicken as follows: First, lift the basket to the drain position. Then, with the drain hooks resting on the rim of the removable pot, push down on the basket handle to tilt the front end of the basket up. This will allow oil to drain out of the cavity of the chicken (see Fig. 5, page 6).** Battered foods will stick to the wire mesh of the basket; therefore, it is suggested you place them directly into the oil using a long-handled scoop or tongs.*** Place turkey breast in basket on its side; turn turkey halfway through frying. † Frozen tag weight.
Deep Frying Recipes
Homemade French Fries (Double Fry Method)Peel 4 medium baking potatoes, if desired, and cut into ¼- to ½-inch thick strips. Place into large bowl and cover with hot tap water. Soak potato strips for 15 minutes or until ready to fry. Rinse, drain, and pat dry with paper towels. Because uncooked potatoes contain a high percentage of moisture, extreme care must be used when deep frying. Thoroughly dry potato strips before deep frying. Fill the basket ½ rather than ⅔ full. Slowly lower the filled basket into the oil. Do not use cover.
Fry at 350° for 3 to 4 minutes until fries are cooked through but not browned. Drain; let stand to cool for at least 10 minutes, but not more than 2 hours. Just before serving, fry potatoes at 375° for 10 to 12 minutes or until golden brown.
Crispy Coating
- ½ cup milk
- 1 egg, beaten
- Flour
- Salt and Pepper
Beat milk and egg together in a shallow bowl. Combine flour and seasonings in another shallow bowl. Dip food into milk mixture, then coat in seasoned flour. Fry food according to timetable on page 18.
Walnut Crusted Fish
- ½ cup Panko bread crumbs
- ½ cup walnuts
- ½ cup all-purpose flour
- ½ teaspoon salt
- 1 egg
- 2 tablespoons milk
- 1 pound fish fillets, fresh or frozen and thawed
Combine bread crumbs and walnuts in blender or food processor; turn on high speed and process until mixture resembles fine crumbs. Place crumb mixture in a shallow bowl; set aside. Combine flour and salt in a shallow bowl; set aside. Beat egg and milk in a shallow bowl; set aside.Dip the fillets first in the flour, then in the egg mixture, and finally in the crumb mixture. Place fillets in basket and fry for 2 to 3 minutes until golden brown.
4 servings (serving size: 4 ounces)
Apple Pie Fritters
- 1 cup all-purpose flour
- 2 tablespoons sugar
- 1½ teaspoons baking powder
- ¼ teaspoon salt
- ⅔ cup milk, minus 1 tablespoon
- 1 tablespoon brandy
- 1 egg yolk
- 1 tablespoon butter, melted
- 4 tablespoons sugar
- ½ tablespoon ground cinnamon
- 4 to 5 apples, peeled, cored, sliced
- ¼ inch thick
- 2 teaspoons ground nutmeg
- 2 egg whites
Combine flour, sugar, baking powder, and salt in a medium bowl. Whisk milk, brandy, egg yolk, and melted butter in a second bowl. Gradually stir into dry ingredients until smooth. Set aside. Combine sugar and cinnamon. Sprinkle over both sides of apple slices, saving remainder to dust over finished fritters. Sprinkle slices lightly with nutmeg.
In clean bowl, beat egg whites until stiff, but not dry. Fold into reserved batter.
Dip several apple slices into batter to coat evenly, letting excess drip off. Carefully place 10 to 12 slices at a time into preheated oil. Deep fry at 375° for 3 to 4 minutes, turning once. Drain on paper towels. Sprinkle both sides with reserved cinnamon and sugar mixture. Best served warm.
How to Use for Steaming and Boiling
- Assemble the turkey fryer (see page 10).Note: To avoid steam damage to cabinets when using the steaming and boiling function, position the turkey fryer so that it is not directly under cabinets.
- For boiling, fill removable pot with water up to the MAX line marking, which is located on the inside of the removable pot (Fig. 31, page 14). Your fryer will need approximately 1.3 gallons (about 5¼ quarts) of water for boiling. Never exceed the MAX line mark.For steaming, fill removable pot with water up to the Turkey line marking, which is located on the inside of the removable pot (Fig. 31, page 14). Your fryer will need approximately 1 gallon (4 quarts) of water for steaming. Do not use less than the minimum.
- Attach the cord to the unit by aligning the magnetic plug end with the two electrical pins located on the back of the controlpanel (Fig. 4, page 5). The plug can be attached in either direction.Important : The magnetic cord was designed to detach easily from the fryer. As a result, if it is bumped or touched during use it could possibly detach causing the unit to stop heating. Avoid contact with cord during operation. If contact occurs, verify that the cord is still properly connected.
- Plug cord into a 120VAC electrical wall outlet only. Always make sure fryer and cord are out of reach of children.
- Turn the temperature control knob just past Steam.
- While water is heating, prepare food for cooking. Also, cut a piece of aluminum foil that will fit over the removable pot to use as a covering instead of the cover provided with the turkey fryer.
- Assemble basket handle for cooking; see page 16.Important : To insure against accidental detachment of handle from basket during use, always make sure the handle bars are securely in the bracket guides and the handle is pulled up to the locked position (Fig. 37, page 17).
- Place basket on countertop and fill up to ¾ full with food. Do not exceed 3 pounds.
- When water begins to boil (approximately 13 to 16 minutes), attach the filled basket to the removable pot using the drain hooks. If steaming, leave basket hooked on removable pot.If boiling, slowly lower the filled basket into the water until the basket handle rests on the rim of the removable pot. Carefully wrap aluminum foil around the rim of the removable pot, leaving a small opening around the exposed handle bars and heating element.
- Begin timing. Refer to page 21 for recommended times.Caution! It is normal for steam to escape from the exposed handle bars and heating element during boiling and steaming. To prevent steam burns, keep well away from these areas.
- When cooking time has elapsed, carefully remove the aluminum foil using tongs. Then remove basket from fryer if the food was steamed. If food was boiled, lift the basket and hook it onto the fryer rim to allow water to drain from food.
- Empty the food into serving bowls. Season to taste.
- When cooking is completed, remove plug from wall outlet and then from fryer. Allow fryer to cool completely before removing control assembly and before cleaning.
Pasta
When boiling pasta, keep in mind the following:Do not use more than 1 pound of pasta. Although the basket will comfortably hold more, once the pasta hydrates, it will be too heavy for the basket.
Use only pasta that is large enough to stay in the basket, such as mostaccioli, penne, rigatoni, and tortellini. Strand-type pasta, such as fettuccini, linguine, and spaghetti, and small pasta, such as elbow macaroni, should be avoided as it will fall through or get stuck in the openings of the wire mesh basket.
Pour pasta into the basket while it is on the counter. This will prevent smaller pieces of pasta from falling through the wire mesh openings into the boiling water and coming in contact with the heating element. Boil pasta for the length of time indicated on the package directions.
Hard-cooked Eggs
Eggs are nicely cooked and easy to peel when steamed in the following manner:Fill the removable pot with water to the TURKEY line. Place eggs in a single layer in the basket; up to approximately 20 large eggs can fit in the basket at one time. After water has started to boil, use the drain hooks to attach the filled basket on the rim of the removable pot. Carefully wrap aluminum foil around the rim of the removable pot, leaving a small opening around the exposed handle bars and heating element.
Steam eggs for 13 minutes. When eggs are almost done, fill a large bowl with ice and cold water; the bowl should be large enough to hold the entire basket. When eggs are done, unhook the basket from the rim and place the entire basket in the prepared ice bath. Allow eggs to remain in the ice bath for 15 minutes and then remove for eating or storing in the refrigerator.
Care and Cleaning
- After unit and oil or water have cooled completely, carefully lift control assembly out of fryer. Wipe the control panel with a damp cloth. Carefully clean the heating element with hot, soapy water, taking care not to immerse the control panel in water.Caution! To avoid electrical shock, never immerse the control panel, cord, or plug in water or wash in a dishwasher.
- When ready to drain the oil or empty the water, carefully lift the removable pot out of the fryer base. Caution! To avoid spilling and prevent damage and burns, do not place removable pot on the counter, as it does not have a flat bottom and will not sit level. Immediately pour out water or discard or strain oil. Refer to the section “Handling Oil after Frying” (below).
- Wash the removable pot, cover, and rotisserie assembly in the dishwasher or in hot, soapy water.Important : To prevent damage to the turkey fryer parts, do not use steel wool scouring pads, abrasive kitchen cleaners, bleach, vinegar, lemon juice, or other acid-based cleaners. When cleaning in the dishwasher, do not use rinse aids or hard water deposit removers, such as Lemi Shine* rinse or Lemi Shine* booster.
- Clean the fryer base with a hot, soapy cloth.
- Wash the fry/steam basket in hot, soapy water. Do not use bleaching agents to clean the fry/steam basket. If necessary, a plastic scouring pad, such as Scotch-Brite* Dobie* Cleaning Pad, may be used to remove food residue.If desired, the basket handle may be removed for cleaning. While squeezing the handle bars together, push the handle towards the bottom of the basket until the lock tabs on the handle bars are below the bracket guides. Remove each handle bar from its bracket guide.
- Before reassembling unit, be sure all parts are completely dry. (See “Oil and water do not mix” safety information on page 6).
- Always check the magnetic plug before use to assure metal items have not become attached to the magnet.
- Periodically check the screws on the basket handle for looseness. Retighten, if necessary, with a Phillips screwdriver.Notice: Continuing to tighten, once secure, can result in stripping of screws.
Handling Oil after Frying
After frying foods, allow oil to cool. To strain oil for reuse, place a funnel into the original oil container or other airtight container and line the funnel with a filter or a double thickness of cheesecloth. Slowly pour oil into funnel. Store the oil in a cool, dark area.
The number of times the oil can be reused will depend on the food that is fried in it. For example, the oil will need to be replaced more often if fish or food coated with bread or cracker crumbs is fried frequently.
Replace the oil if it is dark in color, has an unpleasant odor, smokes when it is heated, or foams excessively during frying.
* Lemi Shine is a registered trademark of Envirocon Technologies, Inc. Scotch-Brite and Dobie are trademarks of 3M Company. Presto is not affiliated with these companies
Consumer Service Information
If you have any questions regarding the operation of your Presto® appliance or need parts for your appliance, contact us by any of these methods:
- Call 1-800-877-0441 weekdays 8:00 AM to 4:00 PM (Central Time)
- Email us through our website at www.GoPresto.com/contact
- Write: National Presto Industries, Inc.Consumer Service Department3925 North Hastings WayEau Claire, WI 54703-3703
Inquiries will be answered promptly by telephone, email, or letter. When emailing or writing, please include a phone number and a time when you can be reached during weekdays if possible.
When contacting the Consumer Service Department, please indicate the model and series numbers for the turkey fryer. These numbers can be found on the back of the control panel.
Please record this information:
Model _________________ Series _________________ Date Purchased ________________The Presto Factory Service Department is equipped to service all Presto® appliances and supply genuine Presto™ parts. Genuine Presto™ replacement parts are manufactured to the same exacting quality standards as Presto® appliances and are engineered specifically to function properly with its appliances. Presto can only guarantee the quality and performance of genuine Presto™ parts. “Look-alikes” might not be of the same quality or function in the same manner. To ensure that you are buying genuine Presto™ replacement parts, look for the Presto® trademark.Canton Sales and Storage CompanyPresto Factory Service Department555 Matthews DriveCanton, MS 39046-3251
Presto® Limited Warranty
(Applies only in the United States)This quality Presto® appliance is designed and built to provide many years of satisfactory performance under normal household use. Presto pledges to the original owner that should there be any defects in material or workmanship during the first year after purchase, we will repair or replace it at our option. Our pledge does not apply to damage caused by shipping. Outside the United States, this limited warranty does not apply.To obtain service under the warranty, please call our Consumer Service Department at 1-800-877-0441. If unable to resolve the problem, you will be instructed to send your Presto® appliance to the Presto Factory Service Department for a quality inspection; shipping costs will be your responsibility. When returning an appliance, please include your name, address, phone number, and the date you purchased the appliance as well as a description of the problem you are encountering with the appliance.
We want you to obtain maximum enjoyment from using this Presto® appliance and ask that you read and follow the instructions enclosed. Failure to follow instructions, damage caused by improper replacement parts, abuse, misuse, disassembly, alterations, or neglect will void this pledge. This warranty gives you specific legal rights, and you may also have other rights which vary from state to state. This is Presto’s personal pledge to you and is being made in place of all other express warranties.
NATIONAL PRESTO INDUSTRIES, INC.Eau Claire, WI 54703-3703
Read More About This Manual…
 report this ad
Questions about your Manual? Post in the comments!
[xyz-ips snippet=”download-snippet”]