
PRINCESS High Speed Deluxe Blender Instruction Manual
SAFETY INSTRUCTIONS
- By ignoring the safety instructions the manufacturer can not be held responsible for the damage.
- If the supply cord is damaged, it must be replaced by the manufacturer, its service agent, or similarly qualified persons in order to avoid a hazard.
- Never move the appliance by pulling the cord and make sure the cord can not become entangled.
- The appliance must be placed on a stable, level surface.
- T user must not leave the device unattended while it is connected to the supply. · This appliance is only to be used for household purposes and only for the purpose, it is made for.
- This appliance shall not be used by children from 0 years to 8 years. This appliance can be used by children aged 8 years and above and persons with reduced physical, sensory or mental capabilities or lack of experience and knowledge if they have been given supervision or instruction concerning the use of the appliance in a safe way and understand the hazards involved. Children shall not play with the appliance. Keep the appliance and its cord out of reach of children aged less than 8 years. Cleaning and user maintenance shall not be made by children unless older than 8 and supervised.
- To protect yourself against an electric shock, do not immerse the cord, plug, or appliance in the water or any other liquid.
- Do not allow children to use the device without supervision.
- Switch off the appliance and disconnect from supply before changing accessories or approaching parts that move in use.
- Always disconnect the device from the supply if it is left unattended and before assembling, disassembling, or cleaning.
- It is absolutely necessary to keep this appliance clean at all times because it comes into direct contact with food.
- NOTE: The chopping blades are very sharp, avoid physical contact during emptying and cleaning the device, you can seriously injure.
- CAUTION: Ensure that the blender is switched off before removing it from the stand.
- This appliance is intended to be used in household and similar applications such as:
- Staff kitchen areas in shops, offices, and other working environments.
- By clients in hotels, motels, and other residential-type environments.
- Bed and breakfast type environments.
- Farmhouses.
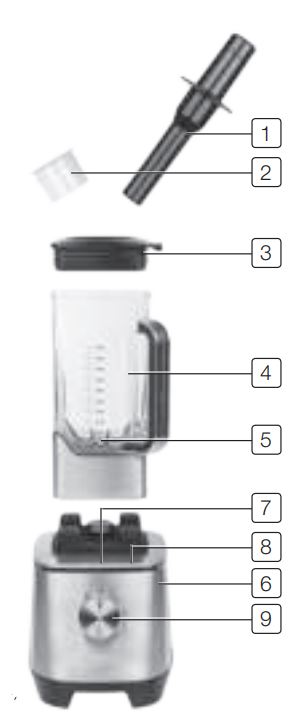
PARTS DESCRIPTION
- Tamper
- Refill cup
- Jar lid
- Jar
- Blades
- Main body
- Display
- Control panel
- Speed control knob
Display
10. Mode button “P”11. Mode button “Crusher”12. Timer13. Mode button “1 min. smoothies blending”14. Mode button “2 min. smoothies blending”

BEFORE THE FIRST USE
Note: Never use the blender without any food or liquid in it!
- Take the appliance and accessories out of the box. Remove the stickers, protective foil, or plastic from the device.
- Before using the High Power Blender for the first time clean the jar and lid with a damp cloth.Caution: the jar contains very sharp blades, handle with care at all times.
- Place the main body of the High Power Blender on a heat-resistant, stable surface. Place the jar on the base unit properly.
- The High Power Blender is equipped with a safety switch off on the motor base.
- Make sure the jar is placed properly on the base.
- Put the lid on the jar. Ensure the refill cup is fitted in the lid, turn clockwise to lock. When the refill cup is not fitted properly there is a risk of splashing.
- When everything is installed correctly, connect the High Power Blender to the mains power supply, the time display begins to flash. When you don’t see the time display flash make sure that the jar is pressed down correctly to the base.
- The High Power Blender is now ready for use.
- Note: The time display only shows the remaining time, the time cannot be adjusted by hand.
Note: The High Power Blender will only work when the speed control knob is started from the “0” position.
USE
General
Note: do not add hot liquids or ingredients into the High Power Blender.
- Chop all your ingredients into approximately 2-3cm cubes and add to the High Power Blender, make sure you keep the ingredients under the 2.0 L mark on the jar.
- Any ingredients to be added during the process can be added through the refill hole in the center of the lid. Do not unlock or remove the lid as this will stop the program.
- Select “P” position with the knob for control panel options or turn the knob clockwise to start the blender, the speed of the blender will increase to the max speed by turning the knob from 0 till 5. Position “0” will stop the blender.
- Make sure to only pull the jar off the base when the motor has stopped.
Manual operation setting using the program position
- Turn the speed control knob to the left position. At this time four buttons will become visible.
- Press the “P” button to start the blending process. When pressing it will blend, release, and it will stop.
- Press the “Crusher” mode, the High Power Blender will automatically work for a few seconds, stops, and repeat the process several times.
- Use the “1” button to select the 1-minute smoothies blending function, the High Power Blender speed will increase to maximum speed, working 1 minute, and will automatically stop.
- Use the “2” button to select the 2-minute smoothies blending function, the High Power Blender speed will increase to maximum speed, working 2 minutes, and will automatically stop.
Recipe
Frozen MargaritaWhat do you need:
- 0.5 dl Tequila
- 0.25 dl Orange liquor
- 0.10 dl sugar syrup
- 0.25 dl fresh lime juice
- salt
- ice cubes
Preparation:
- Rub with half a lime over the edge of the glass.
- Dip the edge of the glass into the salt in order to obtain a salt rim.
- Put all ingredients in the blender.
- Add ice cubes to your own taste.
- Turn on the device, select the ice chopping function and start the program. When necessary, stop the program.
- Pour the cocktail into the glass and garnish with a slice of lime.
Recipe
Frozen FruitWhat do you need:
- 250 g yogurt
- 250 g frozen fruit (e.g. blueberries)
- 1 tbsp sugar (to your taste)
Preparation:
- Put these ingredients in the blender.
- Turn on the device, select the function “2” and start the program. When necessary, stop the program.
- Use the supplied tamper to mix this extra well.
RecipeGreen smoothie with lettuce, mango, and zucchiniWhat do you need:
- 2 bunches lettuce
- 1 mango
- 1 zucchini
- ½ cm ginger
Preparation:
- Peel the mango cut the zucchini into chunks, and wash the lettuce. Put these 3 ingredients in the blender.
- Turn on the device, select the function “1” and start the program. When necessary, stop the program.
- After 20 seconds add the ginger.
- Tip: Use mango and zucchini out of the fridge for a cold smoothie.
RecipeRomesco salsaWhat do you need:
- 4 small tomatoes, without seeds
- 1 clove garlic
- 1 dl olive oil
- 1 sweet pepper
- 125 gr almond (powder)
- 1 pinch of cayenne pepper
- 1 tsp paprika powder
Preparation:
- Turn on the device and select a speed. When necessary, stop the program.
- Insert the peppers into a plastic bag and tie it shut.
- Now you can easily remove the peel.
- Turn on the device and select a speed. When necessary, stop the program.
- If necessary, season with pepper and salt.
CLEANING AND MAINTENANCE
- Always disconnect the blender from the mains power supply before cleaning.
- Do not clean the main body in a dishwasher. Do not immerse the main body in water or any liquids.
- Clean the surface of the base unit and the outer of the jar with a soft, damp cloth. Rinse the lid in warm, soapy water.
- To clean the inside of the jar, rinse and remove any remaining ingredients.
Caution: the blades inside the jar are not removable and are very sharp; extreme caution should be taken when cleaning the inside of the jar.
- Fill the jar half full with warm water and add a couple of drops of liquid dishwashing detergent to the jar.
- Install the lid and select the grinding program and let the blender clean itself. If the jar is not completely clean you can repeat this method.
- After cleaning turn off the Blender and rinse and drain the jar.
- Make sure the blender jar and the blades are completely dry before youstore them.
TROUBLESHOOTING
Problems
- The unit is not working, no lights, no function
- The unit stops working after a long time of processing
- Food becomes not well enough processed
- Ice cannot be well crushed
Cause and solution
- Put the jar on the body properly, plug-in the power source. Press down the jar again to put the safety switch in the right position.
- This is overload protection to prevent damage to the motor Unplug the device and let it cool down for at least 30 minutes.
- Too much or too large pieces of food are processed at the same time. Try a smaller amount of work in batches if necessary. Ingredients should be in pieces not larger than 2cm for best results.
- Choose a smaller ice size (not larger than 2cm) Use the ice crusher function for better results.
![]() DISPOSALIf you want to dispose of equipment with this symbol on the appliance and/or in the user manual, follow the below procedure: Make sure that the appliance is processed in a responsible manner at the end of its service life to guarantee the maximum reuse of (parts of) the appliance. Do not dispose of the appliance with unsorted waste, but hand it in at the store or take it to a recognized collection point. Contact your municipality for information about the reception and collection systems in your area. Make sure that the appliance is reused if you want to dispose of the appliance while it is still in good working order or needs only a minor repair.
DISPOSALIf you want to dispose of equipment with this symbol on the appliance and/or in the user manual, follow the below procedure: Make sure that the appliance is processed in a responsible manner at the end of its service life to guarantee the maximum reuse of (parts of) the appliance. Do not dispose of the appliance with unsorted waste, but hand it in at the store or take it to a recognized collection point. Contact your municipality for information about the reception and collection systems in your area. Make sure that the appliance is reused if you want to dispose of the appliance while it is still in good working order or needs only a minor repair.
GUARANTEE
- This product is guaranteed for 24 months granted. Your warranty is valid if the product is used in accordance with the instructions and for the purpose for which it was created. In addition, the original purchase (invoice, sales slip, or receipt) is to be submitted with the date of purchase, the name of the retailer, and the item number of the product.
- For the detailed warranty conditions, please refer to our service website: www.princesshome.eu
Please visit our website for more recipes: www.princesshome.eu

Service WebsiteJules Verneweg 87 | 5015 BH Tilburg | The Netherlands | www.princesshome.eu
References
[xyz-ips snippet=”download-snippet”]