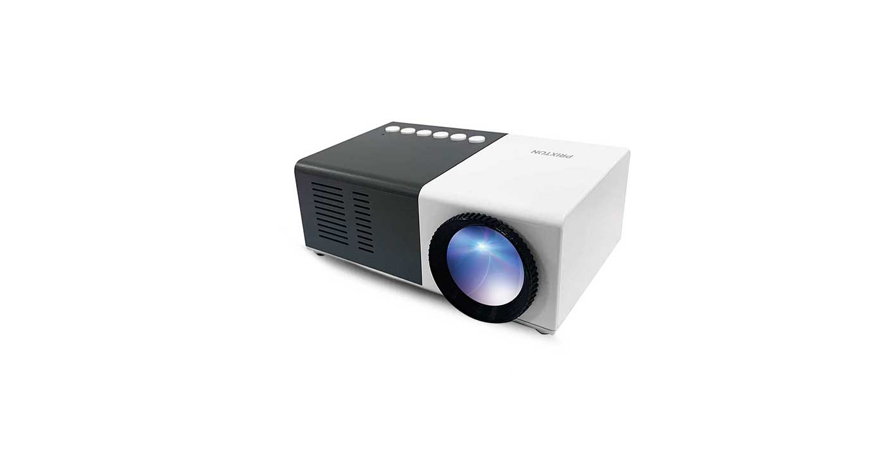
PROYECTOR CINEMA MINI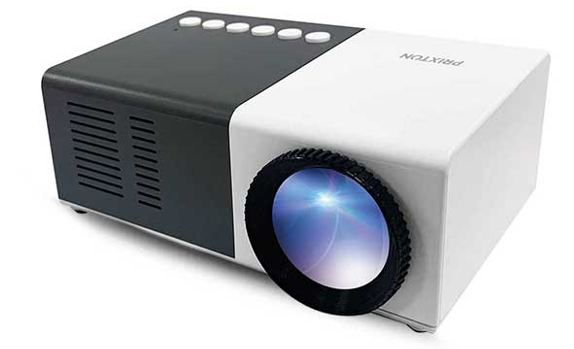
Caution:Usage of controls or adjustments or performance of procedures other than those specified herein may result in hazardous radiation exposure. This unit should not be adjusted or repaired by anyone except qualified service personnel.
Precautions before use:
KEEP THESE INSTRUCTIONS IN MIND:
- Do not use this device near water.
- Clean only with a slightly damp cloth.
- Do not cover or block any ventilation openings. When placing the device on a shelf, leave S cm (2″) free space around the whole device.
- Insta II in accordance with the supplied user manual.
- Don’t step on or pinch the power adaptor. Be very careful, particularly near the plugs and the cable’s exit point. Do not place heavy items on the power adaptor, which may damage it. Keep the entire device out of children’s reach! When playing with the power cable, they can seriously injure themselves.
- * Unplug this device during lightning storms or when unused for a long period.
- Keep the device away from heat sources such as radiators, heaters, stoves, candles, and other heat-generating products or naked flame.
- Avoid using the device near strong magnetic fields.
- Electrostatic discharge can disturb the normal usage of this device. If so, simply reset and restart the device following the instruction manual. During file transmission, please handle with care and operate in a static-free environment.
- Warning! Never insert an object into the product through the vents or openings. High voltage flows through the product and inserting an object can cause electric shock and/or short circuit internal parts. For the same reason, do not spill water or liquid on the product.
- Do not use in wet or moist areas such as bathrooms, steamy kitchens, or near swimming pools.
- Do not use this device when condensation may occur.
- Although this device is manufactured with the utmost care and checked several times before leaving the factory, it is still possible that problems may occur, as with all electrical appliances. If you notice smoke, an excessive build-up of heat, or any other unexpected phenomena, you should disconnect the plug from the main power socket immediately.
- This device must operate on a power source as specified on the specification label. If you are not sure of the type of power supply used in your home, consult your dealer or local power company.
- The socket-outlet must be installed near the equipment and must be easily accessible.
- * Do not overload ac outlets or extension cords. Overloading can cause fire or electric shock.
- * Devices with class 1 construction should be connected to a main socket outlet with a protective earthed connection.
- Devices with class 2 construction do not require an earthed connection.
- Keep away from rodents. Rodents enjoy biting on power cords.
- Always hold the plug when pulling it out of the main supply socket. Do not pull the power cord. This can cause a short circuit.
- Avoid placing the device on any surfaces that may be subject to vibrations or shocks.
- To clean the device, use a soft dry cloth. Do not use solvents or petrol-based fluids. To remove severe stains, you may use a damp cloth with diluted detergent.
- The supplier is not responsible for damage or lost data caused by malfunction, misuse, modification of the device, or battery replacement.
- Do not interrupt the connection when the device is formatting or transferring files. Otherwise, data may be corrupted or lost.
- If the unit has a USB playback function, the USB memory stick should be plugged into the unit directly. Don’t use a USB extension cable because it can cause interference resulting in failure of data.
- The apparatus shall not be exposed to dripping or splashing and make sure that no objects filled with liquids, such as vases, are placed on or near the apparatus.
- * To completely disconnect the power input, the mains plug of the apparatus shall be disconnected from the mains, as the disconnect device is the mains plug of the apparatus.
- If the unit works with a battery, Battery shall not be exposed to excessive heat such as sunshine, fire, or the like.
- Attention should be drawn to the environmental aspects of battery disposal.
- The apparatus can only be used in moderate extremely cold or climates warm environments should be avoided.
- The rating label has been marked on the bottom or back panel of the apparatus.
- This device is not intended for use by people (including children) with physical, sensory or mental disabilities, or a lack of experience and knowledge, unless they’re under supervision or have received instructions about the correct use of the device by the person who is responsible for their safety.
- This product is intended for nonprofessional use only and not for commercial or industrial use.
- Make sure the unit is adjusted to a stable position. Damage caused by using this product in an unstable position or by failure to follow any other warning or precaution contained within this user manual will not be covered by warranty.
- Never remove the casing of this apparatus.
- Never place this apparatus on other electrical equipment.
- Do not use or store this product in a place where it is subject to direct sunlight, heat, excessive dust or vibration.
- Do not allow children access to plastic bags.
- Only use attachments/accessories specified by the manufacturer.
- Pefer all servicing to qualified service personnel. Servicing is required when the apparatus has been damaged in any way, such as the power supply cord or the plug, when liquid has been spilled or objects have fallen into the apparatus, when the apparatus has been exposed to rain or moisture, does not operate normally, or has been dropped.
- *Do not use a damaged power cord or plug or a loose outlet. Doing so may result in fire or electric shock.
- Prolonged exposure to loud sounds from personal music players may lead to temporary or permanent hearing loss.
Installation:
Unpack all parts and remove protective material.do not connect the unit to the mains before checking the mains voltage and before all other connections have been made.•These instructions are related only to products using power cable or AC power adaptor.
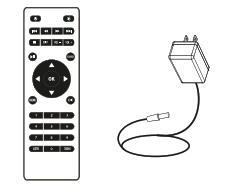
Packing Included:
Usage of controls or adjustments or performance of procedures other than that specified herein – may result in hazardous radiation exposure. This unit should not be adjusted or repaired by anyone except qualified service personnel.
Placing your projector:
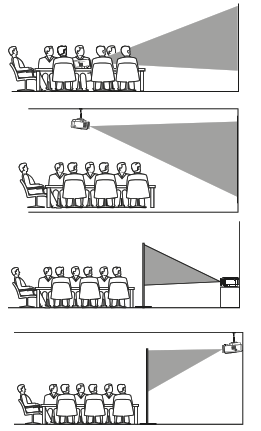
Your projector can be installed in four different configurations:Front Table:Select this location with the projector placed near the floor in front of the screen. This is the most common way to position the projector for quick setup and portability.Front Ceiling:Select this location with the projector suspended upside-down from the ceiling in front of the screen. NOTE: A projector mount is required to install the projector in a ceiling.Rear Table:Select this location with the projector placed near the floor behind the screen. NOTE: That a special rear projection screen is required.Rear Ceiling:Select this location with the projector suspended upside-down from the ceiling behind the screen.NOTE: A projector mount is required to install the projector in a ceiling. A special rear projection screen is required.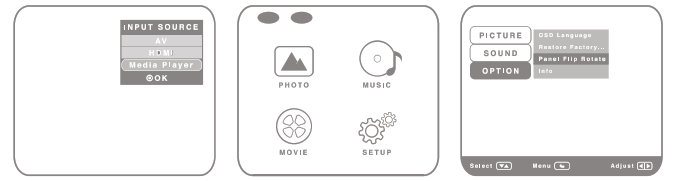 To utilize alternate projector placements, make sure to adjust the screen accordingly. This can be found in Media Pt yer > Setup > Option > Panel Flip Rotate
To reduce image distortion:
It is recommended to move the projector as close to center of screen.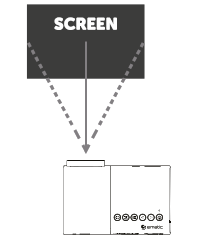
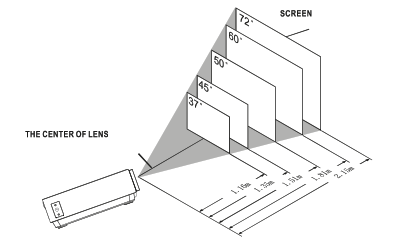
Distance between the projector and screen:
Measure the distance between the projector and where you want to position the screen. This is the projection distance.
ADJUSTING THE FOCUS
Follow the below pictures to adjust the focus.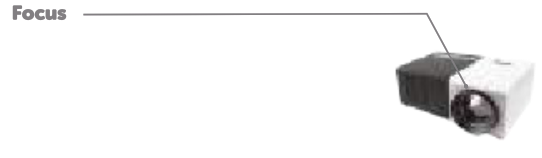 Adjust the focus by turning the lens knob while observing the image pixels near the center of the screen. Optimal focus is obtained when the pixels are clearly visible. Depending on the projected screen size, the focus near the screen edges may be less sharp than the screen center.
Controls of remote
Power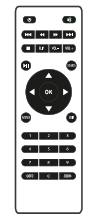 Press to power ON. Press and hold to power OFFPrevious / NextPress to skip between chapters or tracksStopPress to stop playbackFlipPress to flip display image 180°Play/PausePress to play or pause an individualchapter or trackArrows/OKPress to navigate and confirm selections in Settings and other menusMenuPress to access projector SettingsGo To/Number KeypadPress to enter specific chapter or track numbersUse the Play button to begin playingMutePress to mute volumeBack / FwdPress to search through an individual chapter or trackVOL+ / VOL-Press to adjust the audio levelSourcePress to select media source (AV, PC, HDMI, MEDIA)ExitPress to exit menusZoomPress to zoom display image in or out
Install / Remove battery of remote
Remove the battery compartment cover on the back of your remote by carefully sliding to open. The battery cover can then be lifted away. Fit the correct batteries (2 X AAA batteries not included), referring to the polarity markings. Finally, replace the cover.NOTES: Batteries shall not be exposed to excessive heat such as sunshine, fire Be sure that the batteries are installed polarity correctly. Only same or equivalent type batteries as recommend are to be used. Do not dispose of batteries in fire, battery may explode or leak. Do not try to recharge a battery Do not mix old and new batteries. Do not mix alkaline, standard (carbon-zinc), or rechargeable (ni-cad, ni-mh, etc) batteries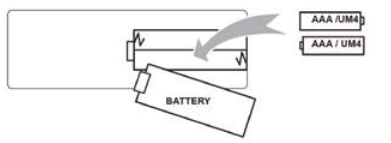
FEATURES AND INPUTS
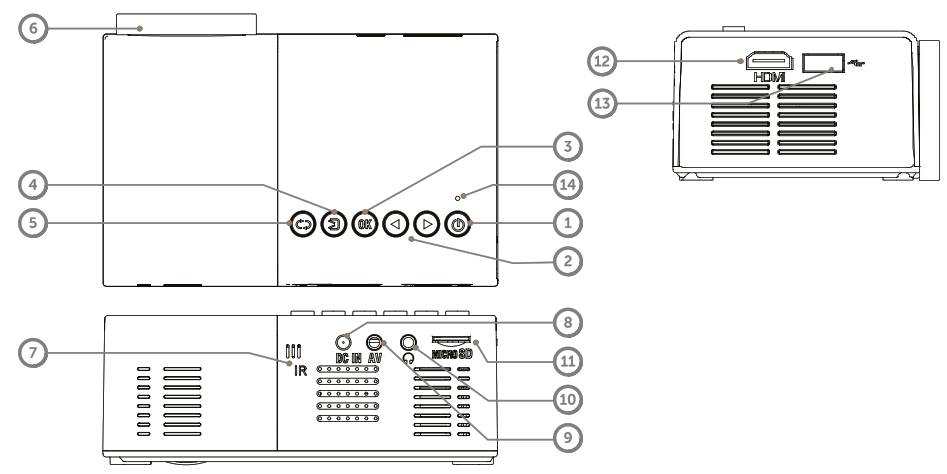
- Power button
- Arrows button
- OK button
- Input Source button
- Return button
- Lens / Focus Adjustment Knob
- IR Window (only on back)
- DC IN
- AV IN
- Earphone Jack
- MicroSD
- HDMI Port
- USB Port
- Indicator Light
Install Power Adapter:
Follow below picture to connect power adapter Connect small end of adapter FIRST. Plug the adapter body to power outlet.
Connect HDMI:
Follow below picture to connect HDMI cable and device.Turn off the unit before connect HDMI cable.After connect, press the![]() button to turn on unit and power indicator will light GREENPress the
button to turn on unit and power indicator will light GREENPress the![]() / SOURCE button to Hdmi mode and the video of HDMI device will show on projector screen.Press the
/ SOURCE button to Hdmi mode and the video of HDMI device will show on projector screen.Press the ![]() button to turn off unit power.
button to turn off unit power.
HDMI hd signal input : this interface can be input with HD player HDMI output at the connection
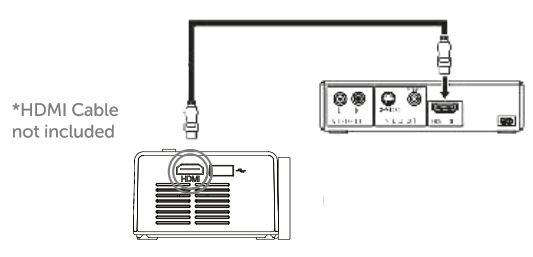
Media Device Connected to Projector In rare cases, if the projector’s speaker has no sound when playing a DVD movie in a player connecting to the HDMI input, please check the player’s digital audio settings and make sure it is set to ‘Auto” mode or “PCM” mode.
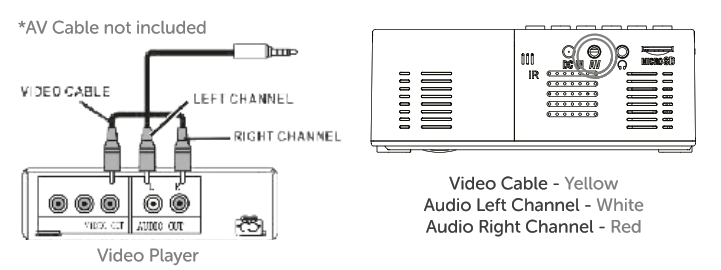
Connect AV:
Follow below picture to connect AV cable and device.Turn off the unit before connect AV cable.Use AV cable to connect follow below figureAfter connect, press the![]() button to turn on unit and power indicator will light GREEN Press the
button to turn on unit and power indicator will light GREEN Press the![]() / SOURCE button to AV mode and the video of AV device will show on projector screen Press the
/ SOURCE button to AV mode and the video of AV device will show on projector screen Press the![]() button to turn off unit power.
button to turn off unit power.
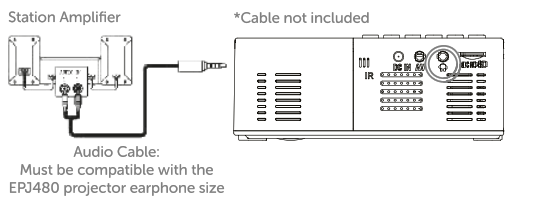
Connect Audio Output:
Follow below picture to connect audio cable and device.Press the![]() button to turn off power of your projector before connection.Use audio cable to connect follow below figure.After connect and turn on both units. Your projector sound from external device now. After using , turn off both unit
button to turn off power of your projector before connection.Use audio cable to connect follow below figure.After connect and turn on both units. Your projector sound from external device now. After using , turn off both unit
Station Amplifier:
Install USB Device And Micro Sd Card “TF”:
Follow below picture to install USB and TF card Turn off the unit before install USB /TF card.

Using TF Card And USB Playback (Media Player)
Install USB / TF device: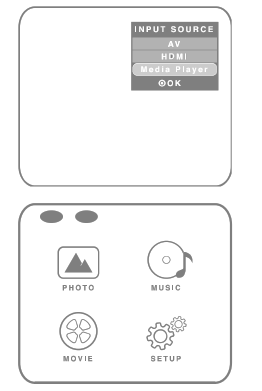
- Turn off the unit before install USB / TF card.
- Install the USB device into USB port.
- After connect, press the button to turn on unit and the power indicator ligh GREEN.
- Press the /SOURCE button to enter and use buttons to search the MEDIAPLAYER mode.
- After selection , use buttons to search the MUSIC / PHOTO // MOVIE icon and press the
Okbutton to enter, If necessary, use theOkbutton to select TF card or USB and press the press theOkebutton to enter. - Use buttons to search the correct file and press the
Okbutton to preview playback file and press the QQ button of unit or (EI button of remote to start playback. - Press button to fast search forward and rewind.
- Press button to search next or previous file.
- During playback, press the button to pause and press again to resume.NOTE: Remove USB / TF device, press the button to turn off power FIRST.
Sub-Menu on Photo screen1. When photoplayback,press the Okbutton and more function screen show on lower2. Use the![]() button to select icon and press
button to select icon and pressOk button to play special function.Sub-Menu on Music screen3. When music play back,press Okbutton and more function screen showon lower4. Use the ![]() button to select icon and press
button to select icon and pressOk button to play special function.Sub-Menu on Movie screen5. When movieplayback, press theOk button and more function screen show on lower6. Use the![]() button to select icon and press
button to select icon and pressOk button to play special function.
Press![]() button to enter projector menu. Press again to previous status.
button to enter projector menu. Press again to previous status.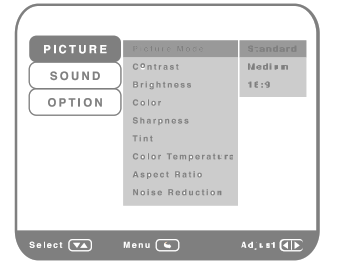 Use
Use![]() buttons to select manual page.This manual showed on right upper of view screen.Picture ModeSelect Vivid, User (custom), Soft ,or StandardContrast ,Brightness, etcSet Picture Mode to “User ” to adjust these settingsColor TemperatureSelect Warm ,Cool, or Medium.Aspect RatioSelect 16:9, 4:3 , or AutoNoise ReductionSelect Off, Low, Middle, High or DefaultScreen
buttons to select manual page.This manual showed on right upper of view screen.Picture ModeSelect Vivid, User (custom), Soft ,or StandardContrast ,Brightness, etcSet Picture Mode to “User ” to adjust these settingsColor TemperatureSelect Warm ,Cool, or Medium.Aspect RatioSelect 16:9, 4:3 , or AutoNoise ReductionSelect Off, Low, Middle, High or DefaultScreen
| Color temper… (temperature) | |
| Customer define | Parameter |
| red | 0-100 |
| blue | 0-100 |
| green | 0-100 |
| Aspect Ratio | |
| 4:03 | The signal in a 4:3 aspect ratio projection image |
| 16:09 | The signal in a 16:9 aspect ratio projection image |
Press![]() button to enter projector menu. Press again to previous status.
button to enter projector menu. Press again to previous status.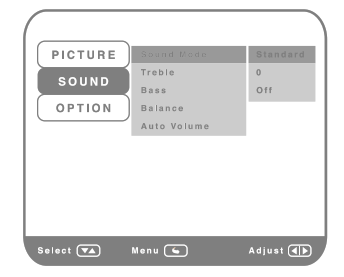 Use
Use![]() buttons to select manual page.This manual showed on right upper of view screen.Sound ModeSelect Music, Movie, User (custom), Sports ,or StandardTreble, BassSet Sound Mode to “User ” to adjust these settingsBalanceAdjust the audio balance.Surround SoundTurn Surround Sound ON or OFF.
buttons to select manual page.This manual showed on right upper of view screen.Sound ModeSelect Music, Movie, User (custom), Sports ,or StandardTreble, BassSet Sound Mode to “User ” to adjust these settingsBalanceAdjust the audio balance.Surround SoundTurn Surround Sound ON or OFF.
| Sound Mode – User | parameter |
| Treble | 0-100 |
| Bass | 0-100 |
Press![]() button to enter projector menu. Press again to previous status.
button to enter projector menu. Press again to previous status.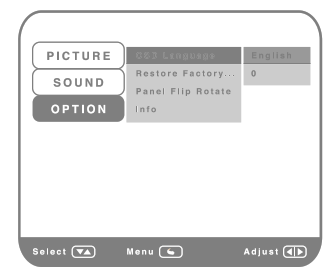 Use
Use![]() buttons to select manual page.This manual showed on right upper of view screen.OSD LanguageSelect different language, Follow below figure.Restore Factory DefaultSelect Y or N.Panel RotateSelect rotate 0, rotate 1, rotate 2, rotate 3..INFODisplay the unit information as below.
buttons to select manual page.This manual showed on right upper of view screen.OSD LanguageSelect different language, Follow below figure.Restore Factory DefaultSelect Y or N.Panel RotateSelect rotate 0, rotate 1, rotate 2, rotate 3..INFODisplay the unit information as below.
Troubleshooting
Before resorting the maintenance service, please kindly cheak by yourself with the fillowing chart
| No Image is Projected or a “No Signal” message is displayed | 1.Power light is on. If it is not on, check the projector is plugged into the mains, that the socket is switched on, and then press the power button on the projector. 2.Check the lens cover has been removed. 3.Check the cables are securely attached and installed as per the User Manual. 4.The image source may not be set correctly. Press the Source button on the Control Panel or the Remote, to select the correct setting. 5.Check in the Menu section under Video input signal to make sure that has been set correctly. |
| The Lamp (Bulb) switches off after a period oftime | Is the warning light indicator red? If so, the projector is overheating which turns the light off automatically.1.Leave the projector to cool for a few moments.2.Once cooled, check nothing is blocking the v ventilation vents.3.Check the air filter is clean and clean if necessary.4.Turn on the projector. If the issue persists please contact your support provider for further assistance. |
| The Image is wider at the top/bottom of the screen | This is called keystone and is due to the projection angle not being perpendicular to the screen. To correct use the projectors inbuilt keystone function to adjust the image. |
| Spots on the screen | Using a vacuum cleaner to clean the lens. If cleaning doesn’t resolve things, please contact your support provider for further assistance. |
| The image brightness has faded | This could possible be caused by the ambient light in the room. If not ,the chances are that you need to replace the lamp (bulb). |
Disclaimer
Updates to Firmware and/or hardware components are made regularly. Therefore some of the instruction, specifications and pictures in this documentation may differ slightly from your particular situation. All items described in this guide for illustration purposes only and may not apply to particular situation. No legal right or entitlements may be obtained from the description made in this manual.
Disposal of the Old Device
This symbol indicates that the relevant electrical product or battery should not be disposed of as general household waste in Europe. To ensure the correct waste treatment of the product and battery, please dispose them in accordance to any applicable local laws of requirement for disposal of electrical equipment or batteries. In so doing, you will help to conserve natural resources and improve standards of environmental protection in treatment and disposal of electrical waste (Waste Electrical and Electronic Equipment Directive).
Warranty Policy
This product is guaranteed for 2 years from the date of purchase. When you have a problem that you can not solve, you must access the web www.prixton.com and click on the contact option to send us your assistance form.
Simplified EU Declaration of Conformity
We, La Trastienda Digital located in Avenida Cervantes 49, modulo 25, Basauri 48970, Bizkaia hereby declare that the following goods, imported and selling at European market:
| BRAND | MODEL NAME | DESCRIPTION | MAIN CATEGORY |
| PRIXTON | CINEMA MINI | PROJECTOR | HOME |
Are in compliance with the EC Council Directive of 2014/53/EU (EM DIRECTIVE) and harmonized standards and with the board of the 16th of April 2014.The complete text of the UE Declaration of conformity is available anytime at this website address: www.prixton.comLA TRASTIENDA DIGITAL
[xyz-ips snippet=”download-snippet”]