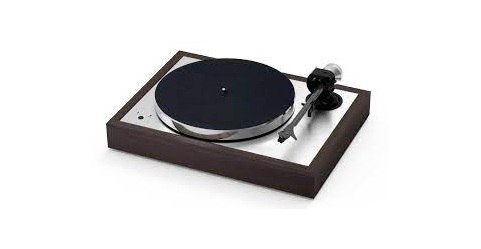

The Classic Evo Setup Guide

Getting started:
- Make sure you have enough space to unpack your turntable.
- Always unpack and set up in a clean environment.
- Do not discard the packaging. If you need service intend to return your product, please send it in the original packaging including all inserts. In the case of damage due to improvised packaging the dealer cannot gurantee a full refund.
- Complete manual:www.project-audio.com/en/product/the-classic-evo/
1. Unpack all items from the accessory bag after opening the carton.
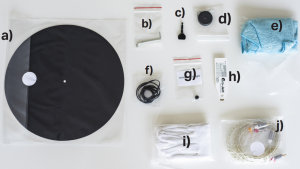
a) felt mat f) flat and round beltb) allen keys g) Anti Skating Weightc) tool for belt change h) stylus pressure gauged) single adapter i) cotton glovese) microfiber cloth j) RCA-Cable Connect it E
2. Remove dust cover carton from the box.

3. Lift the wrapped turntable out of the box.
 4. Carefully remove the protective covering.

5. Remove the inserts from the carton.

6. Unpack the feet (3x) from the first insert.

7. Unpack the counterweight from the second insert.

8. Unpack the power supply from the second inlay.

9. Continue to unpack the platter and the sub-platter.

10. Carefully remove the protective covering.

11. Remove sub-platter from the insert.

12. For the setup of your turntable we recommend wearing gloves.

13. Screw the three feet into the threaded inserts from the bottom of the chassis.

14. Remove the transport screws (3x) from the upper part of the chassis
 15. Remove the protection cover of the axis.

16. Carefully insert the sub-platter axle into the bearing.

17. Loop the flat drive belt around the pulley and the sub-platter.
 18. Place the main platter on the turntable.

19. Remove the tonearm twist tie.

20. Remove the protective tape from the cartridge.

21. Remove the stylus guard.

22. Slide the counterweight onto the rod.
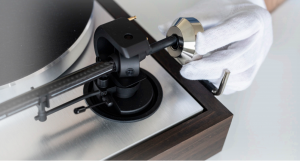
23. Place the tonearm between the platter and armrest. Lower the tonearm lift.
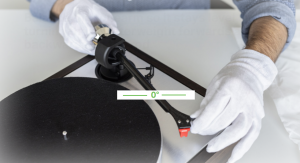
 24. Balance the tonearm so it stays level by turning the counterweight forward and backward on the rod.
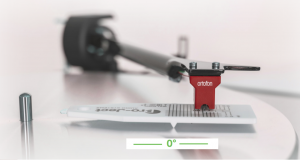
25. Place the stylus pressure gauge on the platter as shown below.

26. Place the cartridge on the gauge. The stylus should be placed on 23.
 27. Turn the counterweight counterclockwise until the gauge is level.
28. Put the stylus guard back on the cartridge.

29. Slip the loop of the Anti Skating Weight in the second groove on the tonearm post.

30. Unpack Dust Cover and attach it to your turntable.

31. Assemble the power supply with the plug- type according to your country.

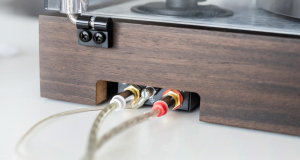
32. Plug in the power supply.

33. Connect to your hifi-system and enjoy your music!
34.

Last, but not least.Always check, if your turntable is perfectly leveled.If not you can adjust the feet accordingly
Service
Should you encounter a problem which you are not able to alleviate or identify despite the above information, please contact your dealer for further advice. Only when the problem cannot be resolved there should the unit be sent to the responsible distributor in your country.
Warranty repairs will only be affected if the unit is returned correctly packaged. For this reason we recommend keeping the original packaging.
Never return a record player without making sure that is it safely disassembled and correctly packaged in the original packaging according to the diagrams on the last page of this user guide. Please remove these parts and pack them separately: lid, counterweight, anti-skating weight and belt.Fit the cartridge protection cap and the transport lock for the tonearm tube, prior to carefully packaging the record player.
Warranty
The manufacturer accepts no responsibility for damage caused by not adhering to these instructions for use and/or by transportation without the original packaging. Modification or change to any part of the product by unauthorized persons, release the manufacturer from any liability over and above the lawful rights of the customer.
Warranty: Terms and Conditions
- A warranty is valid only for products purchased from an authorized Pro-Ject Audio Systems retailer or dealer.
- This warranty offer is limited to the repair of the equipment (which could be a repair or replacement at our discretion, neither of which affects your original warranty).
- Neither transportation or any other costs, nor any risk for removal, transportation and installation of products is covered by this warranty.
- A warranty is only valid for the original owner. It is not transferable.
- To validate your warranty, you will need to provide the original sales invoice or other proof of ownership and date of purchase.
- Warranty must be claimed within two years of purchase from an authorized dealer. After this period of time, the warranty will expire.
- The legal warranty obligation exists in addition to this warranty and is not limited by this warranty.A Pro-Ject Audio Systems warranty relates to claims of defects in materials and/or workmanship at the time of purchase. It does not cover:
- Deterioration of component parts, the nature of which is to become worn or depleted with use, such as batteries and headphone ear pads, drive belts and cartridges.
- Damages caused by incorrect installation, connection or packing.
- Damages caused by any use other than the correct use described in the user manual, negligence, modifications, or use of parts that are not made or authorized by Pro-Ject Audio Systems.
- Damages caused by faulty or unsuitable ancillary equipment.
- Damages caused by accidents, lightning, water, fire heat, war, public disturbances or any other cause beyond the reasonable control of Pro-Ject Audio Systems and its appointed distributors.
- Products where the serial number has been altered, deleted, removed or made illegible.
- Repairs or modifications that have been executed by an unauthorized person.
Commercial Use
Faults caused due to using domestic products in commercial environments or on commercial scales are not covered by warranty. This turntable is intended for domestic use only. Using them for business applications are done so at your own risk.
Pro-Ject Audio Systems is a Registered Trademark of H. Lichtenegger.
This guide was produced by: Pro-Ject Audio SystemsCopyright © 2020. All rights reserved.
The information was correct at the time of going to press. The manufacturer reserves the right to make changes to the technical specification without prior notice as deemed necessary to uphold the ongoing process of technical development.
References
[xyz-ips snippet=”download-snippet”]