
PRO LOGS Electronic Log Book User Manual

Install the ProLogs Electronic Log Book
- For Android phones and tablets download the App from Google Play Store.
- Open the ProLogs Electronic Log Book
Login to the ProLogs Electronic Log Book
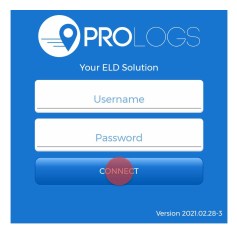
- Enter your login details and tap CONNECT.
 Read the login details from your email. If you don’t have login details yet, or you’ve forgotten them, contact your Carrier administrator.
 - Allow ProLogs app to access device’s location.
- Enter your trip details:
- Vehicle ID Enter vehicle ID. As soon as you start typing in this field list off available vehicles will be displayed.
- Trailer ID- Enter trailer ID. As soon as you start typing in this field list off available trailers will be displayed.
- Shipment ID Enter shipment ID
- Tap SAVE, when you entered all pertinent information.
- Tap CLEAR to clear all entered values.
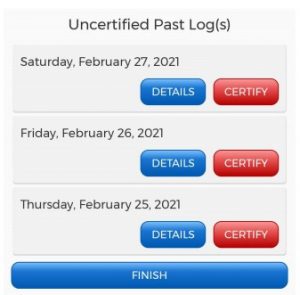
- If the driver did not certify all the daily logs, the app will prompt the driver regarding uncertified logs along with the option to certify the relevant days.
- Tap DETAILS to show log detail.
- Tap CERTIFY to certify log
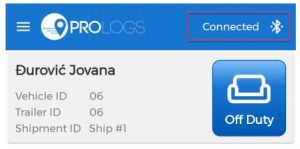
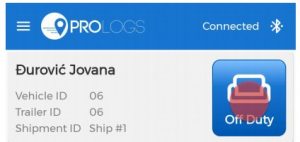
- Tap DISMISS to dismiss log certification for nowAfter successfully login & entering trip details, the Dashboard page is open. Now you need to connect to your vehicle.
- Tap Not connected icon to connect to your vehicle.Please ensure that Bluetooth is enabled on your device before you connect to the ProLogs app. If Bluetooth is not enabled, ProLogs will ask you to turn on Bluetooth.
- Tap CONNECT to establish connection with the vehicle.
- An icon will change upon successful connection
 Read the login details from your email. If you don’t have login details yet, or you’ve forgotten them, contact your Carrier administrator.
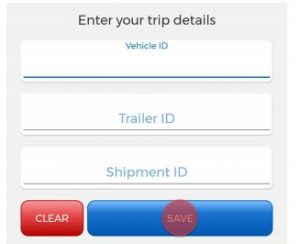
 After successfully login & entering trip details, the Dashboard page is open. Now you need to connect to your vehicle.
 Please ensure that Bluetooth is enabled on your device before you connect to the ProLogs app. If Bluetooth is not enabled, ProLogs will ask you to turn on Bluetooth.
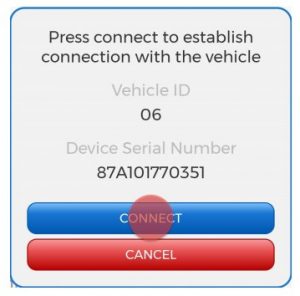
Start Driving
Once you’ve completed all of the pre-trip tasks in this section, you’re ready to drive.
- Tap on duty status button to change current duty status
- Select a duty status from the list. Insert Remark and tap SET STATU
- When your vehicle is moving at 5 MPH or greater, your duty status will automatically switch to Driving, in accordance with the ELD mandate.
- When the vehicle stops you will be back to Dashboard screen and you will be able to change your duty status by tapping current duty status icon and selecting some other status.
- If your vehicle has stopped moving for five minutes you will be prompted with a question if you would like to change your duty status. If you ignore the question for one minute, your duty status will be changed to On Duty.

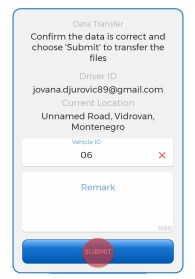
Data Transfer
- From your Dashboard view, tap the hamburger icon
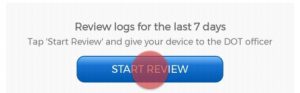
- Tap DOT Inspection
- Tap START REVIEW for visual inspection. to open main navigation menu.
- Tap DATA TRANSFER to send the Output File to DOT Officer via the FMCSA web service.
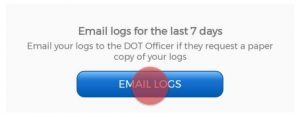
- Tap EMAIL LOGS in order to transfer the log information via email.
- Enter any remark supplied by the DOT officer and finish the process by tapping SUBMIT.
- There is one more way for entering in DOT Inspection page. From Dashboard tap on TRANSFER LOGS, just belove grid.


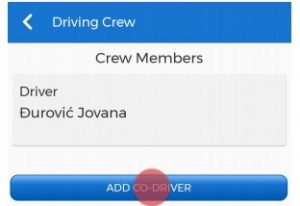
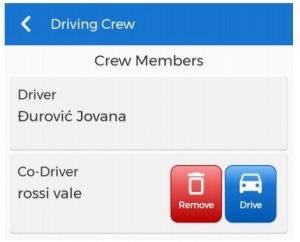
Driving Crew
- From your Dashboard view, tap the hamburger icon
- Tap Driving Crew to open main navigation menu. Here you can see crew members, add new co driver or delete existing
- Tap on ADD CO-DRIVER, to add co driver.
- Enter Co-Driver E-mail and Password and Tap CO-DRIVER SIGN IN
- Tap on DRIVE. to make co driver to become driver
- Tap on REMOVE, to remove co-driver from the crew members

[xyz-ips snippet=”download-snippet”]