pro master 9362 Wireless Bluetooth Remote Control Instructions
Thank you for your purchase of the ProMaster 9362 Bluetooth remote for Canon. Please be sure to refer to your camera’s instruction manual at the same time you read this one. Your camera will need to be paired with the remote and its manual can give the specifics about how to prepare it for that task. Also, check that you have the proper firmware installed in your camera to ensure Bluetooth remote operation.
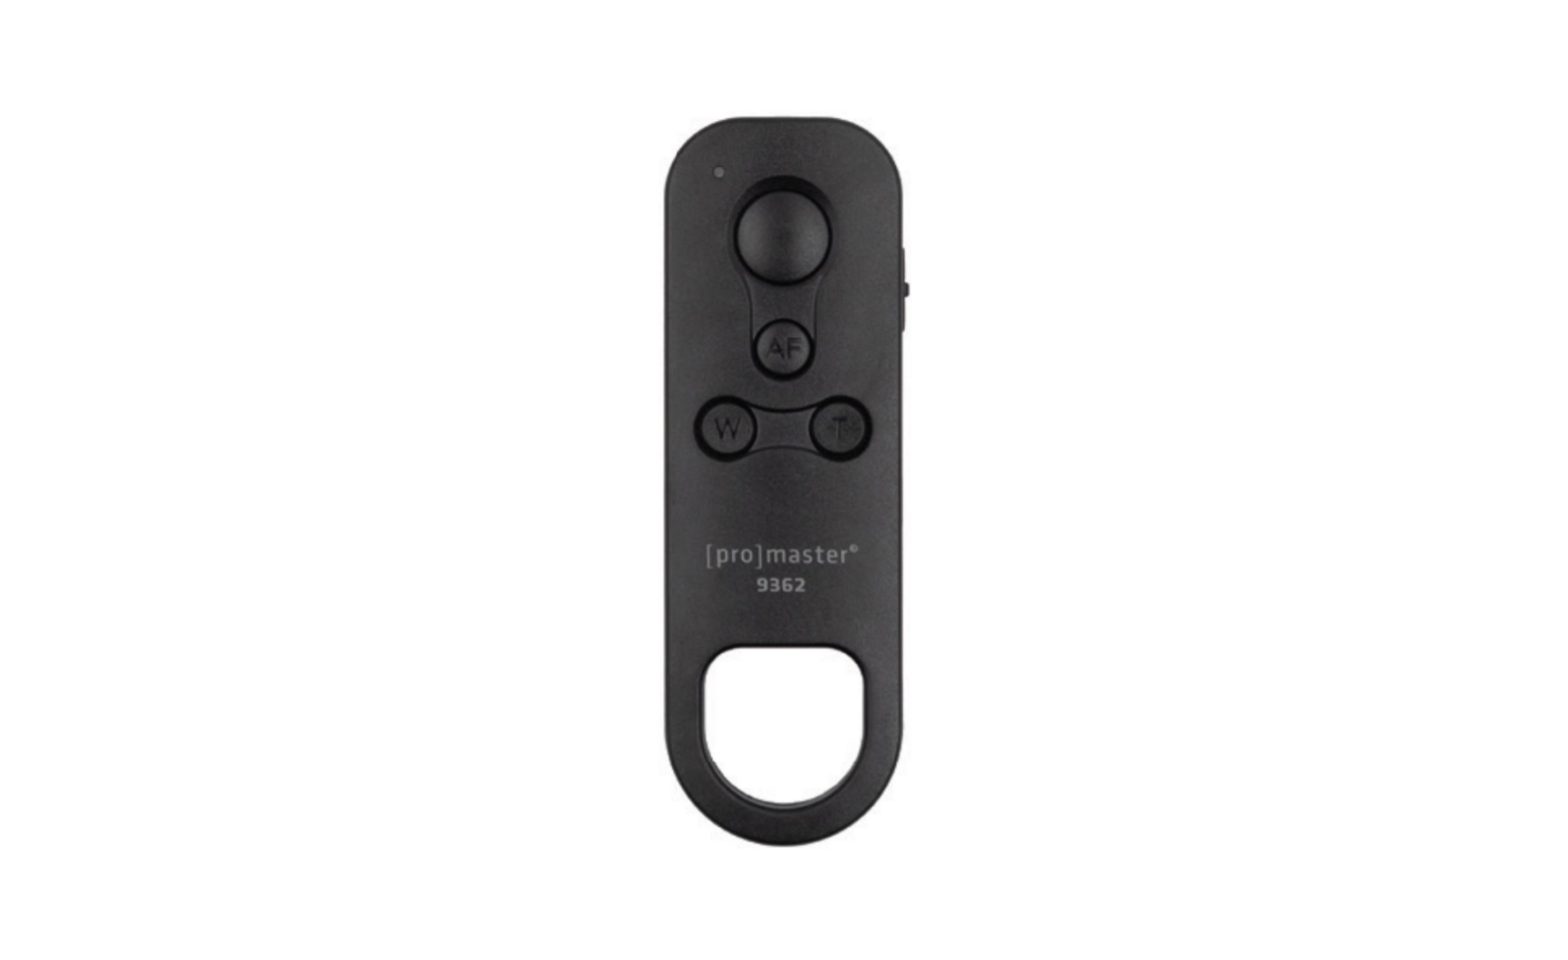
Parts Diagram
- Indicator Lamp
- Shutter Button
- AF Button
- W & T Zoom Buttons
- Function Switch
- Immediate Release (S)
- 2-Second Delay Release (2S)
- Video Recording (REC)
- Battery Compartment
Inserting the Battery
This remote uses a CR2032 battery and we include one for your convenience.
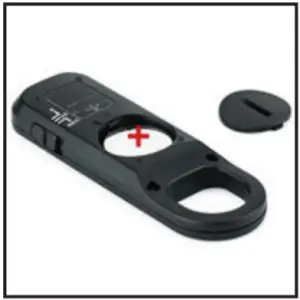
To install the battery, turn the remote over so the Battery Compartment (9), is facing you. Use a coin to rotate the battery cover counterclockwise and remove it. Insert the CR2032 battery with the + side facing up. Reinstall the cover.
Connecting to the Camera
Since the 9362 remote uses Bluetooth technology it will need to be paired with your camera before its first use. Be sure your camera and its current firmware version are compatible with a Canon-type BR-E1 Bluetooth remote.
Start by setting your camera to pairing standby mode. Each camera does this a little bit differently so, please refer to your camera’s instructions for more specific information. Once the camera is ready, press and hold the W & T buttons (4) on the 9362 remote simultaneously for 3 seconds or more. The Indicator Lamp (1) on the remote will blink and pairing with the camera will begin. Once pairing is complete, your camera should notify you with a message on its LCD (varies by camera model).
Operation for Still Photography
Once the remote and camera are paired, set your camera to remote control mode for a Bluetooth remote.
Use the Function Switch (5) on the side of the remote to choose from:
- S: Immediate Release (6) —takes a shot immediately upon pressing the shutter button
- 2S: 2-second delayed release (7)- takes a shot with a 2 second delay after the shutter button is pressed
- REC: Video record (8) – Do not choose the REC option for still photography. It is reserved for video use.
To take a still photo press the Shutter Release Button (2). This will cause the camera to auto focus and take a picture unless the camera is set to manual focus mode, in which case it will take a picture without autofocusing. Once the camera takes the picture the red Indicator Light (1) will illuminate on the remote. To autofocus the image without snapping a picture, press the AF Button (3) on the remote. When focus is achieved the red Indicator Light (1) will illuminate on the remote to confirm.
Operation for Videography
Set your camera to its video recording mode and also set it to remote control mode for a Bluetooth remote.
Use the Function Switch (5) on the side of the remote to choose Video Record REC (8).
To START or STOP recording video while in REC mode, press the Shutter Button (2). Press it once and recording will begin as the remote’s red Indicator Light (1) will flash 4 times to confirm. Press the Shutter Button (2) a second time and recording is ended.
Zooming the Lens
(for both still photos and video)
Use the W and T Zoom Buttons (4) on the remote to zoom the lens between its wide and telephoto ends. You must be using a power zoom lens or compatible zoom lens and power zoom adapter to achieve this.Zooming can typically be done in both still and video mode. Refer to your camera and lens manual for more specifics and to ensure proper operation.
Tips for Operation
- Bluetooth does not require line of sight. So, you can take photos even when there is a wall or obstacle between the remote and the camera. However, it does have a usable range of 32′ / 10M, beyond which it may not function properly.
- Once the remote is paired with your camera it will remember the pairing and be useable anytime you set the camera to its remote mode. If you are in remote mode and it is not working properly, try re-pairing the remote.
- The remote can only be paired with one camera at a time.
- When its battery is replaced the remote may lose its pairing setting and need to be re-paired.
- The loop built-in to the remote is a convenient place to connect it using a carabiner or lanyard.
One Year Unconditional Warranty
If for any reason, this ProMaster product fails within ONE YEAR of the date of purchase, return this product to your ProMaster dealer and it will be exchanged for you at no charge. ProMaster products are guaranteed for ONE FULL YEAR against defects in workmanship and materials. If, at any time after one year, your ProMaster product fails under normal use, we invite you to return it to ProMaster for evaluation.
Code 9362 Made in ChinaWWW.PROMASTER.COM I FAIRFIELD, CT 06825
 report this ad
[xyz-ips snippet=”download-snippet”]