
PROFI-CARERobotic vacuum White Remotely controlledInstruction Manual
Thank you for choosing our product. We hope you enjoy using the appliance.
Symbols in this Instruction Manual
Important information for your safety is specially marked.It is essential to comply with these instructions in order to avoid accidents and prevent damage to the appliance:
WARNING:This warns you of dangers to your health and indicates possible injury risks.
CAUTION:This refers to possible hazards to the appliance or other objects.
NOTE:This highlights tips and information.
General Notes
Read the operating instructions carefully before putting the appliance into operation and keep the instructions including the warranty, the receipt and, if possible, the box with the internal packing. If you give this appliance to other people, please also pass on the operating instructions.
- The appliance is designed exclusively for private use and for the envisaged purpose. This appliance is not fit for commercial use.
- The power adapter is only suitable for use in dry rooms.
- Check if the output current, voltage and the polarity of the power adapter match the information on the connected appliance!
- Do not touch the connected power adapter with wet hands!
- If necessary, disconnect the appliance from the power adapter.
- Ensure that the cable of the power adapter does not become kinked, jammed, driven over or come into contact with heat sources.
- Do not use a damaged power adapter.
- Do not repair the appliance yourself, but visit an authorized specialist.
- The appliance and the mains lead have to be checked regularly for signs of damage. If damage is found the appliance must not be used.
- Use only original spare parts.
- In order to ensure your children’s safety, please keep all packaging (plastic bags, boxes, polystyrene etc.) out of their reach.
WARNING:Do not allow small children to play with the foil. There is a danger of suffocation!
Special Safety Instructions for this Appliance
- This appliance can be used by children aged from 8 years and above and persons with reduced physical, sensory or mental capabilities or lack of experience and knowledge if they have been given supervision or instruction concerning use of the appliance in a safe way and understand the hazards involved.
- Children shall not play with the appliance.
- Cleaning and user maintenance shall not be made by children without supervision.
- The appliance is intended for use with safety extra-low voltage.Connect only to a power supply according to the specifications on the rating label.
- If the connection cable of this appliance has been damaged, it must be replaced with a special connection cable available from the manufacturer or its customer service.
- Do not use any power adapter other than the one supplied.
- Do not suck up hot ashes or pointed or sharp objects!
- Do not suck up liquids!
- Do not use the appliance in damp rooms!
- Never vacuum-clean without the dust container and filter in place.
Special Safety Information Concerning the Integrated Rechargeable Battery
- Do not expose the integrated rechargeable battery to hard impacts or pressure.
- Do not drop the appliance.
- Do not place heavy objects on top of the appliance.
- Keep the appliance away from direct sunlight, heat and open flames.
- The rechargeable battery may not be taken apart, thrown into fire, immersed in liquids or short-circuited.
- If the rechargeable battery shows any leakage, prevent the battery acid of coming into contact with skin, eyes and mucous membranes. In case of contact with battery acid, immediately rinse the affected area with plenty of clear water and seek medical attention immediately.
Unpacking the Appliance
- Remove the appliance from its packaging.
- Remove all packaging material such as plastic films, filler material, cable ties and cardboard packaging.
- Check the content for any missing parts.
- In the event that the packaging content should be incomplete or if damages are noticeable, do not operate the appliance. Return it to the dealer immediately.
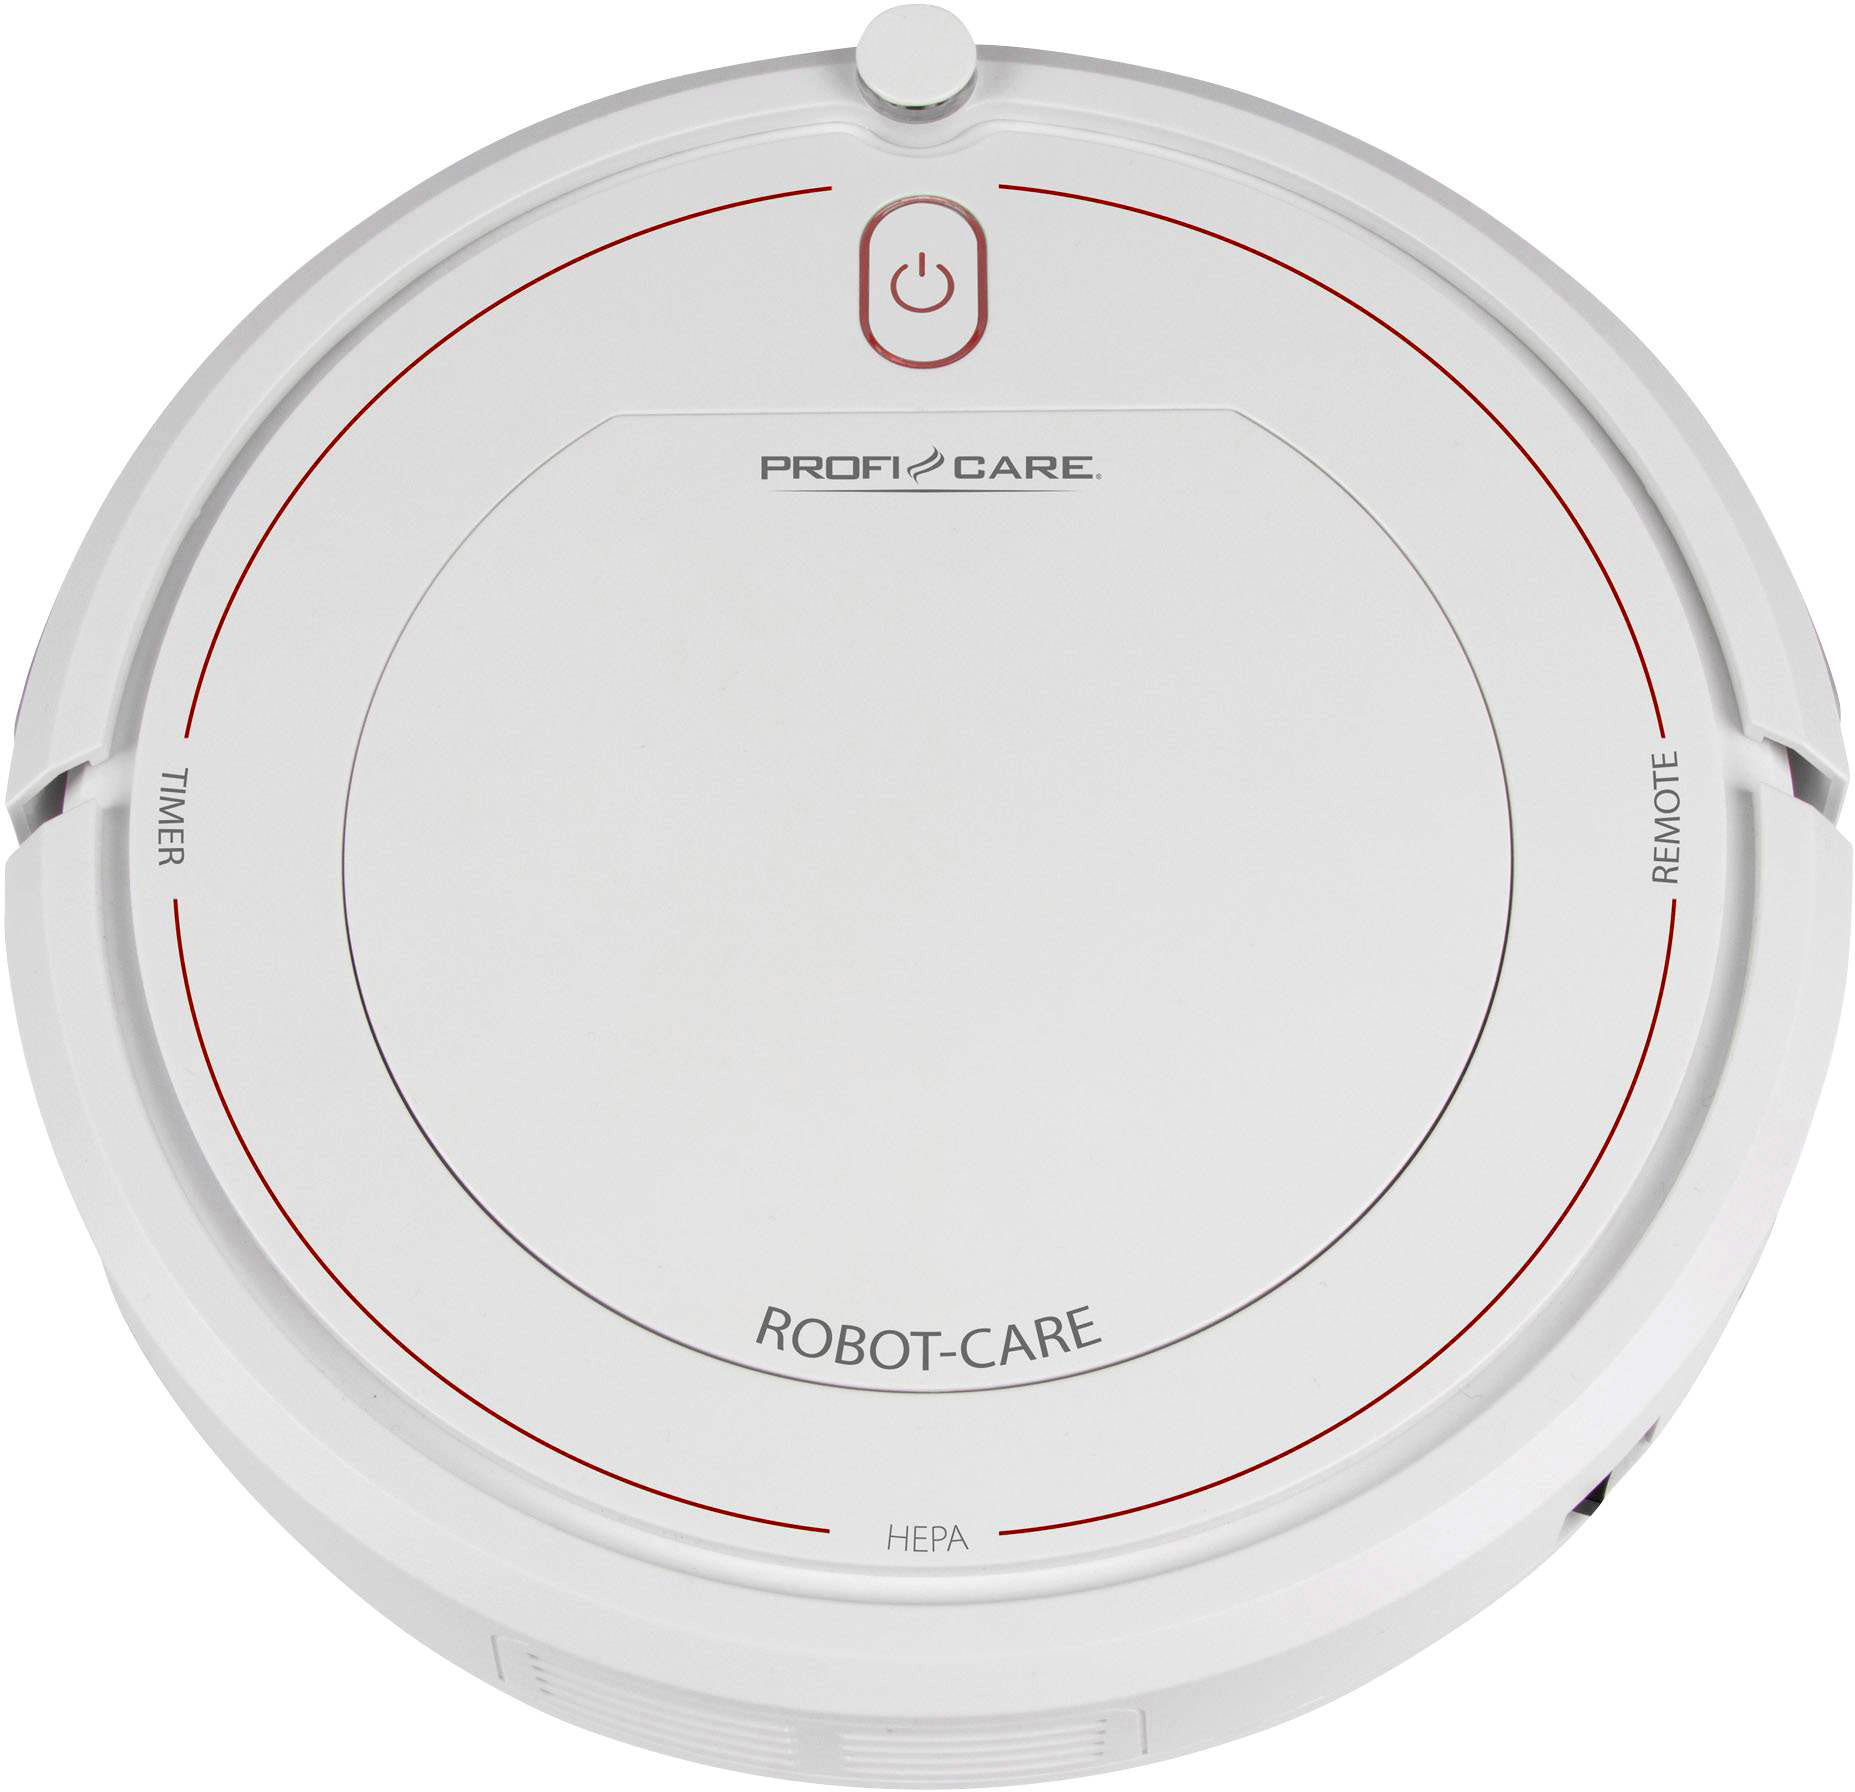
Overview of the Components / Scope of Delivery
Top Side (Figure A)
- Pressure plate to open the dust container compartment
- Dust container compartment
- Infrared receiver for the remote control
- Button (start / pause) with charge / power indicator light
- Shock absorber
- Connection socket for power adapter
- Main switch / (on / off)
- Air outlet
- Power adapterBottom Side (Figure B)
- Side brush (right)
- Front wheel
- Stairway detection sensor
- Battery compartment cover
- Side brush (left)
- Stairway detection sensor
- Drive wheel (left)
- Air intake duct
- Rubber lips
- Drive wheel (right)
- Stairway detection sensor
Remote Control (Figure C)
- RESPOND button
- START / PAUSE button
- RANDOM button
- AUTO button
- FOCUS button
- Direction buttons ,

Not IllustratedFilter insert with mesh filter and HEPA filter
Notes for Use
- The appliance is operated via charged battery. Charge the battery using the power adapter provided. Direct power supply via power adapter is not possible.
- The appliance sucks up loose dirt through the nozzle.For more efficient cleaning, the appliance is equipped with a rubber lip.
- Do not use the appliance to vacuum building rubble.
- Dirty filters reduce the suction power of the appliance, hence we recommend cleaning the dust container and filters after each use.
- When the appliance hits a wall or other obstacles during operation, it will change its driving direction.
- The appliance also cleans underneath furniture if they have a ground clearance of at least 80 mm. If the appliance gets stuck under a piece of furniture, a beep will sound and the robot vacuum cleaner switches itself off.
- If the appliance is lifted during operation, it will emit a beep and the power indicator light flashes red. The appliance will then switch off.
- Due to its design, the cleaning of carpets and the driving over edges is only possible to a limited extent. Short-pile carpets with low edges can be surmounted. For long-pile carpets, please use a conventional 230 V floor vacuum cleaner.
- The sensors at the bottom of the appliance detect steps and other dips, so that it can not drop down.
CAUTION:Prior to each use, ensure the sensors are clean, or else the appliance may crash.
Depending on the condition of the step (colour scheme, design, etc.), it may happen that the sensors can still not detect the landing. Especially near a stairway, please do not leave the appliance unattended.
Before Using the Appliance
- Clear the floor of any objects lying around that couldobstruct the side brushes, get caught in the nozzle or stop the appliance from cleaning.
- Remove any objects that could be knocked over (such as vases, small lamps, decorative items, etc.).
- Make sure that no cables, cords or fringes, e.g. of curtains, table cloths or carpets can be accessed. If necessary, fold the edges with its fringes under the carpet.The appliance may otherwise get entangled in it.
Putting into Service
Inserting Batteries into the Remote Control(Batteries are not included in the scope of delivery)
- Open the battery compartment cover on the back of the remote control.
- Insert 2 batteries of type R03 “AAA” 1.5 V, observing the correct polarity (see markings on the bottom of the compartment)!
- Close the battery compartment cover.
WARNING:Do not expose batteries to excessive heat such as sunlight, fire or similar. There is a risk of explosion!
CAUTION:
- Batteries may leak and lose battery acid. Remove the batteries if the remote control is not being used for an extended period of time.
- Different battery types or new and used batteries must not be used together.
- Do not dispose of batteries along with domestic waste.Return used batteries to the relevant collection facilities or your retailer
Mounting the Side Brushes
Please refer to figure B on page 3.
- Plug the side brush (10) with the imprint R into the appliance at the inscription R below. It must engage with a click sound.
- Plug the side brush (14) with the imprint L into the appliance at the inscription L below. It must engage with a click sound.
Charging the Battery
Before you can use the appliance, you must first charge the integrated rechargeable battery.
- Plug the power adapter into a properly installed shockproof socket.
- Make sure the appliance is switched off. (Main switch in position )
- Connect the appliance with the plug-in power adapter by inserting the plug into the socket (6).
The charge control lamp on the ![]() button indicates the charging process:Flashes green = the rechargeable battery is charging.Lights up green = the rechargeable battery is fully charged.
button indicates the charging process:Flashes green = the rechargeable battery is charging.Lights up green = the rechargeable battery is fully charged.
- Prior to first use, charge the appliance for at least 6 hours.
- After a maximum of 6 hours or as soon as the indicator light stays on permanently, the charging process needs to be stopped.
CAUTION:
- Route the cable of the power adapter in such a way that nobody can trip over it.
- Do not charge the rechargeable battery unsupervised.
- Always remove the mains plug from the power outlet after charging is complete.
NOTE:
- Once the rechargeable battery is almost empty, you will hear a beep. The power indicator light on the button flashes red and the appliance switches off. The power indicator light goes out after around 60 seconds.
- Even when switched off, the rechargeable battery discharges continuously. If the appliance is out of use for a longer period of time, charge the rechargeable battery at least once every 4 to 6 weeks.
Operation
Switching the Appliance On / Off
- The appliance is switched on when the main switch /is set to position .
- Switch off the appliance by setting the main switch to position .Buttons on the Remote ControlThe appliance is mainly operated via the remote control buttons. The remote control signals are transmitted to the appliance via infrared light. To operate the appliance with the remote control, it must be within sight. Point the remote control at the infrared receiver.
- RESPONDIn standby or during operation, the appliance will emit a beeping sound.
- START / PAUSESwitches the appliance on or into standby.
- RANDOMThe appliance is operating in “Random” mode. Based on the room, the appliance automatically opts for the best travel route.
- AUTOThe appliance is operating in “Systematic” mode. It will zigzag between two obstacles as shown in the adjacent illustration.
- FOCUSThe appliance is operating in “Spot” mode. It moves, as shown in the adjacent illustration, from the centre of an area in an ever-growing circle.
- The appliance moves forward, to the right, backwards and to the left. While in standby, these buttons are without any function.
Using the Appliance
WARNING:
- Pay particular attention to the safety of babies, young children and the elderly while the appliance is in operation. Make sure that no one stumbles over the appliance.
- Do not touch the wheels and side brushes with your hands during operation.
CAUTION:
- Do not leave the appliance switched on unattended, so that you are able to intervene if it is handicapped by furniture / objects.
- If anything gets stuck in the nozzle and obstructs the appliance during operation, switch it off immediately and remove the obstacle.
- Prior to each use, ensure that the dust container and filters are in place, empty and cleaned.
- Place the appliance in the middle of the room to be cleaned.
- Switch on the appliance with the main switch. The appliance is now in standby mode.
- Press the START / PAUSE button. The operation indicator lights up orange. The appliance starts cleaning the floor in RANDOM mode.
- If desired, select another cleaning mode (AUTO, RANDOM or FOCUS).NOTE: Should the appliance encounter too many obstacles while operating in FOCUS or AUTO mode it will automatically switch to RANDOM mode.
- The appliance cleans the floor until the battery is empty or it is switched off manually.
Stopping Operation
- Stop the appliance by pressing the START / PAUSE button.
- Bring the main switch into position to switch off the appliance.
- Empty the dust container and clean the filters and sensors as described under “Maintenance and Cleaning”.
Maintenance and Cleaning
WARNING:
- Always switch off the appliance before servicing or cleaning and disconnect it from the power adapter!
- Under no circumstances should you immerse the appliance in water for cleaning purposes. Otherwise this might result in an electric shock or fire.
CAUTION:
- Do not use a wire brush or any abrasive items.
- Do not use any acidic or abrasive detergents.
NOTE:
Do not attempt to lubricate the rollers with lubricants or oil.Ignoring this would cause significantly more dust or dirt to adhere to the rollers.
- Clean the housing with a soft, dry cloth without additives.
- Use a soft cloth to gently clean the sensors (12/15/20).
CAUTION:
Prior to and after each use, check that the sensors are clean. Otherwise, the appliance may tumble down a staircase.
- Prior to and after each use, make sure that the nozzle and vents are clear.
- For optimum performance of the appliance, you should empty the dust container and clean the filters after each use.
Emptying the Dust Container and Cleaning the Filter
CAUTION:
Never wash the filters under any circumstances.Please refer to the images on page 4.
- Press the corresponding surface to open the dust container compartment.
- Fold the handle upwards and remove the dust container from the appliance.
- Pull the HEPA filter out of the dust container. There is still a rubber holder around the HEPA filter. Clean the HEPA filter by tapping the dust out of it. We recommend replacing the HEPA filter once a year.
- CAUTION: Do not use a brush to clean the HEPA filter. Using a brush may damage the filter material.
- Fold the cover of the dust container upwards. Then remove the mesh filter from the dust container.
- Empty the dust container while holding it over a garbage can.
- You can clean the dust container under running water.To clean the mesh filter, use a soft paintbrush.
CAUTION:
- Allow the dust container to air dry. Do not, however, expose it to direct sunlight.
- Only re-insert the filters into the dust container once it is completely dry!
7. Reinsert the filters into the dust container. Make sure that both the HEPA filter and the mesh filter are installed properly.
Cleaning / Replacing the Side Brushes
If the side brushes are dirty, you may clean them with clean water. Do not use any additional cleaning agents.If the side brushes are worn or defective, replace them with new ones.
- The side brushes can be easily removed by pulling them upwards.
- When attaching the side brushes, pay attention to the right (R) and left (L) markings. You will find these markings on both the appliance and on the side brush.
Storage
- Clean the appliance as described and allow it to dry.
- We recommend that you keep the appliance in the original packaging if it will not be used for long periods.
- Always store the appliance out of the reach of children in a dry, well ventilated place. The storage temperature should be between 0 and 40 °C.
Troubleshooting

Technical Data
- Model: PC-BSR 3042
- Net weight: approx. 1.9 kg
Power adapter
- Protection class: II
- Input: AC 100 – 240 V, 50 / 60 Hz, 0.4 A MAX
- Output: DC 24 V, 600 mA
- Polarity: -(+
- Rechargeable battery: 12 x 1.2 V, 1500 mAh Ni-MH
- Operating time: approx. 2 hours
- Charging time: approx. 6 hours
The right to make technical and design modifications in the course of continuous product development remains reserved.
This appliance has been tested according to all relevant current CE guidelines, such as electromagnetic compatibility and low voltage directives, and has been constructed in accordance with the latest safety regulations.
Disposal
Accumulator / Battery Disposal
The appliance contains a rechargeable battery.Used batteries / accumulators (rechargeable batteries) do not belong in household waste.The battery must be removed before the product is recycled.
- Ensure the appliance has been switched off via the main switch (O).
- Remove the two screws on the battery compartment cover.
- Remove the rechargeable battery pack and disconnect the plug connection.
Information, where batteries / accumulators are to be disposed of can be obtained from your local or municipal authorities.
Meaning of the “Dustbin” Symbol
 Protect our environment: do not dispose of electrical equipment in the domestic waste.Please return any electrical equipment that you will no longer use to the collection points provided for their disposal.This helps avoid the potential effects of incorrect disposal on the environment and human health.This will contribute to the recycling and other forms of re-utilisation of electrical and electronic equipment.Information concerning where the equipment can be disposed of can be obtained from your local authority.
![]()
References
[xyz-ips snippet=”download-snippet”]