
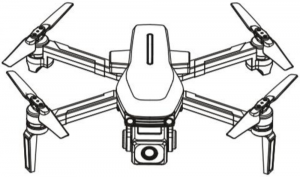
ProFlight PFBD303 Drone
SAFETY WARNINGS
- Read the entire instruction manual and familiarize yourself with the product and all its features before operating.
- Failure to operate the product correctly can result in damage to the product, surroundings or even serious injury.
- This product is not a toy and must be operated with caution and common sense.It requires some basic mechanical knowledge.
- This product is not intended for use by children without direct adult supervision.
- This manual contains instructions for safety, operation and maintenance. It is essential to read and follow all the instructions and warnings in this manual prior to assembly, setup or use in order to operate correctly and avoid damage or serious injury.
- The drone is not intended for use by children under 14 years of age. This is not a toy.
- Always operate your drone in open spaces away from vehicles, buildings, traffic and people.
- Always keep out of reach of children.
- Avoid exposure to water as moisture can cause damage to the electronics.
- Never operate your drone when the controller or drone batteries are low.
- The battery charger included with the drone has been designed to safely charge the battery. Do not use other chargers.
- Mishandling of batteries can result in a fire, personal injury, and /or property damage.
- By handling, charging or using the included Li-Po battery you assume all risks associated with lithium batteries.
- If at any time the battery begins to balloon or swell, discontinue use immediately.If charging or discharging, discontinue and disconnect. Continuing to use, charge or discharge a battery that is ballooning or swelling can result in fire.
- Always store the battery at room temperature in a dry area for best results.
- Do not store the battery or drone in a car or direct sunlight. If stored in a hot environment, the battery can be damaged or even catch fire.
- Never use any other type of battery charger other than the one supplied with the drone. Failure to charge the battery with a compatible charger may cause fire resulting in personal injury and/or property damage.
- Never exceed the recommended charge rate.
- When a Li-Po battery is discharged below 3.7V, the battery may be damaged and may no longer accept a charge. The drone will automatically land and become inactive when the battery approaches this level, this is to protect the battery
SAFETY PRECAUTIONS

Ensure that the weather conditions are suitable for flying. Do not fly the drone during snow, rain, fog, thunder or in windy conditions.
DO NOT touch the rotating blades during operation. They can cause injury or damage to property
No-fly zones must be observed. It is the user’s responsibility to ensure that the drone is operated legally and safely.
PREPARING FOR FIRST FLIGHT
- Fully read and understand the safety warnings, and precautions.
- Make sure both the controller and aircraft batteries are sufficiently charged.
- Find a suitable place to fly the aircraft, away from people, buildings and vehicles.
- Make sure the throttle is centered before turning on the controller
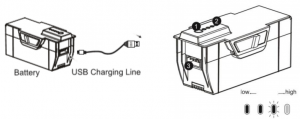
BATTERY CHARGING
Use only the supplied USB Li-Po charger to charge your battery.Remove the battery from the battery compartment on the rear of the aircraft.Press down the release buttons on both sides of the battery and slide the battery out.
Plug the charger into a USB socket before attaching the battery. When the battery is charging the LED on the charger will slowly flash red. When the battery is fully charged the LED will turn off. Charging should take around 270-300 minutes. DO NOT leave the battery unattended whilst charging.
WARNINGS:
- DO NOT use other USB cables. They may lead to incorrect charging, and could cause damage or present a safety risk.
- When reinserting the battery, ensure that the triangle is on the top and make sure it is secure and fully clicks into place.
INSTALLING THE CONTROLLER BATTERIES
Unclip the battery cover from the rear of the controller and insert 4x AA batteries, making sure the correct polarity is followed. Once the batteries are correctly installed, the battery cover must be re-fitted. AA batteries are not supplied.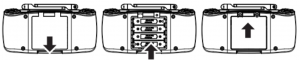
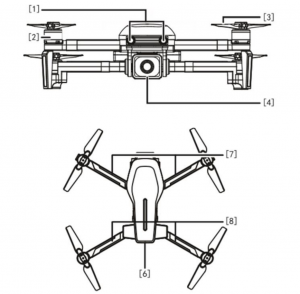
RONE DIAGRAM
- Lights
- Brushless Motor
- Blades
- Camera
- Battery
- Front Indicator
- Rear Indicator

CONTROLLER DIAGRAM
1. SPEED MODE2. PHOTO/VIDEO3. GYROSCOPIC CORRECTION4. GPS5. POWER6. HEADLESS MODE7. ONE BUTTON TAKE OFF/ONE BUTTON LAND8. LENS ANGLE ADJUSTMENT9. ONE BUTTON RETURN10. COMPASS CORRECTION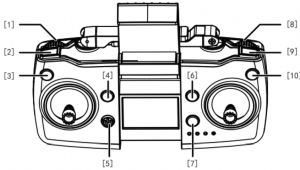
- REMOTE CONTROL SIGNAL
- NUMBER OF GPS SATELLITES
- DRONE BATTERY LEVEL
- REMOTE BATTERY LEVEL
- VIDEO
- PICTURE
- GPS ON
- GPS OFF
- HIGH SPEED
- LOW SPEED
- FLIGHT ALTITUDE
- FLIGHT DISTANCE
- HEADLESS MODE
- ONE BUTTON RETURN

CONTROLLER FUNCTIONS
SPEEDUse the rocker to change the flight mode from low speed (Beginner) to high speed (Advanced).
PHOTOPress once to take a photo, press and hold to start recording a video.
COMPASS CORRECTIONPress the compass correction button and the drone LED will flash quickly. Pick up the drone and hold it around 1 meter from the ground and with the base facing the ground. Turn the drone clockwise 3 times, the controller will emit a sound. Then hold the drone vertically with the camera facing the ground and turn 3 times clockwise again, the controller will emit a long sound indicating compass correction has been successful.
GYROSCOPIC CORRECTIONPlace the drone on a flat surface. Press the gyroscopic calibration button and the drone will flash quickly. This indicates that calibration has been successful. You can now search for GPS signals by pressing the GPS button.
GPS SIGNALIndicates the current flight mode and the number of satellites; When flashing indicates that the GPS signal is insufficient and that the no return, follow, surround and pointing flight functions are disabled. When the light is steady it indicates that the current mode is GPS.
POWERTurn the controller ON/OFF
HEADLESS MODEThe drone can be made to fly in Headless mode by pressing the headless flight button. This will make the aircraft fly without a front or rear. It will fly in the orientation of the pilot. It does not matter which direction the drone is facing in headless mode.
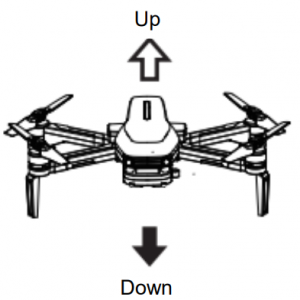
ONE BUTTON TAKE OFF/ONE BUTTON LANDPress once and the aircraft will take off from the ground. Press and hold and the aircraft will begin descending.
LENSE ANGLE ADJUSTMENTUse the rocker to adjust the angle of the camera lens up or down.
ONE BUTTON RETURNPress the return button and the controller will emit a sound. The aircraft will return home regardless of the current direction. Press again to cancel the function.
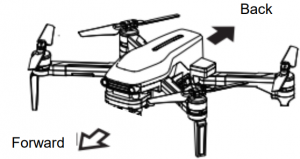
FOLDING THE ARMS
- Fold the front arms backwards until they sit close to the body of the drone.
- Fold the rear arm down until it is parallel to the body.DO NOT FORCE THE ARMS AWAY FROM THE BODY AS THIS MAY RESULT IN DAMAGE.
REPLACEMENT OF THE PROPELLERS
Should one of the fitted propellers become damaged, it can be replaced, by removing the two screws, from the top of the propeller then sliding the propeller off the motor shaft. Refitting is the reversal of removal.
It is important for the correct blade to be placed on the correct motor or the aircraft will not fly correctly. Each blade is marked with an A1 or B1 on the top to indicate which motor it corresponds to.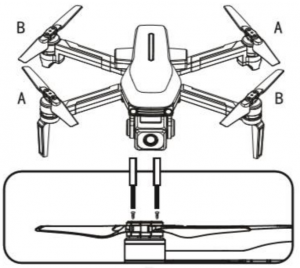
PREPARING FOR FLIGHT
PAIR THE CONTROLLER
Press the power button on the drone once and then and hold the battery power switch, the LED on the drone will flash.
Then press the power button on the controller and the flashing light on the drone will become slower, indicating that pairing is complete.
CALIBRATE THE GPS
After pairing, place the drone on a flat surface. Press the gyro calibration button and the drone will flash quickly. This indicates that calibration has been successful. You can now search for GPS signals by pressing the GPS button. If you don’t require GPS signals you can go directly to the next step.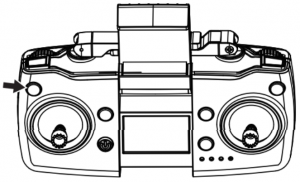
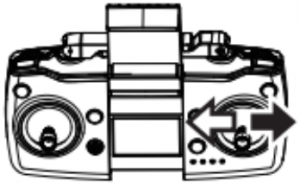
DRONE UNLOCK
To unlock the drone for flight, push the throttle lever (Left) and the direction lever (Right) in the direction of the arrows shown to initiate flight and start the drone’s propellers. You can now start flying by using the throttle or the one button take off.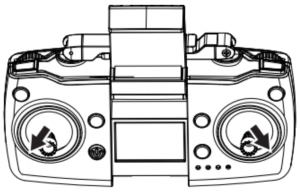
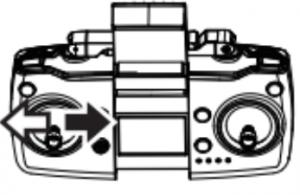
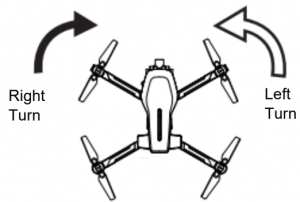
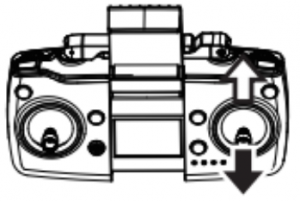
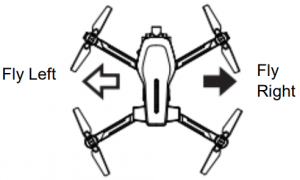
HOW TO CONTROL YOUR DRONE
 |
 |
 |
 |
 |
 |
 |
 |
APP CONNECTION
Install the RC GPS app on your device by scanning the relevant QR code below.


- Turn on the aircraft.
- The drone will automatically create a WiFi hotspot.
- Within the WiFi settings on your phone find the drones hotspot.
- Select the hotspot and connect, no password is required.
- Exit the WiFi settings menu and open the app. Your phone will now be connected to the drone, and is ready to control through the app.
CONTROLLING THE DRONE VIA THE APP
First press the unlock button  to unlock the drone for flight.

|
Joystick On/Off |
Tap to switch between phone control or remote control. |
|
Reverse the lens |
Press to rotate the lens and change the view point. |
|
3D Stereo VR |
Press to enter VR mode. (Only applicable to phones connected to a V.R headset. |
|
Media Library |
Press to enter the media library to see your saved pictures and videos and for one-click sharing. |
|
Flight Record |
Press to view flight record. |
|
Multi-point flight |
In GPS mode, the aircraft will fly according to the location selected on the map. |
|
Point-surrounded flight |
In GPS mode, the aircraft nose will fly around clockwise or counter clockwise with the current position of the aircraft as the center. You can control the rise, fall, forward, and reverse to adjust. |
|
Video Focus |
When taking a video, the camera will focus on the video object (can be people or an object) and the drone will continually move back and rise at same time till 50 meters high then stop this function. |
|
GPS signal |
Indicates the current flight mode and the number of satellites; the flashing indicates that the current flow mode is fixed, and there is no return, follow, surround and pointing flight functions. Steady light indicates that the current mode is GPS. |
|
Battery |
Shows the current battery level of the drone.
|

| Menu Return | Press to return to the main interface. |
| GPS Follow | In GPS mode, click this button and the aircraft will follow the remote control to fly. |
| Return | In GPS mode, click to return the drone to your signal location. |
| Take Off | Press on the aircraft to start taking off. |
| Decline | Press on the aircraft to start descent. |
|
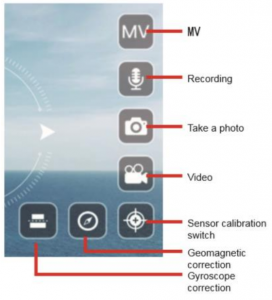
MV |
Press to enter the MV interface. From here you canselect music and add filters to your videos and pictures. |
|
Recording |
Tap to start recording, tap again to stop recording. |
|
Take a photo |
Press the button to take a photo based on the current lens. |
|
Video |
Press the button to start recording a video. Press again to stop recording. |
|
Sensor Calibration Switch |
Press to display the Geomagnetic (Compass) Correction and Gyro Correction icons. |
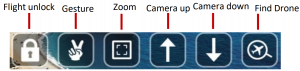
| Flight Unlock | Press this button to unlock the drone for flight, this will start the propellers. |
| Gesture | Use gestures to take pictures and video. |
| Zoom | Use to zoom in and out of the current image or video displayed on screen. |
| Camera Up | Press to tilt the camera up. |
| Camera Down | Press to tilt the camera down. |
| Find Drone | If you find yourself unable to locate your drone or it has landed out of view, press this button and if the drone is still powered on, its current location will be shown on a map. |
WARNING:
- Always calibrate the drone before controlling using the APP.
- Ensure you understand the operating instructions provided before attempting to fly.
- Android device operating system must be 5.0 or higher.
- If you experience problems with the image, the drone is either too far away or there is too much interference in the area. Try moving to a place with less interference.
- Ensure all safety warnings in the front of the manual are adhered to
TROUBLESHOOTING
| Problem | Cause | Solution | |
| 1 | The lights on the aircraft are flashing but it does not respond to the control |
|
|
| 2 | The aircraft blades turn but it will not take off |
|
|
| 3 | The aircraft shakes in flight | The blades are damaged/distorted | Replace the blades. |
| 4 | The aircraft won’t fly using the App. |
|
|
| 5 | Camera not working in App |
|
|
TECHNICAL SPECIFICATION
|
Product Size (cm) |
24.5*23.5*7.5 |
|
Carton Size |
30*27*10.5 |
|
Box Contents |
1 x Drone1 x 2.4G Remote controller (Batteries not included) 8X Blades1X Screwdriver1X 11.1V 1A-1.5A USB Charger |
|
Flying time (On Full Charge) |
23-25 minutes (approx.) |
|
Controller Batteries |
4 AA (Not Included) |
|
RC Distance |
1000 meters |
|
Wi-Fi Distance |
600 meters |
|
Drone Battery |
11.1V 1600mA 25C Li-poly; 1406 Brushless motor |
DISPOSAL
Disposal: Do not dispose this product as unsorted municipal waste. Collection of such waste must be handled separately as special treatment is necessaryRecycling facilities are now available for all customers at which you can deposit your old electrical products. Customers will be able to take any old electrical equipment to participating civic amenity sites run by their local councils. Please remember that this equipment will be further handled during the recycling process, so please be considerate when depositing your equipment. Please contact the local council for details of your local household waste recycling centers.
UK Support
http://www.proflightuk.co.uk/support/If you have been through the troubleshooting, and the unit is failing to operate, our service line can be contacted on: 0330 390 3062
Office hours: 9AM – 5PM Monday to Fridaywww.proflightuk.co.ukUnit J6, Lowfields Business Park Lowfields Way, EllandWest Yorkshire, HX5 9DA

References
[xyz-ips snippet=”download-snippet”]