
promaster Macro LED Ring Flash RL100

Part Description
- Macro ring head
- Power control unit
- Connection cable
- Diffuser ring (clear, amber, blue and white are included)
- LED array
- Mounting ring locks
- Adapter ring
- Battery cover
- Hot shoe base
- Locking wheel
- Mounting foot with hot shoe contact
- Test button (PILOT)
- Mode switch button (MODE)
- Continuous Light / Flash selection button (LIGHT)
- Power switch (ON/OFF)
- Output power adjustment button (Left/Decrease)
- Set button
- Output power adjustment button (Right Increase)
- LCD display screen
Understanding the LCD Panel
Battery Level Gauge
This icon appears in the top, left corner of the LCD panel. It is designed to look like a battery. When all 3 bars are displayed inside the gauge the batteries are at full power. As the batteries are drained each bar will disappear one by one until the gauge is empty and the batteries are exhausted.
Mode Indicator
The Mode Indicator is shown across the middle of the LCD panel and is identified as: LIGHT FLASH L R A dot is displayed below one of the modes to show the RL100 current mode setting.LIGHT indicates Constant Light mode.FLASH indicates Flash mode.L indicates Flash Mode Left side only.R indicates Flash Mode Right side only.
Power Level Indicator
The lower portion of the LCD panel shows the power level indicator inside of a rectangle, as illustrated. The power output level is displayed both as a 7 bar gauge and numerically. It has a range of -3.0 to +3.0. the power level setting always applies to the current mode setting.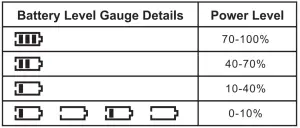
Installing and Removing the Flash Diffusers
- Rotate the diffuser counter-clockwise and gently pull to remove it.
- Attach a new diffuser by placing it over the ring light and rotating it clockwise.
- 4 diffusers are included with this kit. The transparent diffuser will give the most powerful and harshest light. The frosted white diffuser produces a soft light with less power. The amber diffuser matches the RL100’s light to a tungsten color temperature and creates a very warm effect. The blue diffuser creates a cool light which can be used as a special effect or to match the extreme color temperature often experienced during the `blue hour’ before sunrise and before twilight.


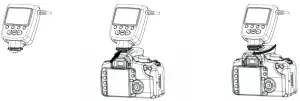
Installing the RL100 Ring Flash on Your Camera
The RL100 has two main parts the ring flash head and the power control unit. To mount the power control unit to your camera:
- Slide the mounting foot onto your camera’s hot shoe.
- Secure the power control unit by rotating the locking wheel clockwise until tight.
Installing the Macro Ring Head on Your Lens
This kit includes 49, 52, 55, 58, 62, 67, 72 and 77mm lens adapter rings.
- Choose the adapter ring that matches the thread size on your lens.
- Screw the adapter ring into the lens threads until snug. Be careful not to overtighten.
- Squeeze the mounting ring locks on the Macro Ring Head
- Slip the back of the Macro Ring Head over the edges of the lens mounting ring.
- Once in place, release the locks and make sure the flash head is secure.
- The Macro Ring Head can also be mounted to a light stand or tripod with the 1/4-20 thread in the bottom of the unit.
NOTE: Some lenses have front elements that rotate when autofocusing. In this case, it is recommended that you use the lens/camera in the manual focus mode to prevent possible damage.
Operating the Unit
| Button Name | Operation |
| Power Switch (ON/OFF) | Press and hold for 3 seconds to turn the unit on or off |
| Mode Switch Button (MODE) | Press to switch between the FLASH, L and R mode |
| Output Power Adjustment Button | Press (buttons with arrows) on either side of the SET button to: Right/Increase or Left/Decrease |
| Continuous Light/Flash Selection Button (LIGHT) | Press to activate the continuous light feature. Press a second time to return to the flash mode. |
| Test button (PILOT) | Press to test the light output while in one of the flash modes |
Continuous Light Mode
After pressing the LIGHT button once to activate this mode, use the Output power adjustment buttons to increase or decrease the intensity of the light. Continuous light is ideal for seeing the exact lighting of your subject, including shadows and highlights. It is also a great way to light your subjects for video. When finished, press the LIGHT button once more to return to the Flash mode.
Flash Mode
The RL100 will start in Flash mode each time you turn the unit on. Be sure the hot shoe contact, located on the bottom of the mounting foot, lines up with the center contact of your camera’s hot shoe. Use the Output Power Adjustment buttons to increase or decrease the intensity of the light. Press the MODE button to activate only the Left or Right side of the Ring light for more dramatic lighting and shadow control.
Power Saving Features
The LCD back-light will automatically turn off after 20 seconds of non use (use includes button pressing or flash operation.) The back-light will automatically turn on again when a button is pressed.
The RL100 will enter a deep sleep mode after 30 minutes of inactivity. Press the SET button to wake it up.
Specifications
- Standard shoe fits most cameras
- Fits lens filter size: 49, 52, 55, 58, 62, 67, 72 and 77mm size with included rings
- Guide Number: 2
- Color temperature range: 3200 15000K (depending on diffuser)
- Exposure time: 100/s
- Effective range: 6.6′ / 200cm + Power: 4 x AA Alkaline, Lithium or Rechargeable Ni-MH Batteries (not included)
- Ring Dimensions: 4 5/8 x 4 13/16 x 5/8″ / 117.5 x 122.2 x 15.9mm
- Power Unit Dimensions: 4 ½ x 2 13/16 x 1 7/16″ / 114.3 x 71.1 x 35.6mm
- Weight: 11 oz / 312 g
ONE YEAR UNCONDITIONAL GUARANTEE
If for any reason, this ProMaster product fails within ONE YEAR of the date of purchase, return this product to your ProMaster dealer and it will be exchanged for you at no charge.
ProMaster products are guaranteed for ONE FULL YEAR against defects in workmanship and materials. If at any time after one year, your ProMaster product fails under normal use, we invite you to return it to ProMaster for evaluation.
Code 1888
www.promaster.com1Fairfield, CT
References
[xyz-ips snippet=”download-snippet”]