Protech 720P High Definition Video Inspection Camera User Manual
GENERAL SAFETY INFORMATION
WARNING! Read and understand all of the included instructions. Failure to follow all instructions listed below may result in electric shock, fire and / or serious personal injury.
SAFETY INSTRUCTIONS
- Prevent object and liquid entry. Never spill liquid of any kind on the video display unit. Liquid increases the risk of electrical shock and damage to the product.
- The unit is not shock – resistant. Do not use this camera as a hammer and avoid high impact resultant from things such as dropping the unit from height.
- Do not immerse video handle in water. Avoid moisture, and store the product in a dry place. Such measures reduce the risk of electric shock and damage to the device. The lens and tube are water resist ant when the unit is fully assembled, but the video display unit is not.
- Do not use the camera if condensation forms inside the lens. Let the water evaporate before use.
- Do not use the unit to inspect environments known or suspected to contain exposed electrical wiring.
- Do not use the unit in the presence of flammable or explosive gases.
- The unit is designed for industrial inspections. Never use to perform medical inspections.
- Turn off the system if it is not in use.
- Remove the batteries when cleaning the unit.
- When batteries are flat, replace all FOUR (4) batteries in this unit with new ones.
- Use only the size and type of battery specified (AA).
- Be sure to install the battery with the correct polarity as indicated in the battery compartment.
- Properly dispose of batteries. Exposure to high temperatures can cause batteries to explode.
- Some countries have regulations concerning batteries disposal. Please follow all
- applicable regulation
WELCOME
Thank you for purchasing our high-definition video inspection camera. This product will provide a rich user – friendly experience providing a solution with reliable performance. Please read this user manual carefully before using this product. This product is designed as a 720P HD real-time inspection camera and is suitable for inspecting internal objects and / or structures with the illumination of the bright LEDs, it is appropriate for use in inspecting pipes/ holes or other hard to reach areas, property inspection, equipment HVAC/R or furnishing installation, car repair or aviation maintenance, search and rescue operations, laboratoryobservation, archaeological exploration, the visual inspect ion of otherwise inaccessible areas, etc.
FEATURES
- 1M IP67 waterproof snake camera probe is coiled inside the case for storage
- Camera tip accessories include: 45° mirror, hook and magnetic pickup are provided for different applications
- 3 inch, high contrast colour LCD display
- 5. 5MM 720P HD ultra-small camera lens with flexible snake tube
- 6 light-adjustable LEDs mounted on lens
- 7 navigation buttons for functional partition
- Photo and video recording function (with optional Micro SD card installed)
- Supports up to a 32GB Micro SD card (Micro SD card not included)
- Flashlight is standalone and could be used as a flashlight or camera auxiliary light
- Powered by four “AA” batteries (not included)
- Rugged frame, compact structure, reasonable layout makes small size, portable and convenient to use
Notice: We suggest you use 4 new AA alkaline batteries to enjoy 3 hours(approximately) long time monitoring(Continuing video recording and LED light adjusted to brightest), if -you use the 4 new AA carbon-zinc batteries, the monitoring time will be about 1hour only. Using different brands and types of AA batteries tend to produce different results.
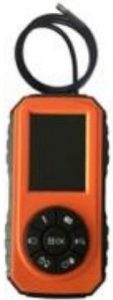
STRUCTURE
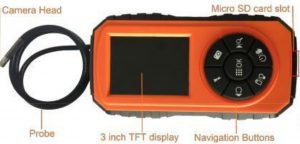
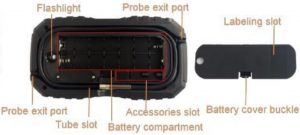
Overview
| 1 | Camera Head | 7 | Probe Exit Ports |
| 2 | Probe | 8 | Flashlight |
| 3 | 3 inch TFT Display | 9 | Battery Compartment |
| 4 | Navigation Buttons | 10 | Accessories Slot |
| 5 | Micro SD Card Slot | 11 | Battery Cover Buckle |
| 6 | Tube Slot | 12 | Labelling Slot |
Navigation Buttons
 |
Power / Suspend Image |
 |
Take Photo / Video / Change Mode |
  |
Enter menu / ok button |
|
Delete / Adjust LED Brightness |
 |
Up / Zoom |
 |
Down / Flip Image |
 |
Flashlight On / Off |
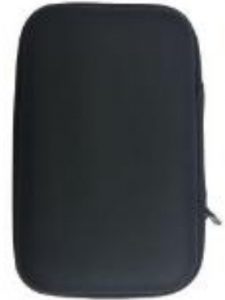
PACKING LIST
Inspection camera with cable
Carry Case
 User Manual
Camera Attachments
BASIC OPERATION
INSTALLING BATTERIESThe battery compartment is accessible from the back of the unit. Press the battery cover buckle, remove the cover and set it aside. Load four “AA” batteries into the compartment according to the polarity markings. Replace the battery compartment cover and secure it.
PREPARE THE PROBETo take out the probe, turn the unit over so its back faces you and use your thumb and index finger at the positions marked. Please note: the probe is tightly wrapped within a twisting channel that makes four full turns around the inside of the tube slot. The probe can be uncoiled to six working lengths through two probe exit ports. Unwrapping only one full turn will make the probe 27.4cm long (counting from the tube exit port to the camera head); Unwrapping two turns will make the probe 62cm long. Finally, unwrapping three turns will make the probe 95.6cm long. Each length incurs a trade-off of probe reach versus probe rigidityPACKING UP THE PROBETo re-coil the probe, it’s important to note that when re-coiling the probe from either its short or long extended length, you must wrap it very tightly within the channel. If the camera head is not back to the original position as you finish wrapping the probe, you will not be able to squeeze the camera head into place. If this occurs we recommend you begin re-winding the cable.
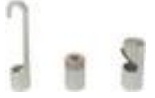
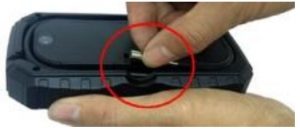
PROBE TIP ACCESSORIESThe system comes with three accessories that screw onto the end of camera head. Take off the protect ion ring before using the tip accessories. Each accessory has a specific purpose:
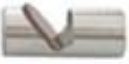 |
The 45 ° mirror enables the probe see around corners |
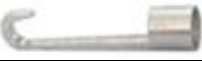 |
The hook lets you retrieve inaccessible items seen by the camera probe |
 |
The magnetic pickup lets you retrieve lost or dropped metal objects, like nuts and bolts |
OPERATING INSTRUCTIONS
QUICK START PROCEDURE
- Before you use the device for the first time, carefully peel off and discard the plastic film protecting the LCD.
- Press and hold the
 button for at least 2 seconds to power on the unit and illuminate the LCD .
 - Point the camera tipped end of the probe at the intended target, pushing the probe through holes or bending the probe around objects if necessary. Avoid bending the delicate probe excessively as this will damage the cable.
- Press the button to take a picture. Press and hold the button to enter recording mode. Once in recording mode, short press the button to begin recording and press again to stop recording. To re-enter picture mode from recording mode, press and hold the button.
- Press the button to freeze the image. Press the button again to release the picture. To save the held image, press the button when the Micro SD card is installed.
- Press the button to increase / decrease the bright ness of the camera ’s LEDs.
- Press the button to delete the picture / video.
- Press the button to flip the picture / video (rotate it 180°). Press the button again to undo the inversion.
- Press the button to scroll down when using the menu.
- Press the button to scroll up when using the menu.
- Press the button to zoom the picture / video frame. The first press of the button will zoom out the frame to 50%, corresponding to a zoom level of 1.0 X. “1.0X” will appear in light at the top right of the screen. Push the button several times to zoom in closer at a level of 1.5 X and 2.0 X. The next push of the button reverts to normal size (1.0 X).
- Press the button to turn on / off the flashlight . The flashlight does not require the unit to be turned on in order for the torch to operate.
- To insert the Micro SD card into the device, use your thumb and index finger to carry the SD card with the front side up and insert into the SD card slot. Use your thumb to push gently on the card until it locks with a ‘click’ sound. To remove the SD card, push the end of the SD card with your thumb. The SD card will unlock with a ‘click’ sound and can be safely removed.
- To power off the device , press and hold the button for at least 3 seconds.
- The device is designed to be powered for several hours by the same set of four “AA” batteries. A full battery icon will appear on screen when the total battery charge is full. A flickering low battery icon will appear on screen when the total battery charge drops below an operational threshold. To replace the batteries, follow the procedure as directed in this guide.
Recording Videos: In real-time recording mode, press the button to begin recording, the![]() icon on the screen, press again to stop recording.Taking Photos: In real-time camera mode, press the button to take a photo, the
icon on the screen, press again to stop recording.Taking Photos: In real-time camera mode, press the button to take a photo, the![]() icon on the screen will flicker once to indicate successfully take the photo and save.
icon on the screen will flicker once to indicate successfully take the photo and save.
- In recording mode, if no SD card is installed an error will appear.
- The video will be automatically saved as an individual file approximately every 4 minutes.
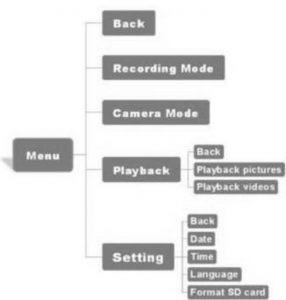
- When the SD card memory is full, the device will stop recording. You will either need to clear the memory on the inserted card, or insert a new card.Playback Videos/Pictures: Press theor button to select your desired video/picture and stop to pause.Delete Videos/Pictures: Press theorto select your desired video/picture, then press thebutton to either delete the selected item or all items. Alternatively, you may press the cancel button to exit.Date/Time Setting: In the setting mode, press or button to select Date/Time, and pressbutton to begin setting. Press the orbutton to increase or decrease in numbers, and press thebutton to confirm.Language Setting: In the Language setting mode, press thebutton to switch the language, and quit to select the language. Pressing the button will switch to the next language. Supported languages: English, Deutsch, Français, Nerderlands, 简体, 繁體 , 日本, Español, Pусский.Format SD card: In the setting mode, pressbutton to select Yes or No to continue the action.
Icons prompt: ![]()
![]()
![]()
 SD card is not installed.
 The camera is not connected.
![]() There is no SD card found.
There is no SD card found.![]() The video is deleting
The video is deleting![]() Deletion has completed
Deletion has completed![]() No data on the SD card
No data on the SD card![]() SD card memory is full
SD card memory is full![]() SD card is formatting SD card format has completed
SD card is formatting SD card format has completed
|
Problem |
Possible Causes |
Likely Solutions |
|
The system can not be started |
1. The batteries have not been installed. 2. The batteries are not installed correctly. 3. The batteries have run out off power. |
1. Make sure the batteries are installed before starting the system. 2. Make sure the batteries are installed correctly as instruction. 3. Make sure the batteries are new or with enough power. |
|
Image too dark or light |
1.LEDs on camera need adjustment. 2.The flashlight affects. |
1. Adjust the brightness of LEDs according to the inspecting environment. 2. Turn on / off the flashlight as the auxiliary lights if necessary. |
|
Camera LED does not light and no image |
1. The camera runs out of power. 2. The connection problem between the main body and the camera probe. 3. The camera is damaged. |
1. Change the new batteries. 2. Reconnect connections between the main body and the camera probe. 3. Separate the camera probe from the main body, and replace a new one. |
|
Micro SD card can not be read |
1. SD card problem. 2. System breakdown. |
1. Make sure the Micro SD card is fine and not more than 32G. 2. Restart the system. |
|
The video image is not so smoothly |
1. The transmission speed of the Micro SD card is less than 6MB/sec. |
1. Use the Micro SD card with transmission speed 6MB/sec or above. |
|
The video is not recorded |
1. Power off when recording. 2. The Micro SD card is full. |
1. Finish the video recording before the battery is running low. |
|
|
MAINTENANCE TIPS
Do not insert or bend the probe by force as over bending any section of the probe to a radius of less than 40mm will permanently damage the delicate internal cables.Do not force a Micro SD card either into or out of the Micro SD card slot in the device. Performing either of these actions will damage the slot and Micro SD card. To protect the device and the Micro SD card, please power off the device before inserting or removing the Micro SD card.
Contact Us
Distributed by: TechBrands by Electus Distribution Pty. Ltd. 320 Victoria Rd, RydalmereNSW 2116 Australia Ph: 1300 738 555 Int’l: +61 2 8832 3200 Fax: 1300 738 500www.techbrands.com Made in China
References
[xyz-ips snippet=”download-snippet”]