
Protech Cordless Screwdriver User Manual

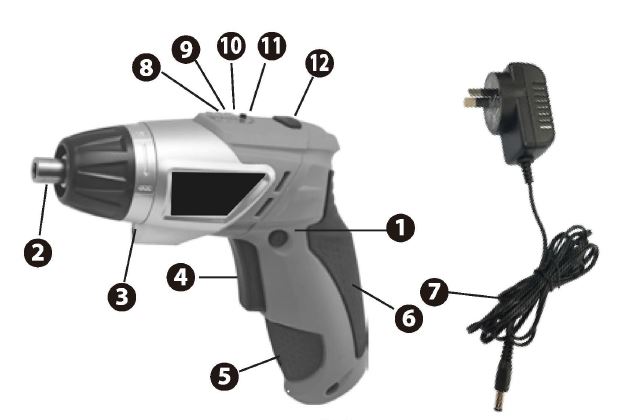
Figure 1
1. Forward/ Reverse rotating control2. Chuck3. Work light4. ON/OFF switch5. Charging socket6. Soft grip handle7. Charger8. Battery capacity indication9. Battery capacity indication10. Battery capacity indication & Charging indicator11. Battery capacity indication switch12. Handle release button
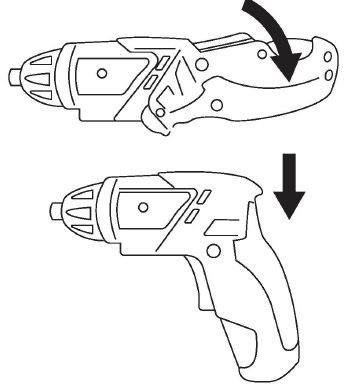
The screwdriver can be used extended or in “pistol grip” by adjusting the position of the handle.
To change from straight to pistol grip, depress the handle release button and rotate the handle of the unit anticlockwise until it clicks into position. To return to the straight position, reverse the process.
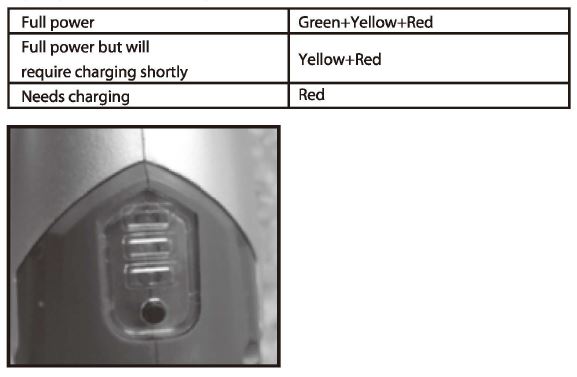
You can press the battery charge display switch to show the battery capacity. When the battery charge display lights up red the battery has less than 30% of its capacity and should be charged.
General Safety Rules
Warning: Read and Understand all instructions.Failure to follow all instructions listed below, may result in electric shock, fire and/or serious personal injury.Save all warnings and instructions for future reference.
WORK AREA
- Keep work area clear and well lit. Cluttered benches and dark areas invite accidents.
- Do not operate power tools in explosive atmospheres, such as in the presence of flammable liquids, gases, or dust. Power tools create sparks, which may ignite the dust or fumes.
- Keep children, bystanders and visitors away while operating a power tool. Distractions can cause you to lose control.
ELECTRICAL SAFETY
- Power tools plug must match the outlet. Never modify the plug in any way. Do not use any adapter plugs with earthed (grounded) power tools.
- Avoid body contact with earthed or grounded surfaces, such as pipes, radiators, ranges and refrigerators.
- Do not expose power tools to rain or wet conditions.
- Do not abuse the cord. Never use the cord for carrying, pulling or unplugging the power tool. Keep cord away from heat, oil, sharp edges or moving parts. Replace damaged cords Immediately. Damaged cords may create a fire.
- Use only with TD2508 charger. If operating a power tool in a damp location is unavoidable, use a residual current device (RCD) protected supply.
PERSONAL SAFETY
- Stay alert watch what you are doing and use common sense when operating a power tool. Do not use a power tool while you are tired or under the influence of drugs, alcohol or medication. A moment of inattention while operating power tools may result in serious person injury.
- Use safety equipment. Always wear eye protection. Dust mask, non-skid safety shoes, hard hat, or hearing protection must be used for appropriate conditions.
- Remove any adjusting key or wrench before turning the power tool on.
- Do not overreach. Keep proper footing and balance at all times. Proper footing and balance enable better control of the tool in unexpected situations.
- Dress properly. Do not wear loose clothing or jewellery. Contain long hair. Keep your hair, clothing and gloves away from moving pans. Loose clothes, jewelry, or long hair can be caught in moving parts.
- If devices are provided for the connection of dust extraction and collection facilities, ensure these are connected and properly used.
POWER TOOL USE AND CARE
- Do not force the power tool. Use the correct power tool for your application.
- Do not use the power tool if the switch does not turn it on and off.
- Disconnect the plug from the power source and/or the battery pack from the power tool before making any adjustments, charging accessories, or storing power tools.
- Store idle power tools out of the reach of children and other untrained persons. Tools are dangerous in the hands of untrained users.
- Maintain power tools with care. Check for misalignment or binding of moving parts, breakage of parts and any other condition that may affect the power tools operation. If damaged, have the power tools repaired before use.
- Keep cutting tools sharp and clean.
- Use the power tool, accessories and tool bits etc. in accordance with these instructions, taking into account the working conditions and the work to be performed. Accessories that may be suitable for one tool may create a risk of injury when used on another tool.
SERVICE
- Tool service must be performed only by qualified repair personnel. Service or maintenance performed by unqualified personnel may result in a risk of injury.
- When servicing a tool, use only identical replacement parts. Follow instructions in the Maintenance Section of this manual. Use unauthorized parts or failure to follow Maintenance Instructions may create a risk of shock or injury.
Working with the cordless screwdriver. (Attention! Before starting up the screwdriver, familiarize yourself with its proper use by carefully read through the instructions before use.)
SPECIFIC SAFETY RULES
Hold tool by insulated gripping surfaces when performing an operation where the cutting tool may contact hidden wiring. Contact with a “live” wire will also make exposed metal parts of the tool “live” and shock the operator.
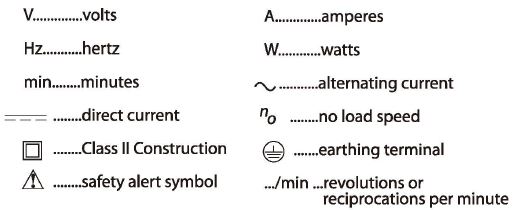
The label on your tool may include the following symbols:
GENERAL SPECIFICATION
Voltage: DC 4VNo load speed : 230RPMCharger: Input AC100~ 240V, 50Hz/60HzCharging time: Approx. 3-5 hoursBattery type: Li-ion 3.7V :-:-: 1300mAh
SCREWDRIVER BIT INSERTION
Select the screwdriver tip that best fits the fastener to be removed or installed. Place the bit into the screwdriver collet and ensure it is in all the way. The cordless screwdriver ONLY accepts 1/4 in. hex-shaft screwdriver bits.
The cordless screwdriver should only be used as a screwdriver. DO NOT attempt tom use the tool as a drill using drill bits with 1/4 in. hex-shafts. The cordless screwdriver does not have the speed necessary to be used as a drill.
NOTE
The internal battery is not fully charged. Before first use. the battery requires 5-8 hours charge time to be fully charged. Subsequent recharging needs 3-5 hours for the battery to be fully charged.
Always recharge internal battery when tool performance begins to diminish. Severe heat is most destructive to a battery; the moreheat generated, the faster the battery loses power. A battery that gets too hot can have a shortened life.
Never over-discharge a battery by using the tool even after tool performance has decreased. Do not attempt to discharge a tool’s battery by continuing to pull on the tool trigger. When tool performance begins to diminish, stop the tool and recharge the battery for optimal performance.
Charge internal battery at ambient temperatures between +50°F(10°C)-95°F(35°C). Store tool and battery in locations where temperatures will not exceed 120°F. This is important to prevent serious damage to the battery cells.
CHARGER
WARNING: Before using the AC battery charger unit, please read carefully all instructions and cautionary markings on charger, batteryand product using battery.
Use only the charger which accompanied your product or direct replacement as listed in this manual. Do not substitute any other charger.
Do not disassemble charger. Do not use charger if it has been damaged, left outdoors in the rain, snow, wet or damp environments, or immersed in liquid.
When the battery requires recharging, a 3-5 hour charge allows the tool to operate at full power. A charging indicator light on the charger will illuminate to show that charging is taking place.
CHARGING THE SCREWDRIVER
The cordless screwdriver has a rechargeable state-of-the-art Lithium- ion battery. The battery is charged with a charger that is plugged into the screwdriver on the end side of the handle. The charging unit uses common prongs (both prongs are the same) requiring no special polarized or grounded AC receptacles. Both the charger unit and the plug are moulded that cannot be opened for repair.
To charge the battery on the cordless screwdriver, use the following steps:
1. Plug the output cord of the charger into the socket as shown in Figure 12. Plug the charger into standard electrical outlet.
OPERATING THE CORDLESS SCREWDRIVER
Select the screwdriver tip that best fits the fastener to be removed or installed. Place the tip in the screwdriver collet and ensure it is in all the way. Insert the screwdriver tip into the fastener and squeeze the reversible trigger. The cordless screwdriver uses only one speed for all operations does not have the capability for variable speeds.
Press the lower portion of the trigger to turn the screwdriver tip in a forward (to the right) motion to install the fastener.
Press the upper portion of the trigger to turn the screwdriver tip in a reverse (to the left) motion to remove the fastener.
MAINTENANCE AND CLEANING
WARNING: No user serviceable parts inside.
Preventive maintenance performed by unauthorized personnel may result in misplacing of internal wires and components which could cause serious hazard.
Never allow any liquid to get inside the tool and never allow any part of the tool to become immersed in a liquid. TOOL LUBRICATION Your screwdriver has been properly lubricated and is ready for use.
D.C. MOTORS The motor in your tool has been engineered for many hours of dependable service. To maintain peak efficiency of the motor, we recommend every six months. Only a genuine all trade replacement motor specially designed for your tool should be used.
WARNING: To avoid accidents, always disconnect the tool and/or charger from power supply before cleaning. The tool may be cleaned most effectively with compressed dry air. Always wear safety goggles when cleaning tools with compressed air.
Ventilation opening and switch and switch levers must be kept clean and free of foreign matter. Do not attempt to clean by inserting pointed objects through opening.
CAUTION-Certain cleaning agents and solvents damage plastic parts. Some of these are: gasoline, carbon tetrachloride, chlorinated cleaning solvents, ammonia and household detergents that contain ammonia.
WARNING: Only use recommended accessories – use of unauthorized accessories can be hazardous and/or result in injury or damage.
This product contains lead, a chemical known to the State of California to cause cancer, and birth defects or other reproductive harm. Wash hands after handling!
WARNING: Changes or modifications to this unit not expressly approved by the party responsible for compliance could void the user’s authority to operate the equipment.
WARNING: FCC Part 15 marking and instructionMarking shall include:
This device complies with Part 15 of 1he FCC Rules. Operation is subject to the following two conditions:(1) This device may not cause harmful interference, and(2) This device mus1 accept any interference received, including interference that may cause undesired operation.
Instruction manual shall include:
- Warning: Changes or modifications to this unit not expressly approved by the party responsible for compliance could void the user’s authority to operate the equipment.”
- NOTE: This equipment has been tested and found to comply with the limits for a Class B digital device, pursuant to Part 15 of the FCC Rules. These limits are designed to provide reasonable protection against harmful interference in a residential installation.This equipment generates, uses and can radiate radio frequency energy and, if not installed and used in accordance with the instructions, may cause harmful interference to radio communications. However, there is no guarantee that interference will not occur in a particular installation. If this equipment does cause harmful interference to radio or television reception. which can be determined by turning the equipment off and on. the user is encouraged to try to correct the interference by one or more of the following measures:
- Reorient or relocate the receiving antenna.
- Increase the separa1ion between 1he equipment and receiver.
- Connect 1he equipment into an outlet on a circuit different from that to which 1he receiver is connected.
- Consult the dealer or an experienced radio/TV technician for help.
Distributed by:Electus Distribution Ply. Ltd.320 Victoria Rd, RydalmereNSW 2116 Australia
www.electusdistribution.com.au
Made in China
WARNING: Repairs should be made by an authorized repair center. Opening this tool could invalidate your warranty.
NOTE: Due to continuous product improvement, we reserve the right to change the product specification without prior notice.
[xyz-ips snippet=”download-snippet”]