![]()
X201 Full HD webcamUser Manual

What’s in the box
1 x Full HD Webcam1 x User Manual
Product Overview
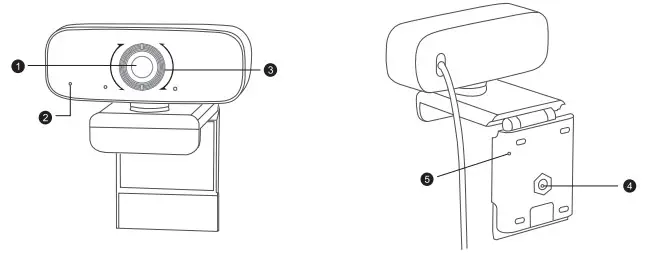
- HD Lens
- Noise Reduction Microphone
- Focus Ring
- Tripod Attachment
- Flexible Clip/base
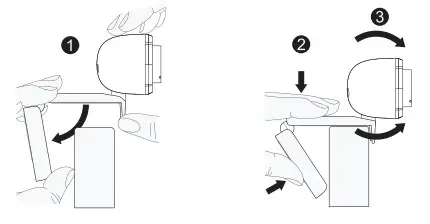
Setting up Your Webcam
- Place your webcam

- Connect to your computerNote: Make sure you are connected to the network.Note: If you can not use the camera within other apps, you will need to enable access.• Select Settings> Privacy > Camera and then turn on Allow apps to access your camera.If you still have trouble connecting the Webcam, please refer to FAQ sections starting from Page 4 .Focus Adjustment Manual focus webcam: Depending on the distance between you and the webcam, the video signal from the webcam may not be in focus, you can spin the focus ring to adjust the lens focal length. Auto-focus webcam: Wave in front of the camera, the webcam will automatically adjust the focus to the clearest state.
- Video calling requirements(1) A computer with speakers (or a headset).(2) Install video-calling applications such as Skype, FaceTime, Yahoo!, Messenger, Zoom, Hangout. As well as a USB camera and video calling applications (both callers need);(3) Confirm your internet connection (e.g.DSL, T1 or WiFi);
- View camera on MacMac users can use the Photo Booth app, which is already installed with the OS. This will allow you to preview the camera images, capture still frames, and video clips. To begin, select the Finder button, click Applications, and start Photo Booth.
 Note: Make sure you are connected to the network.Note: If you can not use the camera within other apps, you will need to enable access.• Select Settings> Privacy > Camera and then turn on Allow apps to access your camera.If you still have trouble connecting the Webcam, please refer to FAQ sections starting from Page 4 .Focus Adjustment Manual focus webcam: Depending on the distance between you and the webcam, the video signal from the webcam may not be in focus, you can spin the focus ring to adjust the lens focal length. Auto-focus webcam: Wave in front of the camera, the webcam will automatically adjust the focus to the clearest state.
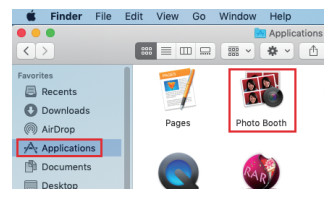
If you want to use the camera within other apps, you will need to enable access in the Mac OS Security & Privacy settings: Go to the Apple menu in the top left corner of the screen and choose System preferences.Select the Privacy tab then choose Camera from the left side list. Locate the app you want to enable camera access for and check the box alongside that app name to enable camera access for that application.To see an image from the camera in Photo Booth, you may need to select the camera from the list of attached devices in the app. At the top of your screen, click Camera in the app menu, and select the Full HD camera from the list of options.
FAQ
Q1: How do I know if my camera is recognized by the operating system? A: Connect the camera in any USB 2.0/3.0 port. It will take few seconds for recognizing after the camera is connected to the laptop. To ensure the camera has been installed correctly, check the Control Panel > System and Security > Device Manager.

To verify connectivity on Mac, you may click the Apple Menu (in the top left corner of your screen) and then click About this Mac. Click on System Report from the pop-up window that appears. The System Information window for your Mac will appear. Navigate to the USB Section and check if the webcam is listed as a connected device (like the photo below):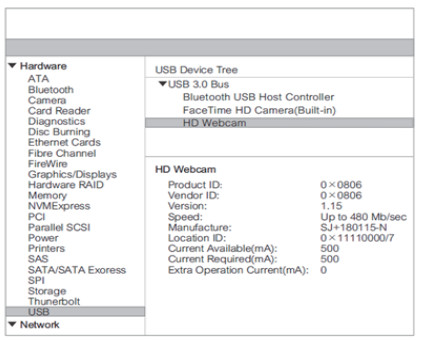 Q2: How can I use my webcam to record a video?A: For Mac OS Please open the Photo Booth video recording application that comes with the Mac OS system to start recording video, taking photos, or testing the webcam.There are three icon buttons of the Photo Booth: “Continuously take four photos”, “take a photo” and “video recording”. In photo mode, the middle button acts as a shutter button, press it to enter the photo countdown. In video capture mode, press it to start recording, press again to stop recording.For the Windows 8/10 systemSearch “Camera” in the search bar of the “Start” menu, double-click “Camera” to preview, record a video and test the camera. When you need to record a better quality video, you can download and install the AMCap video recording program (download address: https://amcap.en.softonic.com/).If you have more than one webcam installed, or if the image does not appear immediately, open the “Devices” menu in AMCap and select “USB live Camera” from the list. At the same time, make sure to select the microphone “USB live Camera Audio”, and select ” Preview” in the “Options” tab. The video signal of the webcam will be displayed on the AMCap screen. Please do not open multiple AMCap interfaces to avoid abnormal image displays.Q3: What is the frame rate of video recording? A: webcam captures crystal clear images and records a 1080p/30fps video in a well-lighted environment. Also, please ensure smooth network transmission when chatting online. The frame rate may drop to 20fps in low light conditions or low bandwidth.Q4: Why my webcam cannot record any sound? Why do I hear echoes during video calls?A: Windows, go to Control Panel > Sound. Select the webcam as the default communication device for playback and recording.
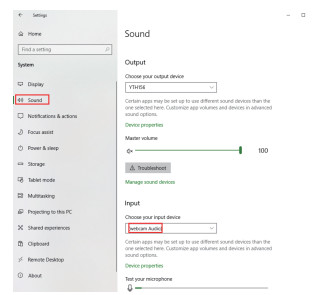
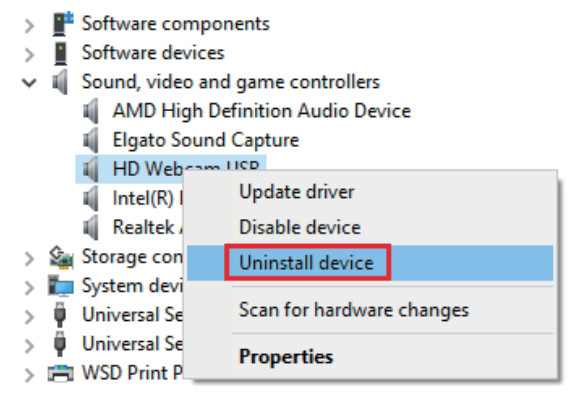
Mac, go to System Preferences > Sound. Select webcam as the default device for sound input and output. In your video/audio calling application, check the audio settings and make sure that the webcam is selected for both the speaker and microphone. Then, check the video settings and verify that webcam is selected for the camera.Q5: What should I do if my Windows 7 computer says a driver is needed/ the webcam is not plugged & play? A: Because Windows 7 is the end of support, your PC with Windows 7 might says a driver is needed or the device is not recognized. Please test the webcam directly in Skype/ Zoom.Q6: Why does the microphone still not work even though it is being recognized by my computer? A: This could mean there is a communication issue happening between the camera and your computer.Navigate to Computer Management > Device Manager > Sound, video, and game controllers and click to expand the menu. Locate the HD Webcam USB option, right-click and select “Uninstall device”.
Once the webcam has been uninstalled, unplug the USB cord from your computer and then plug it back into the USB port. The webcam will automatically install on the new driver. Wait about 1 minute and verify if the microphone is working properly.
Q7: How can I use my webcam in chatting software, like Skype or FaceTime?A: For FaceTime on MacIf your Mac has a built-in camera already, open FaceTime, click Video on the top left of your screen, and choose the name of your webcam to use it.
 For Skype on MacBefore running Skype, please make sure that all other applications using the webcam are closed. Failed to do so means that Skype may not recognize the webcam. It is highly recommended to update your Skype to the latest version. Once you have installed Skype and started it up, select Preferences from the Skype menu in the top left corner of your screen (like the photo below):
 In the Audio/Video tab, select the name of your webcam in the Camera drop-down menu.

For Skype on Windows 10
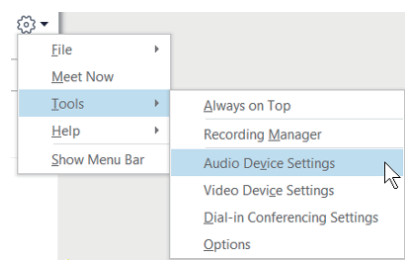
- In the Skype for Business main window, click the arrow next to the Options button, and select Tools > Audio Device Settings.
- Under Audio device, choose the device you want.
- Click the green arrow next to Speaker to hear a sample tone, and drag the slider if you need to adjust the volume.
- To test your microphone volume, speak into it for a few seconds. The volume is optimal when the progress bar reaches the middle of the test area. Drag the slider next to the Microphone to adjust the microphone volume.

For ZoomWhen you first join a meeting, Zoom will work to test your speakers automatically. If you don’t hear the ringtone, use the drop-down menu or dick No to switch speakers until you hear the ringtone. Click Yes to continue to the microphone test.

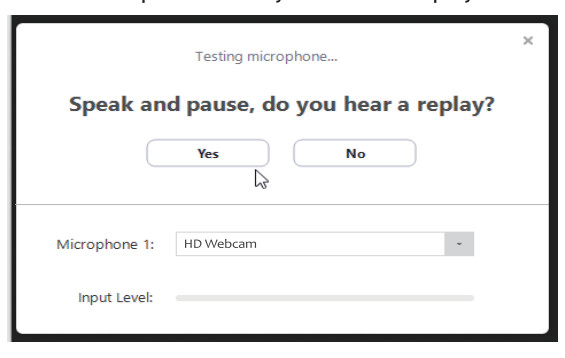
Next, Zoom will ensure you can be heard by others by testing your connected microphone. If you don’t hear an audio replay, use the drop-down menu or click No to switch microphones until you hear the replay. Click Yes when you hear the replay.
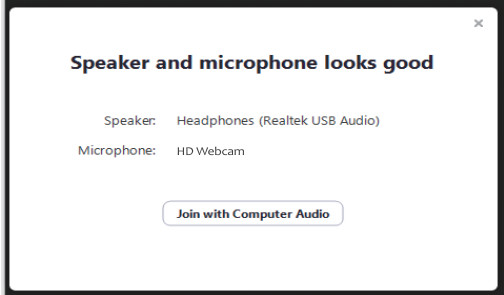
Click Join with Computer Audio to finish testing and join the meeting.
 Q8: Why can’t I reach 1080p with my video calling applications?A: There are various constraints on the system that could impede the ability to attain a 1080p video calling session. They center around processing power (i.e. CPU speed) and available network bandwidth.In all cases, review the requirements from the video calling application. They will guide as to the system performance required as well as the necessary bandwidth. For a manual focus webcam, please gently rotate the lens ring until it is clear. For autofocus webcam, please wave your hand in front of the webcam, it will adjust the focus automatically.Q9: Why is there flickering or banding on the video feed when I use the webcam?A: This might be due to lighting inconsistencies in your room. To resolve this, open the video control panel of your video capture software and change the frequency response rate to either 50Hz or 60Hz, depending on your region. The camera defaults to indoor mode. Please do not aim the camera at the light source directly.Q10: What can I do if the image shows abnormal color?A: For Windows, Please download PotPlayer software on your computer and add this camera to it.While using this camera to stream video on the PotPlayer, click the Setting button then adjust the Brightness or other image settings. Then you can use another software to start video calls.Q11: Does my webcam support Linux system?A: The Linux system is supported if your Linux has UVC drive-free protocols. Otherwise, you have to install the Linux UVC driver manually.Q12: What should I do if photographed pictures are subjected to color cast?A: Please ensure that the light environment is free of unique tone or intense light, such as walls, floors and other large-area non-standard light environments of green-blue/intense.The video application is disordered or if you use a virtual application such as Chromacam and use another video application, please restore the default value.Q13: What’s wrong if the screen goes blank or black during local previewing of images?
A: The reasons for this issue may as follow:
- If the camera you choose is provided with H.264 encoding, as PC systems are generally 1.4 not supportive of H264 decoding, the screen would go blank or black when previewing is conducted using the previewing software (e.g. AMCap) which is not supportive of I-1264 Sao NS. decoding; please download a video previewing application supportive of H.264 decoding.
- There is something wrong with the USB port; please change a USB port or another PC, and test.
- The PC does not recognize the camera device.
- The operating system and computer configuration do not satisfy the requirements Pir of the camera.
- The video preview feature of the application is not turned on, or the privacy feature prohibits access to the camera.
Q14: How to adjust my image parameters, such as brightness or contrast?For SkypeClick Settings, select Audio & Video, then click Webcam settings.
 You can adjust any image parameter you want according to different usage environments.
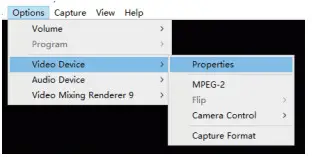
 For AMCapClick Option, select Video Device, then click Properties.
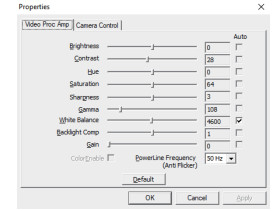
 You can adjust any image parameter you want according to different usage environments.
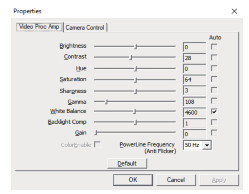 ProXtend Webcam Series:
 report this ad
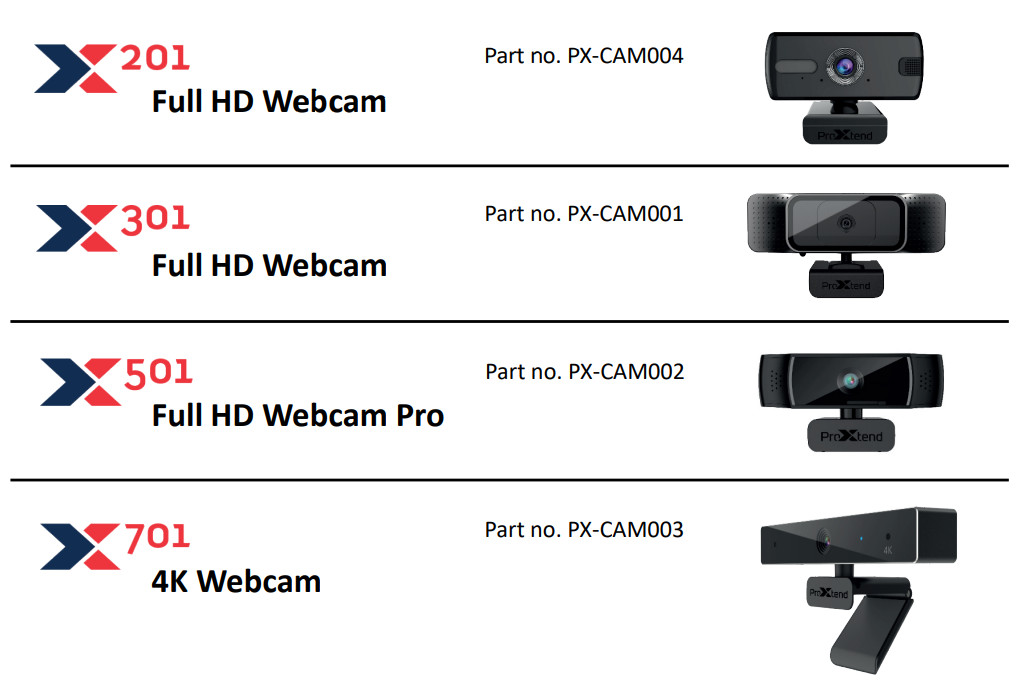
[xyz-ips snippet=”download-snippet”]