
A 1st-Generation Network and Serial Camera Controller
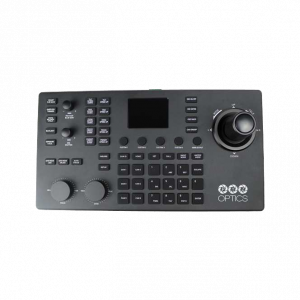
PT-SUPERJOY-G1
Quick Start GuideV1.0
ptzoptics.com || 1 800 486 -5276
1. Powering the Controller
You can power your joystick controller using the included power supply or Power over Ethernet (802.3af). After applying power, make sure that the I/O switch, found on the rear panel, is flipped to “I” for “On”.
For best results, do not power the joystick controller using PoE and the power supply at the same time.
2. Connecting to the Camera(s)
Before adding the cameras to the joystick, you first need to set up a communication method.
Serial ConnectionTo connect to your camera(s) over a serial connection, use the included RS-232C (RS-232) or high quality certified cabling (RS-485 & RS-422) for proper communication.
When utilizing an RS-232 connection, you will need cascading VISCA cables in order to connect cameras 2-7.
Network ConnectionThe PT-SUPERJOY-G1 will automatically obtain an IP address upon connection to your Local Area Network (LAN) as long as the LAN supports a DHCP server. Alternatively, you can assign a local static IP address for use on a LAN that does not feature a DHCP server.
You will need to know the camera’s IP address & network control port to add it to the joystick over the LAN.
3. Adding Cameras to the Controller
Now that the cameras can properly communicate with the joystick controller, it’s time to add them for control.
Joystick On Screen Display Menu Configuration
- Press the [SETUP] button on the joystick controller to open the On Screen Display menu.
- Select “Network Device” or “Serial Device”. Fill out the information below.a. Add Network Devicei. Cam ID (1 – 7)ii. Protocol (VISCA UDP, VISCA TCP, & Sony UDP)iii. IP Address (Camera IP address)iv. Port (Camera control port)b. Add Serial Devicei. Cam ID (1 – 7)ii. Protocol (VISCA, PELCO-D, & PELCO-P)iii. Address: (Set camera to same address as Cam ID for best results)iv. Baud Rate (1200, 2400, 4800, 9600, 19200, 38400, & 115200)
- Once all fields are filled, press the [ENTER] button to save the camera to the controller.
Network Web Interface Configuration
- Using a computer on the same LAN, type in the controller’s IP address into a web browser.
- Go to the Device Management tab, and click the “Modify” button in the Operate column of the camera address you wish to add.
- Fill out the Network or Analog information based on the connection with your cameras.
Rev 1.0 9/20
4. Controlling the Camera(s)
Now that the camera(s) are added to the joystick controller, you have the capability to pan, tilt, zoom, set & call presets, adjust the camera’s image, adjust the camera’s On Screen Display (OSD) Menu, and more.
Pan, Tilt, and Zoom ControlThe joystick controller supports variable speed pan, tilt, and zoom control. You can use the Speed Dial located on the top left corner to adjust the P/T/Z speeds. In addition to the joystick itself, you can use the Fine Tune Zoom Dial to zoom in and out at the slowest rate.
Set & Call PresetsThe joystick controller supports up to 255 P/T/Z presets per camera. The first 9 are Quick Presets.
1 – 255 Set & Call
- Move the camera to the location you wish to set the preset.
- Press the [SET] button
- Using the Alpha-Numeric keypad, type in a preset number to associate with the preset. Press [ENTER] to save the preset.
- To call the preset, press the [CALL] button, and type in a preset number. Press the [ENTER] key to call the preset.
1 – 9 Quick Presets
- Move the camera to the location you wish to set the Quick Preset.
- Press and hold 1 – 9 on the Alpha-Numeric keypad for 3+ seconds to save the preset.
- To call a Quick Preset, tap the Alpha-Numeric button associated with the preset position.
Adjust the Camera’s ImageThe joystick controller supports multiple ways to adjust the camera’s image.
White Balance
- Use the [WHITE BALANCE MODE] button to cycle through the available White Balance modes. Available White Balance Modes: Auto, Indoor, Outdoor, OnePush, & Manual.
- Use the [RED GAIN / BLUE GAIN] dial to adjust the Red and Blue Gain values while in Manual mode.
- Use the [ONEPUSH TRIGGER] button to calculate the white balance while in OnePush mode.
Exposure
- Use the [EXPOSURE MODE] button to cycle through the available Exposure modes. Available Exposure Modes: Auto, Manual, Shutter Priority, Iris Priority, & Brightness Priority.
- Use the [IRIS / SHUTTER] dial to adjust the Iris and Shutter values while in Manual / Iris Priority or Manual / Shutter Priority mode respectively.
- Use the [BACKLIGHT] button to enable or disable the Backlight Compensation.
Focus
- Use the [NEAR / FAR] dial to adjust the focus value while in manual focus mode.
- Use the [AUTO FOCUS] button to enable auto focus mode.
- Use the [FOCUS LOCK] or [FOCUS UNLOCK] button to lock or unlock the focus from the current position.
Rev 1.0 9/20
Camera On Screen Display Menu
The joystick controller can traverse the camera’s OSD Menu in order to adjust many settings not directly available on the joystick.
- Press the [OSD OPEN / CLOSE] button.
- Move the joystick up or down to traverse the camera’s OSD menu.
- Press the [OSD ENTER] button to select a specific option.
- Move the joystick left and right to adjust the settings.
- Press the [OSD BACK] button to return to the previous window.
- Press the [OSD OPEN / CLOSE] button again to close the camera’s OSD menu.
Additional Info
For more information about the PT-SUPERJOY-G1 joystick controller, view the user manual at ptzoptics.com/resource-library/.
Support
- To troubleshoot the controller, see the Troubleshooting section of the user manual.
- For more information not covered in the quick start guide or user manual, check out the knowledge base at help.ptzoptics.com/support/home.
- If you need to reach out to our support team, you can reach them by submitting a ticket athelp.ptzoptics.com/support/login or emailing [email protected].
Warranty
The PT-SUPERJOY-G1 includes a 2 Year Limited Warranty. This warranty covers all manufacturers defects, and any damage that is done to the joystick during shipping. This warranty does not cover physical damage to the joystick that is due to lack of proper care. If you have trouble with your joystick and wish to see if it is covered under the manufacturer’s warranty, please contact our support team by using the methods above.
Rev 1.0 9/20
References
[xyz-ips snippet=”download-snippet”]