https://www.youtube.com/playlist?list=PLjxyU2ftlF9B4ixlqgqSqlRcpKfFy27XxScan the QR code for install/feature overview for the L84 Pulsar LT.
Read Me
Safety Warning & Caution
Throughout this User Manual, you will see important messages regarding your safety or the protection of your vehicle. These messages are designated by the words WARNING, AUCTION, or NOTICE.WARNINGA WARNING indicates a hazardous situation that, if not avoided, will result in death or serious injury.
CAUTIONA CAUTION indicates a hazardous situation that, if not avoided, could result in minor or moderate injury.NOTICEA NOTICE indicates a condition that could cause damage to the product or your vehicle.NOTEA NOTE is a step or reminder that is important to remember when installing or using the product. The product you have purchased is a high-performance product. As such, it does present some risks of which you should be fully aware. Do not use this product until you have carefully read the following safety information and the Owner Agreement.
WARNING: Prior to using, read the User Manual. Misuse of the device could result in traffic accidents, death or serious injury, and/or damage to your vehicle. POWERTECH IS NOT RESPONSIBLE FOR AND SHALL HAVE NO LIABILITY TO YOU FOR ANY CLAIMS ARISING OUT OF OR RELATING TO ANY MISAPPLICATION OF THE DEVICE, CUSTOM TUNES, IMPROPER USE OF CALIBRATIONS, MALFUNCTION, OR LACK OF LEGAL COMPLIANCE FOR USTOM PROGRAMS CREATED BY THIRD PARTIES.
Safety Guidelines
WARNINGBefore using the device, read and understand the user manual, including these additional safety instructions. Failure to do so could result in DEATH or SERIOUS INJURY.
- Do not exceed legal speed limits on public roadways. Violating traffic laws is dangerous and could result in injury or vehicle damage or both.
- Use any enhanced speed capabilities of this product only in closed circuit, legally sanctioned racing environments expressly for this purpose. Violating traffic laws is dangerous and could result in injury or vehicle damage or both.
- Do not operate the device while driving. Distracted driving could result in traffic accidents, death or serious injury, and/or damage to your vehicle.
- Always perform all adjustments or changes while stopped. Changing a setting while driving can interfere with your attention to roadway conditions and could result in injury or vehicle damage or both.
- Do not stack products. “Stacking” performance-enhancing devices or other improper installation can cause power train failure on the road. Other products may have features incompatible with your device. Follow all installation and operating instructions.
- Some modifications may affect other parts of your vehicle. For example, if you remove/adjust the speed limiter in your vehicle, be sure your tires and other components are rated for the increased speeds they will have to withstand. Not doing so can lead to loss of vehicle control. Modify the speed limiter only for use in closed circuit, legally sanctioned racing environments, not for use on public roadways.
NOTE: The stickers included in some products apply to products that have received CARB exemption for emissions compliance.This product may meet the emissions compliance requirements of the California Air Resources Board and the Federal Environment Protection Agency. If so, it is legal for sale and uses on pollution-controlled vehicles operated on public streets and highways. The device must be installed and operated according to the instruction provided in this user manual. Included with these compliant products is a sticker for you to keep in your vehicle. You can either adhere it somewhere on the vehicle (e.g., the inside end of the river’s door) or simply store it in your glove box. The purpose of these stickers is to inform anyone who may have questions regarding the use of this product and how it affects emissions. For example, it would be something to show an emissions technician if questioned when taking your vehicle in for an emissions check to let him/her know the product is CARB emissions compliant.
Installation L84 Pulsar LT
Materials
 Required Tools
- Small Flat Head Screwdriver
- 10mm Socket
- Socket Wrench
- Socket Extension
Pulsar LT Installation
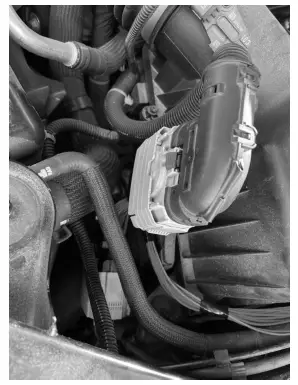
STEP 1 – Before installation, remove the negative side battery terminal.STEP 2 – Release the red locking tab by pushing the red tab up as shown on the right.
 |
 |
STEP 3 – Press the bottom right tab on the connector inward to release. Then the connector can slide upwards toward the red tab to take it apart as shown above.STEP 4 – Release the locking tab in the back of the connector with a pick or small flathead screwdriver as shown below.
 |
|
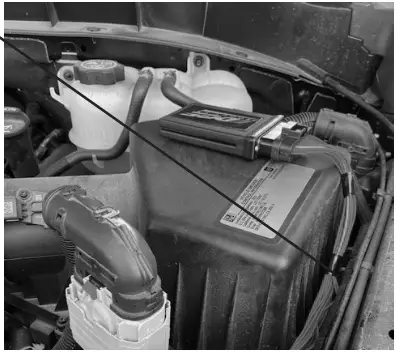
NOTE: The connector is located under the hood driver’s side by the air intake as shown in the above image.
|
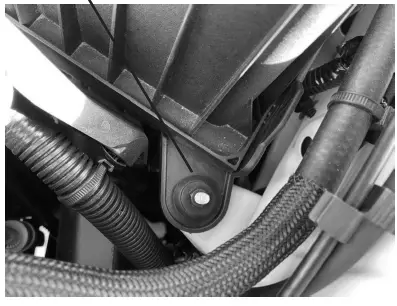 |
STEP 5 – Remove the zip tie tree from the bracket as seen to the right.STEP 6 – Locate and remove the factory nut holding down the front of the air intake as seen in the picture with a 10 mm socket.STEP 7 – Install the supplied bracket as shown in the picture. Reinstall the factory nut and tighten it by hand.
|
 |
STEP 8 – Install the supplied Pulsar LT harness and rotate the bracket so that the wires going through the frame are not rubbing. Then tighten the factory nut.STEP 9 – Install the harness onto the factory mounting tab and then route the harness.STEP 10 – Install the module and Velcro to the top of the airbox. It is a good idea to clean the back of the module and the top of the airbox with an alcohol wipe before installing the Velcro.STEP 11 – Reinstall the negative side battery terminal.
Programmable Features
NOTE: To access the programming menu of the device, cruise control must be turned off. Each feature adjustment requires a new programming session. The vehicle has to be running to turn off cruise control.Access the programming menuSeven modes can be accessed through the programming menu. The speedometer (MPH) gauge is used to display the modes and programming inputs. The cruise control switches will be used to navigate the programming menu.10 – Speed Limiter Adjustment (82-140 MPH)20 – TPMS Adjustment (1-99 PSI)30 – Tire Size Correction (Input stock then modified sizes for front and rear tires)40 – Axle Ratio (Input stock then modified axle ratio)50 – Clear DTC’s60 – Auto Start/Stop Disable70 – DFM Disable (Will also disable Auto Start/ Stop)STEP 1 – The vehicle must be turned off.STEP 2 – Without putting your foot on the brake pedal hold the Start Engine button until the truck gauges turn on and green light is seen on the start button. (approx. 5 seconds)STEP 3 – Adjust the vehicles screen cluster to the digital speedometerSTEP 4 – Hold the cancel cruise control button until the speedometer sweeps to 140. (Approx. 5 seconds)STEP 5 – Use the +RES or –SET wheel to navigate to the desired programming mode.STEP 6 – Press the cancel cruise control button to select the mode.STEP 7 -The speedometer gauge will sweep and then stop at the current programmed condition. (The stock input will be displayed if not previously adjusted.)NOTE: During programming, the seatbelt warning light may activate.
Speed Limiter
After accessing speed limiter programming mode, adjustment between 82 and 140 MPH can be input.STEP 1 – Access the Programming Menu.STEP 2 – Using +RES or -SET, select mode 10 (MPH).STEP 3 – Use +RES or -SET wheel to adjust to the desired value.STEP 4 – Press the cancel cruise control button to save the input value.STEP 5 – The speedometer will sweep to 140 MPH indicating the function is complete.
TPMS – Tire Pressure Monitor System
After adjusting the TPMS inflate to number, the min and max values automatically adjust. This mode reprograms the vehicle ECM.STEP 1 – Access the Programming Menu.STEP 2 – Using +RES or -SET, select mode 20 (MPH)STEP 3 – Use the +RES or –SET wheel to adjust to the desired value between 25 and 99 (PSI).STEP 4 – Press cancel cruise to select.STEP 5 – Speedometer sweeps to 140 MPH for 3 seconds indicating TPMS has been selected.
Tire Size
Input Stock and Modified Tire Size.STEP 1 – Access the Programming Menu.STEP 2 – Using +RES or -SET, select mode 30 (MPH)
Tire Size Cont’d
STEP 3 – Enter Stock Tire SizeExample: 33.5” Tire- Whole Number = 35, Decimal = 5a. Using +RES or -SET, adjust to the Stock Tire Whole number.b. Press cancel cruise to save the input.c. Using +RES or -SET, adjust the Stock Tire Decimal number.d. Press cancel cruise to save the input.STEP 4 – Enter Modified Tire Sizea. Using the +RES or -SET wheel to adjust to the Modified Tire Whole number.b. Press cancel cruise to save the input.c. Use the +RES or -SET wheel to adjust the Modified Tire Decimal number.d. Press cancel cruise to save the input.STEP 5 – The speedometer will sweep to140 MPH, indicating the function is complete.NOTE: Adjusting Tire Size will modify the vehicle’s displayed speed, correct the size of the modified tire.
Axle Ratio
Input Stock and Modified Axle Ratio.STEP 1 – Access the Programming Menu.STEP 2 – Using the +RES or -SET, select mode 40 (MPH)STEP 3 – Press cancel cruise to select.STEP 4 – Enter Stock Axle Ratio.Example: 3.73 Axle- Whole Number = 3, Decimal = 73a. Using +RES or -SET, adjust to the Stock Axle Whole number.b. Press cancel cruise to save the input.c. Using +RES or -SET, adjust the Stock Axle Decimal number.d. Press cancel cruise to save the input.STEP 5 – Enter Modified Axle Ratio.a. Using +RES or -SET, adjust to the Modified Axle Whole number.b. Press cancel cruise to save the input.c. Using +RES or -SET, adjust the Modified Axle Decimal number.d. Press cancel cruise to save the input.
Axle Ratio Cont’d
STEP 6 – The speedometer will sweep to 140 MPH, indicating the function is complete.
Clear DTC’s
STEP 1 – Access the programming menu.STEP 2 – Using +RES or -SET, select mode 50 (MPH)STEP 3 – Press cancel cruise to select.STEP 4 – The speedometer will sweep to 140 MPH, indicating the function is complete.
Auto Start/Stop Disable
STEP 1 – Access the Programming Menu.STEP 2 – Using +RES or -SET, select mode 60 (MPH)STEP 3 – Use the +RES or –SET wheel to adjust to the desired value.a. 0 = Auto Start/Stop is activeb. 10 = Auto Start/Stop is disabledSTEP 4 – Press the cancel cruise control button to save the input value.STEP 5 –The speedometer will sweep 0 to 140 MPH indicating the function is complete.
DFM (Dynamic Fuel Management) Disable
Disabling DFM will automatically disable Auto Start/StopSTEP 1 – Access the programming menu.STEP 2 – Using +RES or -SET, select mode 70 (MPH)STEP 3 – 3. Use the +RES or –SET wheel to adjust to the desired value.a.0 = DFM is activeb.10 = DFM is disabledSTEP 4 – Press the cancel cruise control button to save the input value.STEP 5 – The speedometer will sweep 0 to 140 MPH indicating the function is complete.
Responsiveness Level Adjustment
When the vehicle is running and cruise control is turned off, the vehicle’s throttle responsiveness can be adjusted. The responsiveness level is indicated using the vehicle’s speedometer.STEP 1 – Using the +RES or -SET, adjust to the desired value.Level 0 = StockLevel 1 = Reduced responsiveness (up to 15% less than stock)Level 2 = Increased responsiveness (up to 15% over stock)Level 3 = Increased responsiveness (up to 30% over stock)Level 4 = Increased responsiveness (up to 48% over stock)Level 5 = Increased responsiveness (up to 65% over stock)STEP 2 – To recall the vehicle’s performance level, press the cancel cruise control button.
Update Software
Downloading Update Agent 1.0 (Optional)
The Update Agent may be used to update the device via the USB connection.The software can be downloaded through the internet. This process currently can only be done on a Windows computer, Mac devices are not supported.NOTE: It is recommended to install Update Agent 1.0 on a laptop computer for best accessibility (you will need to connect the computer to the vehicle’s OBDII port to perform updates).STEP 1 – Go to a computer with internet access, and go to one of the following websites: superchips.com – diablosport.com – edgeproducts.comSTEP 2 – Go to the website’s Updates/Downloads tab and click the link “Download Update Agent 1.0” and save the .exe file to a findable location on the computer.STEP 3 – Run the .exe installation program that you downloaded, and read through the license terms and conditions, check the agreement box and click Install. Continue through the installation until it says Installation Successfully Completed. Click Close to finish the process.NOTE: If given a Security Warning pop-up upon install, click run to proceed.Also, if asked, install Holley USB CAN Driver as well as Update Agent 1.0. This driver is required to connect to the device.

Product Updates (Optional)
This device has the ability to update via a USB connection. A USB to OBDII update cable is required to perform the update. The cable is sold separately. It is recommended that a battery charger be attached and turned on during the update process.NOTE: The Pulsar LT must be installed into a vehicle before updating. When updating, you CANNOT use your vehicle’s Wi-Fi. It will be disabled during the update process. Use an external source such as your home Wi-Fi.STEP 1 – Take a computer with Update Agent 1.0 installed to the location of the vehicle with the Pulsar device.STEP 2 – Turn the vehicle’s ignition to the RUN position (do not start the engine) then open Update Agent 1.0 on the computer, plug in USB to OBDII cable into both the vehicle’s OBDII port and a USB port on the computer.STEP 3 – Update Agent 1.0 should automatically detect the Pulsar LT device, follow onscreen instructions until it checks for an update. If an update is available, click yes.NOTE: If you have not yet registered for an account and/or signed in, you will be prompted to do so before you can proceed with the update.STEP 4 – Follow update steps as is shown onscreen. Do not power down the vehicle during the entire process unless prompted by the Update Agent. Once Update Agent 1.0 says “Your device is up-to-date,” click ok and disconnect the USB to the OBDII cable.
report this ad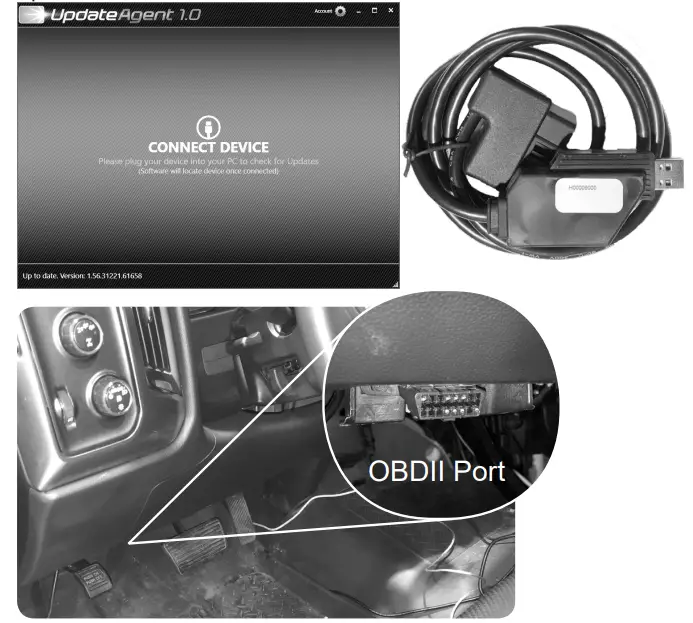
FAQs
Frequently Asked Questions
Question: Can I adjust power levels when cruise control is on?Answer: No, only when cruise control is off.NOTE: Cruise control can be used as normal, you just can’t change power levels when cruise control is on.Question: Should I remove the Pulsar LT prior to going to the dealer?Answer: Yes, please remove the Pulsar LT to eliminate it from the system so they can perform any updates or services.Question: How do I check what level I am on when cruise control is off?Answer: Simply press Cancel on the power steering keypad.Question: Can I “stack” or use other tuners with this device?Answer: No, please do not use any other tuners when the Pulsar LT is in use or installed. Stacking tuners with the Pulsar LT may cause serious damage to the vehicle.Question: What is the best way to accurately measure tire size?Answer: Mark a line on the ground where the center of the tire rests, then drive the vehicle for two full rotations of the tire and mark the spot where it comes to a rest with another line. Measure the length between the two lines and divide by two. Then divide that number by Pi π (3.14159265359).
Copyright© 2020D10024100 Rev01 05/11/2021For additional questions not found in the user guide call:Powerteq Technical Support: (801)-476-3343 6:00 am – 5:00 pm MSTTo expedite your support call, please have your Vehicle Information,Part Number, and Serial Number ready prior to calling Technical Support.
References
[xyz-ips snippet=”download-snippet”]