PURE RESONANCE AUDIO RMA350BT 350W Rack Mount Mixer Amplifier with Bluetooth Instruction Manual
SAFETY PRECAUTIONS
- Be sure to read the instructions in this section carefully before use.
- Make sure to observe the instructions in this manual as the conventions of safety symbols and messages regarded as very important precautions are included.
- We also recommend you keep this instruction manual handy for future reference.
SAFETY SYMBOL AND MESSAGE CONVENTIONS
Safety symbols and messages described below are used in this manual to prevent bodily injury and property damage which could result from mishandling. Before operating your product, read this manual first and understand the safety symbols and messages so you are thoroughly aware of the potential safety risks.
WARNING: Indicates a potentially hazardous situation which, if mishandled, could result in death or serious personal injury.
CAUTION: Indicates a potentially hazardous situation which, if mishandled, could result in moderate or minor personal injury, and/or property damage.
WARNING
WHEN INSTALLING THE UNIT
- Do not expose the unit to rain or an environment where it may be splashed by water or other liquids, as doing so may result in fire or electric shock.
- Use the unit only with the voltage specified on the unit. Using a voltage higher than that which is specified may result in fire or electric shock.
- Do not cut, kink, otherwise damage or modify the power supply cord. In addition, avoid using the power cord in close proximity to heaters, and never place heavy objects — including the unit itself — on the power cord, as doing so may result in fire or electric shock.
- Be sure to replace the unit’s terminal cover after connection completion. Because high voltage is applied to the speaker terminals, never touch these terminals to avoid electric shock.
- Be sure to ground to the safety ground (earth) terminal to avoid electric shock. Never ground to a gas pipe as a catastrophic disaster may result.
- Avoid installing or mounting the unit in unstable locations, such as on a rickety table or a slanted surface. Doing so may result in the unit falling down, causing personal injury and/or property damage.
WHEN THE UNIT IS IN USE
- Should the following irregularity be found during use, immediately switch off the power, disconnect the power supply plug from the AC outlet and contact your nearest dealer. Make no further attempt to operate the unit in this condition as this may cause fire or electric shock.
- If you detect smoke or a strange smell coming from the unit
- If water or any metallic object gets into the unit
- If the unit falls, or the unit case breaks
- If the power supply cord is damaged (exposure of the core, disconnection, etc.)
- If it is malfunctioning (no tone sounds)
- To prevent a fire or electric shock, never open or remove the unit case as there are high voltage components inside the unit. Refer all servicing to your nearest dealer.
- Do not place cups, bowls, or other containers of liquid or metallic objects on top of the unit. If they accidentally spill into the unit, this may cause a fire or electric shock.
- Do not insert or drop metallic objects or flammable materials in the ventilation slots of the unit’s cover, as this may result in fire or electric shock.
CAUTION
WHEN INSTALLING THE UNIT
- Never plug in or remove the power supply plug with wet hands, as doing so may cause electric shock.
- When unplugging the power supply cord, be sure to grasp the power supply plug; never pull on the cord itself. Operating the unit with a damaged power supply cord may cause a fire or electric shock.
- When moving the unit, be sure to remove its power supply cord from the wall outlet. Moving the unit with the power cord connected to the outlet may cause damage to the power cord, resulting in fire or electric shock. When removing the power cord, be sure to hold its plug to pull.
- Do not block the ventilation slots in the unit’s cover. Doing so may cause heat to build up inside the unit and result in fire.
- Avoid installing the unit in humid or dusty locations, in locations exposed to the direct sunlight, near the heaters, or in locations generating sooty smoke or steam as doing otherwise may result in fire or electric shock.
WHEN THE UNIT IS IN USE
- Do not place heavy objects on the unit as this may cause it to fall or break which may result in personal injury and/or property damage. In addition, the object itself may fall off and cause injury and/or damage.
- Make sure that the volume control is set to minimum position before power is switched on. Loud noise produced at high volume when power is switched on can impair hearing.
- Do not operate the unit for an extended period of time with the sound distorting. This is an indication of a malfunction, which in turn can cause heat to generate and result in a fire.
- Contact your dealer as to the cleaning. If dust is allowed to accumulate in the unit over a long period of time, a fire or damage to the unit may result.
- If dust accumulates on the power supply plug or in the wall AC outlet, a fire may result. Clean it periodically. In addition, insert the plug in the wall outlet securely.
- Switch off the power, and unplug the power supply plug from the AC outlet for safety purposes when cleaning or leaving the unit unused for 10 days or more. Doing otherwise may cause a fire or electric shock.
An all-pole mains switch with a contact separation of at least 3 mm in each pole shall be incorporated in theelectrical installation of the building.
PLEASE NOTE: Due to product upgrades, some of the features and specification in this user manual may or may not match the actual functions of the unit.
GENERAL DESCRIPTION
The highly efficient and lightweight Pure Resonance Audio RMA350BT mixer amplifier with MP3, tuner, and Bluetooth adopts a high-performance switching power supply and class H power amplifier chip combination with a 1U chassis design in a beautiful slim design.
FEATURES
- MP3 decoding module supports USB / SD / Bluetooth / FM playback automatic switch. Configure MP3 remote control, support power-off memory, and MIC recording function.
- Support 1 channel EMC input, 2 AUX input, 4 MIC input.
- Each channel has volume control function, master volume controls and bass/treble tone control.
- Level indicator, overload, and protection indicator, a good short circuit, overload, overheating protection.
- Mute, MIC input, MIC prior to line input, mute, and MIC1 prior to other audio input, EMC prior to all audio input.
- Channel priority: EMC> MIC1> MIC2 / MIC3 / MIC4 / AUX1 / AUX2 / MP3.
- The use of advanced and high performance power amplifier circuit, speaker output is 100V or 4 ohms; rated output power is 350W.
- AC power, power supply power 500W.
- Forced air-cooling fan from front to back, starting up in uniform speed rotation, and then speeds up when with the temperature is increasing, to meet the long working hours.
- 24V DC power interface for DC 24V backup or optional.
- 1U chassis design, high efficiency, lightweight, beautiful appearance.
FRONT PANEL
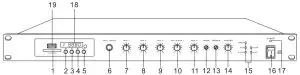
- SD / MMC card slot
- PREV / volume reduce
- Playback / Pause
- Next / volume plus
- MP3 mode selection
- MIC1 unbalanced input jack
- MIC1 volume control knob
- MIC2 volume control knob
- MIC3 volume control knob
- MIC4 / AUX1 volume control knob
- AUX2 volume control knob
- BASS adjustment potentiometer
- TREBLE adjustment potentiometer
- Master volume control
- PROT/70V/OL/CLIP/SIG status indicators
- The power switch
- The power indicator
- LED display
- USB interface
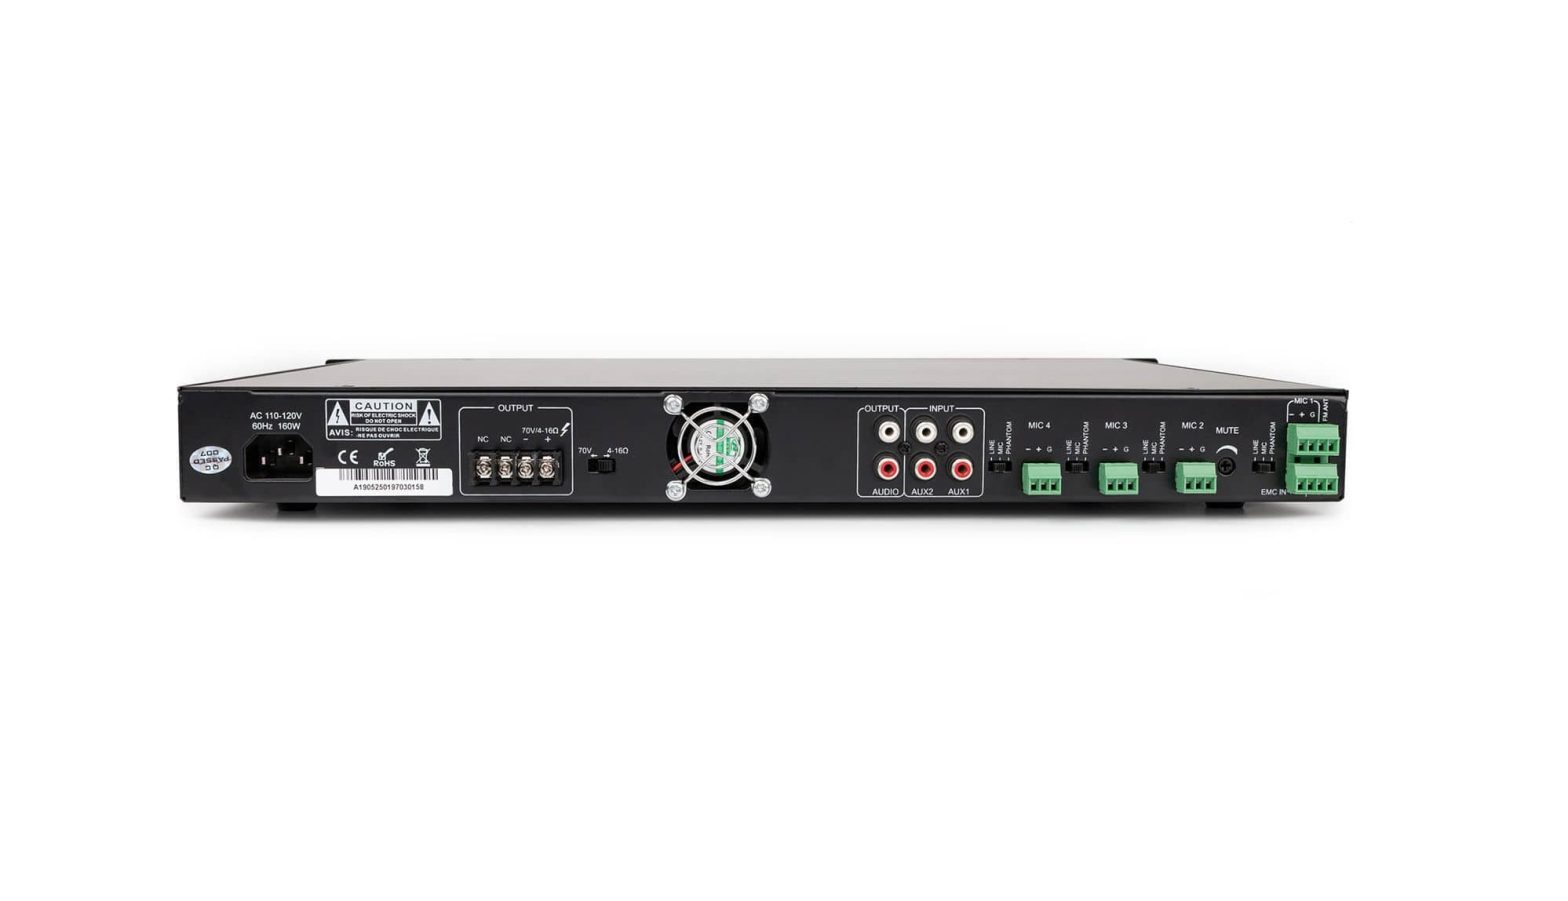
REAR PANEL
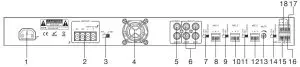
- AC power input socket
- 70V/4-16Ω output interface
- 70V/4-16Ω speaker output switch
- Cooling fan
- Line output interface, used to connect the line input interface
- 2 channel AUX input interface, used to connect AUX output interface
- Line input /Mic input /Phantom power switch for MIC4
- MIC4/AUX1 Balance input
- Line input /Mic input /Phantom power switch for MIC3
- MIC3 Balance input
- Line input /Mic input /Phantom power switch for MIC2
- MIC2 Balance input
- MUTE control switch
- Line input /Mic input /Phantom power switch for MIC1
- EMC input interface
- MUTE signal input port
- FM radio antenna interface
- MIC1 Balance input
REMOTE CONTROL
 Normal remote control distance: 25 feet
- Power switch
- Mode
- Previous/next
- Volume increase/decrease
- 0-9 number buttons
- Play/pause
- Sound effect control
- Mute
- Cycle play button
- Pause
Remote control usage attention:
- When installing the battery, please mind electrode.
- Aim remote control at the mixer amplifier.
- When remote distance gets short and insensitive, please change the battery.
- Please take out the battery when not in use for a long period of time.
- Avoid dropping remote
OPERATION ILLUSTRATION
CONNECT THE SPEAKERS:
- With the 70V and 4-16Ω selector switch to 70V position, as shown below:
 70 Volt speaker: According to the rated power of the power amplifier, adjust 70V transformer tap accordingly.
 - With the 70V and 4-16Ω selector switch to 4-16Ω position, as shown below:Fixed resistance speaker: 4-16Ω
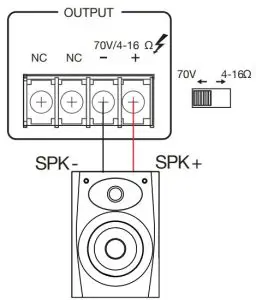 70 Volt speaker: According to the rated power of the power amplifier, adjust 70V transformer tap accordingly.
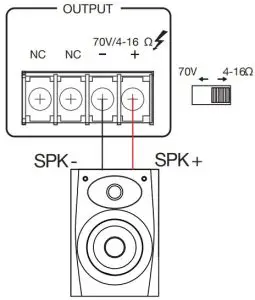 Fixed resistance speaker: 4-16Ω
PLEASE NOTE:
- Before connecting the speakers, please make sure that the equipment is powered off. In the case of the power being on, you may run the risk of electric shock.
- Please make sure that there is no applied load to the speaker cables.
- During the installation of speakers, please make sure that the sum of the rated input power of the speakers to be connected is less than the rated power of equipment.
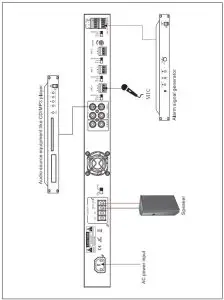
CONNECT EXTERNAL DEVICES:
- Please ensure that the equipment and all other equipment to be connected are powered off.
- Use the corresponding cable to connect this equipment and other external equipment.
CONNECT THE POWER LINE AND TURN IT ON:
- Please make sure that the power switch of equipment and its connected equipment are turned off (in the OFF position).
- Turn the volume knob to the left.
- Connect the supplied power line to the AC IN interface.
- Plug the power line into the applicable socket.
- Turn on the connected equipment (CD player, etc.), and then turn on the equipment.
PLEASE NOTE:
- Before powering on, please check and make sure there are no problems with the cable and connection.
- When you turn off the system, turn off the equipment, and then turn off the connected equipment.
USING A MICROPHONE:
- Turn the volume knob to the left and connect the microphone and microphone input interface.
- Turn the volume knob in the right position.
- Face the microphone and speak loudly. Turn the volume knob to the right, until the output signal is no longer distorted. If the input is high but the voice output is low then increase the volume by using the volume knob. If the speaker volume is very high, then reduce the volume by using the volume knob.
SHUTDOWN THE SYSTEM:
- Turn the volume knob to the left until the minimum position.
- Turn off the panel power switch of the professional power amplifier, at 0ff. Then shut off the processor equipment and audio source equipment.
PLEASE NOTE:
- When turning off the power switch, please wait about 5 seconds before turning it on again. Continuous rapid turning on and off of the power switch will lead to equipment failure.
- Even when the switch is in the off status, there will be a little current in the equipment. If you won’t be using the equipment for a long period of time, please unplug the power cord from the wall AC socket.
BUILT-IN MP3 PLAYER OPERATION METHOD:
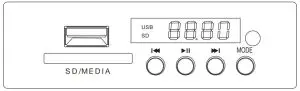
- USB and SD card interface with functions of priority to automatically play audio.
- MODE button: press MODE to choose radio, Bluetooth or audio playback.
- button: If pressed quickly, it will play the last song; if pressed for longer it will decrease the volume.
- button: When playing music, press it one time quickly to pause, press it again to play.
- button: If pressed quickly, it will play the next song; if pressed for longer it will increase the volume.
PLEASE NOTE:
- When using the built-in MP3 player buttons, please pay attention to the strength used, avoid excessive force causing damage to the MP3 player button.
- When an SD card or USB interface is inserted, please insert in the correct way, avoid the wrong way or forcing it too hard causing damage to the SD card or USB interface.
BLUETOOTH OPERATION:
- Press the Mode button on the remote to ensure media player is in Bluetooth mode, indicated by letters “BT.”
- Go to your device’s settings and find then select device “PA-02086B”. No password should be required.
- Device should pair within a minute or so.
- If pairing is unsuccessful, power down your amplifier, close the settings app on your device.
- Power up amplifier & reopen settings. Repeat first steps to attempt to pair again. If you still have an issue pairing, please reboot personal device & cycle amplifier power.
- Once pairing is successful, open music app. Ensure device volume is turned up to at least 75% capacity on device.
- Adjust volume of audio player with volume buttons on infrared remote (OK to set at max volume – 32)
- Adjust master volume to desired level, ensuring amplifier does not show clip or show any red lights.
OPERATION INSTRUCTION FOR MIC/ MIC2/ MIC3/ MIC4 INPUT SWITCH:
As shown in the right picture, the input switch includes: line input, Mic input, and Phantom power supply.
- When switching to Line input, you can input the source, such as CD, VCD, DVD and some other external audio equipment.
- When switching to the MIC input, you can use the dynamic microphone.
- When switching to PHANTOM, the input interface with 48V phantom power supply, you can use the condenser microphone.
TROUBLESHOOTING
| SYMPTOM | PROBLEM |
| Power switch is not opened |
|
| All lines are connected, but there is no sound |
|
| The sound suddenly disappears in normal status |
|
| Low sound | The equipment is set to be a low impedance connection, but the speakers are connected with high impedance |
| Sound is distorted | The input level of Mic or external equipment is too high |
REAR PANEL CONNECTIONS
BLOCK DIAGRAM

SPECIFICATIONS
| Rated Power | 350W |
| Output Level | 4-160/70V |
| Input Sensitivity | MIC1, 2, 3, 4: 5mV/6000AUX1, 2: 350mV/101(0EMC: 775mV/101(.0 |
| Output Sensitivity | MIX OUT: 1000mV/4700 |
| Tone | Bass: +/-10dB at 100HzTreble: +/-10dB at 10KHz |
| Frequency Response | 501-1z— I 6KHz(+1dB, – 3dB) |
| SNR | MICI, 2, 3: 66dB;AUX1, 2: 80dB |
| THD | s0.05%(at IKHz, 1/3 rated power) |
| Indicator | Power indicator |
Mute Control |
MIC1 priority over MIC2-4, Aux1-2 audio input; EMC highest priority |
| Channel Crosstalk Attenuation | >_50d6 |
| Heat Dissipation | Flank in and rear panel out to force fan cooling, fan starts when amplifier turned on, infinitely variable speed |
| Protection | Over-heat, overload, short circuit |
| Power Supply | 110-120V 60HZ |
| Power Consumption | 500W |
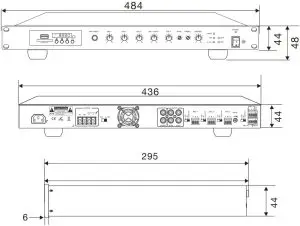
| Dimensions (H x W x D) | 1.73″ (44 mm) x 19.05″ (484 mm) x 10.24″ (260 mm) |
| Weight | 11.50 lbs (5.22 kg) |
| Shipping Weight | 13 lbs (5.9 kg) |
REAR PANEL CONNECTIONS
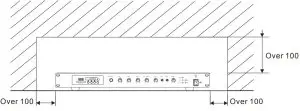
Keep all sides of the unit over 10 cm away from objects that may obstruct air flow to prevent the unit’s internal temperature rise.
SERVICE
Ensure the problem is not related to operator error, or system devices that are external to this unit. Information provided in the troubleshooting portion of this manual may help with this process. Once it is certain that the problem is related to the product contact your warranty provider as described in the warranty section of this manual.
LIMITED WARRANTY
PRO ACOUSTICS, LLC. (“PRO ACOUSTICS”) warrants this product to the original purchaser to be free from defects in materials and workmanship (subject to the terms set forth below), for the following periods from the date of purchase.
THIS WARRANTY COVERS THE LISTED PRODUCTS AGAINST DEFECTS IN MATERIALS OR WORKMANSHIP FOR THE FOLLOWING PERIOD
Warranty Terms
- Speakers: 2 Years
- Amplifiers & Electronics: 1 Year
- Microphones: 1 Year
- Accessories: 1 Year
PRO ACOUSTICS will repair or replace (at PRO ACOUSTICS’s option) this product or any defective parts (excluding electronics and amplifiers) in this product.
Your authorized PRO ACOUSTICS dealer will inspect the product and, if your dealer is not equipped to perform the repair of your PRO ACOUSTICS product, they will replace your product or return it to PRO ACOUSTICS for repair, at their discretion. Proof of purchase in the form of a bill of sale or receipted invoice, which is evidence that this product is within the warranty period, must be presented to obtain warranty service.
This warranty is invalid if the factory applied serial number has been altered or removed from this product.This warranty is invalid if this product was not purchased from a PRO ACOUSTICS authorized dealer. Cosmetic damage or damage due to the accident, acts of God, misuse, abuse, negligence, commercial use, or modification of, or to any part of, the product are not covered in this warranty. This warranty does not cover damage due to improper operation, maintenance or installation, or attempted repair by anyone other than PRO ACOUSTICS or a PRO ACOUSTICS dealer which is authorized to do PRO ACOUSTICS warranty work.Any unauthorized repairs will void this warranty.
This warranty does not cover products sold as is.
REPAIRS OR REPLACEMENTS AS PROVIDED UNDER THIS WARRANTY ARE THE EXCLUSIVE REMEDY OF THE CONSUMER/PURCHASER. PRO ACOUSTICS U.S.A. SHALL NOT BE LIABLE FOR ANY INCIDENTAL OR CONSEQUENTIAL DAMAGES FOR BREACH OF ANY EXPRESS OR IMPLIED WARRANTY ON THIS PRODUCT. EXCEPT TO THE EXTENT PROHIBITED BY LAW, THIS WARRANTY IS EXCLUSIVE AND IN LIEU OF ALL OTHER EXPRESS AND IMPLIED WARRANTIES WHATSOEVER, INCLUDING BUT NOT LIMITED TO, THE WARRANTY OF MERCHANTABILITY AND FITNESS FOR A PRACTICAL PURPOSE.
This warranty gives you specific legal rights. You may have other rights which vary from state to state.
Customer Support
 report this ad
PURE RESONANCE AUDIO®Phone: (866) 676-7804Email: [email protected]Web: www.PureResonanceAudio.com
Specifications may change without notice.
References
[xyz-ips snippet=”download-snippet”]