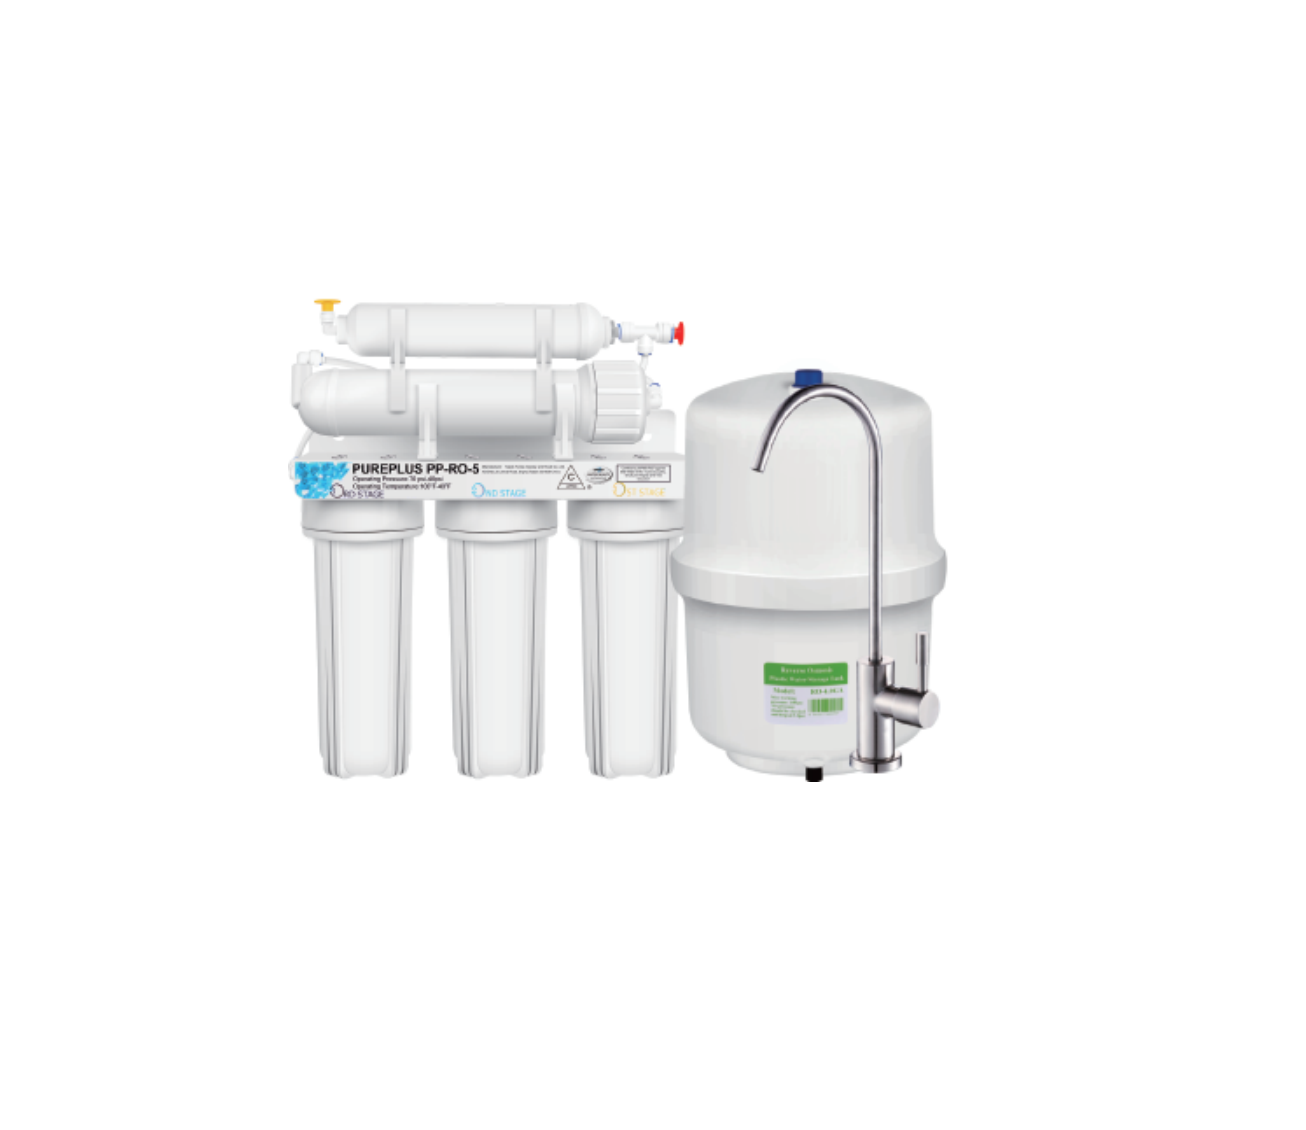
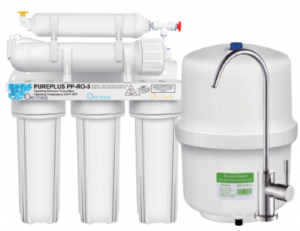
PurePlus 5 Stage Reverse Osmosis Filtration System
BEFORE INSTALLATION
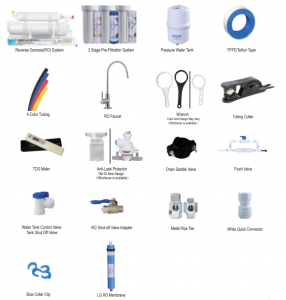
Please open the box, and take out all the components and tool kit. Inspect them to make sure they are intact, undamaged, or unbroken during transportation. If any parts, components, or accessories is cracked or damaged, please contact our customer support immediately for replacement.
Operation Conditions And Specifications
Maximum Operating Water Pressure: 70 PSIMinimum Operating Water Pressure: 40 PSI(Electric Water Boost Bump may required for water pressure under 40 PSI or improve water efficiency.)Water Temperature: 40-100ºF(Not for HOT water)Installation: Install the RO system in a location where it is safe and dry. Please avoid direct sunlight, hitting, Falling, or dragging as they may cause leaks and cracks.
Component Chart
Installation Preparation
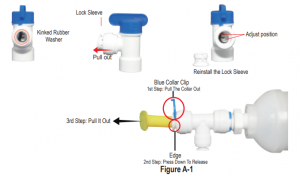
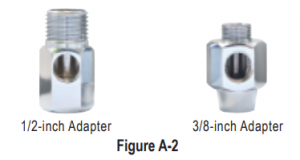
What is a Quick-Connect Fitting System?A: Pull out the Blue Collar Clip, inser the Tubing, then put back on the Blue Collar Clip, as shown in Figure A-1.How to connect?A: Pull out the Blue Collar Clip, then press down on the Lock Sleeve, and pull out the Tubing, as shown in Figure A-1.A: The majority of the U.S residents are using 1/2-Inch feed water pipe inlet that connects to the Water Shut-off valve, which offers either a standard 3/8-Inch threads outlet or a 1/2-Inch threads outlet to the sink faucet`s water supply line. Customers could find the information on the label. Our accessory kit includes both 1/2-Inch and 3/8-Inch Metal Tee, as shown in Figure A-2.1/2-inch Adapter 3/8-inch AdapterHow to Disconnect?A: It is rare for the rubber washer that get twist inside the connector. If this does happen during installation, 1 ) Please use the end of the tuber cutter to pry open and remove the Lock Sleeve from the connector, as shown in Figure- Washer. 2 ) Adjust the washer`s position and carefully insert the Lock Sleeve back into the connector.
How to pick the right versatile Metal Tee and RO Shut-off Valve?
A: The majority of the U.S residents are using 1/2-Inch feed water pipe inlet that connects to the Water Shut-off valve, which offers either a standard 3/8-Inch threads outlet or a 1/2-Inch threads outlet to the sink faucet`s water supply line. Customers could find the information on the label. Our accessory kit includes both 1/2-Inch and 3/8-Inch Metal Tee, as shown in Figure A-2.
INSTALLATION STEPS
- Using a 1/4-inch bit to drill a 1/4-inch hole on the drain pipe that fits 1/4-Inch Black Tubing.
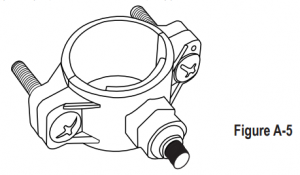
- Install and fasten the Drain Saddle Valve onto the drain pipe and connects the Black RO Tubing, as shown in Figure A-5 .*It is recommended to turn on the Flush Valve every two weeks to flush and clean the RO membrane. (The maintenance frequency entirely depends on the local water quality.)

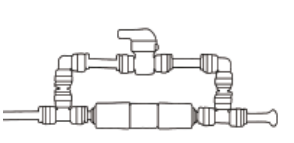
RO Shut-off Adapter and Metal Tee assembly
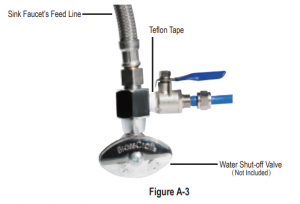
- Wrap the RO Shut-off Valve Adapter`s threads with supplied white PTFE tape and install the adapter onto the Metal Pipe Tee
- Connect the Blue Tubing and carefully tighten the silver screw-cap to fasten the Blue Tubing, as shown in Figure A-3.
- Shuts off the water supply by turning off the Water Shut-off Valve (or shut off the main water line.)
- Disconnect the current existing faucet water supply line from the feed pipe and install the RO Shut-off Valve.
- Connect the current existing faucet`s water supply line onto the Metal Pipe Tee thread.
- Keep the RO Water Shut-off Valve at OFF position and turn on the Water Shut-off Valve to test for possible leaking.
- If leaking spotted, uninstall the RO Water Shut-off Valve and re-wrap the threads with Teflon/PTFE tap would stop the leak
- Completed Water Shut-off Valve, Metal Tee, and RO Shut-off Valve assembly diagram as shown in Figure A-3.

RO Faucet Installation
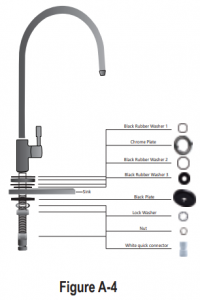
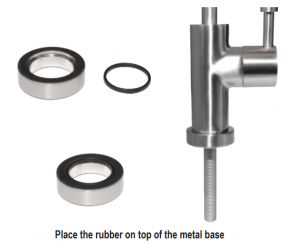
- Insert the Two Black Rubber O-Ring onto the chrome plate and install the plate onto the RO Faucet as a faucet base, as shown in Figure A-4
- Insert the Black Plastic Black Rubber Washer 3 onto the faucet under the chrome plate as a protective base, as shown in Figure A-4.
- If the counter-top surface has a second faucet hole, remove the protective cap and install the RO Faucet. (Or, drill a hole on the sink or counter-top surface; this requires a 1/2-inch Hollow Diamond Bit)
- After the RO Faucet is positioned, install the Black Plastic Plate onto the faucet under the sink or counter-top, as shown in Figure A-4.
- Install the Metal Lock Washer under the Black Plastic Plate, then tighten the Nut to lock and secure the faucet on the counter-top, as shown in Figure A-4.
- Install the White Quick Connector onto the bottom of the faucet`s threads, as shown in Figure A-4.
- Connect the Yellow RO Tubing into the White Quick Connector, as shown in System Diagram.
Set Up Storage tank and Tank Shut-off Valve installation
- Remove the Blue Cap from the pressure tank, install the Water Tank Control Valve, as shown in Figure A-7.
- Connects the other end of the Red RO Tubing into the Water Tank Control Valve, as shown in Figure A-7.

Install Reverse Osmosis Membrane
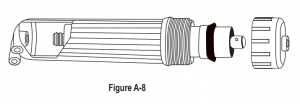
- First remove the connected White RO Tubing, then use supplied wrench to unlock the RO Membrane Cap, as shown in Figure A-8.
- Get the RO Membrane out of the sealed package and insert the RO Membrane inside the RO Membrane housing. Screw the cap back on, re-connect the White RO Tubing, direction as shown in Figure A-8.
- Install the filter housing back onto the RO system. First turn on the Flush Valve, then turn on the Water Shut-off Valve.
- Flush the new filters for over 15 minutes to condition the new replaced filters, then turn off the Flush Valve.
Color Tubing Connection
*The bottom 3 Stage Pre-filtration system`s tubing connection is set and ready.
Red RO Tubing Connection:
- Remove the Blue Collar Clip, pull the Red Protective Cap out of the Tee connector.
- Insert the supplied Red RO Tubing to the Tee connector, install the Blue Collar Clip back on.
- Connect the other side of the Red RO Tubing into the Tank Shut-off Valve, as shown in System Diagram.
Yellow RO Tubing Connection:
- Remove the Blue Collar Clip, pull the Yellow Protective Cap out of the L-Shaped quick connector.
- Insert the supplied Yellow RO Tubing into the L-Shaped quick connector, install the Blue Collar Clip back on.
- Connect the other side of the Yellow RO Tubing into the RO Faucet`s Connector, as shown in System Diagram.

Anti-Leak Protector Installation
*While installing, please make sure that the Anti-Leak Protector is placed on the flat ground surface.
- Remove the 3M sticker on the bottom of the protector, position the protector and the filtration system on the same ground level.
- Use the Tubing Cutter to trim the Blue Tubing at its best fitting length.
- Insert the trimmed first-half Blue Tubing, that is partially connected to the RO Shut-off Valve, into the Anti-Leak Protector`s Red-Colored inlet that marked with “IN”, as shown in System Diagram.
- Connect the second-half Blue Tubing into the Gray colored outlet that marked with “OUT”, as shown in System Diagram.
- Pull out the Blue Collar Clip, remove the Blue Protective Cap from the system’s water inlet, and Insert the Blue Tubing to connect the system.*The Anti-Leak Protector is one-time use only. If there is water leak detected, the Anti-Leak Protector shuts off the water supply to prevent further leaking.
System Diagram And Definitions
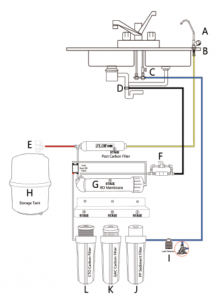
| A) RO Faucet | B) RO Faucet White Quick Connector | C) RO Shut-off Valve |
| D) Drain Saddle Valve | E) Water Tank Shut-off Valve | F) Flush Valve |
| G) RO Membrane Housing | H) Pressure Water Tank | I) Anti-Leak Protector |
| J) 1 Stage Filter Housing | K) 2 Stage Filter Housing | L) 3 Stage Filter Housing |
Completed system inspection and start up
- After the system is set up, please carefully inspect all the connection, joints for possible loosen parts or connections.
- After inspection is complete, please keep the Tank Shut-off Valve at OFF position, and keep the Flush Valve at ON position. Prepare a bath towel and a water container to catch any water leak.Top 3 causes of leaking are 1) The tubing was not fully inserted and secured. 2) The O-ring was not in place or kinked. 3) Loosen cap/housing.
- Unplug the white RO tubing that located at left side of the pre-filtration filter housing, as shown in Figure A-FlushWater flushes through the tubing, enters the Post Carbon Filter, and exits from the system (B)
- First turn on Water Shut-off Valve, water would come out from the left side. Wait for 15 Minutes for the system to flush and condition the filters. *Water first comes out black due to loose harmless carbon residuals, which is normal.
- Turn OFF the Water Shut-off Valve, re-connect and secure the White RO Tubing.
- First Turn on RO Faucet and slowly turn ON the Water Shut-off Valve , then check for water leak.
- Turn OFF RO Faucet, then turn ON the Tank Shut-off Valve. Wait for the water storage tank to be filled up.
- Drain the first tank of water and then you can start enjoy the purified water!
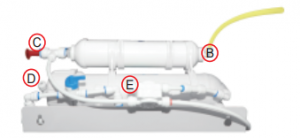 Water flushes through the tubing, enters the Post Carbon Filter, and exits from the system (B)
- DO NOT DRINK THE FIRST TANK OF WATER.
- Check for leakage daily for the first week and periodically thereafter.
- Always flush the new filters as instructed.
SYSTEM MAINTENANCE
*While changing filter cartridges, you must have to first turn off the water shut-off valve, Tank shut off valve, turn on the RO Faucet and drain the remaining water from the system. Prepare a bath towel for spilled water
Please read the following diagram carefully and replace your water filter cartridge accordingly to maintain the system at its best performance.
How to change the vertical pre-filtration filters
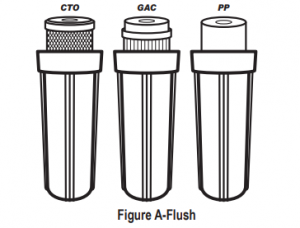
1st Stage- PP Sediment Filter
- PP Sediment Filter usually need to be replaced every 6 months.
- Remove the used filters from the filter housing then remove the plastic shrink wrap off the new filter.
- Insert the new filter inside the 1st Stage filter housing.
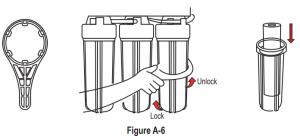
- Use supplied wrench to install the filter housing into the main system, as shown in Figure A-6.
2nd Stage – GAC Carbon Filter
- GAC Carbon Filter usually need to be replaced every 6 months.
- Remove the used filters from the filter housing then remove the plastic shrink wrap off the new filter.
- Insert the filter inside the 2nd Stage filter housing.
- Use supplied wrench to install the filter housing into the main system, as shown in Figure A-6.
3rd Stage – CTO Carbon Filter
- CTO Carbon Filter usually need to be replaced every 6 months.
- Remove the used filters from the filter housing then remove the plastic shrink wrap off the new filter.
- Insert the filter inside the 3rd Stage filter housing
- Use supplied wrench to install the filter housing into the main system, as shown in Figure A-6.
How to change Reverse Osmosis Membrane
- Reverse Osmosis Membranes usually need to be replaced every 2 years.
- Remove the connected White RO Tubing, then use supplied wrench to unlock the RO Membrane Cap, as shown in Figure A-8.
- Get the RO Membrane out of the sealed package and insert it inside the RO Membrane housing. Put the cap back on, re-connect the White RO Tubing, direction as shown in Figure A-8.
- Install the filter housing back onto the RO system. First turn on the Flush Valve, then turn on the Water Shut-off Valve.
- Flush the new filters for over 15 minutes to condition the new replaced filters, then turn off the Flush Valve.
How to change the inline cartridges
- Post Carbon Cartridges usually need to be replaced every 12 months.
- Check the Water Flow indicator on the filter body before unplug the White RO Tubing, as shown in Figure A-10.
- Unscrew the quick connector, and install them on the new cartridges after removing the plastic shrink wrap.

How to use the Flush-Valve
- Flush Valve helps to clean the RO Membrane by flushing out the stopped particles, impurities to extend the RO Membrane`s service life.
- Keep the Flush Valve on during the installation; keep the Flush Valve off during the daily use.
- It is recommended to turn on the Flush Valve every two weeks to flush and clean the RO membrane.(The maintenance frequency entirely depends on the local water quality.)
 (The maintenance frequency entirely depends on the local water quality.)
Specification And Performance Data
This system has been tested according to NSF/ANSI 58 for the reduction of the substance listed below.The concentration of the indicated substances in water entering the system was reduced to a concentration less than or equal to the permissible limit for water leaving the system as specified in NSF/ANSI standard 58.
|
Maximum |
Maximum |
|
|
Operating Temperature: |
100°F (37.8°C) | 40° F (4.4°C) |
| Operating Pressure: | 70 ps |
40 psi |
|
pH Parameters: |
10 | 5 |
| TDS (Total Dissolved Solids) |
< 1800 ppm |
|
m Substance |
Total Dissolved Solids |
Daily Production Rate L/D(gpd) |
|
Inf.Challenge Concentration mg/L |
750±40mg/L |
73.9 L/D |
|
Max.Permissible Concentration mg/L |
187 |
Non-Covered Defects
|
PROBLEM |
CAUSE |
SOLUTION |
| Milky/Cloudy/Gray Water | 1.Excessive air inside the filtration system. 2.Filter was not properly flushed. | Air in the system is normal when the RO system first installed. The Milky/cloudly water would disappear within 1-2 week of daily use. |
| Noise from faucet | Air trapped inside the facuet, tubing, and RO system. | Air in the system is normal when the RO system first installed. The noise should be fixed within 1-2 hours of regular use. |
| Slow water flow from faucet | 1. Low water pressure 2.Kinked tubing3. Clogged filters or membrane4. Lower Pressure inside the water tank | 1. Check your local water pressure, it should be around 80PSI to keep the system at its best working condition.2. Check the system`s entire tubing connection to find and fix kinked tubing.3. Uninstall the examine all the filters from the system.4. Use the digital tire pressure gauge to measure the tire pressure to ensure it is at least 6 PSI. |
| Water taste issue | 1. Either filters or RO Membrane is depleted or expired.2. Water tank was not in use for a long period of time. | 1.Use TDS meter to measure the TDS level and replace the filters, including the Post Carbon and Alkline filter.2. Drain the water completely from water tank, refill and drain it again. Repeat for at least 3 times to flush the tank. |
| Unable to flush the membrane | Broken/Closed Flush-Control-Valve | Turn the Flush-Control-Vale at “ON” position; Replace the Flush-Control-Valve |
| Leak/Dripping off from dispenser/faucet | 1.Fittings are not tightened2.O-ring is missing or needed to replaced (aged) 3.Air trapped inside4.Inadequate Teflon tape applied/Gap | 1. Reconnect the fitting to make sure it is securely connected.2. Check the O-ring to see if it is damaged or missing; replace when needed.3. Flush the system for 5 minutes will solve the dripping off from faucet issue.4. Disconnect the connector and apply more Telfon tape to seal the gap. |
One (1) Year Limited Manufacturer Warranty Terms And Conditions On Parts And LaborsPUREPLUS Products warrants to you, the original purchaser of this new product (“Product”), that the Product shall be free of defects in the original manufacture of the material or workmanship for a period of ONE (1) Year from the date of your purchase of the Product (“Warranty Period”). This Product must be purchased from an authorized dealer of PUREPLUS brand products and packaged with this warranty statement. This warranty does not cover refurbished Product. If you notify PUREPLUS during the Warranty Period of a defect covered by this warranty that requires service, terms of this warranty apply.
How long does the coverage last?The Warranty Period lasts for ONE (1) YEAR from the date you purchased the Product. The purchase date is printed on the receipt you received with the Product.
What does this warranty cover?During the Warranty Period, if the original manufacture of the material or workmanship of the Product is determined to be defective by an authorized PUREPLUS a repair center or store personnel, PUREPLUS will (at its sole option): (1) repair the Product with new or rebuilt parts; or (2) replace the Product at no charge with new or rebuilt comparable products or parts. Products and parts replaced under this warranty become the property of PUREPLUS and are not returned to you. If service of Products or parts are required after the Warranty Period expires, you must pay all labor and parts charges. This warranty lasts as long as you own your PUREPLUS Product during the Warranty Period. Warranty coverage terminates if you sell or otherwise transfer the Product.
Testing results were performed under designated standard individual laboratory, the actual conditions, and performance may vary.
How to obtain warranty service?Retail store location, take your original receipt and the Product to the store you purchased it from. Make sure that you place the Product in its original packaging or packaging that provides the same amount of protection as the original packaging.Online platform, mail or email your original receipt and the Product to the address listed on the web site. Make sure that you put the Product in its original packaging or packaging that provides the same amount of protection as the original packaging.
Where is the warranty valid?This warranty is valid ONLY to the original purchaser of the product in the United States. Conditions of validity of this Limited Product WarrantyEven though the Product has an extremely high endurance for operating conditions such as PH, Maximum TDS, temperature, and optimum water pressure, THIS LIMITED PRODUCT WARRANTY SHALL ONLY BE VALID IF:
- The replaceable filters and membrane are changed and maintained on a regular basis as directed in the instruction. Moreover, depending on local input water`s quality, regular maintenance may need to be increased.
- The Product is operated within the confines of the following standard operating conditions:Maximum Operating Water Pressure: 70 PSIMinimum Operating Water Pressure: 40 PSIWater Temperature: 40-100°F(Cold Water Line Only)
What information, documents, evidence, or files does PUREPLUS ask from you?PUREPLUS requires following documents:
- Original dated receipt. And any information that might be needed to evaluate the claim, Such as but not limited to, water source, local water TDS level, appliance`s model number, previous filter`s brand name and its model number.
What does the warranty not cover?
This warranty does not cover:
- Customer instruction, commercial use, installation, set up adjustments.
- Cosmetic damage, damage due to acts of God, such as lightning strikes, fire.
- Accident, Negligence, Misuse, And/Or, Abuse, Connection to an incorrect filter assembly, housing, connector.
- Modification of any part of the Product, including the connector, nob, and the O-Ring. Or Attempted repair by anyone other than a facility authorized by PUREPLUS to service the Product.
- Damage due to incorrect operation, installation, or maintenance Products sold as is or with all faults
- Products where the factory applied serial number has been confirmed expired or manufactured more than one (1) year ago
Do not use with water that is microbiologically unsafe or of unknown quality without adequate disinfection before or after the system.
Repair replacement as provided under this warranty is your exclusive remedy. PUREPLUS shall not be liable for any incidental or consequential damages for the breach of any express or implied warranty on this product, including, but not limited to, lose data, lost of use of your product, lost business or lost profits. PUREPLUS product makes no other express warranties with respect to the product, all express and implied warranties of and conditions of merchant-ability and fitness for a particular purpose, are limited in duration to the warranty period set forth above and no warranties, whether express or implied, will apply after the warranty period. Some states, provinces, and jurisdictions do not allow limitation may not apply to you. This warranty gives you specific legal rights, and you may also have other rights, which vary from state to state

Manufacturer:Tianjin Yunda Industry and Trade Co.,Ltd. ADD:No.29,Jinhai Road Jinghai,Tianjin 301600 China www.pureplus.com
© PUREPLUS,.All rights reserved.PUREPLUS is the trademark(s) of PUREPLUS registered company.Registered in some countries. All other products and brand names are trademarks of their respective owners and used for customer reference ONLY.
References
[xyz-ips snippet=”download-snippet”]