
PYLE P3201BT Wireless BT Hybrid
Amplifier Receiver User Manual
FOREWORD
Your New Pyle Amplifier gives you the power and versatility you need in a professional sound system. The amplifier’s wide frequency response makes it suitable for amplifying music or vocal program material. lt can be used in meeting halls, house, restaurant, schools, stores, or for paging systems.
Please read this manual thoroughly before you attempt to set up and use the amplifier. It contains a range of installation suggestions as well as instructions to ensure safe usage. Installed properly, you can expect years of trouble-free service from this product.
![]()
Front and Back Panel
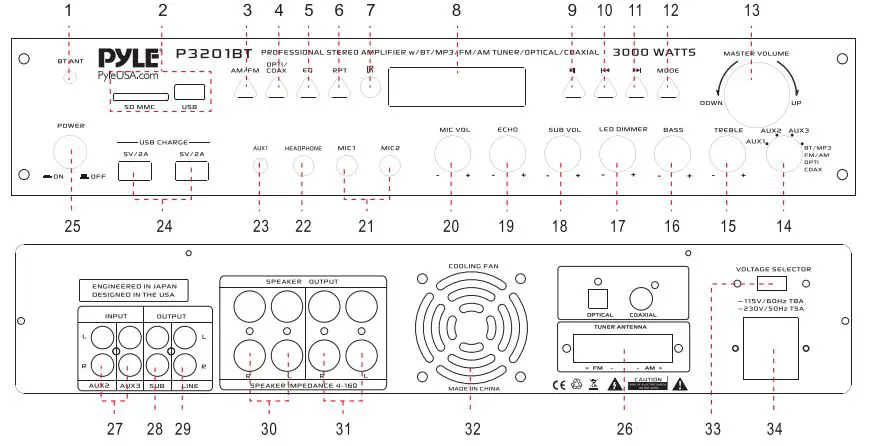
Function
- BT ANTENNA
- SD CARD READER/USB PORT: For using external media on this device, just plug your SD/USB into these ports.
- Source Input AM/FM
- Source Input OPTI/COAX
- EQ button control for Hall, Live, Jazz, Rock, Pop, Normal.
- RPT button: Repeat music control
- REMOTE CONTROL WINDOW
- LCD SCREEN: All information regarding external media or this device will be displayed from this screen
- Play/Pause
 Button• Short press for play/pause in BT/USB/SD system.• Press and hold this button to auto scan the programs in AM/FM system and automatic memory to the program number.
 - Button:• Short press for previous music in BT/USB/SD system, or for previous program in AM/FM system.• Press and hold this button to auto scan the programs downward in AM/FM system, and automatic memory to the program number.
- Button:• Short press for next music in BT/USB/SD system, or for next program in AM/FM system.• Press and hold this button to auto scan the programs upward in AM/FM system, and automatic memory to the program number.
- Mode switch button for input choice like USB/SD/BT/FM
- MASTER VOLUME CONTROL: Adjusts the volume level. Turn the knob clockwise to increase the volume.
- INPUT SELECTOR: Turn this button to choose the favourable input
- Treble Control: Turn this knob to adjust the high frequencies of Channel 1 and Channel 2.
- Bass Control: Turn this knob to adjust the low frequencies of Channel 1 and Channel 2.
- LED DIMMER: Adjusts the blue lights and blue rings.
- SUB. OUT VOLUME CONTROL
- ECHO CONTROL: Turn the knob to adjust the MIC echo level.
- MIC VOLUME: Adjust the volume level. Turn the knob clockwise to increase the MIC volume.
- MIC INPUT JACKS 1&2: Connect KARAOKE MIC to these jacks.
- HEADPHONE JACK: Connect Headphone to this jack.
- AUX 1 Input
- Dual USB Charge (5V/2A): Charge for Mobile-phone
- POWER SWITCH: Press to switch the power unit ON or OFF
- TUNER ANT: Connect for AM/FM antennas.
- AUDIO INPUT JACKS: Connect the audio output jacks of DVD/CD. AUX to these jacks.
- SUB-WOOFER OUTPUT JACKS 1 & 2: Connect IPOD/MP3 to this jack.
- LINE OUTPUT JACKS: Connect the line input jacks to these jacks.
- A SPEAKER OUTPUT TERMINALS: Connect your speaker system to these terminals.
- B SPEAKER OUTPUT TERMINALS: Connect your the other speaker system(s) to these terminals.
- COOLING FAN
- 115V/230V SWITCH: According to power voltage, push this button to the station of the 115V or 230V.
- POWER CORD: Connect to AC 115V/60Hz & 230V/50Hz outlet.
2. USB/SD Card Control Console Display Screen

- Mode Displayed “USB” or “SD” letters will be displayed here if the “MODE” button is switched to USB mode or SD mode.
- The current playing Music’s name will be displayed here.
- The playing time of the current music will be displayed.
- The number of the music will be displayed.
- Formats like Mp3, WAV, WMA, APE, FLAC, etc. will be displayed.
- “FM Radio” be displayed if the “MODE” button is switched to FM Radio mode.
- The current FM Frequency is displayed here
- The current FM Channel will displayed hereMARK 1: There will be 6 different EQ that will be displayed on the screen depending on the selected setting: Hall, Live, Jazz, Rock, Pop, Normal.MARK 2: USB/SD Card/BT Control Console: After inserting a USB flash drive/ SD Card into the input terminal, be sure to set the input selector to USB/SD, then press the mode button to choose between audio from the USB Port, SD Card input, BT or FM radio. If you want to use the BT, check the steps for connecting with BT device.
STEPS FOR CONNECTING WITH WIRELESS BT DEVICE
- A. Press MODE button under the LCD display screen and enter into Wireless BT mode.
- B. Search on the Wireless BT device and you can find the Wireless BT name “PYLE PRO“
- C. Select the “PYLE PRO” Wireless BT name and wait for the device to pair.
- D. The unit will make a signal to confirm that the device has successfully paired and the screen will display “BLUETOOTH CONNECTED“
- E. Once being paired, you can play music from your BT device. You can also use the control buttons on the unit to select the tracks from your BT device.
REMOTE CONTROL FUNCTION
- Standby Button
- Equalizer Button: (Hai, Live, Jazz, Rock, Pop, Norma)
- Previous Song Button:• Short press for previous music in BT/USB/SD system, or for previous program in AM/FM system.• Press and hold this button to auto scan the programs downward in AM/FM system, and automatic memory to the program number.
- Source Input Volume
- MODE: Menu Control Button Press to select BT/USB/SD/AM/FM/ LINE IN etc. audio input
- MUTE Button This function only works in radio/BT/ USB/SD/AM/FM state
- Source Input Volume + This function only works in BT/USB/SD state
- SCAN Button Press this button to auto scan the programs in AM/FM system, and automatic memory to program number.
- Next Song Button:• Short press for next music in BT/USB/SD system, or, for next program in AM/FM system.• Press and hold this button to auto scan the programs upward in AM/FM system, and automatic memory to the program number.
- Play/Pause Button• Short press for play/pause in BT/USB/SD system.• Press and hold this button to auto scan the programs in AM/FM system and automatic memory to the program number.
- Repeat Song Button: Repeat one music or repeat all
- Number Buttons for Song Selection: Remote control should be operated within 6 meters with a scope of 30° in front of the receiver. Make sure that there is no large obstacle between the remote control and the machine. Remote sensor should be far away from the light, high amounts of light can affect its performance.
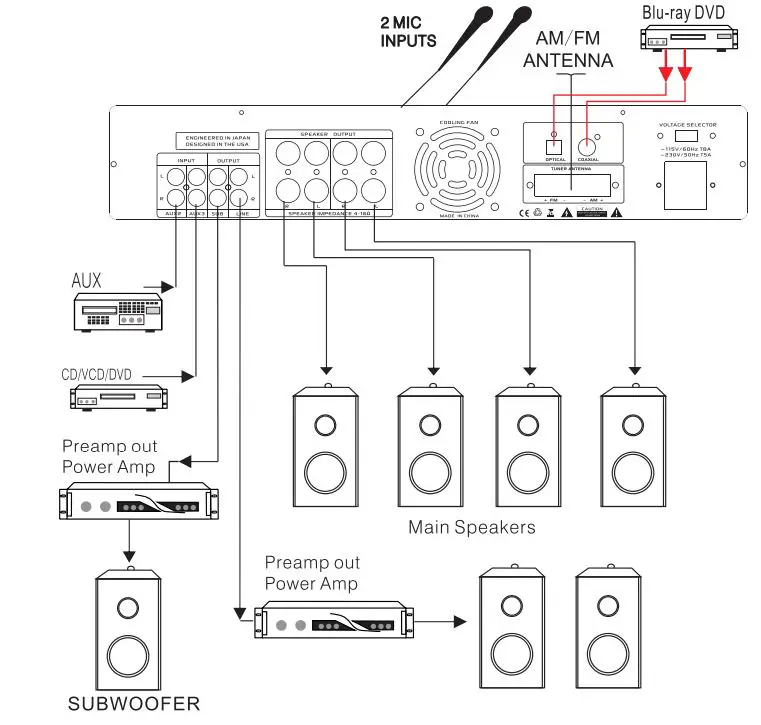
SYSTEM CONNECTION
HOW TO REPLACE THE PRESET RADIO STATIONS?
- Use the remote control to set the radio stations.
- Use button of the front panel set the radio stations.
NOTE: The present stations can’t be deleted, BUT CAN BE REPLACED.
OPERATIONS STEPS
- Rotate the input selector switch to the BT/MP3/AM/FM/OPTI/COAX position.
- Press the Mode key of the front panel or remote to select AM/FM.
- / : Press the button to adjust to your favourite station number, then, press and hold this button to auto scan the programs downward or upward. It will not stop until the tuner is found, and the tuner will automatic replace your favourite station number.
In this way, you can replace the present radio stations.
Features:
- Home Theater Pro Audio Receiver
- High-Powered Hybrid Pre-Amplifier
- Multi-Channel Source Audio Selection
- Built-in Bluetooth for Wireless Music Streaming
- Independent Audio Source Selection
- Digital LCD Display with FM/AM Radio
- Dual USB Device Charging Ports
- MP3 Audio File Playback Support
- Connect & Stream Audio from External Devices
- USB Flash & SD Memory Card Readers
- Aux (3.5mm) Input Jack
- (2) 1/4” Microphone Inputs
- Headphone Jack, 1/4”
- RCA (L/R) Audio Input / Output Jacks
- Dedicated for Subwoofer Output
- Screw-Type Speaker Terminal Binding Posts
- Front Panel Button & Rotary Controls
- LED Backlight Illumination with Dimmer Control
- Microphone Volume/Echo Control
- Music Master/Bass/Treble Control
- Built-in Cooling Fan
- Integrated Overload & Short Circuitry
- Universal Rack Mount Design
What’s in the Box:
- Hybrid Pre-Amplifier
- (2) UHF Wireless Handheld Microphones
- Detachable Rack-Mount Brackets
- AM/FM Antenna / BT Antenna
- Remote Control
- Power Cable
Wireless BT Connectivity:
- Built-in Receiver for Wireless Audio Streaming
- Simple & Hassle-Free Pairing
- Works with All of Today’s Latest Devices (Smartphones, Tablets, Laptops, Computers, etc.)
- Wireless BT Version: 5.0
- Wireless BT Network Name: `PYLE PRO‘
- Wireless Range: 40’+ ft.
Technical Specs:
- Power Output: 3000 Watt MAX
- 900 Watt @ 2 Ohm
- 450 Watt @ 4 Ohm
- 300 Watt @ 8 Ohm
- Frequency Response: 40Hz-15kHz, +/-2dB
- S/N Ratio: >76dB
- T.H.D.: <1%
- Radio Station Memory Presents: 30
- Digital Media File Playback Support: MP3/WMA/WAV/FLAC/APE
- Maximum USB/SD Flash Memory Support: Up to 64GB
- Battery Operated Remote: Requires (2) *LR03/1.5V Batteries, Not Included
- Battery Operated Mic: Requires (2) x AAA Batteries each, Not Included
- Power Cord Length: 4.5′ ft.
- Power Supply: 115/230V, Switchable
- Unit Dimensions (L x W x H): 19.0″ x 12.0″ x 3.1″ inches
![]() This product can expose you to a chemical or group of chemicals, which may include “Lead (PB)” which is known in the state of California to cause cancer, birth defects, or other reproductive harm. For more info, go to https://www.p65warnings.ca.gov/.
This product can expose you to a chemical or group of chemicals, which may include “Lead (PB)” which is known in the state of California to cause cancer, birth defects, or other reproductive harm. For more info, go to https://www.p65warnings.ca.gov/.
![]()
 report this ad
Questions? Issues?We are here to help!Phone: (1) 718-535-1800Email: [email protected]
References
[xyz-ips snippet=”download-snippet”]