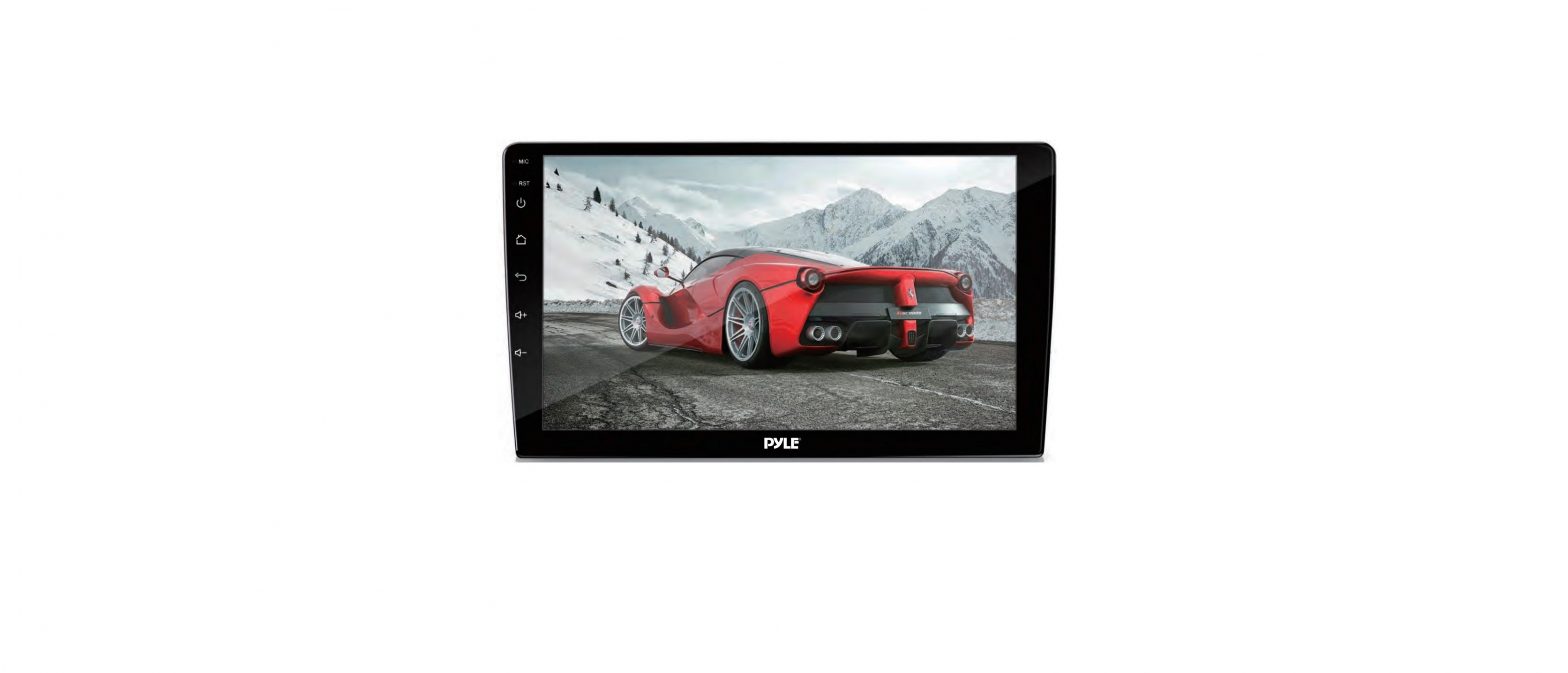
PYLE PLINDVTB10 10.1″ Adjustable Single DIN Car Stereo Receiver with Wireless BT WIFI/GPS/AM/FM User Guide
Note:We are constantly aiming to improve the customer experience and your receiver’s features and specifications are continually changing for the better, with improvements to the user interface experience, software updates, bug fixes, etc. System descriptions and features reflected as herein stated by this user manual serves to express our Head unit Receiver features at the current production period. We reserve the right to change terms and conditions of system specifications, features and descriptions at any time, as we continue to improve and provide our customers with upgrades in safety, performance and system operation in general.
System Installation:
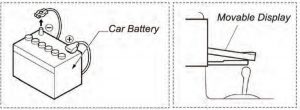
Before starting:To prevent short circuits, be sure to disconnect the battery terminal before starting.
Installation Guide
Caution:
- Consult your vehicle dealership before making any modications to your car’s body (ex. Drilling holes)
- Use included screws in installation. Improper operation may damage machine or cause accidents.
Do not install unit in any area where:
- It may obstruct the steering wheel and gearshift lever operations
- It may obstruct the operation of safety devices such as air bags
- It may obstruct visibility

Button & Feature Layout
RST : Use a pin to insert into reset port to trigger unit reset. (Hold for 20 secs. to reset)
![]() Hold to power up.
Hold to power up.![]() Home
Home![]() Return
Return![]() Volume up
Volume up![]() Volume down
Volume down
Turning Power On
- Turn on the engine key to the “ACC” or “ON” position
- Press and hold the power button for 3 seconds• When the engine key is turned to off position, the unit Status Bar is turned off(on the top of radio screen and app screen) you can swipe down for more.
App Screen – Interface Layout
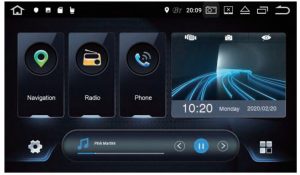
 Swipe UP/DOWN to access more apps
 |
Radio |
 |
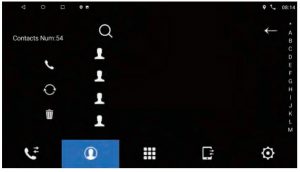
Phone |
 |
All Apps list |
 |
Navigation |
 |
Settings |
| Navi | Loads Navigation software (if you have several maps in this device, you can set the default map,
setting car setting navi setting |
| Radio | AM/FM tuner |
| Clock | Shortcut to time setting |
| Calculator | Open calendar app |
| Clear cache | Clear Cache |
Click the main interface “navigation” to enter the navigation interface.If the memory card does not have map data, it will prompt download and enter the map managementinterface after confirming.
Clicking icon description
- Map download: Click the top left corner, “” then click offine data, and then click on the offline map, select the city map data you need to download.
- Download Management: Download all or pause, also you can click the city to cancel or pause the download.
- Download Manager: You can update all apps, click the city to select “delete data” or “update”. Top left corner, “” Return to the previous level interface
Local musicClick the main interface “music” to enter the local music interface.This operation is valid when the unit has a SD card or USB interface and the corresponding media files.
Online musicClick on the main interface “online music” to enter the online music interface.Need to connect to the internet.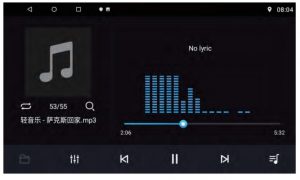
Music player button function description![]() Folder
Folder![]() Enter the sound settings
Enter the sound settings![]() Loop playback mode switch
Loop playback mode switch![]() Previous/next song
Previous/next song![]() Pause (Play)
Pause (Play)
Video playbackClick “Video Player” to enter the video player interface (supports 1080P HD video).This operation is valid when the unit has a SD card or USB interface and the corresponding media files.Click the “All icon” to switch between All/SD/U Disk/File Browser. When the video file is read, the system automatically plays the file that has not been played last time the video player is opened again.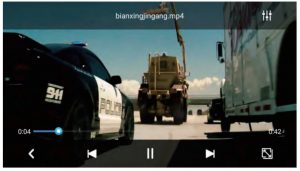
Clicking icon description![]() Menu
Menu![]() Last track
Last track![]() Play/Pause
Play/Pause![]() Next song
Next song![]() Full screen
Full screen
CalendarDisplays the day, month and year. Use forward and back arrows the view past or future months. Selected dates are highlighted in blue.
RadioClick the main interface “radio” to enter the local radio Clicking icon description interface (FM / AM band can store 40 effective platforms each)
![]() Click to search channel backwards then stop when nd clear channel.
Click to search channel backwards then stop when nd clear channel.![]() BAND to switch between mode FM1/FM 2
BAND to switch between mode FM1/FM 2![]() Search for radio station
Search for radio station![]() Click to search channel forwards then stop when find strong and clear channe1.
Click to search channel forwards then stop when find strong and clear channe1.![]() Forward tuning radio
Forward tuning radio![]() Backward tuning radio
Backward tuning radio![]() Locate and DX
Locate and DX![]() Audio settings
Audio settings
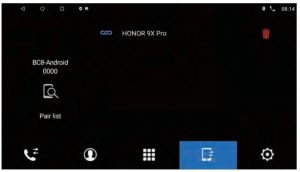
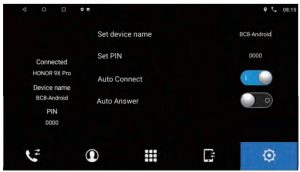
Wireless BTClick the main interface “Bluetooth®” to enter the Wireless BT connection interface.
When the BT is not connected:Enter the Wireless BT interface, there is no BT connection device displayed.Click the Wireless BT interface, such as the dial key, you will be prompted “Please connect HFP.”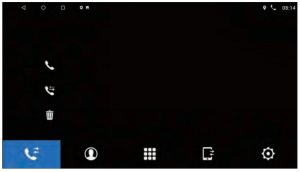

DSP 32bandsGolden fingerSwipe your finger to easily make DJ adjustments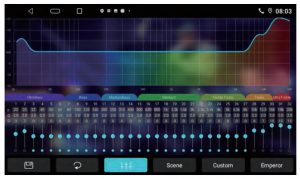
Phone Link APPFor the detailed operation instruction for Phone Link, please follow the instruction on actual unit.
Third Party AppsFor the detailed operation instruction for a certain 3rd party App, such as Google map, Youtube etc., please contact your 3rd party App provider for further service.
Steering wheel learningSteering wheel learning steps are as follows:
- Press any key on the steering wheel, the interface will display “please long-press and hold a direction key”, without pressing the steering wheel button for a certain period of time will lead to failure.
- Click on the screen to access docking function
- Press the corresponding function button on the steering wheel.Follow the steps 1 – 3 until all control buttons on the steering wheel is finished.
Note: Click ![]() will reset all the saved keys.If you perform a “System Reset” operation in “Factory Mode Settings”, please resave the steering wheel before using again.
will reset all the saved keys.If you perform a “System Reset” operation in “Factory Mode Settings”, please resave the steering wheel before using again.
The realization of this feature:
- For non-bus control of the original car steering wheel.
- The original car steering wheel keys need to be voltage input control.
Brightness setting: Click the “+” or “ – ” icon to adjust the value.
Volume settings: Slide the button directly to adjust the media volume and call volume.
GPS monitoring: View related GPS information, click ![]() to restart GPS.
to restart GPS.
Sound settings
- Click the slider to adjust Subwoofer, bass, midrange, treble.
- Settings can be made in Rock/Custom/Classic/Jazz/Pop by clicking the corresponding icon.
- Click the upper right comer of the speaker to et four icons or dick the centre dot to adjust the speaker position settings.
- Click the “default” icon will restore the sound settings parameters to the system default state.
Memory cleanCleaning up memory speeds up the system.
Desktop wallpaperAccording to your personal preference, you can go from “wallpaper” to “dynamic wallpaper” the “gallery” sets the wallpaper as prompted.
ResetReset Network: This will reset all network settings, including (WLAN, Mobile Data Network, Wireless BT) Restore factory settings: This will restore the system to factory settings and clear all data in your device’s memory.
Time settingDetermining the date and time automatically can be turned on, optionally using the network or provided by GPS. If you need to adjust the time manually, it need to be switched off, click directly to mobilize the time or date. Determining the time zone automatically can also be opened. It can be manually adjusted after switching off. It can also open or close the 24-hour system.
Dual HD DVR Camera
- Front camera + Rear Camera,
- Best Parking Assistance For Lady Driver
- These two cameras work as DVR camera as well
Front and Rear dual HD DVR camera
- Dual camera cover both front and rear angle for great protection and peace of mind on the road.
- Monitoring the roads ahead and behind the car simultaneously.
- The videos taken by the rear camera are stored alongside those from the front camera on the memory card for easy access.
Gravity SensorWith built-in G-sensor, it can automatically detect a sudden shake/collision and lock the footage to prevent the video from being overwritten even in cycle recording. Accident scene can be truly restored.
Cycle RecordingAutomatically overwrite the oldest file when the memory disc is full, never need to worry about memory capacity.
24-Hours Parking Monitor
- Parking mode monitors your car’s surroundings while car is parked.
- If someone hits your car and impact reaches the G-Sensor, the front and rear camera will turn on and record a short video, then lock and save it, and turn off automatically
Troubleshooting
Q: Unit doesn’t power up.A: Use a multi-meter to check for 12v+ to red and yellow wires. Check for proper Ground on the Black wire.Q: My video does not play.A: Attach “PARK” wire to parking break. When this wire is grounded the video will play(Grounding trigger of the parking brake)Q: Reverse camera does not come up on the screen.A: Attach “BACK UP CAMERA” wire to reverse tail light 12v+ (Make sure camera is and sending video signal)Q: Can I set up steering wheel control?A: Key 1 and Key 2 wires need to be wired to your vehicle’s steering wheel columnQ: The time I set is not saved after device reboot.A: Are other setting saved? If not: Check that yellow memory wire is attached to 12v+ constantA: Turn off GPS auto updateGo to radio settings > Set Time > switch ofi auto updateQ: My GPS gets no reception.A: Check if the antenna properly connected.A: Mount Antenna directly to your vehicle (GPS antenna is to be magnetically mounted, it will boost GPSreception when attached)A: Check alternate antenna placement to test for interferenceQ: How to I set the time?A: System setting, set timeQ: How do I turn up GPS instruction volume (I Can’t hear it over music)A: Change GPS sound settingsGo to Navi > Settings > Sounds > Set GPS voice level to max > Set radio volume to min (Adjust accordingly)Q: Where can I download firmware updates?A: This unit’s hardware does not allow it to be updated with new OS or firmware.Q: How do I play video files? My unit cannot read my digital video files.A: Make sure SD card is compatibleA: Check file format of your file. (You may need to convert your video file to an alternate file format)
You have entered the ‘Touch Screen Calibration Menu’. For optimum touchscreen performance, this feature enables you to enjoy the best functionality of your device’s touch screen.To complete the touchscreen calibration, an “X” will appear in the circles on the screen in numbered order, continue to press the center of the “X” as it passes through each numbered circle.(In circle number one, you will see an “X”, touch the center of the “X”, then the “X” will move to circle number two. Continue to touch the center of the “X” as it will move to the other circles in numbered order. If calibration senses an error, the process may restart; Repeat if necessary.)
(In circle number one, you will see an “X”, touch the center of the “X”, then the “X” will move to circle number two. Continue to touch the center of the “X” as it will move to the other circles in numbered order.If calibration senses an error, the process may restart; Repeat if necessary.)
Wiring – Back Panel:
- . For GPS antenna
- For radio antenna
- For power cable
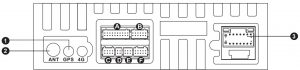
A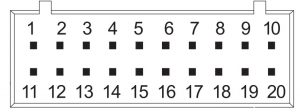
- AMP_+12V
- R_AXU_R
- R_AXU_L
- NA
- NA
- NA
- NA
- NA
- NA
- MIC11. GND
- RCA_FL
- RCA_FR
- GND
- GND
- GND
- CVBS_OUT1
- SUB_OUT
- AUXINCVBS
- MIC+
B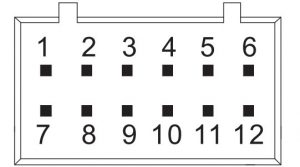
- NA
- NA
- NA
- GND
- GND
- Power 5V
- NA
- NA
- NA
- Rear Camera
- Front Camera
- Power 5V
C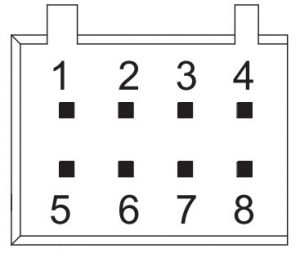
- GND
- RCA_RL
- FRONT_IR
- CAN_TXD
- NC
- RCA RR
- NC
- CAN_RXD
D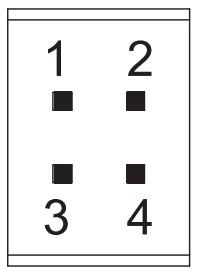
- USB_5V
- GND
- USB0+ DP0
- USB0- DM0
E
- . USB_5V
- GND
- USB2- DM2
- USB1+ DP1
- USB1- DM1
- USB2+ DP2
F
- TXD_TPMS
- RXD_TPMS
- IR
- CAM_12V
- PBK
- WIFI_ANT
- GND
- NA
- GND
- BT_ANT
For power cable
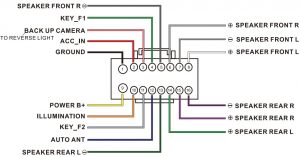
WIRING
| 1. | Black | GROUND | Connect to (—) side of car battery |
| 2. | Red | ACC | Ignition Accessory 12V+ |
| 3. | Pink | BACK UP CAMERA | 12 volt + trigger from reverse lights |
| 4. | Green | SW-KEY-F 1 | Steering wheel control Key 1 interface wire |
| 5. | Gray | Speaker Front R | Front right speaker Gray (+) Gray/Black (-) |
| 6. | White | Speaker Front L | Front left speaker White (+) White/Black (-) |
| 7. | Yellow | FUSE/ POWER B+ | Connect to (+) side of car battery |
| 8. | Orange | ILLUMINATION | 12 volt + trigger dash board illumination |
| 9. | Gray | SW-KEY-F 2 | Steering wheel control Key 2 interface wire |
| 10. | Blue | AUTO ANTENNA | 12 volt + trigger output |
| 11. | Green | Speaker Rear L | Rear left speaker Green (+) Green/Black (-) |
| 12. | Purple | Speaker Rear R | Rear right speaker Purple (+) Purple/Black (-) |
Visit us online:
Have a question?
Need service or repair?
Want to leave a comment?

Questions? Issues?We are here to help!Phone: (1) 718-535-1800Email: [email protected]

References
[xyz-ips snippet=”download-snippet”]