

![]()
PGVILN20
Student Violin Starter Kit
Instructions Manual
First time players will achieve the best results by bringing the violin to a music teacher to assist with the initial assembly.
Please read through the manual below to familiarize yourself with your new instrument. If damaged goods are found, the wrong item was received, an exchange or refund in required, please email your seller immediately.
Getting StartedYou must assemble and tune your new violin prior to playing. If you have a violin instructor we recommend you see him/her to assist you with assembling, cleaning, and tuning your instrument for the first time. If you cannot wait, follow these steps:
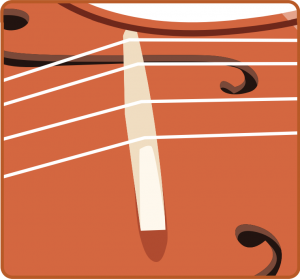
1. BRIDGE: The bridge is preset before we ship out the violin; however, since it is not permanently glued on, and it’s held down by the tension of the strings only, it might come off or misalign during shipment. If that happen, please reinsert the bridge into proper position. Keep in mind that not all players have the same size hands and fingers. Some violins come with the bridge not set at the correct height for the player and need to be adjusted. If this is the case then a professional luthier should adjust the bridge to get it comfortable to play.
2. STRINGS: Gradually tighten each string in the sequence of G-D-A-E. The reason for starting from G string is to prevent damaging the thinner E and A strings. Tighten only 1-2 notes higher on one string at a time. Then tighten the next. Do not tighten one string all the way to the desire pitch while leaving the other strings very loose. This will create unequal pressure on the bridge causing it to fall.
2

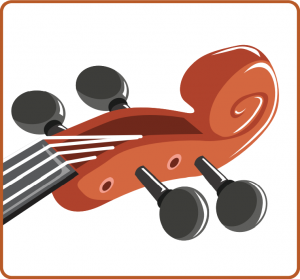
3. PEGS: The pegs can be shrink or expand due to the temperature and humidity changes. When the peg shrink, it will not fit the peg hole as well as they were originally made. It will leave a little gap between the peg and peg hole. This is why the strings slip. Simply apply the rosin powder or peg drop oil (which you can get from the retail store) on the pegs and peg hole. This will fill the little gap in between and increase the friction.
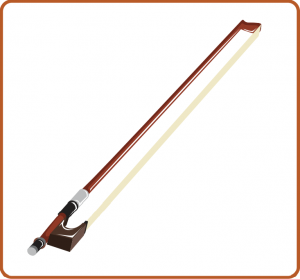
4. BOW: Floss the bow with Rosin for at least 5-10 minutes until you see the white powders come out from the horse hair before it can make sound.
 5. SOUND POST: It is not in a fixed position but is held in place by being custom fit to match the curvature of your instrument. During shipping it is possible for the sound post to come loose or dislodge itself. If this happens, please see a local luthier or repair technician.

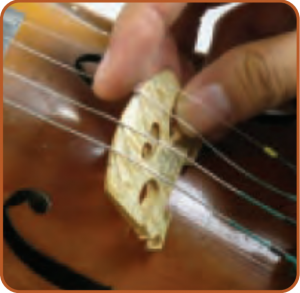
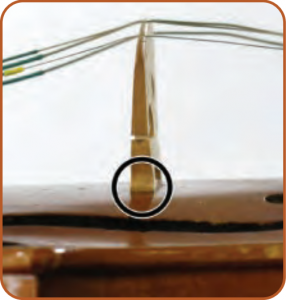
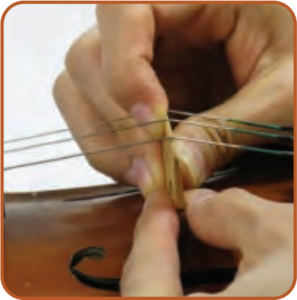
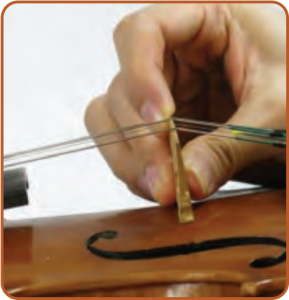
How to Position Violin BridgeTo slightly adjust your instrument’s bridge, first properly support the violin so it cannot slip or fall in any way. Place your middle and ring fingers along the front and back of the bridge, using your index fingers to very gently move the bridge back to a 90 degree angle.
3

If the bridge is too tight and will not budge, you can loosen one or two strings to provide more give. Do not loosen all of the strings as that will cause the bridge to fall over! Continue making very slight and small adjustments to the bridge until it is back in line.
Violin Bridge ReplacementEvery violin player faces the task of changing the bridge. With very few detachable pieces on a violin, changing the bridge is one of the most essential tasks for a violin player to know.
Step 1 Bridge


Identify two sides of your violin. The violin bridge has one side that is higher than the other. The lower side is the E-string side.
Step 2
Loosen the strings gently starting with the G-string and the E-string, then the D-string and the A-string.

• G-string• E-string• D-string• A-string
Only loosen the strings until you can easily remove the bridge from under the strings without having to drag the bridge out.
4
Step 3

Remove the bridge gently from the violin.
Step 4


Mark the New bridge: Use a pencil or other marking tool to add 4 light marks where the 4 strings sit on the top of the new bridge.
- The width should be wide enough so that when you are playing on only one string the bow won’t produce noise from adjacent strings.
- The width should also be narrow enough so that, when you are playing on two strings at the same time, you can use one finger to press on both these two strings without much difficulty.
- Suggested horizontal distance between adjacent strings is 9-12mm. Adjust it based on your finger width. You can also use your old bridge as a guide for where to make marks if you please.
Step 5

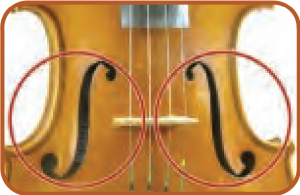

Place the new bridge between the center of the f-holes of your violin.
- Put the strings on your new bridge, align them with the marks you made in step 4.
5
Step 6
Hold the bridge in one hand and tighten the strings in the reverse order you loosened them. That is, tighten the A-string and D-string first, and then, tighten the E-string and G-string. Tighten until each string matches its rough standard pitch (violin tuner suggested).
- Continue to adjust the bridge to keep it perpendicular to the violin body every time you tighten the string so it is not leaning too far away from the f-holes.
- After tightening all four strings, play a little to test the string placement. If the distance between the strings is not comfortable for performance (as noted in step 4), repeat step 2-6 and adjust the distance between the strings on the bridge again to find the proper distance.
Step 7

Finally, make any last adjustments to the bridge. Ensure that it is nearly perpendicular to the violin body. Also make sure that the feet of the bridge sit flat on the body of your violin.
6

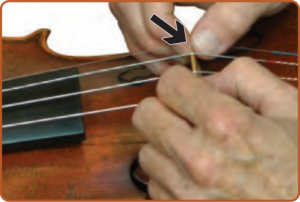
How to Tune Your ViolinHow to Tune a Violin with a Tuner
- Switch the tuner ON.
- Pluck the violin’s G string.
- Watch the gauge on the tuner, where you see a little needle moving around. The needle registers the pitch and tells you if your note is too low or too high. The tuner may also have a green light, to tell you when you’re on the best pitch.
- Make the adjustments to the violin string using the fine tuners (tighten if the note is too low, or loosen if it’s too high).
- Pluck the string again. The tuner keeps telling you how you’re doing as you adjust, until the little needle of the tuner is on target.
- When the needle stays in the center of the gauge — bingo! Your violin is in tune.
- Continue through the D, A, and E strings using Steps 3 through 6.
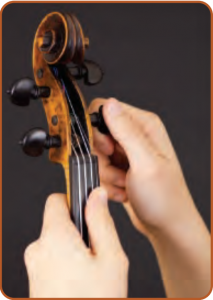
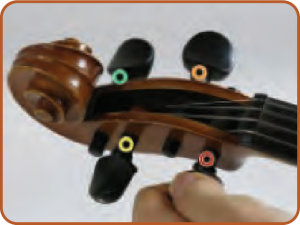
How to Tune a Violin Using Its PegsOn the violin there are both pegs and fine tuners. The pegs are used for when your instrument is really out of tune and the fine tuners are used for when it’s just slightly out of tune.On the violin there are four strings. Starting with the thickest string, they are called G, D, A, and E. When learning how to tune a violin, always start with the A string. In a sitting position with your violin upright on your knee, use your left had to pluck the string and use your right hand to turn the peg. Pluck the string as you turn your peg to the right to make it tighter and look at your tuner to see how close to the middle dial it is.
When it’s right in the center, bring your left hand up to the scroll and support it as you press the peg firmly into the hole to make it stay exactly in that spot, being careful not to let it move.
If the peg turns even a hair while you’re pressing in, it can make the string go out of tune. The real trick here is to press the peg into the hole it sits in firmly, and sometimes you will have to use all of your strength to make it stay where you positioned it.
7
If you can’t get the string perfectly in tune, that’s okay. Just get it as close as you can. For the rest of the pegs, you’ll use the same process, except when you go to tune the G and the D strings you’ll switch hands and use your left hand to turn and your right hand to pluck and support.
Note: If you play a note that sounds too high, carefully bring your finger closer to the violin scroll until you hear the right note. If you come across a note that sounds too low, slide it closer to the violin bridge until it is in tune.
Ways to Improve Your IntonationIntonation is a lifelong challenge for string players – which is not surprising, since perfect intonation is mathematically impossible. You can go from one note to another via a different series of perfect intervals and end up with slightly different frequencies.
- Get comfortable: It is important for you to get physically comfortable with your instrument. You may have perfectly good ears, but play out of tune because of a bad physical relationship with your instrument. Tension resulting from poor practice can result in inaccurate shifts, and even in an inability to hear yourself objectively when playing.
- Record yourself: This can be painful, but also enlightening. It helps to record yourself with decent equipment so that you don’t sound bad merely because of the quality of the recording itself. For violin tone, stereo makes a big difference.
- Practice slowly: It takes time to hear pitch precisely, so practicing fast too early while learning a piece will train fingers to fall imprecisely, and will dull objective listening.
- Delay vibrato: Never use vibrato until you have a clear idea of pitch. While learning a piece try playing it entirely without vibrato, and then with a very small, centered vibrato, until the pitch relationships jell.
- Practice scales and arpeggios accompanied by a drone: There is a simple note-generating programme on the internet that you can use for this purpose.
- Play solo Bach: In addition to all their other virtues, Bach’s sonatas and partitas for violin and his cello suites are excellent intonation studies. Every issue of melodic versus harmonic intonation relative to the open strings arises, forcing the player to decide consciously on a philosophy of intonation.
- Play duets
- Play chamber music
8
Features:
- High-Quality Piano Code
- Wood Grain Visible
- Double F Control Uniform Symmetry
- Set Up and Ready to Play
- Lightweight and Smooth Finish
- 80% Glossy and 20% Matt
- Plywood Body with Nice Flames Veneer on Top, Back & Side
- Dyed Hardwood Fingerboard & Chin Rest, Metal Tailpiece
- Ebonized Pegs and Nut
- Includes Student Foamed Triangle Case and Student Bow
- With Rosin and Bridge
- Metal Pull Plate
- Durable and Fine Tuning to Ensure Standard Tuning
Technical Specs:
- Bow Frog Material: Ebony
- Panel Material: Splint
- Side Panel Material: Maple
- Pull String Material: Metal
- Total Violin Length: 23.6” -inches
- Headstock Material: Maple
- Fretboard/Fingerboard Material: Maple
- String Material: Steel
- Product Dimension (L x W x H): 23.6” x 8.3” x 3.4” -inches
What’s in the Box:
- Violin
- Extra Set of String
- Tuner
- Shoulder Rest
- Cleaning cloth
Digital Violin Tuner:
- Convenient Clip-on Design
- Tuning Range: A0 – C8 (27.5 – 4186 Hz)
- Response Time: <20ms
- Used for Stringed Instruments: Guitars, Bass, Violins, Ukuleles
- Battery Powered Tuner: Requires (1) x Button Cell (CR-2032), Included
- Tuner Size: 2.4’’ x 1.0’’ x 2.0’’ -inches
9
![]()
Questions? Issues?We are here to help!Phone: (1) 718-535-1800Email: [email protected]
References
[xyz-ips snippet=”download-snippet”]