QAZQA 92645/92646/92647 Instruction Manual
Warning symbols
- Read the instructions

- Caution
- Lamp

General Safety Instructions
Read this instruction manual thoroughly before using the appliance and save it for future reference and if necessary pass the instruction manual on to a third party.![]() WARNING: When using electrical appliance, basic safety precautions should always be followed to reduce the risk of fire, electrical shock and personal injury.
WARNING: When using electrical appliance, basic safety precautions should always be followed to reduce the risk of fire, electrical shock and personal injury.
General
- Before carrying out any work on the fan, disconnect it from the electrical supply!
- Check if the electrical specifications of this appliance are compatible with your installation. The suppler accepts no responsibility for any physical injury or material damage resulting from incorrect use or installation of this fan. If you have the slightest doubt, please contact electrician.
- Unauthorized use and technical modifications to the appliance can lead to danger to life and health.
- This appliance can be used by children aged from 8 years and above and persons with reduced physical, sensory or mental capabilities or lack of experience and knowledge if they have been given supervision or instruction concerning use of the appliance in a safe way and understand the hazards involved. Children shall not play with the appliance. Cleaning and user maintenance shall not be made by children without supervision
- Children should be supervised to ensure that they do not play with the appliance.
- This appliance is for indoor use only.
- Means for disconnection must be incorporated in the fixed wiring in accordance with the wiring rules.
- Never install the appliance in a moist or wet room.
- Be careful when working near the rotating blades. The fan should be installed at least a height of 2.3m
- Before pushing the reversible slide switch, it is necessary to stop the action of the blades by turning off the fan
- Don’t place your arm or other object in the path of the blades, when the fan is operating.
- Always maintain the minimum distance between the lamp and any inflammable material (curtains, wall etc), as indicated on the pictogram
- Means for all poles disconnection having a contact separation that provide full disconnection under over voltage category III conditions must be incorporated in the fixed wiring in accordance with national wiring rules.
- Power supply wire from ceiling needs 1.5 sq mm wire
- Regarding the method of the cable connection , how to assembly and the bulb type reference of a luminaire, thanks to refer to the section “INSTALLATION”
- Warning: Before obtaining access to terminals, all supply circuits must be disconnected. “5. Appliance specification”.
- Warning: Before obtaining access to terminals, all supply circuits must be disconnected.
Electrical safetyThe appliance should be installed by authorized electrician only acc. to national wiring rules.
Specific Safety RulesThe fan is to be installed so that the blades are more than 2.3 m above the floor
Environmental protection
![]() CAUTION
CAUTION
Electrical products must not be thrown out with domestic waste. They must be taken to a communal collecting point for environmentally friendly disposal in accordance with local regulations. Contact your local authorities or stockist for advice on recycling. The packaging material is recyclable. Dispose of the packaging in an environmentally friendly manner and make it available for the recyclable material collection-service.
Appliance specifications
| TECHNICAL CHARACTERISTICS | |
| Rated voltage | 220-240 V |
| Rated frequency | 50 Hz |
| Rated wattage | 50 W |
| Bulb rating | GU10 3x50W Max. |
| Ambient operating temperature | 25 °C |
| Protection class | I |
| IP number | IPX0 |
| Protective shields | N/A |
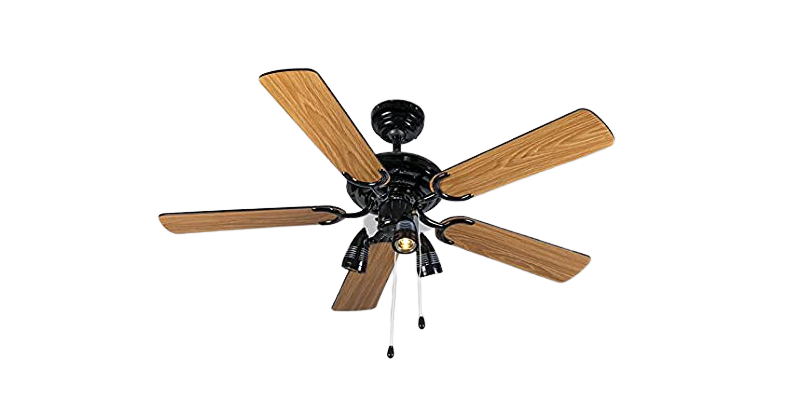
The ceiling fan (element)
PARTS DESCRIPTION
- MOUNTING PLATE
- J HOOK (FOR TEMPORARY HANG UP THE FAN WHEN WIRING CONNECTION)
- SCREWS
- SCREWS
- HANGER BALL
- UPPER CANOPY
- DOWNROD
- CROSS PIN
- COTTER PIN
- DOWNROD YOKE
- SCREWS
- MOTOR
- BLADE HOLDER SCREWS
- BLADE
- BLADE HOLDERS
- SCREW
- SWITCH HOUSING
- PULL CHAIN
- MALE AND FEMALE CONNECTOR
- SWITCH COVER
- SPOTHEAD
- LIGHT BULB(Not provided)
Installation of the ceiling fan
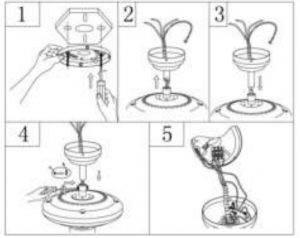
- Install the mounting plate by screw (Fig.1)
- Insert downrod over upper canopy (Fig 2 3)
- Then, insert the cross pin over yoke and Cotter pin(Fig 4)
- Connect the wire as the fig show (Fig 5)
- Make sure the wiring correct, if you are not sure, pls consult qualified electrician (Fig.6) Black +Brown wire “L” Blue wire “N” Green & yellow wire
- Hang up the fan and assembly the mounting plate with the motor set by side screws (Fig 7)
- Assembly the blades to blade holders (Fig 8)
- Move away the stopper from motor (Fig 9)
- Connect the light kit by male and female connector. (Fig 10)
- Tight up the screws, overtightening of the screws crack the lamp shade and cause daangers.(Fig 11)
- Loose the lock ring before install the light bulb (Fig 12)
- Install the light bulb (bulb not provided)(Fig 12
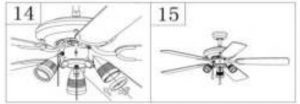
- Tight up the lock ring after Install the light bulbs (Fig 14)
- Now, the fan is completed (Fig 15)


If the fan or light kit is PARTIALLY pre-assembled, you can skip the assembly procedures to next step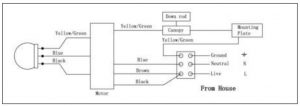
How to use
One pull chain switch is for light control, another one for speed control – The speed can be selected by pressing the speed chain HI-1 pull, MED –2 pull, LOW—3 pull, OFF—-4 pull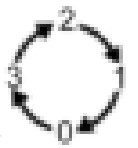
![]() Light on off can be controlled by pressing the light chain ON–1 pull, OFF–2 pull
Light on off can be controlled by pressing the light chain ON–1 pull, OFF–2 pull
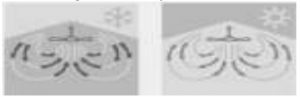
- Direction switch on the fan ‘s switch box(SUMMER and WINTER switch)
- Down for summer make the air movement directly from ceiling
- UP for winter, to circulate the warm air generated by heater to floor
Remote Control
(remote control adaptable, but this model does not included)This ceiling fan can be installed with remote control, but make sure you know how to install the device in safe way or consult licensed electrician Warranty may be affected if you install the improper remote control or install it in improper way.
Disconnect from mains before maintenance or cleaning.
Do not use a wet sponge to clean the appliance.
- Before conducting any cleaning or maintenance work, disconnect the lamp from the electrical supply and wait until it cools down
- No abrasive products, solvents, detergent or any other liquid may be used to clean the fan or lamp
- Be sure the power is off when you clean the fan
- Don’t clean the motor, switch house and other electric parts of the fan with water in order to avoid short circuit
Trouble shooting
| TROUBLE | PROBABLE CAUSES | SUGGESTED REMEDY |
| 1. Fan will not start | A/ Fuse or circuit breaker blown. B/ Loose power line connections to the fan.
C/ Speed controller not in correct position. |
A/ Check main and branch circuit fuses or circuit breakers.
B/ Check line wire connections to fan C/ Check speed controller’s position. |
| 2. Fan sound noisy | A/ Top canopy touching ceiling. B/ Loose fan blade screws.
C/ Ceiling fan not secured against ceiling. D/ Incorrect speed controller. |
A/ Lower Canopy from ceiling to ensure minimum 3 mm clearance.
B/ Re-tighten all screws on fan blades but never over-tighten. C/ Re-tighten all screws in the hanging bracket or plate. D/ Change the controller to the one supplied. |
| 3. Mechanical Noise | A/ Allow at least for 8 hours
settling-in period. |
|
| 4. Fan Wobbles | A/ Fan blades are not horizontal to ceiling.
B/ Blade screws are loose. |
A/ Measure from ceiling to tip of blades, then rotate fan so all blades are checked for equal height from ceiling (not adjustments may be made by slight pressure up or down on blade holders). Make sure all screws are securely fastened. |
DYNAMIC BLADE BALANCE KIT

PREFACE
Your ceiling fan may sometimes have wobble problem when operate due to irregularity in blades or the blade holder. Also, improper assembly in the mounting system may cause some additional problem also bearing crooked. The following procedure to remedy such problem is strongly recommended by us from our past experience in handling the wobble problem.
Dynamic blade balancing kit for ceiling fans
- Make sure that all blade are firmly screwed into the blade holder
- Make sure that all blades are firmly secured the flywheel and check pitch of blade holders all must be the same
- By looking up the fan from below, check and be certain that none of the blade holders are bent so that none of the blade is out of position. A correction can be made by very gently bending the blade holder back into position
- By the simple use of a household yardstick blade tracking can be checked, out the yardstick up against the ceiling vertically and even with the outside leading edge of a blade. Note the distance of the edges of the blade to t he ceiling; carefully turn the blade slowly by hand to check the remaining blades. If blade is not in alignment, the blade holder may be gently bent up or down to be in line with the other blades
If by following all the steps and the wobble problem is not solved, a dynamic balancing need to be done by the use of the balancing kit. Follow the procedure listed below:
- Turn the fan on and adjust the speed control (usually high speed) setting to the speed, which creates to greatest wobble.
- Turn the fan off; select on blade place the balance clip on it. Halfway between the blade holder and the blade up on the rear edge of the blade.
- Turn the fan on, watch to see of the wobble is improved or worse. Then, turn the fan off again and move the clip to another blade and test again. Repeat this process with all blades and then note that blade which is the most improved.
- Move the clip back to the blade, which showed the most improvement. Move the clip inward and outward on this blade and operate t he fan to find the position where the clip gives the most improvement
- Next remove the clip and install a balancing weight to the top of the blade along the centerline near the point where the clip was positioned
Caution:stay clear of the blades if the clip for any reason is not secured, injury could result
Others
Have your product repaired by a qualified personThis electric product is in accordance with the relevant safety requirements. Repairs should only be carried out by qualified persons using original spare parts; otherwise this may result in considerable danger to the user. This appliance can be used by children aged from 8 years and above if they have been given supervision or instruction concerning use of the appliance in a safe way and if they understand the hazards involved. Cleaning and user maintenance shall not be made by children unless they are older than 8 and supervised. Keep the appliance and its cord out of reach of children aged less than 8 years. Please contact the store which you bought the product for after sale services if question This appliance can be used by children aged from 8 years and above if they have been given supervision or instruction concerning use of the appliance in a safe way and if they understand the hazards involved. Cleaning and user maintenance shall not be made by children unless they are older than 8 and supervised. Keep the appliance and its cord out of reach of children aged less than 8 years. Appliances can be used by persons with reduced physical, sensory or mental capabilities or lack of experience and knowledge if they have been given supervision or instruction concerning use of the appliance in a safe way and understand the hazards involved. Children shall not play with the appliance.
Please contact the store which you bought the product for after sale services if question
| Information requirements regarding the eco-design | |||
| Description | Symbol | Value | Unit |
| Maximum fan flow rate | F | 64.16 | m3/min |
| Fan power input | P | 43.50 | W |
| Service value | SV | 1.47 | (m3/min)/W |
| Standby power consumption | PSB | 0.0 | W |
| Seasonal electricity consumption | Q | 13.92 | kWh/a |
| Fan sound power level | LWA | 43.50 | dB(A) |
| Maximum air velocity | c | 1.42 | m/seg |
| Regulation Nº 206/2012 | |||
| IEC 60879:1986 | |||
| EN 50564:2011 | |||
| Measurement standard for service | EN 60704-2-7:1998 | ||
| EN 60704-1:2010 | |||
| [Shall not appear all of these ones, but the same as the ones which are detailed in | |||
| the ERP test report] |
[xyz-ips snippet=”download-snippet”]