
![]()
Q1 Hummer User Manual

Copyright© Qiewa Industrial Co., Ltd All Right Reserved
 Safety Precaution
- Do not place battery near fire, flammable, explosive, or corrosive objects.
- Do not dissemble battery or charger, any damage caused by such actions are not eligible for warranty.
- Do not short the circuit with wires or fuses.
- Do not drop or throw battery and charger.
- Please store battery in dry, ventilated environment.
- Do not cover battery or charger with other objects to prevent overheating.
- Keep battery and charger away from young children.
- Do not carry charger while riding, any damage caused by user’s mistake will void warranty.
Battery Usage
- Avoid sharp or uneven surfaces such as railroads and stairs.
- Please double-check all structures and brake systems before riding.
- Do not temp to service or modify any part.
- Do not overload or hang objects on handle bar.
- Please wear rain coat if riding in rain, do not ride while holding umbrella.
- Please wear protection gear at all times and obey all local traffic laws.
Battery Usage
- Keep Battery charged if possible, or it may shorten battery life.
- Recharge the battery at least once per month if not in use.
- Replace the battery if any damage found on exterior of the battery or wire.
- Park at cool area and avoid direct sunlight in hot seasons, keep battery in 5 – 3 0°C environment.
- Do not overcharge the battery.
- Do not recharge while using.
How to Recharge
- Do not charge continuously mere than 18 hours.
- Please remove power plug from power source first, then remove the charge plug from the battery.
- Red light indicates power connection; green light indicates recharge completed.
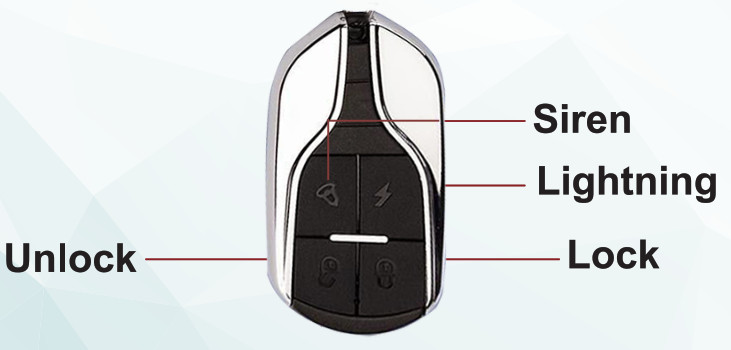
Remote Controller
- Lock: Lock mode, vehicle cannot be started.
- Unlock: Unlock mode, vehicle cannot be started.
- Lightning: After alarm deactivated, press twice to trigger siren sound, now the vehicle is ready to be strted.
- Siren: Activate alarm.
Product Structure

- Electronic Instrument Gauge
- Quick Release for Handle Bar
- Remote Control
- Handle Bar Beam
- Headlight & Horn
- Quick Release for Chassis
- Front Suspension
- Tires
- Kick Stand
- Mud Flap
- Tail Light
- Disk Brakes
- Rear Suspension
Electronic Instrument gauge
- Press and hold to turn off.
- While turned off, press once to turn on, press again to switch data review.ODO = Total travelled mileageRM = Remaining meleageERRO = Error/MalfunctionTrip= Single trip mileage.TM = Current Time
- Press +/- to adjust travel speedGears: 1st gear is slowest, 3rd gear to be traveled at highest speed.
- Press and hold + and — to enter setting mode, press to change settingP01: Background lighting: higher the number the brighter. (Def. 2)P02: Unit: 0 for km, 1 for mileP03: Voltage level: 24v,36v,48v.(Def.48v)PO4:Gauge Stand by time: 0 means always on, can be set 1 to 60 min. (Def. 5 min)P06: Wheel Size: Def 0011.0, do not change this setting.P07: Speed Calibration: Def.00024, do not change this setting.P09: 0 = Accelerator starts 1 = Slide start(Def. 0)P14: Remote Control Current Limit: 1-20A, Def. 12, do not change this setting.P15: Speed Limit: Set 0 — 100km/h, Def. 60km/hP16: Cruise Control: 0 to shut off, 1 to activate. Def. 1.
- WARNING: Suggest NOT to change any of above settings, any damages caused by altering setting references are not eligible for warranty.

Specification
- Specification (Dimension) 113*61*121cm(Wheel Base ) 93cm(Weight ) 25kg(Max Load ) 200kg(Battery ) Lithium Battery(Voltage) 48v(Output ) 800w(Tire Size) 10″(Tire Type) Inflatable(Handle Bar) Quick Release(Chassis) Quick Release(Max Speed) 55km/h(Suspension) F&R(Range) 100km(Range may vary by load.)
- Safety (Headlight ) 0(Chassis Lamp) 0(Remote) 0(Brake Light ) 0(Aluminum ) 0(Seat) Removable(Brakes) Disk
- Charger(Power) 48v3a (Recharge Time) 12Hr
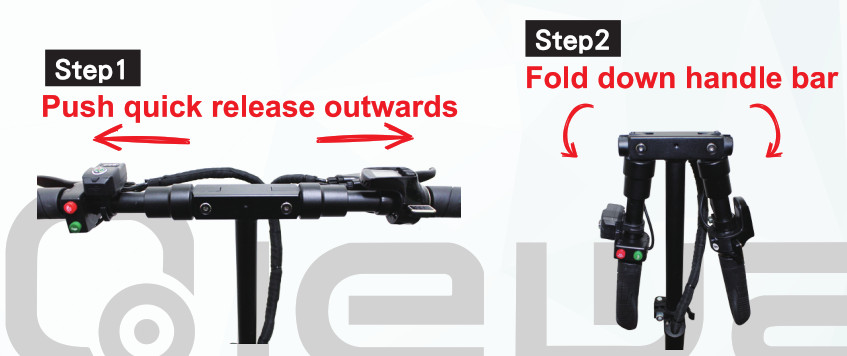
Chassis Folding/Unfolding

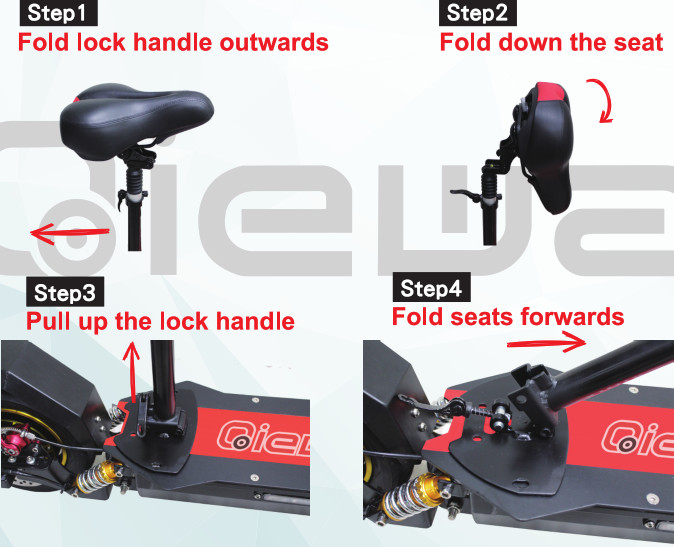
Seat Installation
Trouble Shooting
- ERRO 1 : Electrical error
- ERRO 2 : Throttle error
- ERRO 3 : Controller error
- ERRO 4 : Brake malfunction
- ERRO 5 : Low voltage protection
- ERRO 6: Communication fail, gauge fail to receive input from remote.
- ERRO 7: Communication fail, remote fail to receive output from gauge.
- It is normal and do not worry if ERRO flashes on gauge while braking.
Support
| Malfunction | Reason | How to fix |
| Gauge shows no power | 1.Battery too low | Replace switch unit |
| 2.Broken fuse | Fully charge the battery | |
| Gauge shows enough power but cannot start | 1.Battery false wiring | Reconnect firmly |
| 2.Damaged wires | Send to distributor for service | |
| 3. Handle bar false wiring | Send to distributor for service | |
| Range too short | 1.Low tire pressure | inflate the tires |
| 2.Damaged battery | Replace the battery | |
| 3.Low charge or damaged charger | Fully charge the battery or replace the charger | |
| 4.UphilI, against wind, or overweight loads | Suggest to assist with man-power | |
| Not charging | 1.Charger plug misconduct | Clean conduct points. |
| 2.Damaged charger | Replace charger | |
| 3.Damaged Battery | Replace battery | |
| 4.False wiring | Replace fuse | |
| Others
|
1.Ff above trouble shooting does not solve issue | Please contact distributor or manufacturer |
| 2.Damaged controller, battery, or charger | Temp to dissemble and fix may void warranty |
Visit us at QiewaScooter.com for any questions about your scooter.Copyright© Qiewa Industrial Co., Ltd
[xyz-ips snippet=”download-snippet”]