qtx USB Powered UHF Neckband Microphone User Manual

Introduction
Thank you for choosing the U-MIC for your wireless microphone requirements. This system is designed to provide a reliable, cable-free solution with minimal setup and ease of use. Please read and keep this user manual to get the best results from your product and avoid damage through misuse.
Layout
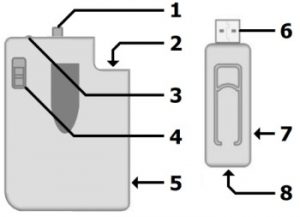
- Volume control
- 3.5mm neckband mic input
- LED power indicator
- Power switch
- Battery compartment (rear)
- USB type A plug
- 3.5mm audio output
- USB type A socket

Setting up
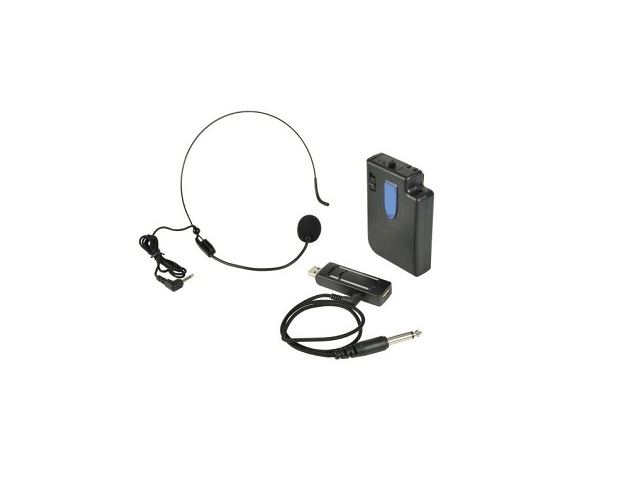
The U-MIC is supplied as a neckband microphone, beltpack transmitter and USB receiver with a 3.5mm to 6.3mm jack lead. The USB type A plug (6) on the receiver should be connected to a USB port for power (5V, 500mA). This can be from a USB power adaptor or power bank for portable use if required. The connection can also be made to the receiver using an optional USB extension lead if preferred.Note: the audio is not transmitted to the USB port. The USB is for power only. If the USB port is a U-Disk player or computer port, the digital media (USB stick) or other peripheral device can still be connected through the receiver by connecting to the USB type A socket (8) on the rear of the receiver. Connect the supplied 3.5mm lead from the output jack (7) on the receiver.
Operation
The U-MIC receiver is designed to connect to a microphone input channel on a mixer or amplifier. Turn down the volume level on the microphone input of the mixer or amplifier before connecting to avoid loud noises when connecting. Connect the 3.5mm plug end of the supplied lead to the U-MIC receiver (7) and the 6.3mm plug into an appropriate microphone input channel. The beltpack transmitter has an on/off switch (4), which should be in the up position (off). The top volume control (1) should be turned fully down.Connect the neckband microphone to the 3.5mm microphone input (2). Slide open the cover of the battery compartment (5) and insert 2 x AA alkaline batteries, ensuring that the polarity is the correct way around. Move the switch down to the “on” position and the power indicator (3) should light. Note that the switch has a centre position which is also “on”. Gradually turn up the volume control on top of the transmitter and the level on the mixer or amplifier and speak into the neckband microphone until the sound can be heard through the connected speakers or recording equipment. Increase the volume to the required level. If the microphone is not being used, turn down the volume level on the top of the beltpack transmitter and the mixer/amplifier and switch the power off. For long term storage, unplug the jack and USB receiver and remove the batteries from the beltpack transmitter.
Specifications
| Model | U-MIC-863.2-N | U-MIC-864.8-N |
| Carrier frequency | 863.2MHz | 864.8MHz |
| Power supply | USB 5V 0.5A (receiver), 2 AA batteries (transmitter) | |
| Frequency response | 50Hz – 15kHz | |
| Capsule | Back electret condenser | |
| Output connection | 3.5mm mono jack | |
| Wireless range | Up to 50m | |
| Dimensions: transmitter | 105 x 65 x 30mm | |
| Weight: transmitter | 67g (no battery) | |
| Dimensions: receiver | 80 x 23 x 13mm | |
| Weight: receiver | 17g |
 Disposal: The “Crossed Wheelie Bin” symbol on the product means that the product is classed as Electrical or Electronic equipment and should not be disposed with other household or commercial waste at the end of its useful life. The goods must be disposed of according to your local council guidelines.
[xyz-ips snippet=”download-snippet”]


