 OWNER’S GUIDEENERGY SAVER WHOLE HOUSE FAN
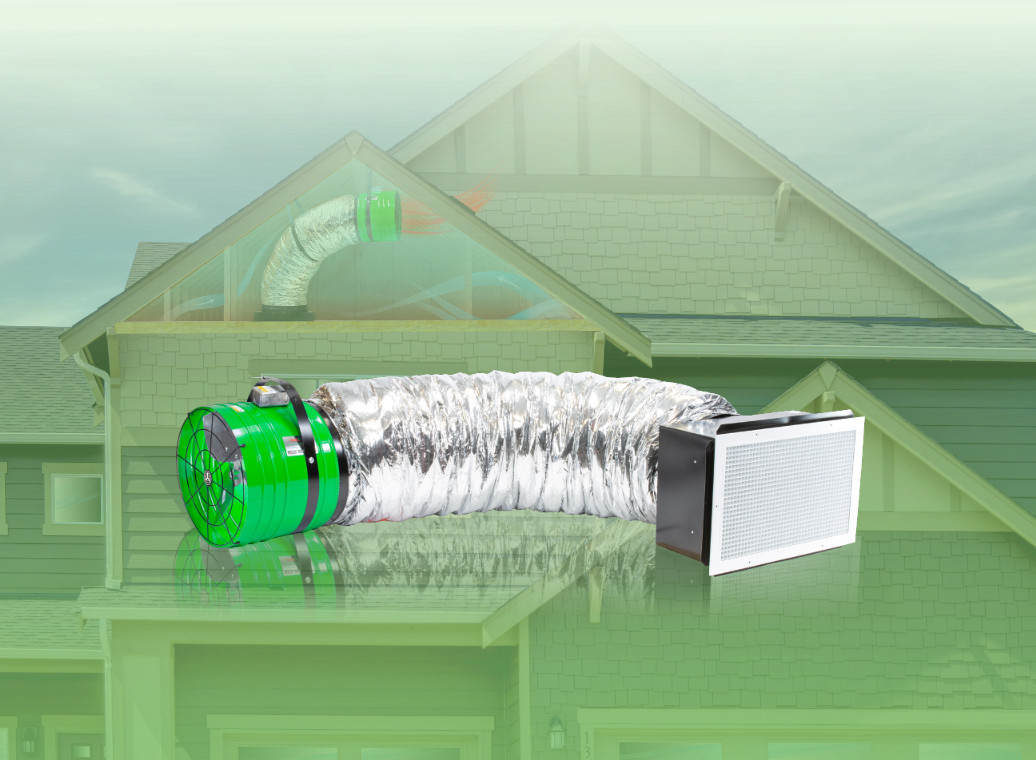
!DO NOT THROW AWAY!SERIAL NUMBER FOR FAN IS LOCATED ON THE BACK COVER OF THE OWNER’S GUIDE.LEAVE WITH HOMEOWNER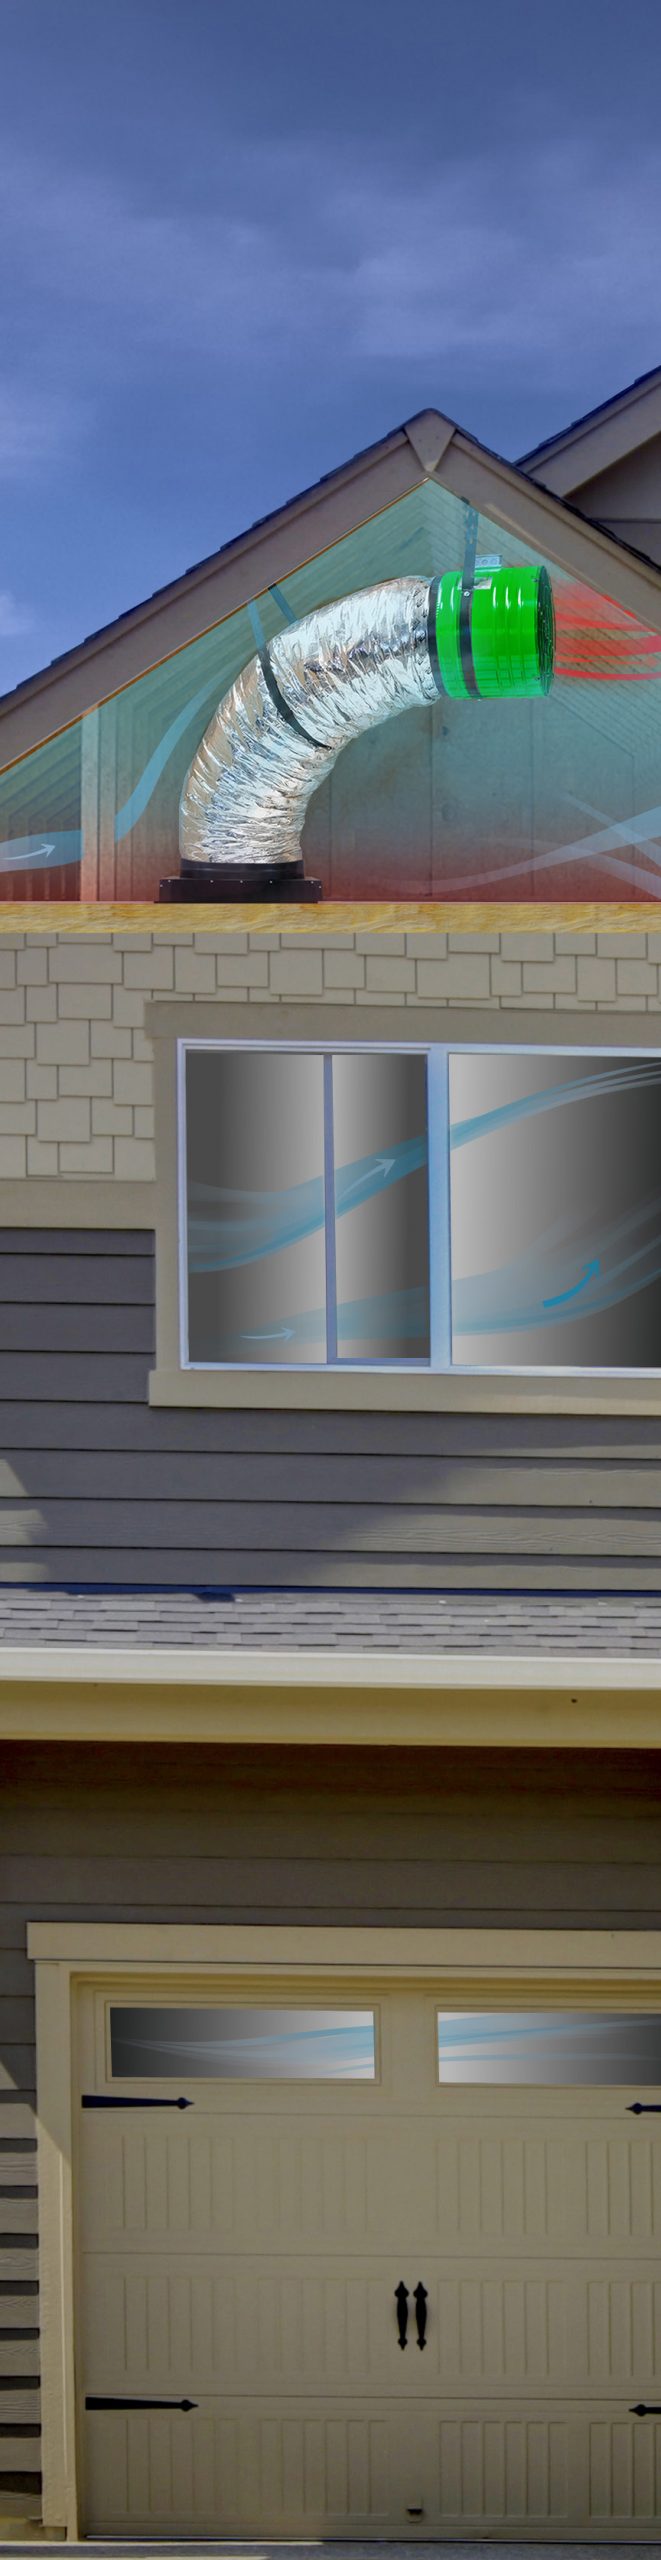

QC MANUFACTURING, INC.26040 YNEZ ROADTEMECULA, CA 92591PHONE 1-888-QUIETCOOLWEBSITE WWW.QUIETCOOLSYSTEMS.COM
HOW TO USE YOUR QUIET COOL
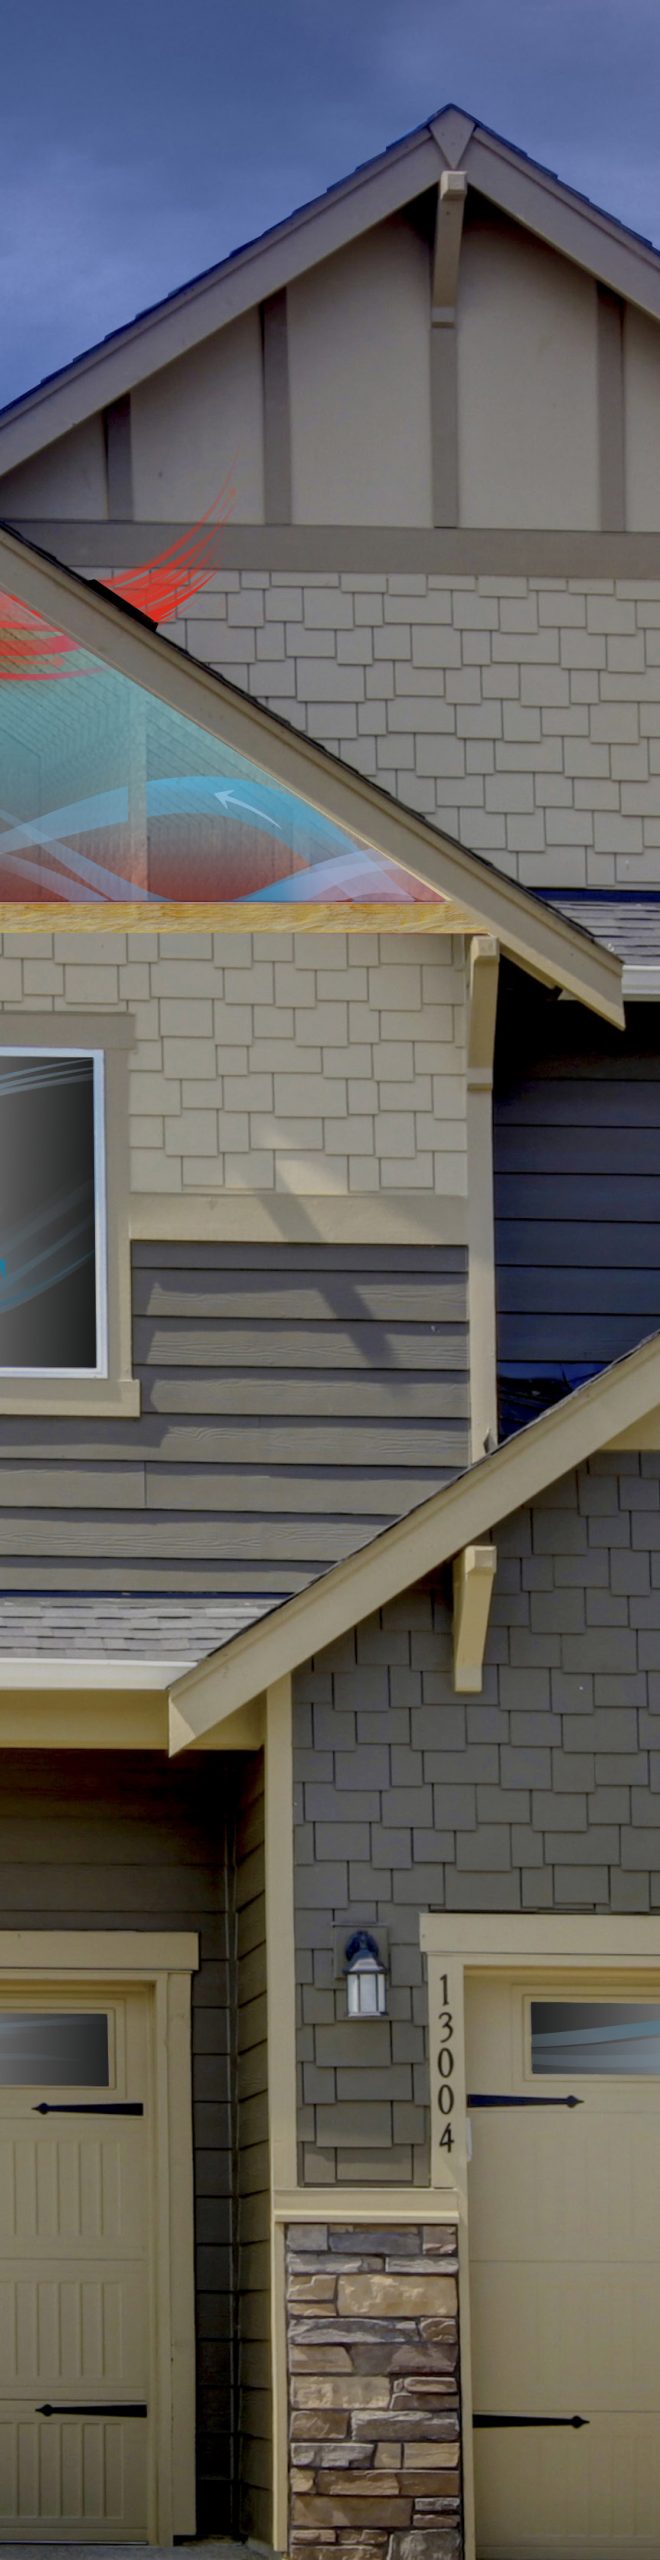
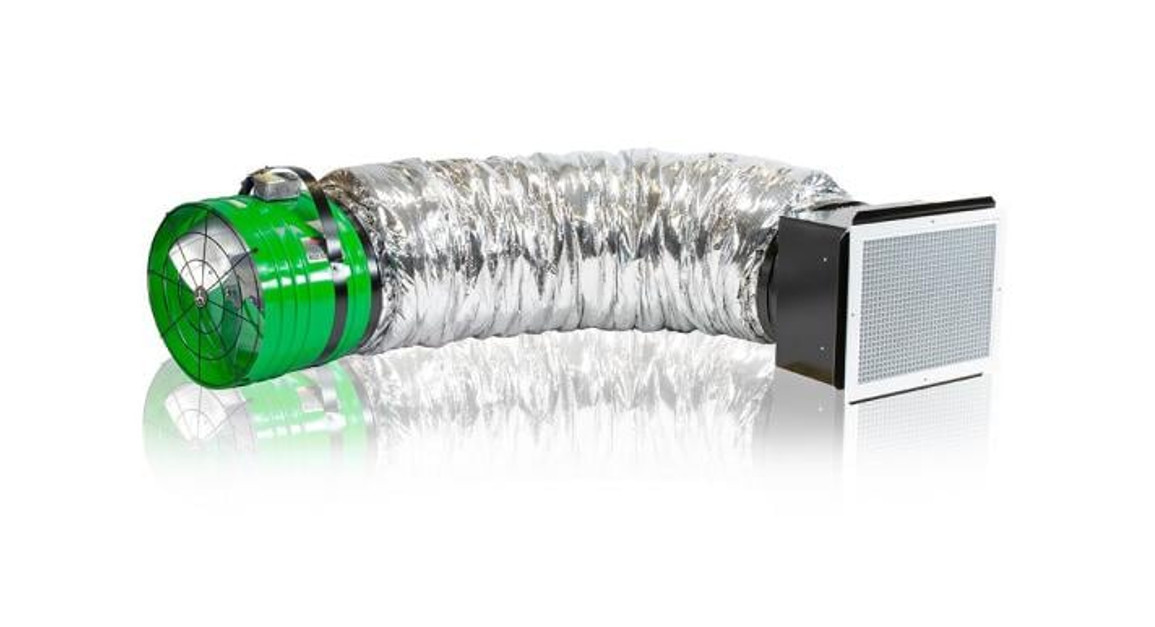
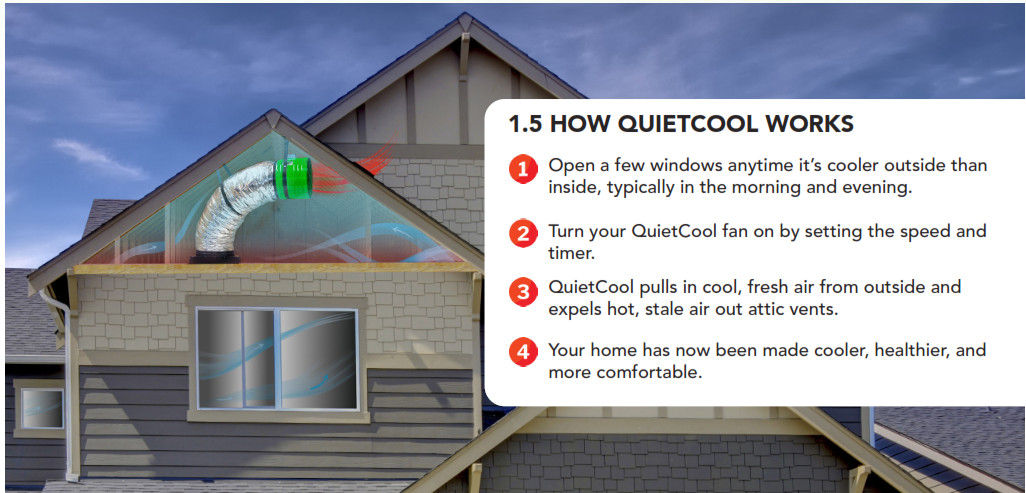
INTRODUCTIONCONGRATULATIONSon the purchase of your new QuietCool Whole House Fan!The QuietCool whole house fans dominate the market in energy efficiency and quietness. Whole house fans operate by pulling the cool air from outside your home, through the living space, into your attic, and out your attic vents. This accomplishes a cooling effect that can save you up to 90% off your A/C-related energy costs depending on where you live. The difference between QuietCool and a standard whole house fan is a mix between its’ astounding energy efficiency and its’ jaw-dropping sound level. A standard whole house fan operates around 75dB; that’s equivalent to a loud vacuum cleaner running!The QuietCool system uses a cutting-edge, patented design to get our sound levels down to a respectable level. Our fans suspend in the attic and use an acoustical duct that connects to a ceiling box and grille. The result is an easy installation and quiet operation.Once the air outside is cooler than the indoor air, crack open a few windows, turn your uietCool on, and enjoy the hot air being sucked out of your home and pushed out of your attic with a nice, cool breeze. While performing 15-22 complete air exchanges per hour, the QuietCool whole house fan system will force the hot stale air out of the attic which will help your house stay cooler during the hotter hours of the next day!

FEATURES+ Ultra-Energy Efficient ECM+ Patented Design+ Built-in USA+ R5 Insulated Dampers+ 10 Year Warranty
WHEN TO RUN THE QUIETCOOL WHOLE HOUSE FANAnytime it is cooler outside than the inside of your home, the system will work effectively. In the summer this normally happens in the late afternoon to early evening, through to the next morning. We recommend running your fan through the evening. If you have a multi-speed fan, you will get the best cooling effect when you turn the fan on low afterthe desired cooling occurs and lets it run throughout the night.WHERE TO START COOLING THE HOMEWe recommend cooling the area where you are going to be spending the most time for the next few hours. For example, in most family situations, the early evening is spent in the kitchen or family room area. Assuming this to be true, this is where you would want to start the cooling process.Begin opening a few windows in the area you are going to be spending your time and turn on all of your QuietCool fans at once, for maximum cooling. The cool outside air will immediately begin to create a breeze in the homemaking you instantly feel up to 10 ºF cooler. Opening windows too wide or opening too many windows will lessen the cooling breeze you feel.The breeze will flow through your home and make its way to each QuietCool you have in operation. As it gets later in the evening, and even cooler outside, you can begin to open windows in other rooms of your home, to prepare for bedtime. Then when it’s time for bed, you should close all the windows in your main living space, but leave the windows in your occupied bedrooms open. This will provide each room with a cool breeze as long as desired.Using the timer, you can automate your fan and have it turn off when you anticipate it being comfortable for sleeping. If you have a QuietCool installed in each bedroom as we recommended, you can enjoy the breeze and your privacy with your door closed.

INDOOR AIR QUALITYYou will want to ventilate your home on a very regular basis. Many studies, such as one from the Environmental Protection Agency, show that the air inside a home can be 2-5 times more polluted than the air outside, even in the smoggiest of cities. Your QuietCool system can greatly reduce this problem by bringing in fresh air and exhausting stale polluted air.Even in the cold winter months, running your QuietCool for just a few minutes each day will allow you and your family to breathe happier and healthier.USING QUIET COOL DURING THE WINTERDuring the winter, you can use the QuietCool to warm up your home during the warmer parts of the day. Usually, this occurs mid-day.By running the QuietCool during the warmer parts of the day in the winter, you can heat up the thermal mass in your home so your heater doesn’t have to work as hard. This also allows you to purge your home of the old, stale air that accumulates in your home during the winter due to a lack of opening windows.If you have any trouble installing or operating your new QuietCool whole house fan, or for more tips on running the QuietCool, please visit our website www.QuietCoolSystems.com or call us at 951-325-6340 for support.
SYSTEM OVERVIEW
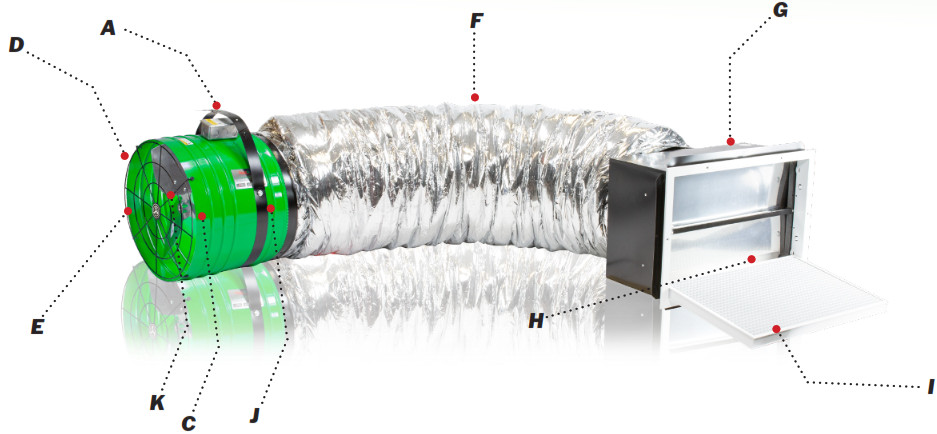
PRODUCT DIAGRAMA. ADJUSTABLE HANGING STRAPS – Keyhole straps that allow you to adjust up or down without removing the screw so the fan can be hung in nearly every attic space.B. DUCT CLASP – Duct clasp that helps secure the ducting to the Airtight Damper Box and Steel Housing without screws or tape.C. HEAVY DUTY STEEL HOUSING – This is the cylinder that houses the motor. Comes in diameters of 14”, 16”, 18”, 20”, 22”, and 24”.D. COMPUTER BALANCED FAN BLADES – High-performance fan blades that cut through the air in the most efficient and effective way possible.E. HAND GUARD – Guard that protects from potential injury or fan obstruction.F. HIGH-PERFORMANCE ACOUSTICAL DUCTING – Noise dampening technology with insulated ducting that is used to separate the Steel Housing from the living space.G. AIRTIGHT DAMPER BOX – Damper Box with R5 insulated doors that prevent any heat transfer from the attic to the living area.H. R5 DAMPER DOORS – R5 lined damper doors to prevent air movement between the home and attic.I. HIGH AIRFLOW GRILLE – Aesthetically pleasing removable egg-crate ceiling grille.J. DUCT COLLAR – The adjustable collar that helps seal and secure the Heavy Duty Steel Housing and the Airtight Damper Box with no air leakage.K. ULTRA-ENERGY EFFICIENT ECM MOTOR – The Electronically Commutated Motor is the most energy-efficient motor available in a QuietCool Whole House Fan.
SYSTEM VENTING REQUIREMENTS
![]() VERY IMPORTANT: 1 SQUARE FOOT OF NET FREE VENT AREA PER 750 CFM
VERY IMPORTANT: 1 SQUARE FOOT OF NET FREE VENT AREA PER 750 CFM![]() RECOMMENDED: 2 TO 4 SQUARE FEET OF INLET VENTS PER FANVenting plays a very significant role in the performance of QuietCool fans. QuietCool recommends a minimum of 1 SQ. FT. of venting for every 750 CFM in the QuietCool system. If an attic has at least 1:750 attic venting, the QuietCool system will operate efficiently and effectively. If an attic has less than 1:750 attic venting, the system may not operate as efficiently, or effectively, as it could with 1:750 attic venting. But don’t worry, the system will still operate if there is not enough venting.Insufficient venting is a very simple problem to fix. Roofing contractors can add extra venting to most homes simply and easily. The most common type of venting is shown in the chart below.
RECOMMENDED: 2 TO 4 SQUARE FEET OF INLET VENTS PER FANVenting plays a very significant role in the performance of QuietCool fans. QuietCool recommends a minimum of 1 SQ. FT. of venting for every 750 CFM in the QuietCool system. If an attic has at least 1:750 attic venting, the QuietCool system will operate efficiently and effectively. If an attic has less than 1:750 attic venting, the system may not operate as efficiently, or effectively, as it could with 1:750 attic venting. But don’t worry, the system will still operate if there is not enough venting.Insufficient venting is a very simple problem to fix. Roofing contractors can add extra venting to most homes simply and easily. The most common type of venting is shown in the chart below.
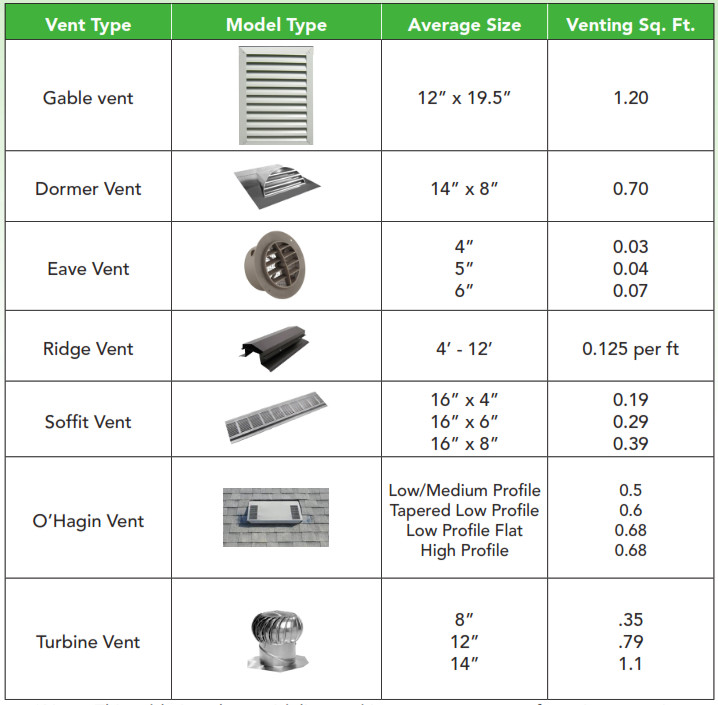
*Note: This table is only a guideline and is not a guarantee of venting capacity.
READ ALL INSTRUCTIONS IN THIS GUIDE BEFORE INSTALLING YOUR QUIET COOLGETTING STARTED![]() STOP! Read the following pages before proceeding! The manufacturer is NOT responsible for faulty installation or product damages caused through failure to fully read this guide BEFORE attempting installation.GENERAL SAFETY INFORMATION1. READ INSTRUCTIONS – All safety and operation instructions must be read.2. RETAIN INSTRUCTIONS – The safety and operating instructions should be kept for future reference.3. HEED WARNINGS – All warnings should be followed.4. FOLLOW INSTRUCTIONS – All installation and operating instructions should be followed.5. WATER – The QuietCool system should not be used near water. If you live in a very humid climate, be sure to cover your damper box with insulation to reduce condensation.6. HEAT – The QuietCool system should be situated away from heat sources.7. DAMAGE REQUIRING SERVICE – Only qualified service personnel should service the QuietCool system. The user should not attempt to ser vice the product.8. AVOID BACKDRAFTS – Care should be taken to avoid back-drafting combustion appliances that are installed in the conditioned space. Whole house fans are capable of pulling large quantities of air, from the home, particularly if not enough windows are open. This could easily backdraft gas appliances located inside your home. Take care if you have gas appliances installed inside of your home.
STOP! Read the following pages before proceeding! The manufacturer is NOT responsible for faulty installation or product damages caused through failure to fully read this guide BEFORE attempting installation.GENERAL SAFETY INFORMATION1. READ INSTRUCTIONS – All safety and operation instructions must be read.2. RETAIN INSTRUCTIONS – The safety and operating instructions should be kept for future reference.3. HEED WARNINGS – All warnings should be followed.4. FOLLOW INSTRUCTIONS – All installation and operating instructions should be followed.5. WATER – The QuietCool system should not be used near water. If you live in a very humid climate, be sure to cover your damper box with insulation to reduce condensation.6. HEAT – The QuietCool system should be situated away from heat sources.7. DAMAGE REQUIRING SERVICE – Only qualified service personnel should service the QuietCool system. The user should not attempt to ser vice the product.8. AVOID BACKDRAFTS – Care should be taken to avoid back-drafting combustion appliances that are installed in the conditioned space. Whole house fans are capable of pulling large quantities of air, from the home, particularly if not enough windows are open. This could easily backdraft gas appliances located inside your home. Take care if you have gas appliances installed inside of your home.
WARNINGS![]() CAUTION: This unit has an unguarded impeller. Do not use in locations readily accessible to people or animals.
CAUTION: This unit has an unguarded impeller. Do not use in locations readily accessible to people or animals.![]() CAUTION: Do not operate any fan with a damaged cord or plug. Discard fan or return to an authorized service facility for examination and/or repair.
CAUTION: Do not operate any fan with a damaged cord or plug. Discard fan or return to an authorized service facility for examination and/or repair.![]() CAUTION: Do not run cord under carpeting. Do not cover the cord with throw rugs, runners, or similar coverings. Do not route the cord under furniture or appliances. Arrange cord way from traffic area and where it will not be tripped over.
CAUTION: Do not run cord under carpeting. Do not cover the cord with throw rugs, runners, or similar coverings. Do not route the cord under furniture or appliances. Arrange cord way from traffic area and where it will not be tripped over.
TEMPLATE SIZES
The template size varies depending on which model of QuietCool fan you are installing:
| QuletCool Fan Model | Template Size | Vertical Adapter Model(Sold Separately) |
| QC ES-1500 | 14-1/4″ x 14-1/4″ | VA-1414 |
| QC ES-2250 | 14-1/4″ x 18-1/4″ | VA-1418 |
| QC ES-3100 | 14-1/4″ x 22-1/4″ | VA-1422 |
| QC ES-4700 & QC ES-5400 | 14-1/4″ x 30-1/4″ | VA-1430 |
| QC ES-6000 & QC ES-7000 | 14-1/4″ x 36-1/4″ | VA-1436 |
SPECIAL INSTRUCTIONS
- CHECK the box when opening for the first time; loose parts may shift during shipping. Check box contents against the section “Included in the Box” before proceeding with the installation. Do NOT throw away the shipping box until completely satisfied with the product. Note: Included controls will be located at the bottom of the box.
- BEFORE CUTTING into ceiling drywall, “measure twice, cut once.” This ensures that you don’t make mistakes in either selecting the wrong location for the intake grille, or cutting the wrong size hole.
- READ wiring instructions BEFORE attempting to wire the product. Product warranty does NOT cover defective motors resulting from wiring errors.
- DO NOT use any QuietCool ducted whole house fan in a home with all closed windows.
- TEST your QuietCool unit before installation using the included power cord. If the fan does not work, call us immediately.
SPECIAL INSTRUCTIONS TO CONTRACTORS
- DO NOT take the Owner’s Guide with you after the installation. This Owner’s Guide has the serial number and warranty information of the homeowner’s product.
- DEMONSTRATE the use of the product to the customer before leaving the home, INCLUDING; explain the use of the timer, switch, and/or smart application as applicable.
- PROVIDE the customer with a completed invoice that clearly shows your company name, product model # and product serial number, date of sale and installation, and the price paid. The manufacturer is not liable for warranty claims where proof of purchase cannot be verified.
SPECIAL INSTRUCTIONS TO DO-IT-YOURSELFERS
- DO NOT attempt to install any QuietCool cooling and ventilation system yourself if you lack sufficient skill and experience to do so.
- WATCH the installation videos on the manufacturer website by visiting www.QuietCoolSystems.com/support or by scanning any QR code found in this guide that appearsnext to any instructional step.
INCLUDED IN THE BOX– QuietCool Whole House Fan – QuietCool Damper Box – QuietCool Duct – Ceiling Grille– Window locks (2) – Accessory Bag containing needed hardware – Cut-out TemplateTOOLS YOU WILL NEED– Cordless Drill with Nut Driver and Philips Bit – Drywall Saw – Measuring Tape – Carpenter Pencil
INSTALLATION
INSTALLING ENERGY SAVER WHF
Installation Video: Watch the video by scanning the QRcode or visit: www.QuietCoolSystems.com/support

www.QuietCoolSystems.com/support
Installing the QuietCool system is very easy. Simply follow the steps given below:Determine from down below in which areas you would like to install your QuietCool fan. Go up into the attic to mark the exact location for the fan. Make sure you have a minimum of 30” of clearance. Take the cardboard cutout template and a small screwdriver with you. Make us re the template fits between the framing.
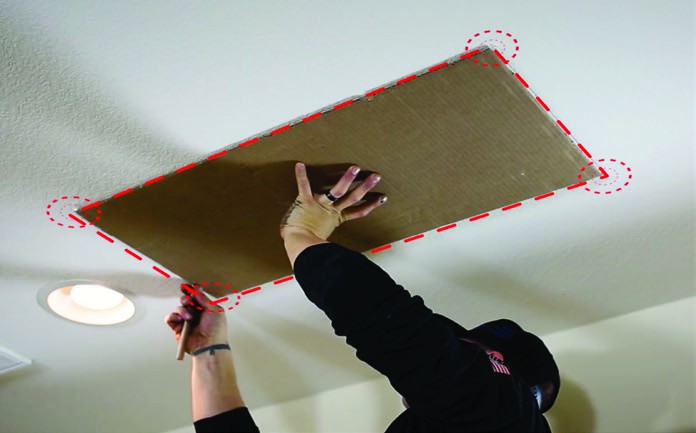
- When you have chosen your exact spot, place the provided template on the spot and mark it at each corner by pushing the screwdriver through at each corner to make a hole so that you can find it from below. Figure 3.1A

- From below, place the cut-out template on the ceiling, making sure that you have at least 2 inches of clearance all around it. While holding the template in place, mark its outline with a pencil.
- Using a drywall saw or similar device, cut out the hole in the ceiling.
- Open and unpack your QuietCool fan.TIP: If your attic is very tight, you may want to wire your QuietCool motor housing before bringing it into the attic. Please follow the wiring diagrams that start on page 13.Figure 3.1B
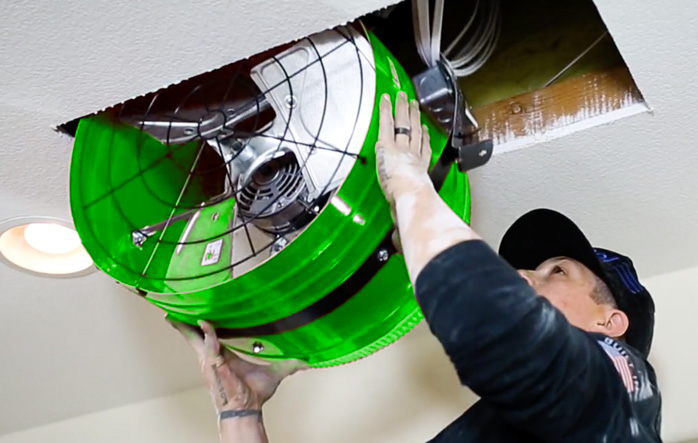
- Take the main assembly, which includes the motor housing, damper box, and duct into the attic through the crawl hole and moves into position near the ceiling cut-out hole.TIP: If your attic access is far from your fan location, you can remove the duct from the motor housing and pass the motor housing, duct, and damper box through the ceiling cut-out hole, and reattach the duct to the motor housing in the attic.Figure 3.1C
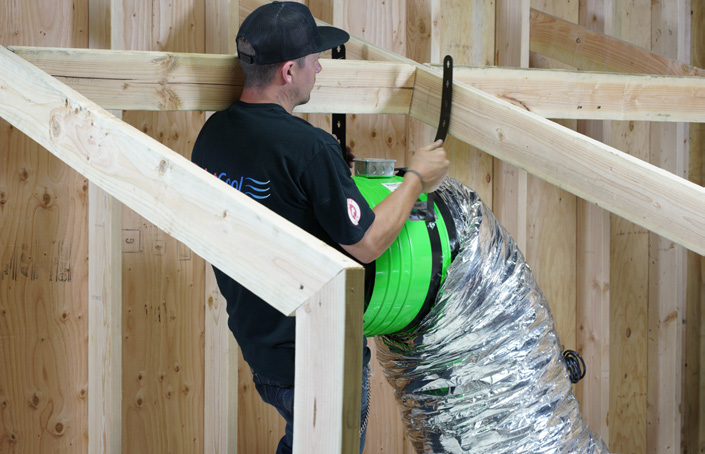
- Pre-screw two wood screws into the rafter almost all the way. Using the new hanger strap with eyelet holes, hang the motorhead from the two wood screws and tighten the crews. Make sure that the handy box on the motorhead is at the very top. Secure duct to damper box using three black sharp screws. Make sure the housing is angeled slightly p and the duct has a gentle 90-degree bend to help reduce the noise level. The angle is important so the fan does not disturb any blown-in insulation in your attic.Figure 3.1DNOTE: Once your QuietCool fan is hung, it’s time to go below and install the damper box and ceiling grille.NOTE: If you are installing the damper box with a vertical adapter, please follow the instructions on page 12.
- Look through the hole and make sure there are no kinks or twists in the ducting. Pull the damper box down through the hole in the ceiling.NOTE: The QuietCool Damper Box includes removable flanges in the case that you are installing the damper box between studs that are exactly 16” on center. To remove the flanges, simply take a screwdriver and pry between the flange surface and the damper box. Do this along the entire edge of the flange and it will pop off.NOTE: The damper box flange is designed to sit on the backside of the drywall, inside the attic. Do not attempt to install the damper box with the flanges on the outer side of the drywall in the home.
- Using the included drywall screws, fasten the damper box to both the drywall and the joist in the attic.NOTE: Remember that you just asten the damper box to the ceiling joists AND drywall. The purpose of this is to make sure the damper box stays in place when you are screwing in the grille. If you do not fasten the damper box to the drywall, the damper box will not stay in place when attempting to screw in the grille.
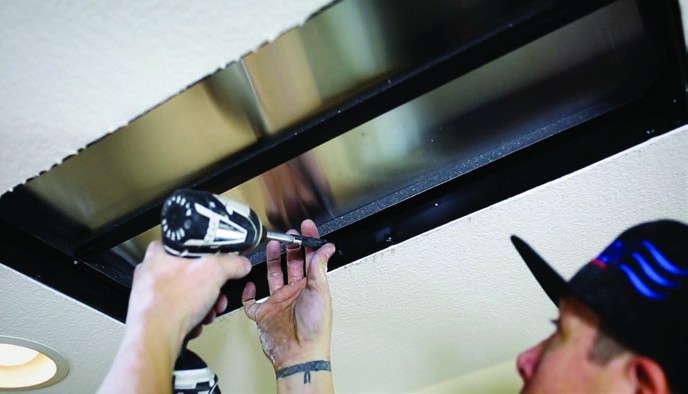
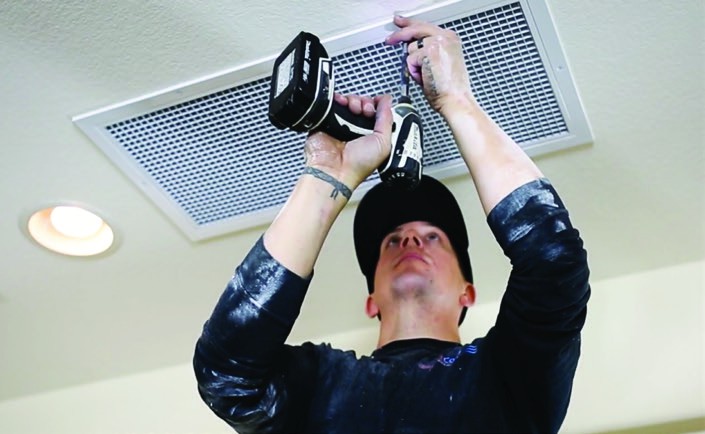
- Remove ceiling grille and screws from its packaging. Center the rille over the damper box. Install the grille with the white screws provided by screwing through the drywall into the flange of the damper box.
- eturn to the attic. Using the nylon straps and the long wood screws provided, support the duct to the framing. This will stabilize the entire assembly. Replace any insulation that was removed. The installation of the fan is now complete.

![]() NOTE: Some ceiling surfaces are uneven and may cause a small gap to be present. This can easily be caulked later if excessive.
NOTE: Some ceiling surfaces are uneven and may cause a small gap to be present. This can easily be caulked later if excessive.![]() NOTE: Local building codes and standards must be adhered to in the installation of this unit.
NOTE: Local building codes and standards must be adhered to in the installation of this unit.![]() NOTE: Additional insulation can be added to the top of the damper box to provide additional sound dampening.
NOTE: Additional insulation can be added to the top of the damper box to provide additional sound dampening.
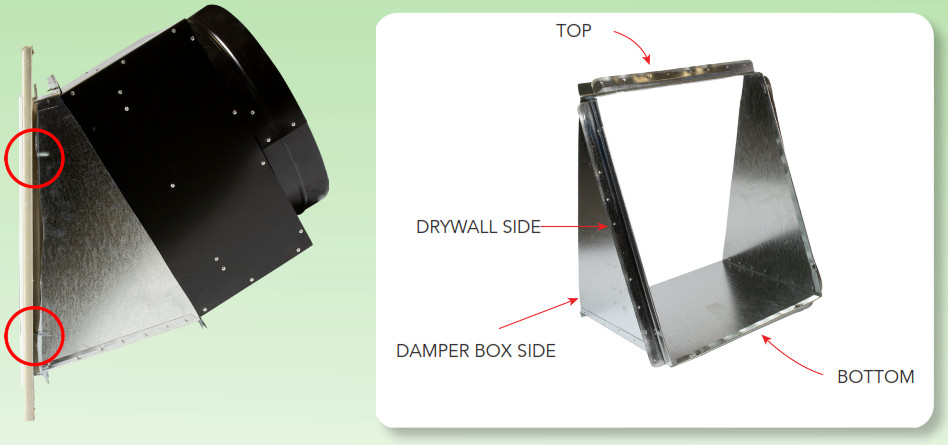
INSTALLING VERTICAL ADAPTERA vertical wall adapter allows a damper box to be installed in the wall instead of the ceiling. A vertical adapter is installed on the wall with the damper box mounted diagonally so the damper doors close properly when the fan is turned off.
![]() NOTE: Measure the studs in your wall. If they are 16” on center, you will need to follow steps 1 through 4 completely. If they are wider than 16” on center, you will only need to follow steps1 & 4.
NOTE: Measure the studs in your wall. If they are 16” on center, you will need to follow steps 1 through 4 completely. If they are wider than 16” on center, you will only need to follow steps1 & 4.![]() NOTE: The damper box MUST be installed with the damper doors oriented vertically. If the damper box is mounted on the wall with the damper doors horizontally, the damper doors will not operate correctly.
NOTE: The damper box MUST be installed with the damper doors oriented vertically. If the damper box is mounted on the wall with the damper doors horizontally, the damper doors will not operate correctly.
- Note the T (TOP) side of the vertical adapter. Place the vertical adapter with the T side up onto the damper box with the side that has only two flanges, flush on the damper box.
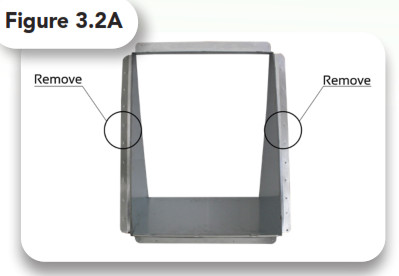
- If you have studs spaced at 16” on the center, you will need to remove certain flanges on the damper box and vertical adapter. Using a flat head screwdriver, remove the two side flanges on the vertical adapter. (See Figure 3.2A)
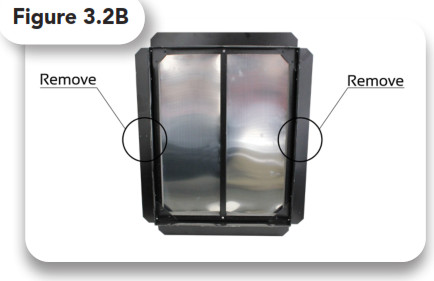
- Using a flat head screwdriver, remove the two side flanges on the amper box. Make sure that you are removing the flanges on the same side as the flanges you removed on the vertical adapter. (See Figure 3.2B)
- Using the included black sharp screws, attach the vertical adapter to the damper box by screwing them together through the two remaining flanges.
- The vertical adapter is now installed. Go back to step 8 on page 10 and continue your installation.
WIRING AND CONTROLS
![]() NOTE: Wiring Diagrams are for examples ONLY. Wiring should be done by an experienced electrician.
NOTE: Wiring Diagrams are for examples ONLY. Wiring should be done by an experienced electrician.
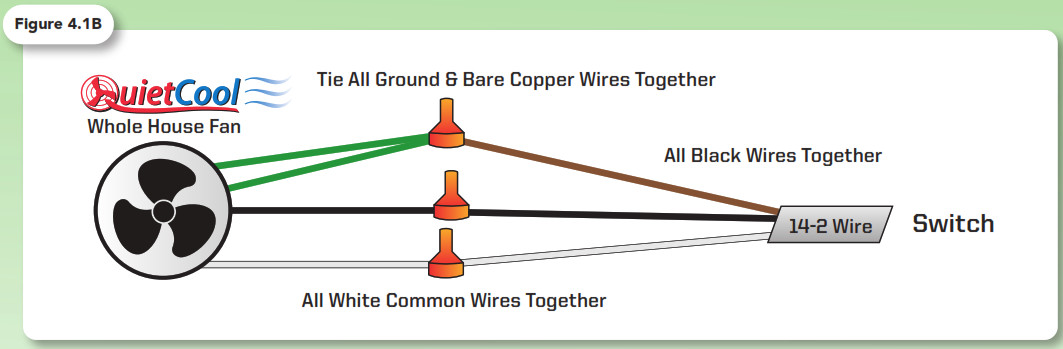
![]() NOTE: Your fan came pre-wired to a power cord for testing purposes before installation. If you would like to hard-wire the fan, or it is required by your local building codes, please follow the wiring instructions are below. SINGLE-SPEED WIRING (FOR QC ES-1500)
NOTE: Your fan came pre-wired to a power cord for testing purposes before installation. If you would like to hard-wire the fan, or it is required by your local building codes, please follow the wiring instructions are below. SINGLE-SPEED WIRING (FOR QC ES-1500)
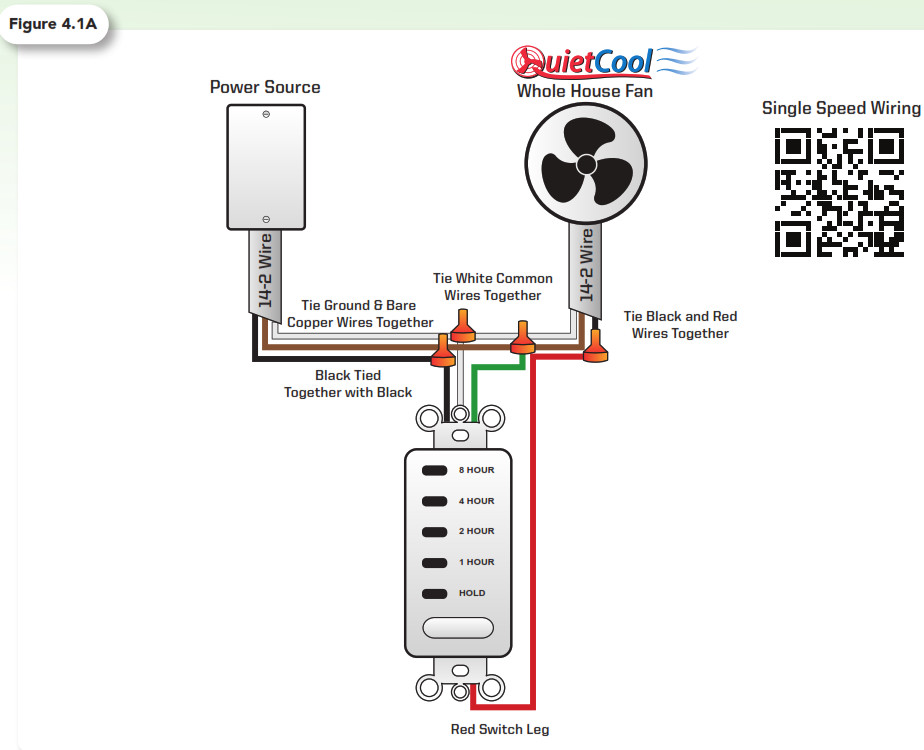
- For this installation, you will need (2) 2 wire Romex, and an 8 Hour Timer. Using the included wire nuts, tie the black wire from the first 2 wire Romex from the power source to the black wire on the timer. (see Figure 4.1A)
- Using a wire nut, tie the black wire on the 2 wire Romex from the fan to the red wire on the timer.
- Using a wire nut, tie the bare copper wires together with the green ground wire on the timer.
- Using a wire nut, tie the white neutral wires from the Romex to the white neutral wire on the timer.
- Begin wiring the fan by opening up the handy box. Take off the wire nuts within the handy box.
- Unscrew the green ground wire. Detach the green ground wire from the power cord. Remove the power cord.
- Re-attach the ground screw and wire to the handy box. Cut your green ground wire in half and strip both sides. (see Figure 4.1B)
- Feed the 2 wire Romex through the handy box. Using the included wire nuts, tie the black wires together. Tie the white neutral wires together. Tie your bare copper wire and green ground wires together.
- Carefully reinstall the handy box cover.
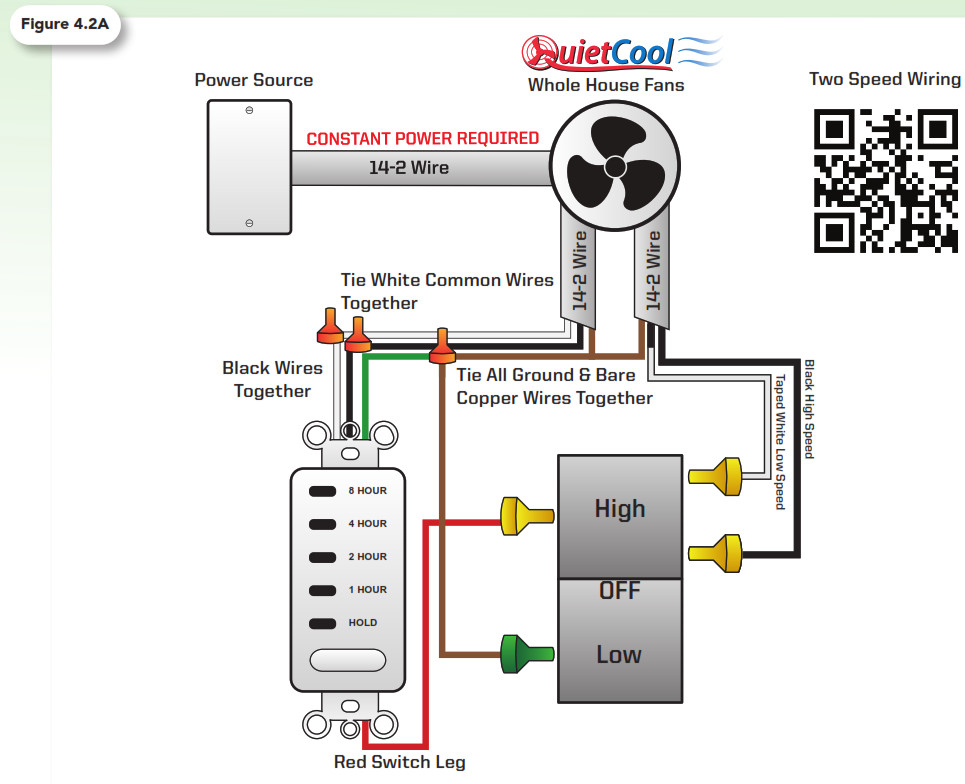
TWO SPEED WIRING (FOR QC ES-2250/3100/4700/5400/6000/7000)
- For this installation, you will need (3) 2 wire Romex, a double-gang retrofit box, an 8 Hour Timer, and a HIGH-LOW-OFF Switch.
- Using your first 2 wire Romex, tape the white common wire because we are going to use it for low speed. Attach the white wire to the top gold screw on the right of the switch. Then, attach the black wire to the bottom gold screw. (see Figure 4.2A)
- With a piece of bare copper wire, attach it to the green ground screw on the switch.
- Using the second 2 wire Romex that’s going to your timer, use one of the supplied wire nuts to tie the black wire to the black wire on the timer. Tie the white wire from the 2 wire Romex to the white wire on the timer.
- Using a wire nut, tie all bare copper wires together with the green ground wire on the timer.
- Attach the red leg wire from the timer to the top gold screw on the left of the switch. Finish up the installation of the timer and switch and switch cover plate.
- Begin wiring your fan by opening up the handy box. Take off the wire nuts within the handy box. Detach the green ground wire from the power cord. Remove the power cord. Re-attach the ground screw and wire to the handy box. Cut your green ground wire in half and strip both sides. (see Figure 4.2B or Figure 4.2C)
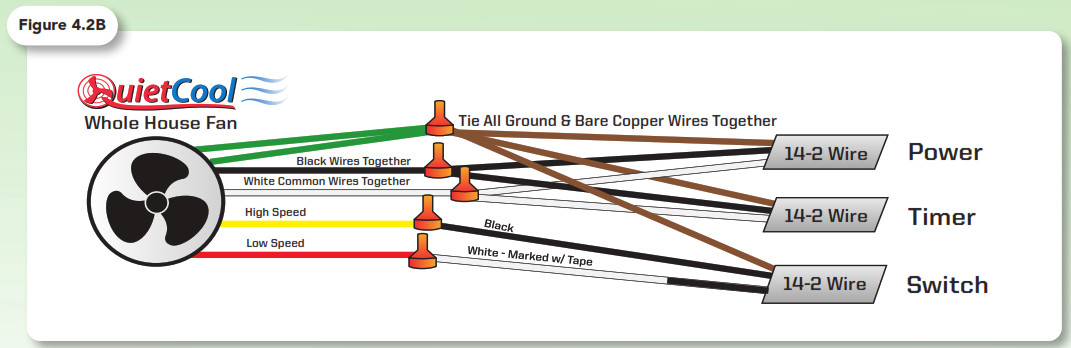
- Feed the 2 wire Romex from your timer into the handy box. Feed the 2 wire Romex from your power source into the handy box.
ES-2250 Wiring (see Figure 4.2B)Feed the 2 wire Romex from your switch into the handy box. Tape the white wire on this end of the Romex. Tie the yellow & black wire together for high speed. Tie the red and taped white wire together for low speed.
ES-3100/4700/5400/6000/7000 Wiring (see Figure 4.2C)Feed the 2 wire Romex from your switch into the handy box. Tape the white wire on this end of the Romex. Tie the blue & black wire together for high speed. Tie the red and aped white wire together for low speed.
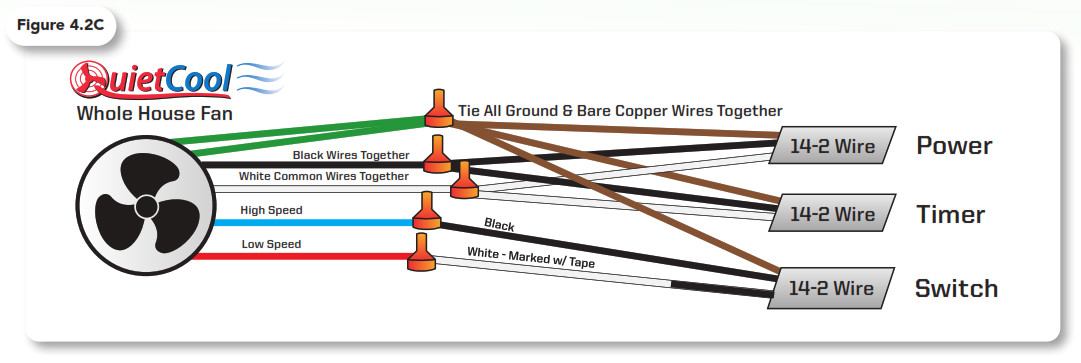
10. Tie the three remaining black wires together. Tie the three remaining white common wires together. Tie the three bare copper wires and the two green ground wires together.11. Carefully reinstall the handy box cover.
SYSTEM OPERATING INSTRUCTIONS
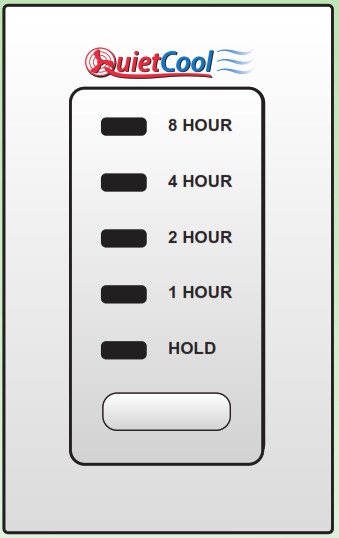
OPERATING THE WALL CONTROLSSINGLE-SPEED CONTROLS (TIMER ONLY)
- The 8 Hour Countdown Timer is a convenient way to control your QuietCool fan.
- By clicking the button on the timer, you can cycle through the timer options.
- The last cycle of the timer turns the fan off. All lights will be off when the fan is off.
- By holding the button on the timer, the timer will enter HOLD which will keep the fan on indefinitely.
- This only controls single-speed QuietCool fans or multi-speed QuietCool fans on one single speed.
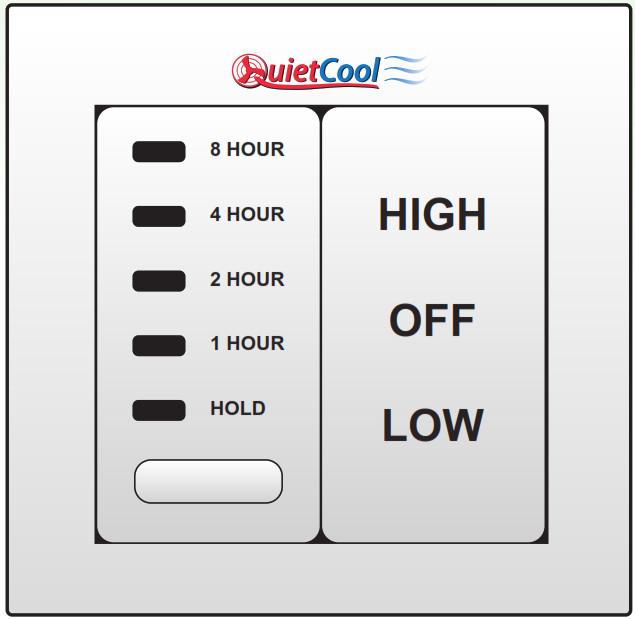
TWO SPEED CONTROLS (TIMER + HIGH-LOW-OFF SWITCH)
- To control a multi-speed QuietCool fan, we recommend the 8 Hour Countdown Timer and a HIGH-LOW-OFF Switch.
- By clicking the button on the timer, you can cycle through the timer options.
- The last cycle of the timer turns the fan off. All lights will be off when the fan is off.
- By holding the button on the timer, the timer will enter HOLD which will keep the fan on indefinitely.
- When the HIGH-LOW-OFF Switch is in the middle position, the fan will be off, regardless of the setting on the Timer.
- With the switch in the top position, the fan will be on HIGH.
- With the switch in the bottom position, the fan will be on LOW.
![]()

WHOLE HOUSE FANS LIMITED WARRANTYQC Manufacturing Inc. extends this warranty to the original purchaser of the following QuietCool Energy Saver Line Models – QC ES-1500, QC ES-2250, QC ES-3100, QC S-4700, QC ES-5400, QC ES-6000, & QC ES-7000 – installed and used in a residence under normal conditions within North America: A. Ten-year coverage applies to the quiet cool motor fan assembly. At our option, we will repair or replace any part of the assembly should it fail to operate during the first ten years from the date of original purchase.B. One year coverage for all other components including grilles, housings, controls, and accessories furnished by QC Manufacturing, Inc. At our option, we will repair or replaceany part which fails as a result of defective material or workmanship during the first year from the original date of purchase.C. This warranty does not cover any of the following:1. Accidental or consequential damage resulting from the operation of our equipment or any malfunction thereof.2. Cost of service calls to diagnose the cause of problems or the labor charge to un-install any components.3. Product failure or damage due to faulty installation, abuse, misuse, unauthorized alteration to factory specs, lack of maintenance, or transportation damage.4. Shipping or postage for warranty claims.D. To obtain service under this warranty, first, contact the dealer where you purchased the equipment. If you are unable to find or reach your dealer, contact Customer Service at QC Manufacturing, Inc. In order to process a warranty claim, you must have your serial number as well as your proof of purchase. QC Manufacturing, Inc. will not process a warranty claim without a serial number. Your serial number is located on the fan motorhead as well as on the back of this Owner’s Guide.This warranty is the only warranty extended by QC Manufacturing, Inc. to purchasers or suppliers of our equipment. QC Manufacturing Inc. disclaims all other warranties, express or implied, that arise by operation of the law. Where consumers may have additional warranty rights in accordance with federal and state law, such rights shall supersede those stated herein.
QC Manufacturing, Inc. Customer Service 26040 Ynez Rd.Temecula, CA 92591www.QuietCoolSystems.com951-325-6340
![]() FAN SERIAL NUMBER INFORMATION
FAN SERIAL NUMBER INFORMATION
RETAIN FOR YOUR RECORDS.A SERIAL NUMBER IS REQUIRED FOR WARRANTY PURPOSES.1-888-QUIET COOL | WWW.QUIETCOOLSYSTEMS.COM
References
[xyz-ips snippet=”download-snippet”]