
QwikProducts® QwikPad® for Generators Installation Instructions
Installation Instructions
- Inspect Hardware Package Contents:
 A – (4) WASHERS, LOCK 3/8”B – (4) WASHERS, FLAT 3/8C – (4) BOLTS, HEX, 3/8-16 (1½”)D – (3) BOLTS, HEX, 3/8-16 (4½”)E – (4) BOLTS, HEX, 3/8-16 (7/8”)F – (4) BOLTS, HEX, 3/8-16 (3¼”)Hardware needs are specific to generator model. Hardware shown at the left is included with the Universal Pad model (QT8200).See Model Specific Hardware chart at the bottom of this section.Refer to the anchorage configurations (below) to identify general mounting points and appropriate hardware for your specific generator model.Refer to manufacturer’s specifications for details about the proper mounting points/methods for your specific generator model.ANCHOR DETAILMODEL SPECIFIC HARDWARE REQUIREMENTS
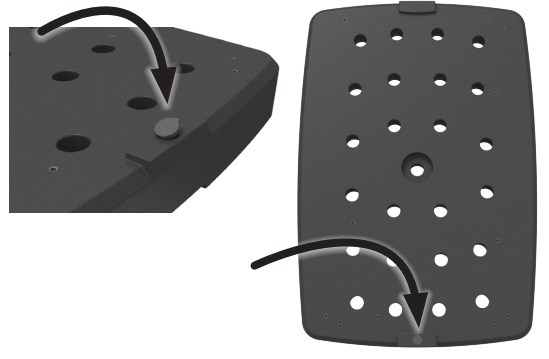
 - Locate the fill port cap (center of short side, nearest the product label), ensure it is securely pressed into pad, then tip the pad on the edge where the plug is located. This process should shift the powdered gelling agent contained inside the pad towards the fill port.
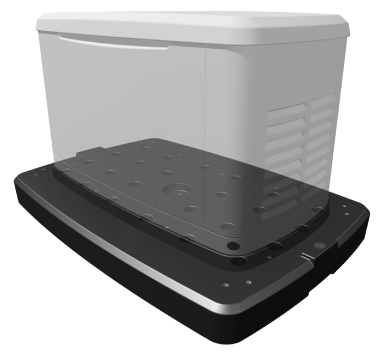
- Place the QwikPad® for Generators on level, compacted ground where equipment is to be installed (or on top of existing, level concrete pad).
- Remove fill port cap. Insert garden hose into fill port and fill QwikPad® for Generators to the top with tap water.*Do not overfill – Overfilling may result in loss of a portion of the gelling agent. Replace fill port cap.*In areas that experience frequent freeze-thaw cycles, only fill the QwikPad® for Generators 80% full for increased lifetime. This can be done by only filling the pad with water to a depth of 3 inches – when filling, use a dip-stick or straw to periodically check liquid height. Verify that an 80% fill still meets local wind regulations through our online calculator and information.
- (Required for some installations)Install concrete anchor as determined by your wind loading requirements.Concrete Anchor Installation:
- With pad in place, drill one (1) hole in concrete to 1.375” minimum depth, centrally located in the center anchor hole using 3/16” masonry bit (includ- ed in QT8381, sold separately).
- Secure pad using one (1) 1/4” x 5” concrete anchor with fender washer. (included in QT8381).
- Place the equipment onto the QwikPad® for Generators and center. Secure the generator to the pad using included stainless steel mounting bolts with lock and flat washers. Torque to 20-25 FT•LB. Refer to table at the bottom of Step 1 for appropriate hardware.NOTE: Mounting bolt placement is specific to generator model.
 A – (4) WASHERS, LOCK 3/8”B – (4) WASHERS, FLAT 3/8C – (4) BOLTS, HEX, 3/8-16 (1½”)D – (3) BOLTS, HEX, 3/8-16 (4½”)E – (4) BOLTS, HEX, 3/8-16 (7/8”)F – (4) BOLTS, HEX, 3/8-16 (3¼”)Hardware needs are specific to generator model. Hardware shown at the left is included with the Universal Pad model (QT8200).See Model Specific Hardware chart at the bottom of this section.Refer to the anchorage configurations (below) to identify general mounting points and appropriate hardware for your specific generator model.Refer to manufacturer’s specifications for details about the proper mounting points/methods for your specific generator model.
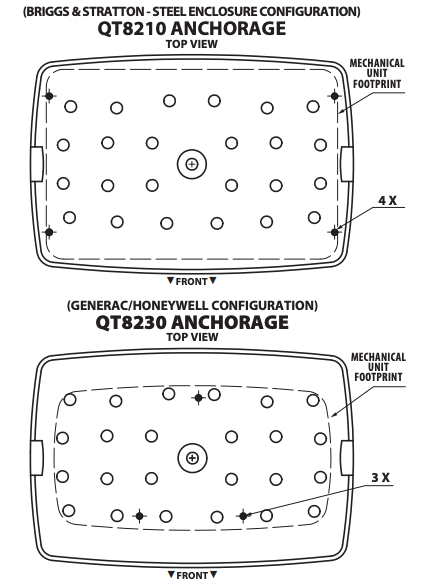
 ANCHOR DETAIL
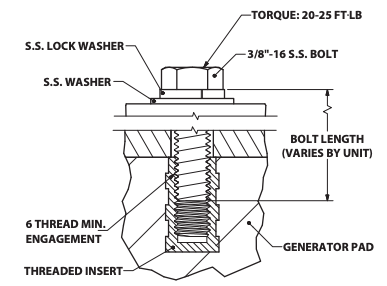 MODEL SPECIFIC HARDWARE REQUIREMENTS
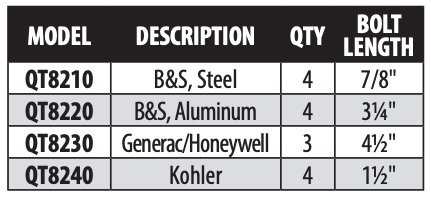

 Concrete Anchor Installation:
 NOTE: Mounting bolt placement is specific to generator model.
 For more details or information about the QwikPad® for Generators visit www.qwik.com/qwikpad4gen, email [email protected] or call 1-321-631-3550
QwikProducts® and QwikPad® are registered trademarks of Mainstream Engineering Corporation® Rockledge, Florida 32955, (321) 631-3550, © 2021 Mainstream Engineering Corporation® • U.S. Patent #10,557,589 and Other Patents Pending
References
[xyz-ips snippet=”download-snippet”]