![]()
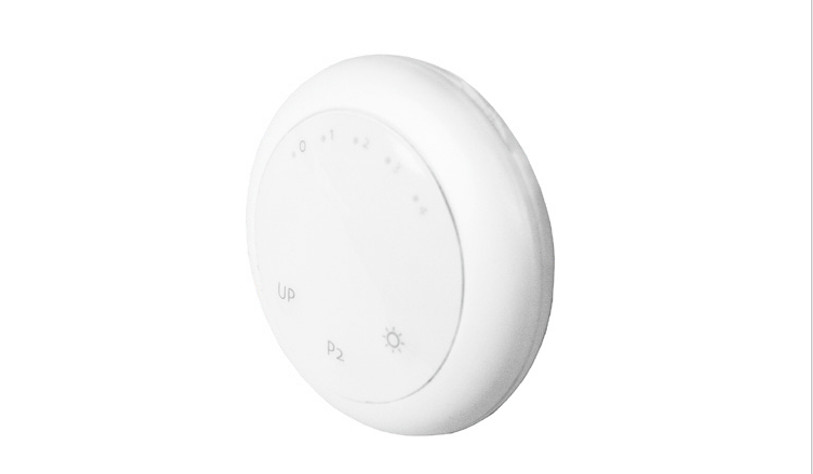
R-TEC Smart Controls – Interior Sun Sensor RTMISS
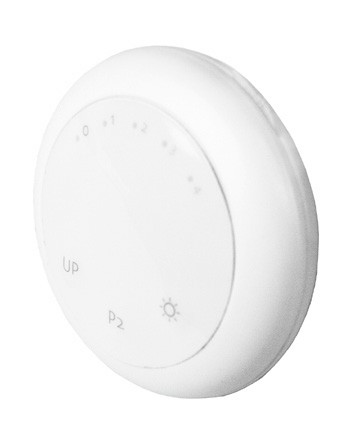 Interior sun sensors automatically manage daylight transitions at each window, minimizing reliance on and costs of artificial light.
FEATURES

![]()
COMPLIANCE STATEMENTThis device complies with part 15 of the FCC Rules. Operation is subject to the following two conditions:
- This device may not cause harmful interference.
- This device must accept any interference received, including interference that may cause undesired operation.
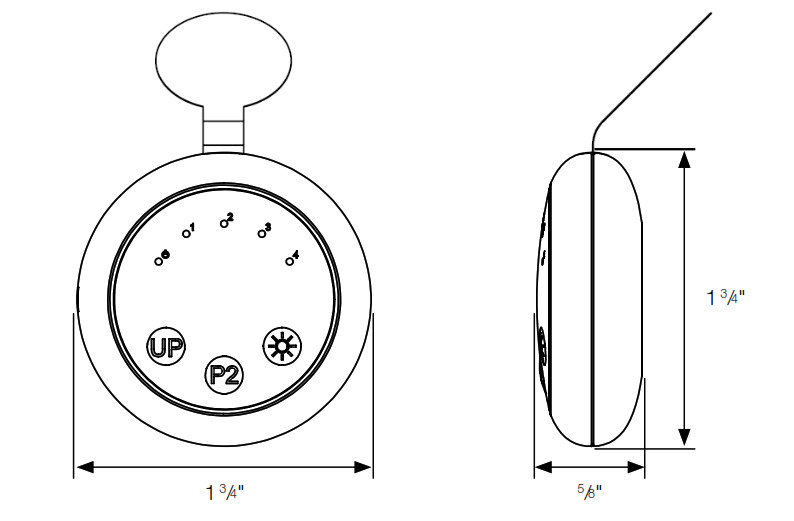
TECHNICAL DATA / PACK CONTENTS
PRODUCT SPECIFICATIONS
| Parameters | Value |
| Voltage | 3 V DC |
| Battery | CR2032 |
| Radio Frequency | 433.92 MHz |
| Transmitting Power | 10 milliwatt |
| Transmission Range | 65′ |
| Standby Current | 5 uA |
| Light Intensity Level Range | 15 – 75 Klux |
| Temperature Working Range | 14º F – 122º F (-10º C – 50º C) |
PACK CONTENTS
- Sun Sensor
- Instruction Manual
- 3V – CR2032 Battery

SAFETY
![]() WARNINGAny changes or modifications to this unit not expressly approved by the party responsible for compliance could void the user’s authority to operate the equipment. Incorrect installation can lead to serious injury and will void manufacturer’s liability and warranty.
WARNINGAny changes or modifications to this unit not expressly approved by the party responsible for compliance could void the user’s authority to operate the equipment. Incorrect installation can lead to serious injury and will void manufacturer’s liability and warranty.
CAUTION
- Do not expose to moisture or extreme temperatures.
- Do not allow children to play with this device.
- Use or modification outside the scope of this instruction manual will void warranty.
- Installation and programming to be performed by a suitably qualified installer.
- Use only R-TEC Automation® hardware.
- Keep clear when in operation.
- Replace battery with correctly specified type.
IMPORTANT SAFETY INSTRUCTIONS TO BE READ PRIOR TO OPERATION
- It is important for the safety of persons to follow the enclosed instructions. Save these instructions for future reference.
- Persons (including children) with reduced physical, sensory or mental capabilities, or lack of experience and knowledge should not be allowed to use this product.
- Frequently inspect for improper operation. Do not use if repair or adjustment is necessary.
- Keep away from children.
INSTALLATION
SENSOR BATTERYPull battery tab out to activate for first use.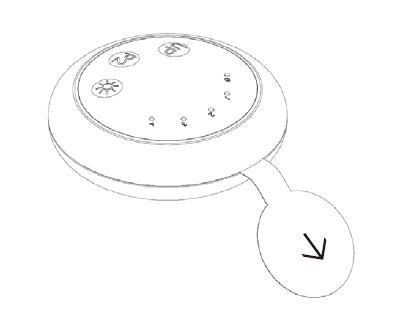 REPLACING BATTERY
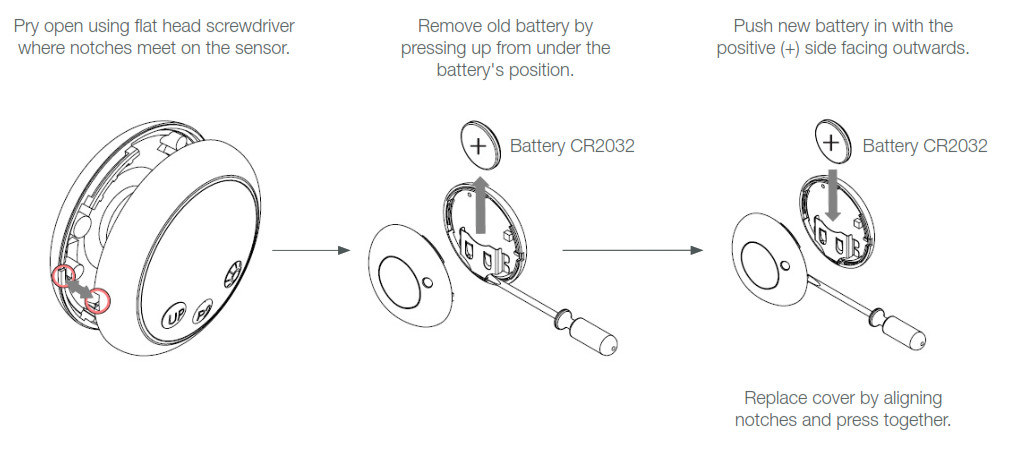
MOUNTING
- Ensure surface on glass is clean and free of dust.
- On the back of the sensor, peel clear plastic off to reveal adhesive.
- Find desired position on glass for the sensor and press adhesive side to glass.
- Check that the glazing or the tint on the window will not affect the functionality of the Sun Sensor.
- Ensure that the light level is enough to activate the Sun Sensor. If it is possible to measure the light intensity using the Lux-meter. The values measured should be according to the level of the sensor mode selected.
FUNCTIONAL OVERVIEW
BUTTONS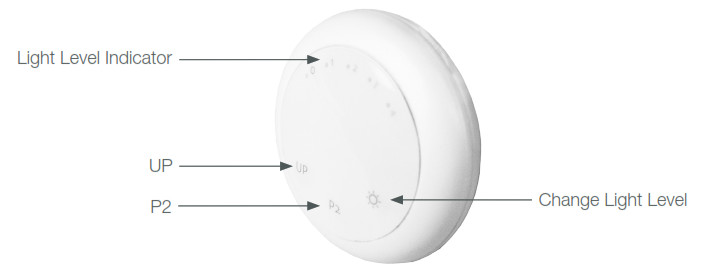
MODES
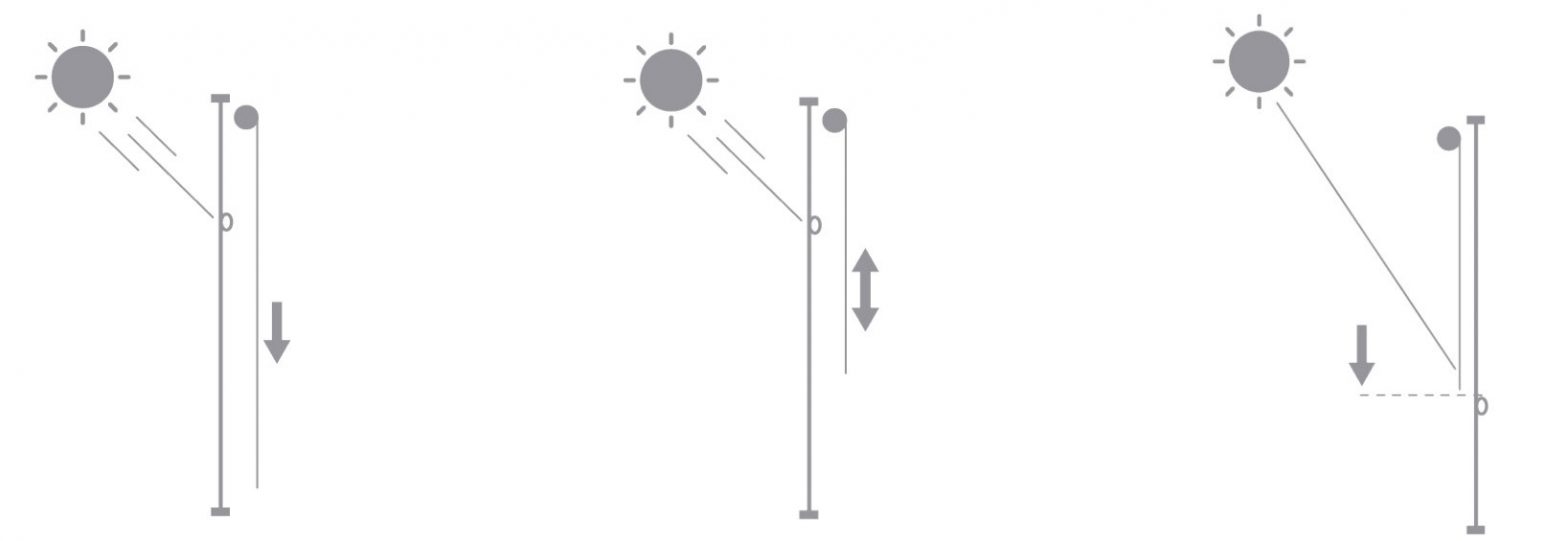
| Mode 1 – DEFAULT Close Mode | Mode 2 Open / Close Mode | Mode 3 Shade Detect Mode |
| Preset light level reached
Light level stays above preset for 2 minutes Blind goes down Blind stays down |
Preset light level reached
Light level stays above preset for 2 minutes Blind goes down Light level goes below the preset value for more than 15 minutes Blind goes back up |
Preset light level reached
Light level stays above preset for 2 minutes Blind goes down until sensor is covered Blind goes up until sensor is uncovered Light level goes below the preset value for more than 15 minutes Blind goes back up |
VIEW AND CHANGE SENSOR MODE
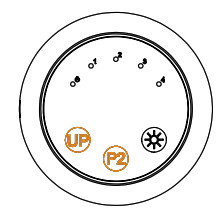
To view the current mode:Press the SUN button for one second
- blink indicates mode 1
- blinks indicate mode 2
- blinks indicate mode 3
To change the mode:Hold the SUN button until the LED blinks 5 times. The mode has now shifted up by one. E.g. Mode 2 has changed to Mode 3.
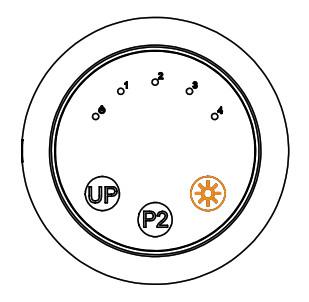
LIGHT LEVELS OF LIGHT INTENSITY VALUES
| Light Level | Luminous flux per unit area |
| 0 Level | Not Operational |
| 1 Level | 15,000 LUX |
| 2 Level | 30,000 LUX |
| 3 Level | 45,000 LUX |
| 4 Level | 60,000 LUX |
![]() TO CHANGE LIGHT LEVEL SETTING:Press the SUN key repeatedly until the desired light level flashes.
TO CHANGE LIGHT LEVEL SETTING:Press the SUN key repeatedly until the desired light level flashes.
LIGHT INTENSITY DETECTIONPress the SUN and P2 buttons for one second. → Hold the sensor toward the light.
 ResponseThe unit will indicate light level
LOW BATTERY NOTIFICATIONWhen the battery needs changing, the currently selected light level LED will blink every 2 minutes.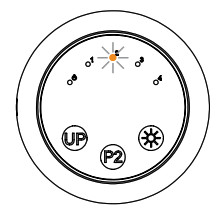 UP BUTTONThe UP button can be used to manually override the sensor and tell the shade to go up.
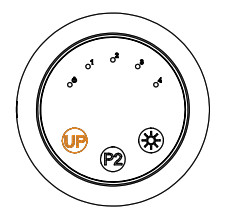
PROGRAMMING
PROTOCOL SELECTIONR-TEC Automation® motors use the default ARC protocol mode. If your device is in the “EL” mode, to toggle back to the ARC mode follow the steps below.
Hold P2 while inserting battery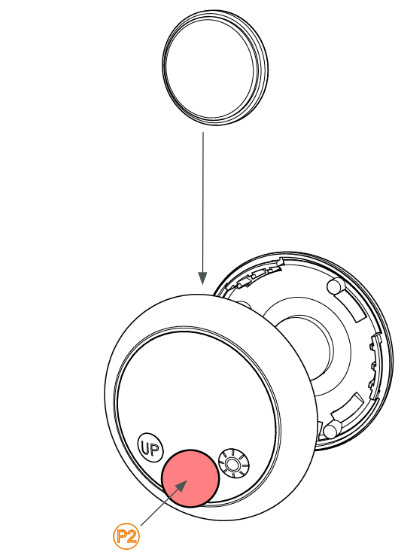
To check which mode the sensor is currently in, press the UP or P2 button briefly.ARC Protocol: The current LED will blink fast 8 times to indicate that the new (ARC) protocol is currently set. *This is the mode needed for your R-TEC Automation® motor to work.Acmeda “EL” Protocol: The current LED will blink slowly 4 times to indicate that the old protocol is currently set.
ADDING OR REMOVING SENSOR & CREATING GROUP CONTROL
USING MOTOR P1 BUTTON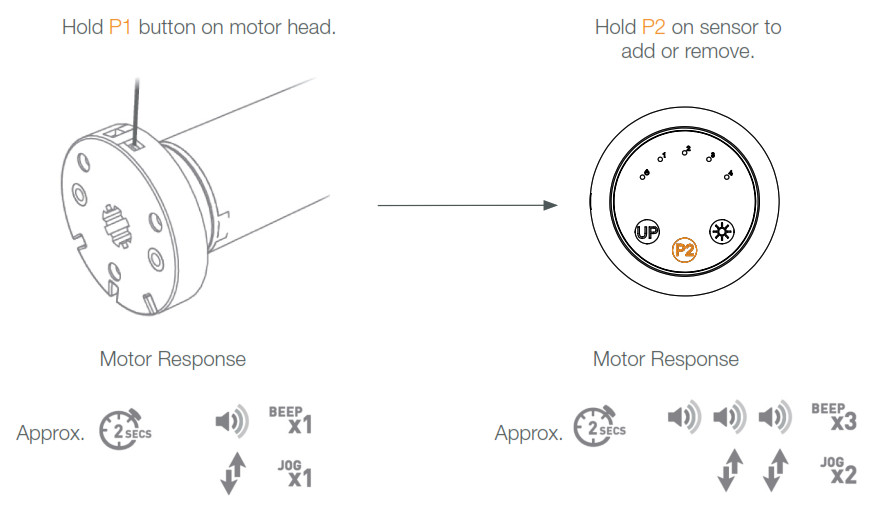
USING PRE-EXISTING CONTROLLERA = Existing controller or channel (to keep). B = controller or channel to add or remove. Press P2 on new sensor.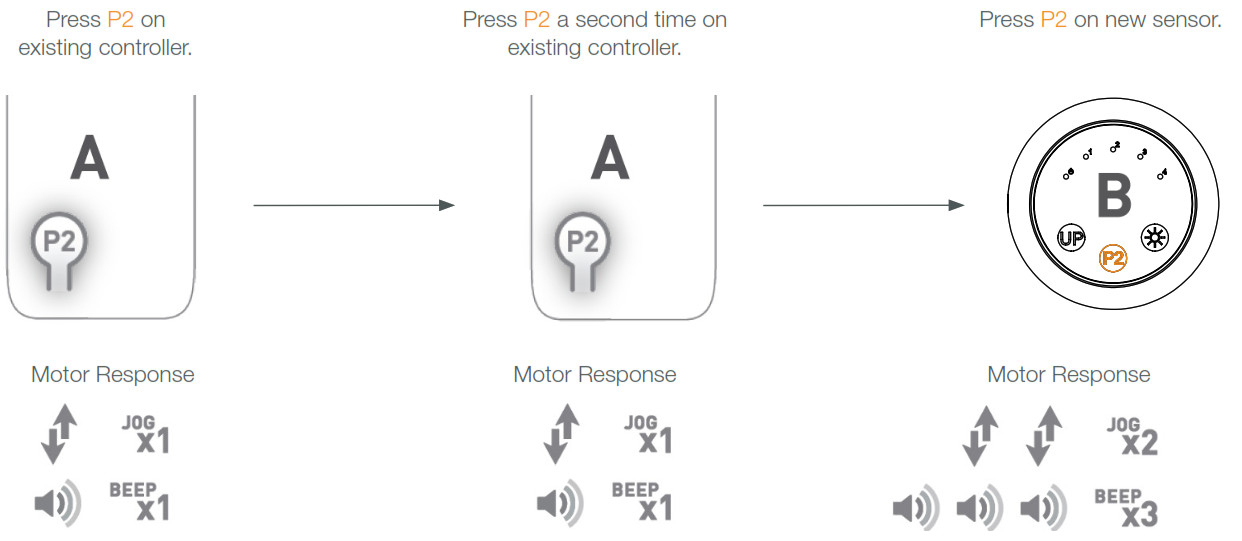
![]() IMPORTANTConsult your user manual for your controller or sensor.
IMPORTANTConsult your user manual for your controller or sensor.
TROUBLESHOOTING
| Problem | Cause | Remedy |
| Motor is not responding | Sensor battery is discharged | Replace battery. See page 5. |
| Battery is inserted incorrectly | Check battery polarity. See page 5. | |
| Radio interference / Shielding | Ensure sensor is positioned away from metal objects and that aerial on motor or receiver is kept straight and away from metal. | |
| Sensor distance is too far from remote | Move sensor to a closer position. | |
| Power failure | Check power supply to motor is connected and active. | |
| Incorrect wiring | Check wiring is connected correctly (refer to motor installation instructions). |
Any Questions?Contact our R-TEC Automation® in-house experts at 866.985.3423. Email us at [email protected].© 2021 Rowley® Company. All rights reserved. R-TEC Automation® is a registered trademark of the Rowley® Company, LLC.
 Do no dispose of in general waste.Please recycle batteries and damaged electrical products appropriately.
[xyz-ips snippet=”download-snippet”]