
Radial BT-PRO V2 Bluetooth Direct Box
OVERVIEW
A typical direct box is a device that lets you interface an unbalanced audio output with a professional balanced input, such as those commonly found on a PA or recording system. The Radial BT-Pro is similar in that it pairs with a Bluetooth enabled transmit device and converts the streamed digital signal to balanced stereo analog outputs for connection to any pro audio device.
Once it is paired with your streaming device, the BT-Pro’s internal antenna picks up the streaming audio and converts it to an analog signal. A level control allows you to adjust the output level and a mono sum switch can be activated to reduce channel count requirements at your mixer or to check for phase issues. The 3.5mm headphone output can be used to monitor the stereo signal and test for audio prior to connecting to the PA. At the XLR outputs, the left and right signals are balanced to drive long cables without noise, and a ground lift is provided to eliminate hum and buzz caused by ground loops.
A front-panel level control is used to adjust the volume of the XLR and headphone outputs. This is variable from a mic-level output to feed a traditional mixing channel preamp input, or it can be turned up to a linelevel signal to feed the line input on a mixing console, recording system or powered speaker. The BT-Pro ensures the audio signal is delivered to the PA as faithfully as possible.
The BT-Pro is easy to setup and use. Once it is powered up by plugging into the external power supply (included) or by providing 48V phantom power to the XLR outputs, it will automatically appear as an available audio destination on your Bluetooth-enabled mobile device — providing you with a high quality wireless audio link to your sound system.
FEATURES
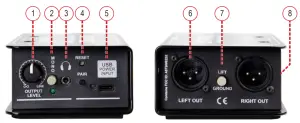
- LEVEL: Used to set the overall output volume at the XLR and headphone outputs.
- MONO: Sums the stereo signal to mono. When active, the LED indicator illuminates. Mono mode allows you to reduce the channel count on the PA or send identical mono signals to two separate audio systems simultaneously.
- HEADPHONE: Mini 3.5mm stereo (1/8″) TRS headphone output is used to check the output from the source for troubleshooting.
- PAIR/RESET: Press and hold the PAIR button for three seconds to disconnect from any Bluetooth devices and force the BT-Pro into pairing mode. Press the recessed RESET switch to power-cycle the BT-Pro. The red/yellow PAIR LED indicates the pairing and playback status of the BT-Pro.
- POWER INPUT/USB: Used to locally power the BT-Pro. Connect the included USB Type-C cable to a computer or a USB wall charger (included). This is a power input only that will not pass audio or other data.
- XLR OUT: Standard XLR male outputs provide balanced audio outputs to connect to a PA system. The BT-Pro can be powered remotely by providing 48V phantom power to these outputs.
- GROUND LIFT: Used to help eliminate hum and buzz caused by ground loops. Lifts pin-1 on both XLR outputs.
- PLASTIC INSERT: The BT-Pro combines a 14 gauge steel outer shell with an injection-molded plastic insert which allows wireless signals to pass though unimpeded, enhancing the effective range of the device while ensuring it handles the stresses of nightly use on tour.
MAKING CONNECTIONS
Before making any audio connections to the BT-Pro, always ensure your audio system is either turned down or turned off in order to protect more sensitive components from damage caused by loud turn-on or plug-in transients.
POWERING THE BT-PRO
The BT-Pro uses a USB Type-C connector and cable for its power requirements. Use the included `USB-C to USB-A’ cable and connect to a computer, USB hub or the included USB wall charger. You may also use any standard USB wall charger that is included with most phones and tablets, as the BT-Pro will only draw a small amount of current.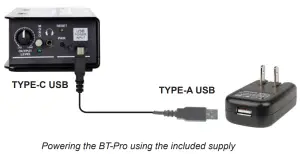
Alternatively, when connected to microphone inputs, the BT-Pro can be operated using 48V phantom power – which is available on the vast majority of mixing consoles and recording interfaces. Simply engage phantom power on both channels that are connected to the XLR outputs of the BT-Pro, then press the PAIR button. The PAIR LED will illuminate to indicate that the BT-Pro is receiving power and ready for use.
Both methods of powering the BT-Pro can be used simultaneously, providing redundant power sources that will allow the BT-Pro to continue working even if one source fails.
CONNECTING TO THE AUDIO SYSTEM
Connecting the BT-Pro to your audio system is done using two XLR cables. These XLRs can be connected to mic or line level inputs, depending on the setting on the BT-Pro LEVEL control.
| NOTE: The BT-Pro is capable of producing line-level signals, which can easily overload the inputs of a microphone preamplifier. Always start with the LEVEL control turned all the way down before testing playback. When connecting to mic inputs on your console or interface it is normal to have the BT-Pro LEVEL control set between 9 o’clock and 12 o’clock. |
Once you make these connections, turn up the audio system. It is good practice to always test at a low volume. Should you encounter hum or buzz due to a ground loop, engage the Ground Lift switch to help alleviate the problem.
Headphone outputIt is important to note that there is a very loud headphone output built into the BT-Pro that enables professional grade, low sensitivity headphones to be used. Make sure you always set the level completely off (fully counter-clockwise) before using.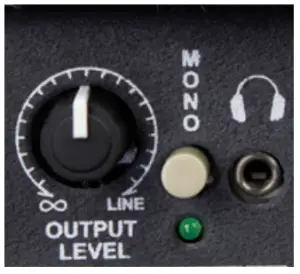
Adjusting the level control on the BT-Pro will affect both the XLR and headphone output. The intended use of the headphone output is for testing purposes to ensure that signal is being properly received by the BT-Pro. If you do not hear sound in the PA, signal presence at the headphone output lets you know that the problem is likely not the BT-Pro but may be another connection or that a piece of equipment needs to be checked.
|
As with all products capable of producing high Sound Pressure Levels (SPL) users must be very careful to avoid the hearing damage that may occur from prolonged exposure. This is particularly important as it applies to headphones. Prolonged listening at high SPLs will eventually cause tinnitus and can lead to partial or complete loss of hearing. The user agrees that Radial Engineering Ltd. remains harmless from any health effects resulting from the use of this product and the user clearly understands that he or she is entirely responsible for the safe and proper use of this product. Please consult the Radial Limited Warranty for further details. |
BLUETOOTH PAIRING
Once the BT-Pro is connected to a power supply, the PAIR LED will flash red, then begin to alternate between red and yellow. At this point the BT-Pro will be available to pair with Bluetooth devices. Check the available devices on your Bluetooth enabled playback source; the BT-Pro should appear in the list as `Radial-XXXXXX’, where the last 6 digits will be the unique identifier for the BT-Pro. After selecting the BT-Pro, your plackback device should prompt you for a password. The password is 1246. Once initially paired, the BT-Pro automatically converts the streaming audio to analog for connection to a variety of systems. Your device should automatically reconnect on future sessions, as your smartphone does in your car.
- Make sure the BT-Pro volume control is turned fully counter clockwise.
- Enable Bluetooth pairing on your Bluetooth enabled device.
- Connect your BT-Pro to power; the PAIR LED will turn red to indicate that it is receiving power.

- The PAIR LED will then alternate between red and yellow showing the BT-Pro is in search mode for pairing.
- Your Bluetooth device will identify the BT-Pro as `Radial-XXXXXX’ in the Bluetooth devices menu.
- Select the BT-Pro in your Bluetooth devices menu.
- Your Bluetooth device will then ask for a first time password for the BT-Pro. Type in: 1246.
- Once your Bluetooth device has paired with the BT-Pro, the PAIR LED will flash once every two seconds. When audio is playing, the PAIR LED will flash three times quickly every three seconds.
Once your Bluetooth device has been paired to the BT-Pro, the BT-Pro will automatically pair to the same Bluetooth device when the BT-Pro is turned back on and in range.
| NOTE: If you’re using a computer with a USB Bluetooth dongle, some pairing features may not be automatically available. Please refer to your dongle’s software manual for instructions on how to activate these features. |
TESTING AND USING
First, set the BT-Pro’s LEVEL control to the 7 o’clock (off) position. This will allow you to adjust the output level on the fly. Next, check the status of the MONO SUM switch and LED indicator. For stereo, set the switch to the outward position (LED off). For dual mono operation, set the switch to the inward position (LED on).
It’s a good idea to start testing the Bluetooth audio with a sound file you are familiar with. Set your source’s output level and the level of the media playback software (if applicable) at 80% or higher for optimal signal to noise. A higher volume from the source will allow the BT-Pro to operate at the lowest noise floor. Keep in mind that various media files will play back at different volume levels depending on your software and how the sound file was recorded.
Slowly raise the output level of the BT-Pro. It is good practice to always test at a low volume to ensure proper connections have been made and all devices in the signal chain are set up correctly and working. This way, should a device not be turned on or a connection not fully made, it will not create a loud transient `pop’ in the PA that could damage a tweeter or annoy your audience. When satisfied, slowly increase the input gain on your mixing console until you reach an appropriate level.
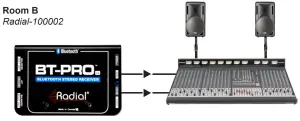
Using Multiple BT-Pro’s in one location
Some applications require the use of multiple BT-Pro’s within close proximity, such as a dance studio with multiple rooms. The BT-Pro makes this easy, as each unit has its own unique identifier visible in your available Bluetooth device menu.
For example, three different BT-Pro’s might show up as Radial-100001, Radial-100002 and Radial-100003 when powered up within range of your Bluetooth device. Upon initial setup, power each BT-Pro on individually and note the six-digit identifier; you can mark this on the unit itself or in the location where it will be installed, providing an easy reference.

SPECIFICATIONS*
| Audio Circuit Type: | Bluetooth A2DP receiver with audio line drive |
| Bluetooth Compliance: | Bluetooth 5.0 |
| Data Compression: | SBC Codec |
| Compatibility | All Bluetooth A2DP compliant devices |
| Device Range: | ≥30m (100’) Typical: line-of-sight |
| Frequency Response: | 20Hz to 20KHz |
| Dynamic Range: | 90dB |
| Signal to Noise: | 90dB |
| Maximum Gain: | +4dBu (source file dependent) |
| Total Harmonic Distortion: | 0.05% |
| Output Impedance: | 150Ω |
Features
| Audio Output | 2x Balanced XLR-M |
| Headphone Output: | 3.5mm TRS |
| Level Control: | Variable, works on headphone and XLR |
| Mono Switch: | Sums Left and Right Channels |
| Ground Lift: | Lifts pin 1 on both XLR Outputs |
General
| Construction: | 14-gauge steel outer shell, molded nylon inserts |
| Finish | Durable powder coat |
| Size: (W x H x D) | 3.3” X 5” X 2” (84 x 127 x 51mm) |
| Weight | 1.1lbs (500g) |
| Power | .USB-C connector (Power Only) or 48V Phantom |
| Warranty: | Radial 3-year, transferable |
|
FCC IDENTIFIER:2AJYKTS-BT35A01 This device complies with Part 15 of the FCC Rules. Operation is subject to the following two conditions: (1) this device may not cause harmful interference, and (2) this device must accept any interference received, including interference that may cause undesired operation |
|
The BT-Pro contains Digital devices that are susceptible to Electrostatic Discharge (ESD), precautions should be observed for optimal system performance. |
THREE YEAR TRANSFERABLE LIMITED WARRANTY
RADIAL ENGINEERING LTD. (“Radial”) warrants this product to be free from defects in material and workmanship and will remedy any such defects free of charge according to the terms of this warranty. Radial will repair or replace (at its option) any defective component(s) of this product (excluding finish and wear and tear on components under normal use) for a period of three (3) years from the original date of purchase. In the event that a particular product is no longer available, Radial reserves the right to replace the product with a similar product of equal or greater value. In the unlikely event that a defect is uncovered, please call 604-942-1001 or email to obtain an RA number (Return Authorization number) before the 3 year warranty period expires. The product must be returned prepaid in the original shipping container (or equivalent) to Radial or to an authorized Radial repair centre and you must assume the risk of loss or damage. A copy of the original invoice showing date of purchase and the dealer name must accompany any request for work to be performed under this limited and transferable warranty. This warranty shall not apply if the product has been damaged due to abuse, misuse, misapplication, accident or as a result of service or modification by any other than an authorized Radial repair center.
THERE ARE NO EXPRESSED WARRANTIES OTHER THAN THOSE ON THE FACE HEREOF AND DESCRIBED ABOVE. NO WARRANTIES WHETHER EXPRESSED OR IMPLIED, INCLUDING BUT NOT LIMITED TO, ANY IMPLIED WARRANTIES OF MERCHANTABILITY OR FITNESS FOR A PARTICULAR PURPOSE SHALL EXTEND BEYOND THE RESPECTIVE WARRANTY PERIOD DESCRIBED ABOVE OF THREE YEARS. RADIAL SHALL NOT BE RESPONSIBLE OR LIABLE FOR ANY SPECIAL, INCIDENTAL OR CONSEQUENTIAL DAMAGES OR LOSS ARISING FROM THE USE OF THIS PRODUCT. THIS WARRANTY GIVES YOU SPECIFIC LEGAL RIGHTS, AND YOU MAY ALSO HAVE OTHER RIGHTS, WHICH MAY VARY DEPENDING ON WHERE YOU LIVE AND WHERE THE PRODUCT WAS PURCHASED.
To meet the requirements of California Proposition 65, it is our responsibility to inform you of the following:WARNING: This product contains chemicals known to the State of California to cause cancer, birth defects or other reproductive harm. Please take proper care when handling and consult local government regulations before discarding.
Radial Engineering Ltd. 1588 Kebet Way, Port Coquitlam, British Columbia, V3C 5M5 Tel: 604-942-1001 · Fax: 604-942-1010 · Email: [email protected]
 report this ad
Radial® BT-Pro™ User Guide – Part #: R870 1067 00 / 01-2020 Copyright 2020 Radial Engineering Ltd. All rights reserved. Specifications and appearance subject to change without notice.
[xyz-ips snippet=”download-snippet”]