
T8USER MANUALWWW.RADIOMASTERRC.COM
 Introduction
Thank you for purchasing the RadioMaster T8 2.4g remote control system. The system is powerful and versatile and can be used by beginners to professionals. In order to ensure the correct and safe use of this product, please read this manual carefully before use. The information contained in this manual is subject to change without notice.-RadioMaster team.
Safety Information
Many remote-control models are equipped with powerful motors and sharp propellers. When using or maintaining models, proceed with caution. When performing assembly or maintenance, make sure to disconnect the power to the model and remove the propellers.Do not operate the T8 remote-control system under the following conditions:
- In severe weather or strong wind conditions, such as rain, hail, snow, storms or highly electromagnetic environments.
- In any situation where visibility is limited.
- In areas where people, property, high-voltage power lines, public roads, vehicles or animals may be present.
- If you feel tired or unwell, or under the influence of drugs or alcohol.
- If the remote control or model seems to be damaged or not working properly.
- In areas with high 2.4GHz interference or where 2.4GHz radio is prohibited.
- When the battery voltage is too low.
- In areas where local regulations prohibit the use of aviation models.
Manual and firmware download
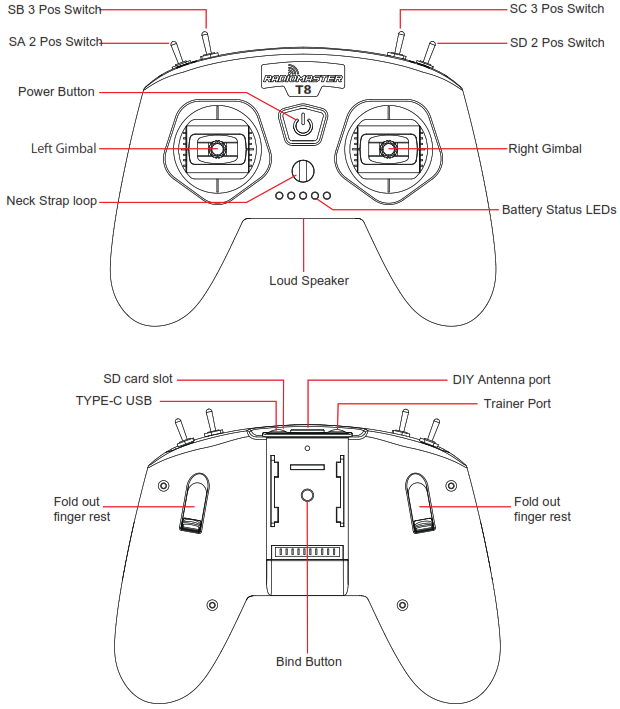
The T8 comes factory installed with special a T8 firmware for D8 and D16 use. No firmware updates are required for this radio. Simply charge, Bind and go fly! Visit www.radiomasterrc.com to learn about optional hardware accessories to convert your T8 in to a T8 Pro!![]() Remote control overview
Remote control overview
Charging Instructions
The T8 has a built in 1000mah 3.7v Battery. The built in USB-C charger will charge your batteries by connecting the supplied USB-C cable to any suitable USB power outlet. We suggest using a regular 2amp 5v USB power adapter.Charge status and battery Level:The 5 LEDS below the neck strap loop indicate the charging status. When the LEDs light up from left to right the T8 is charging. Each of the 5 LEDs indicates 20% of the battery capacity. 5 LEDs shows 100% charge, 4 LEDs 80%, 3 LEDs 60%, 2 LEDs 40%, 1 LED 20%. When the radios power is low and the T8 requires charging all 5 battery status LEDs will flash at the same time. Please recharge the batter before using the radio any further
Using your T8
Press and hold the Power button until you feel a vibration feedback. The radio is now on. If the throttle or switches are not in the correct position the Power LED will be RED. Please reset the switches to the correct position and move the throttle to the lowest point. The Power LED will turn GREEN to indicate the radio is now ready to use. To Turn off your T8 press and hold the power button until you feel a vibration feedback and the radio will turn off. If the LED is RED when turning off disconnect power to your model first.Quick Guide to Understanding the Power Button LED colors.GREEN: Radio is starting up or turned on and working normally.RED on start: A switch(s) or the throttle must be moved to default position.RED on shut down: The model or receiver is still connected, disconnect power to the model to complete the shut down cycle of the radio.The T8 has the follow settings by default and is ready to setup with the firmware of your flight controller or receiver up to 8 channels. The default channel order is AETR, please set accordingly in your flight controller software.CH1 AileronCH2 ElevatorCH3 ThrottleCH4 RudderCH5 2 Position Switch SACH6 3 Position Switch SBCH7 3 Position Switch SCCH8 2 Position Switch SD
Binding your T8
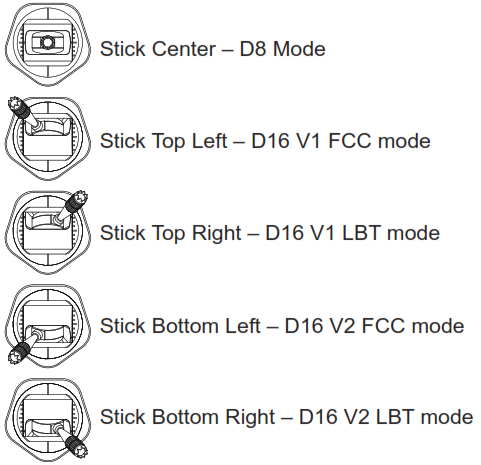
The T8 Uses a combination of Stick inputs and then pressing the Bind button to bind to one of the following protocols: D8 / D16 v1 FCC / D16 v1 LBT / D16 v2 FCC / D16 v2 LBTHold the LEFT gimbal Stick in the positions shown below then press the bind button for more than 1 second to bind the required Protocol. The Power button will blink blue to indicate binding is in progress.Once a model or receiver is bound you can change between various models using the Stick positions below and pressing the bind button for more than 1 second. The Power button will blink blue to indicate the protocol is changing. There is no need to put the model or receiver in bind mode again if it was successfully bound previously.
 Various different receivers and models will have different methods to place the model or receiver in to bind mode. Please follow the instructions from the model or receiver manufacturers user manual to initial the bind process.A Note on input sensitivity:If your craft feels too sensitive to input you may need to set up EXPO. EXPO is a function to soften the stick feeling in the center of the stick movements. This can help settle down a drone that is very sensitive to stick movements. This is handled in the flight-controller firmware and varies depending on the flight controller you are using and may be called EXPO or RC EXPO. Please refer to the setup guide of your specific drone or flight controller to set EXPO to your desired setting on the models flight control system.
Specifications
Size: 160*130*45mmWeight: 218gFrequency: 2.400GHZ-2.480GHZRF Module: Multi-Protocol Module Compatible Single chip (CC2500)Protocol Options: D8 / D16 v1 FCC / D16 v1 LBT / D16 v2 FCC / D16 v2 LBTTransmission power: 20dbmAntenna gain: 2dbRange: > 1km @ 20dbm (depending on the receiver)Battery: Built in 3.7v 1000mah Lithium batteryCharging: Built in USB-C chargingFirmware: OpenTX T8 Edition (Special T8 Edition, non-configurable) *Channels: Up to 8 channels (depending on the model / receiver)Gimbal: High-precision quad bearing potentiometer sensor gimbalVoice support: Yes (SD Card required)Option Accessories: 128*64 LCD and OpenTX operation Clip on moduleRequires Upgrading to OpenTX T8 Pro firmware*Does not support or require OpenTX companion or user programming.![]() EU Simple Declaration of ConformityRadioMaster declares the radio equipment T8/T8 Pro is in compliance with EU directives Directive 2014/53/EU. Full text of the declaration of conformity is available at the following website www.radiomasterrc.com Manufactured byShenzhen RadioMaster Co., LtdAddress: 5/F,Building 9, De Zhi Gao Technology Park, Yang Tian RoadBao’an District, Shenzhen, 518101, GuangDong, China
EU Simple Declaration of ConformityRadioMaster declares the radio equipment T8/T8 Pro is in compliance with EU directives Directive 2014/53/EU. Full text of the declaration of conformity is available at the following website www.radiomasterrc.com Manufactured byShenzhen RadioMaster Co., LtdAddress: 5/F,Building 9, De Zhi Gao Technology Park, Yang Tian RoadBao’an District, Shenzhen, 518101, GuangDong, China FCC ID: FCC ID: 2AV3G-T8FCC InformationThis equipment has been tested and found to comply with the limits for Part 15 of the FCC rules. This device complies with part 15 of the FCC rules. Operation is subject to the following two conditions: (1) This device may not cause harmful interference, and (2) this device must accept any interference received, including interference that may cause undesired operation. Full text of the declaration of conformity is available at the following website www.radiomasterrc.com
![]() CAUTION:Changes or modifications not expressly approved by the party responsible for compliance could void the user’s authority to operate the equipment. This product contains a radio transmitter with wireless technology which has been tested and found to be compliant with the applicable regulations governing a radio transmitter in the 2.400GHz to 2.4835GHz frequency range.Antenna Separation DistanceWhen operating your RadioMaster transmitter, please be sure to maintain a separation distance of at least 20 cm between your body (excluding fingers, hands, wrists, ankles and feet) and the antenna to meet RF exposure safety requirements as determined by FCC regulations.
CAUTION:Changes or modifications not expressly approved by the party responsible for compliance could void the user’s authority to operate the equipment. This product contains a radio transmitter with wireless technology which has been tested and found to be compliant with the applicable regulations governing a radio transmitter in the 2.400GHz to 2.4835GHz frequency range.Antenna Separation DistanceWhen operating your RadioMaster transmitter, please be sure to maintain a separation distance of at least 20 cm between your body (excluding fingers, hands, wrists, ankles and feet) and the antenna to meet RF exposure safety requirements as determined by FCC regulations.
 Follow us on Facebookhttps://www.facebook.com/radiomasterrc/
 Visit our website to learn morehttps://www.radiomasterrc.com/
 Follow us on Instagramhttps://www.instagram.com/radiomasterrc/
T8 Quick Start Guide – T8 Quick Start Guide –
[xyz-ips snippet=”download-snippet”]