RAE SYSTEMS T01-3029-000 AutoRAE 2 Controller User Guide

Setup
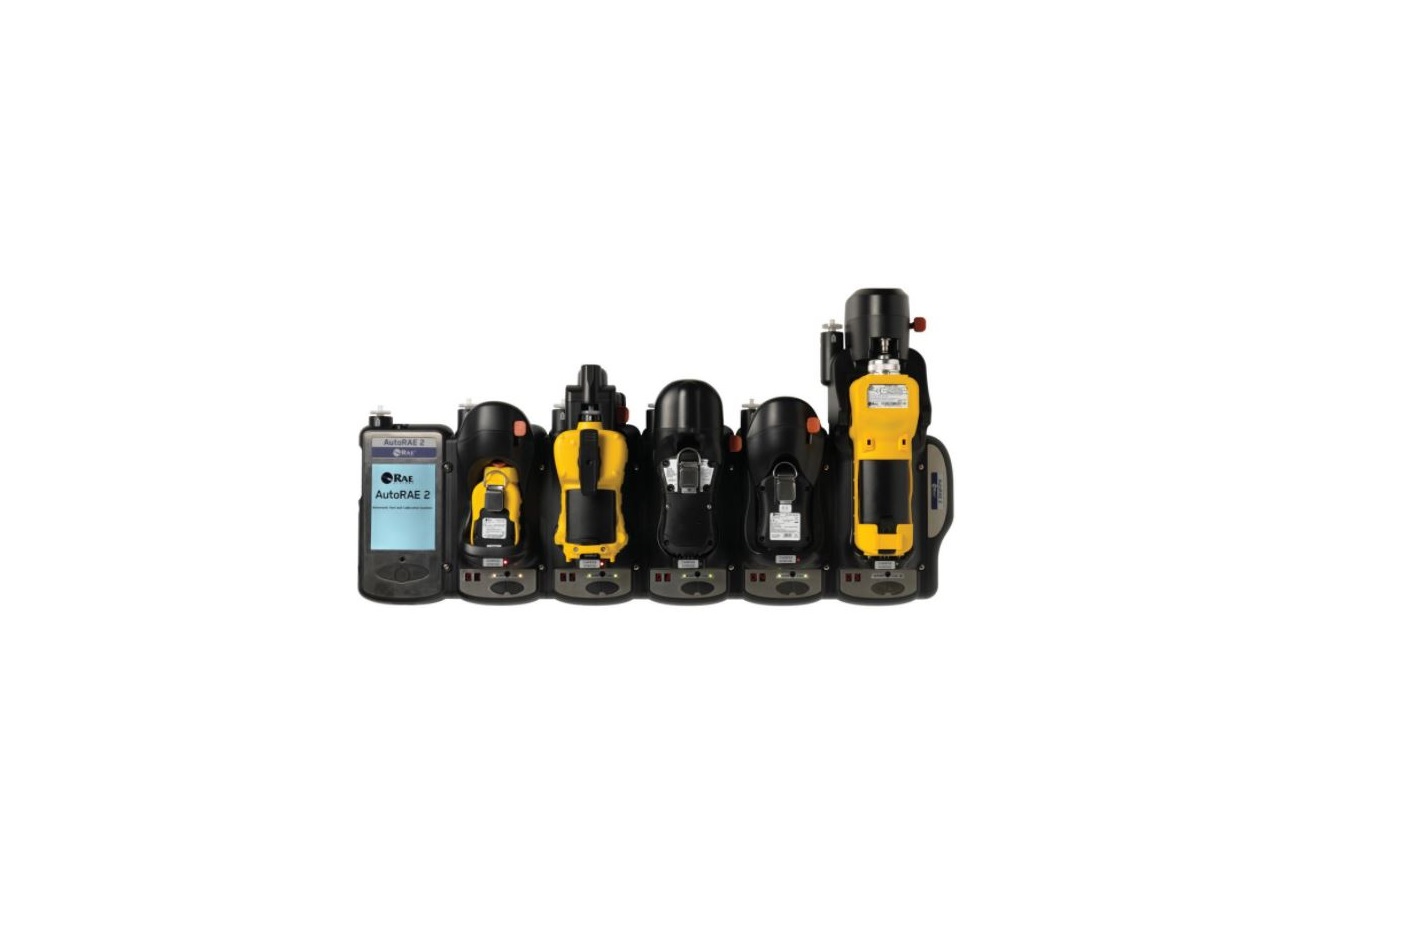
Before using the AutoRAE 2 Controller and AutoRAE 2 Cradle(s) to bump test or calibrate ToxiRAE Pro-family, QRAE 3, MicroRAE, Handheld PID, and/or MultiRAE -family (pumped versions) instruments, follow the instructions in the AutoRAE 2 User’s Guide for programming the gas configurations. The steps to follow for assembly and gas configuration, as well as functionality, are the same for all cradles.
Connections
Important! Make sure an SD card is installed in the AutoRAE 2 Controller. The system cannot operate if an SD card is not installed. For installation instructions, consult the AutoRAE 2 User’s Guide. Make sure the AutoRAE 2 Controller’s RTC (real-time clock) has been set in ProRAE Studio II before its first use.
Turning The System On
Toggle the switch on the side of the AutoRAE 2 Controller. The display and power LED glow, and the LEDs on attached cradles light up. The AutoRAE 2’s internal pump and the valves in the system are tested. If self-checkout is successful, the system is ready to use. The display provides a list of the AutoRAE 2 Cradles, and if there are instruments in them, the names of the instruments are included in this list.
Make sure calibration gases match the configurations created in ProRAE Studio II and transferred to the AutoRAE 2 Controller. Also make sure the gas cylinders have sufficient gas in them and that they are attached properly.
Place An Instrument In The Cradle
Make sure the filter on the instrument is not dirty or clogged (MiniRAE 3000, ppbRAE 3000, UltraRAE 3000, and MiniRAE Lite must be equipped with Quick Connectors and have their inlet probes removed). Important! For MicroRAE, make sure the external filter is removed from the unit before placing it in the Cradle.
- Make sure the instrument is in AutoRAE 2 Mode or turned off.
- Place the instrument into the cradle face-down, making sure that it is aligned correctly with the contacts on the AutoRAE 2 Cradle’s charging port. There are two alignment points on one side and one alignment point on the other side, designed to mate with matching points on the bottom of the instrument.
- Press in on the capture mechanism to lock the instrument in place.

Automatic Warm-Up Before Bump Testing Or Calibrating
When you place an instrument in the cradle and lock the capture mechanism, the instrument begins charging and is automatically warmed up. Warm-up time depends on the sensors installed in the instrument and their individual warm-up requirements.
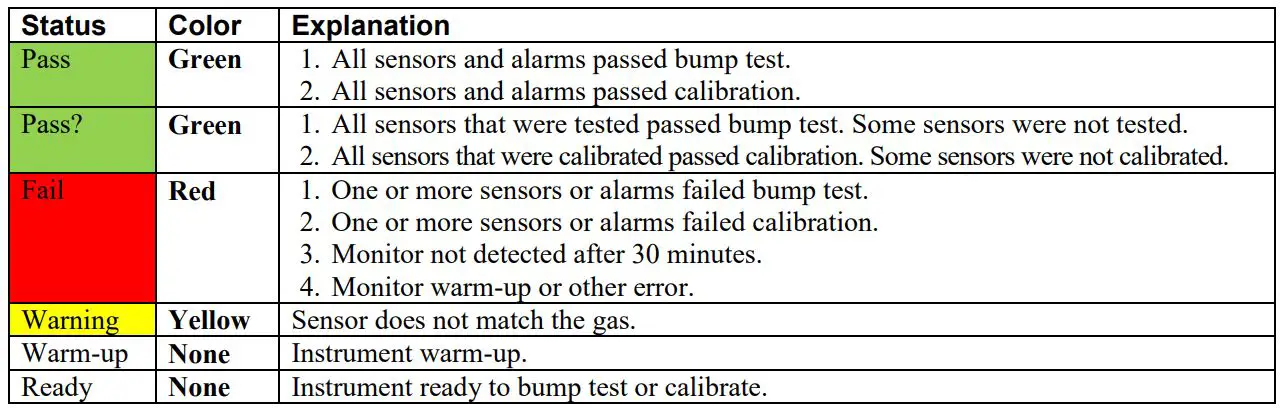
Display Color Coding
The AutoRAE 2 Controller has a color display, so colors are used to indicate status in different categories of information.
Bump Testing
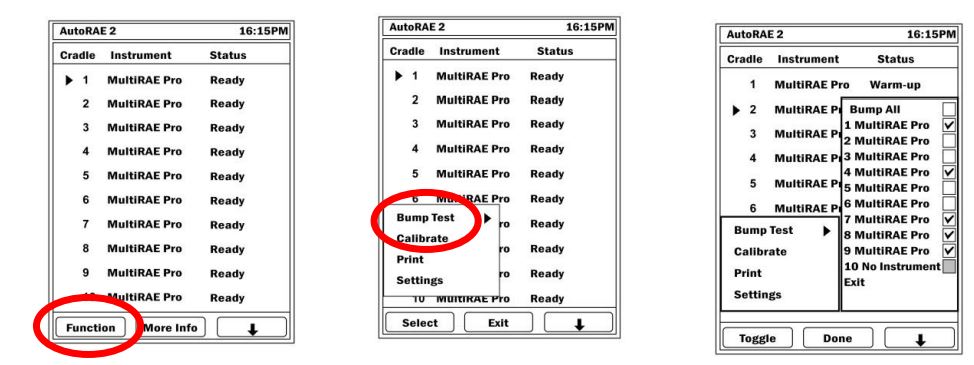
You can bump test all or individually selected instruments that are seated in the system’s cradles. From the main screen, enter Bump Test by pressing [Y/+] twice (“Function” and then “Select”).
Note: Any cradle that does not have an instrument in it is shown with a gray checkbox. You cannot check/uncheck this box.
To select all instruments in cradles to bump test:
- Press [Y/+]. When you check “Bump All,” the “Bump All” checkbox and all of the other checkboxes for cradled instruments are automatically checked.
- Press [MODE] for “Done.”
- Press [Y/+] to start.
To select specific instruments to bump test:
- Press [N/-] to scroll down the list to an instrument you want to select for bump testing.
- Press [Y/+] to toggle the selection between unchecked and checked.
- Press [MODE] for “Done.”
- Press [N/-] to select “Exit,” and then press [Y/+] to exit.
If you did not press [Y/+] to start the process, then a countdown begins. When the countdown reaches zero, then the instruments are bump tested.
To abort a bump test: Press [N/-]. You will be asked if you want to abort the process. Press [Y/+] for “Yes” and [N/-] for “No.”
IMPORTANT!If an instrument does not pass a bump test, a full calibration is automatically started.
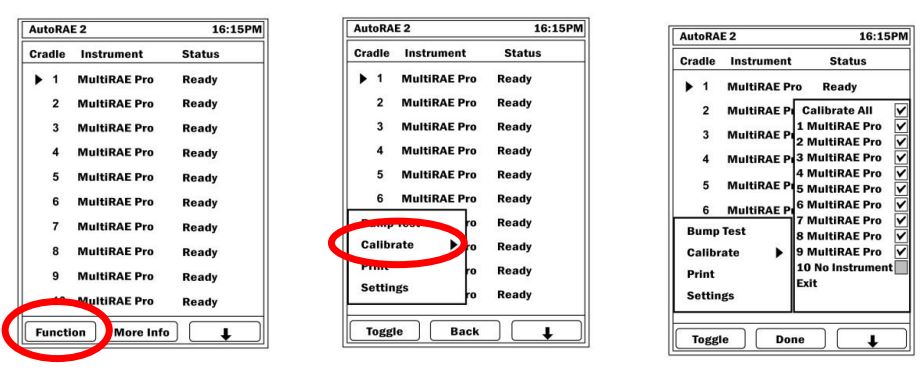
Calibration
You can calibrate all or individually selected instruments that are seated in the system’s cradles. From the main screen, enter Calibrate by pressing [Y/+] (“Function”), and then [N/-] until “Calibrate” is highlighted. Then press [Y/+] to select it.Note: Any cradle that does not have an instrument in it is shown with a gray checkbox. You cannot check/uncheck this box.
To select all instruments to calibrate:
- Press [Y/+]. When you check “Calibrate All,” the “Calibrate All” checkbox and all of the other checkboxes for cradled instruments are checked.
- Press [MODE] for “Done.”
- Press [Y/+] to start.
To select specific instruments to calibrate:
- Press [N/-] to scroll down the list to an instrument you want to select for calibration.
- Press [Y/+] to toggle the selection between unchecked and checked.
- Press [MODE] for “Done.”
- Press [N/-] to select “Exit,” and then press [Y/+] to exit.
If you did not press [Y/+] to start the process, then a countdown begins. When the countdown reaches zero, then the instruments are calibrated.
To abort calibration: Press [N/-]. You will be asked if you want to abort the process. Press [Y/+] for “Yes” and [N/-] for “No.”
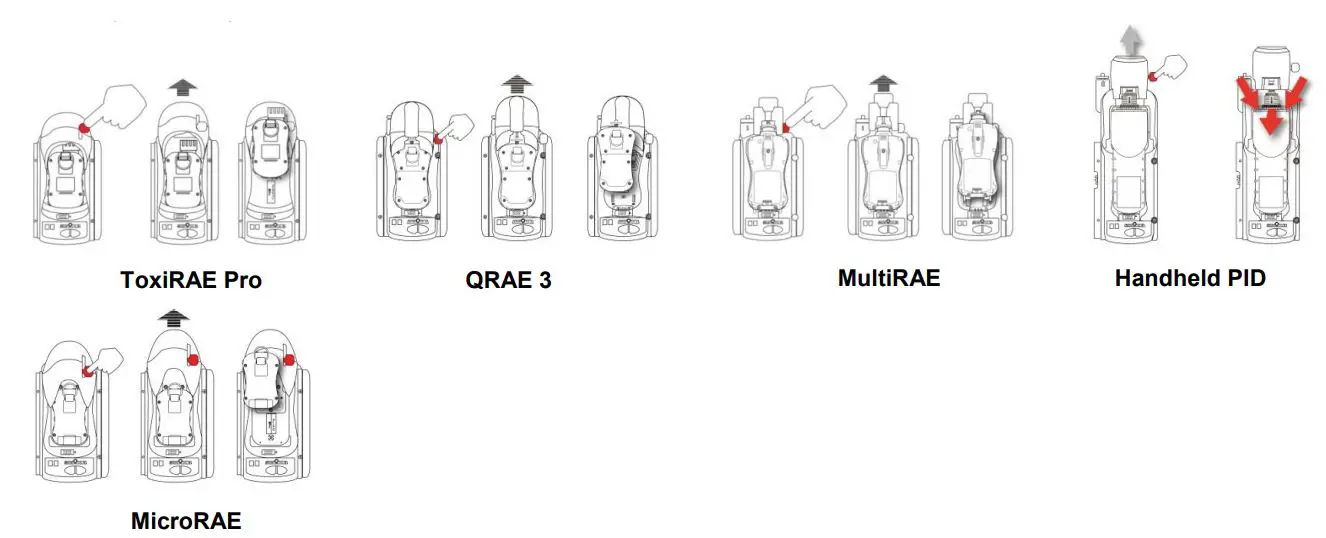
Removing An Instrument From A Cradle
To remove an instrument from a cradle, press the button to release the capture mechanism. Then lift the instrument from its inlet end.
Charging An Instrument’s BatteryEach AutoRAE 2 Cradle attached to an AutoRAE 2 Controller automatically charges an instrument’s battery when it is docked. The Charge Status LED glows red to indicate that charging is taking place. When the instrument’s battery is fully charged, the LED glows green.
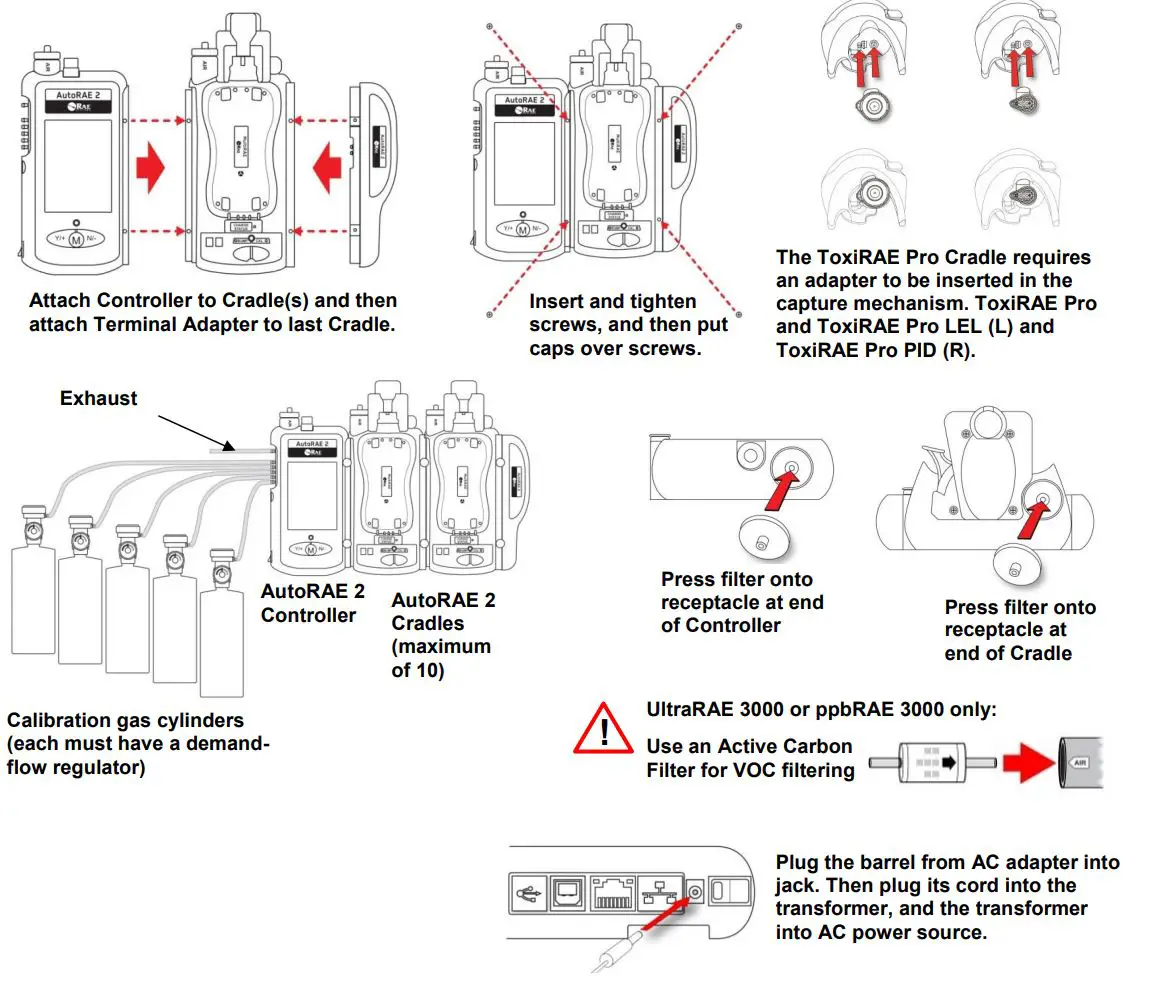
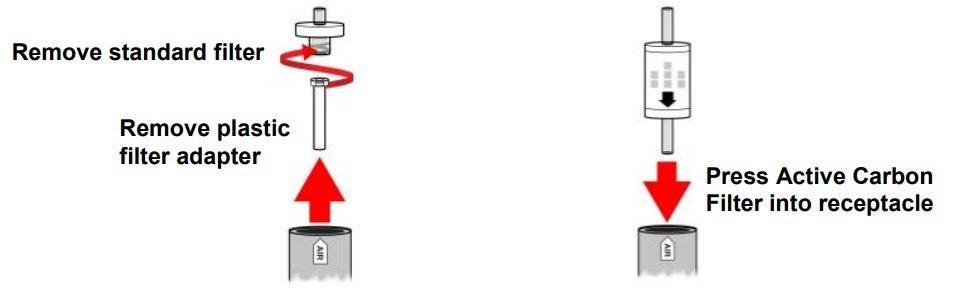
Active Carbon Filter For Removing VOCWhether zeroing a ppbRAE 3000, an UltraRAE 3000, or in an environment in which the ambient air has VOC (volatile organic compounds), it is strongly recommended to use an Active Carbon Filter (P/N: 490-0006-000), which filters out VOC from the air.When an AutoRAE Controller is used with one or more Cradles, the air inlet on each attached cradle is disabled and air is taken in through the Controller’s air inlet. Therefore, you only need to use one Active Carbon Filter for the Controller instead of on each cradle. To install the Active Carbon Filter on the Controller:
- Remove the standard filter (if one is installed).
- Remove the plastic filter adapter by twisting the plastic filter clockwise while gently pulling outward.
- Press the Active Carbon Filter into the receptacle. The filter is designed for 20 uses. To help you keep track of how many calibrations are performed, there are 20 small boxes painted on the surface of the filter that you can mark with a pen after each use.Note: Make sure the arrow on the side of the filter points toward the Controller.
Handheld PID Monitors Must Be Equipped With A Quick Connector
You must remove the inlet probe before placing a handheld PID instrument (MiniRAE Lite, MiniRAE 3000, ppbRAE 3000, or UltraRAE 3000) into the cradle. If the instrument does not have a Quick Connector (P/N: T02-3301-000) already installed, you must install one.
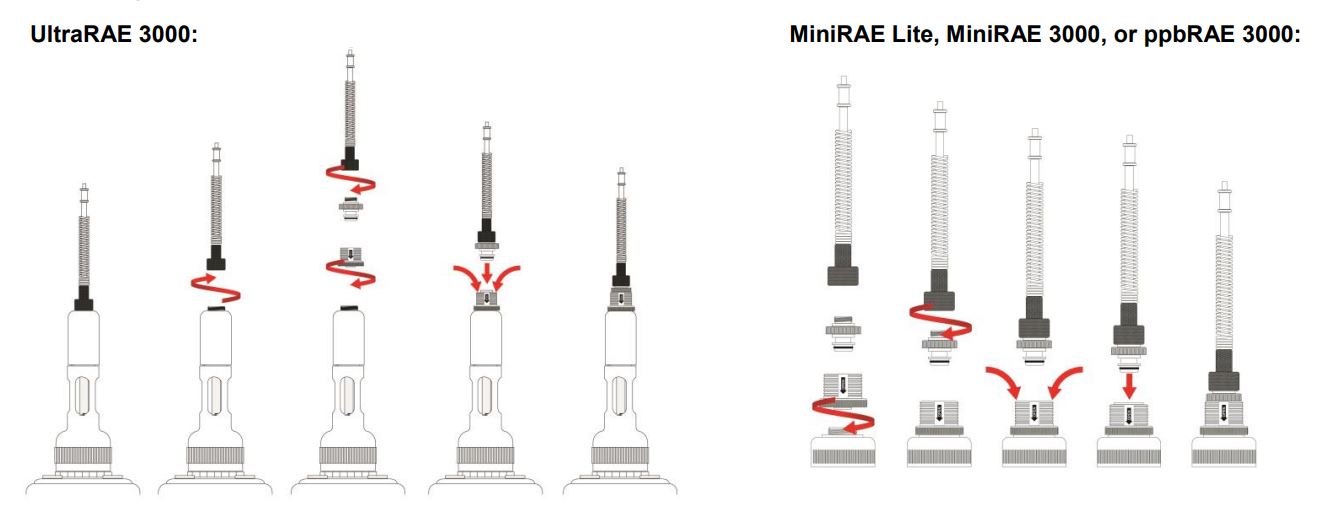
![]() Do not use a RAE-Sep Tube in the UltraRAE 3000 tube holder when using it with an AutoRAE 2 Cradle.
Do not use a RAE-Sep Tube in the UltraRAE 3000 tube holder when using it with an AutoRAE 2 Cradle.
![]()
CORPORATE HEADQUARTERS RAESystems by Honeywell 3775 N. First St. San Jose, CA 95134 USAPhone: 408.952.8200Fax: 408.952.8480[email protected]
WORLDWIDE SALES OFFICESUSA/Canada: 1.877.723.2878Europe: +45.86.52.51.55Middle East: +00971.4.440.5949China: +86.10.5885.8788-3000Asia Pacific: +852.2669.0828
Rev E May 2016 P/N T02-4002-000
 report this ad
[xyz-ips snippet=”download-snippet”]