![]() RAELink3QUICK REFERENCE
RAELink3QUICK REFERENCE
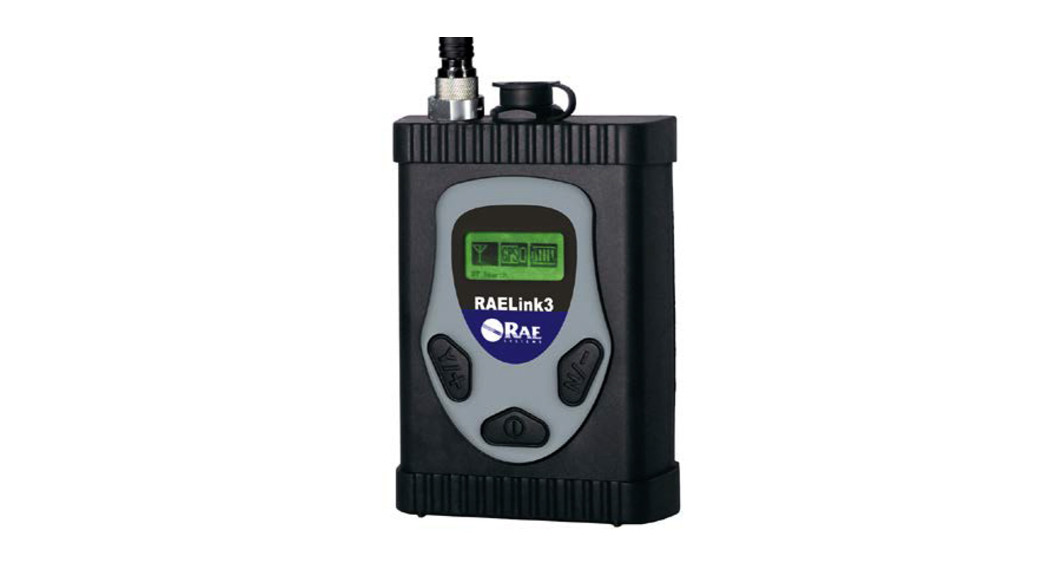
The RAELink3 compact, portable radio-frequency modem provides long-range wireless communication between remote portable air monitors and a base station/computer for comprehensive monitoring. Up to 64 RAELink3-equipped monitors can be networked with a single Host.
The RAELink3 can be configured to act in one of the following modes:
- Remote. The RAELink3 Remote functions as a slave modem and communicates to a host modem with the same network ID.
- Host. The RAELink3 Host functions as a host modem and communicates with multiple wireless modems.
- Repeater. The RAELink3 Repeater functions as a repeater for RAELink3 Remote modems (or AreaRAE or RAELink series products) with the same network ID.
Battery ReplacementThe RAELink3 can use a rechargeable lithium-ion battery or an alkaline battery pack. It can also be operated on its charger. To take the rechargeable battery or alkaline battery pack out of the RAELink3, remove the 3 Phillips-head screws and lift it out. To replace the AA batteries in the alkaline battery pack, remove the two Phillips-head screws on the inside, remove the cover, and replace the 5 AA batteries (Duracell MN1500 or Energizer E91 only). Make sure that the polarity (“+” and “-”) for each battery is correct. Do not mix old and new batteries. Only change batteries in a non-hazardous location.Setup & Battery ChargingBefore using the RAELink3, charge the Li-ion battery by attaching the instrument to the Charging Adapter.

- Align the Charging Adapter with the back of the RAELink3 (two guides match indents on the back of the Charging Adapter.
- Slide the Charging Adapter onto the back of the RAELink3.
- Make sure the latch clicks into place. (Press the latch when detaching the charger.)
- Plug the power supply’s connector into the input on the side of the Charging Adapter.
- Plug the power supply into the wall outlet.
The LED Charging Indicator in the Charging Adapter should glow red to indicate it is charging, and glow green when the battery is fully charged. RAE Systems Inc. 3775 N. First St., San Jose, CA 95134-1708 the USA
Toll-free: 888-723-8823 Website: www.raesystems.com
ConnectionsAttach all antennas before turning on RAELink3 and other equipment.Remote For the Remote, connect a portable gas monitor (PGM) such as a ppbRAE Plus, MiniRAE 2000, or MultiRAE Plus to the RAELink3 using an optional Portable Coiled Cable (part number 400-0189-000), or cordlessly with Bluetooth to monitors such as the MiniRAE3000 and ppbRAE3000. Third-party portable monitors use Bluetooth or require unique cables to connect to the RAELink3. Make sure Bluetooth is turned on in any monitors that use Bluetooth.You can use a single RAELink3 in Remote Mode to transmit data from a Bluetooth-enabled and a cable-connected devicesimultaneously.
|
Products Supported with RAELink3 v2.00 |
Connection |
Remote Mode Setting |
| QRAE Plus | Cable | RAE PTP |
| MultiRAE Plus, MiniRAE2000, MiniRAE3000 | Cable | Bypass |
| ppbRAE Plus | Cable | Bypass |
| ppbRAE3000, UltraRAE 3000 | Bluetooth | Bypass |
| GammaRAEII R | Bluetooth | GammaRAE2 |
| ChemRAE | Cable | ChemRAE |
| BioHarness | Bluetooth | BioHarness |
| DustTrak2 | Cable | DustTrak2 |
| AP4C | Cable | AP4C |
When Remote Mode is selected, this screen says “OP Mode: Remote Change?”Press [N/-] to keep the RAELink3 in Remote Mode and to advance to the BT menu.
- Press [Y/+] if you want to change to another Bluetooth device in the list.
- Press [N/-] if you want to simply advance to Cable settings.
If you chose to change the BT setting, then you can use the [Y/+] and [N/-] buttons to navigate through the list and make a selection.
Cable SettingIf a cable is used to connect a monitor to a RAELink3 in Remote Mode, you must make sure the correct setting is selected for proper operation.
- Press [Y/+] if you want to change to another Cable setting in the list.
- Press [N/-] if you want to simply advance to GPS Status.
To connect two devices simultaneously, make sure of the following:
- Each device must have a unique Unit ID.
- The correct device must be selected in the BT and Cable menus.
Example: To connect a MultiRAE Plus and a BioHarness to the same RAELink3, in Remote settings, select “Cable: Bypass.” Then select “BT: BioHarness.”Note: If one of the two channels (Cable or Bluetooth) is not connected to a device, it is not necessary to select a setting for the unused channel.
User Interface
The user interface consists of the display and three “soft” keys: [Y/+], [MODE], and [N/-]. The LCD display provides visual feedback that includes the reading, time, battery condition, and other functions.
Controls
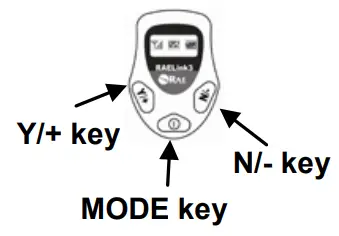
Display
[Y/+] increases values, [MODE] acts as on/off and save, and [N/-] selects “no” and advances to the next function.In addition to their labeled functions as “yes,” “mode select,” and “no,” [Y/+], [MODE], and [N/-] act as “soft keys” that control different parameters and make selections within the instrument’s menus.
Operation
Turn On Press and hold [MODE] until the display is on.Turn Off Press and hold the [MODE] for 3 seconds. The display shows “Shutting Down…” After a 5-second countdown, you see “Unit Off.” Release your finger.Backlight: Press any key to turn on the backlight. After 15 seconds, it shuts off.
Establish Bluetooth Link
- Turn on the Bluetooth-enabled monitor and make sure Bluetooth is turned on.
- Turn on the RAELink3. It should be in Remote Mode, and Bluetooth turned on.
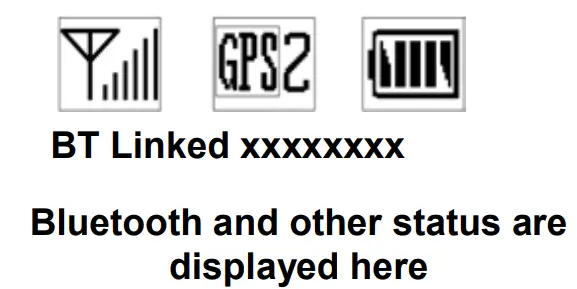
- The two units connect, and exchange ID numbers. The ID number of the monitor is shown below the icons. They are now connected.
The RAELink3 can scan for Bluetooth-enabled monitors, and stores up to 2 connections in memory for faster re-deployment. Upon powering on, the RAELink3 automatically searches for the primary Bluetooth device (indicated by the asterisk) in memory.To perform the initial pairing of a monitor with RAELink3, scan for a Bluetooth-enabled monitor: Press and hold [MODE] and [N/-] for 3 seconds. When the “BT Search” message appears, press [Y/+]. For the fastest operation, only turn on one RAELink3 and one monitor at a time during this initial pairing.
Set Network IDImportant! All units in a network must have the same Network ID.With the RAELink3 turned on, press and hold both [MODE] and [N/-] for 3 seconds.The RAELink3 enters programming mode:
| Network ID: 0001Change? | To change the Network ID, press [Y/+].To advance without changing, press [N/-].To exit Programming Mode, press [MODE]. |
 report this ad
When changing the Network ID, the cursor flashes on the selected digit:
- Press [Y/+] to increase the number or [N/-] to decrease the number.
- Press [MODE] to advance to the next digit.
- Input a network ID from 1 to 4095 (except 255).
To accept the new Network ID, press and hold [MODE] for 2 seconds. When the confirmation screen appears, press [Y/+] to save, or press [N/-] to abort the change.
Set Unit ID
Important! Every remote unit in a network must have a unique Unit ID.Note: When RAELink3 is configured as a Repeater or Host, it does not require a Unit ID. Some portable monitors require setting the Unit ID on the monitor. Refer to the operation manual for the monitor.
With the RAELink3 turned on, press and hold both [MODE] and [N/-] for 3 seconds. The RAELink3 enters programming mode. Press [N/-] until you see the screen at right.
| Unit ID: 01Change? |
Press [Y/+] if you want to change the Unit ID. When changing the Unit ID, the cursor flashes on the selected digit.
- Press [Y/+] to increase the number or [N/-] to decrease the number.
- Press [MODE] to advance to the next digit.
- Input a Unit ID from 00 to 64.
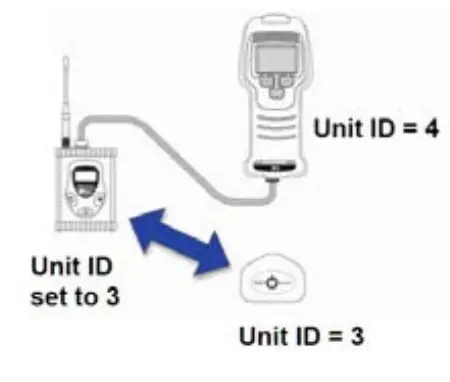
To accept the new Unit ID, press and hold [MODE] for 2 seconds. When the confirmation screen appears, press [Y/+] to save, or press [N/-] to abort the change.When connecting two detectors to one RAELink3 and both devices require setting the Unit ID on the RAELink3 modem (that is, neither “Cable” nor “BT” is set to “Bypass”), RAELink3 automatically assigns Unit ID of (N +1) to the Cable-connected device (where N is equal to the Unit ID set in the RAELink3 for the BT-connected device).
For example, if connecting a ChemRAE via cable and a BioHarness via Bluetooth, the settings in the RAELink3 are:
- Mode of Operation = Remote
- Cable = ChemRAE
- BT = BioHarness
- Unit ID = N (in this example, we set “N” to “3,” so the BioHarness is assigned Unit ID “3”)
- Therefore, Unit ID for the ChemRAE is “4” by default
 Additional Information And SupportRead the RAELink3 User’s Guide for additional information on features and settings, as well as regulatory information not covered in this Quick Reference. For support, contact RAE Systems Technical Support at (888) 723-8823, or email [email protected].
[xyz-ips snippet=”download-snippet”]