
![]()
SOHORAIDGR4670-TB3
User Manual
About this Manual
Thank you for choosing the RAIDON product. This manual will familiarize you with the RAIDON GR4670-TB3 product. We recommend reading through this manual before using the RAIDON GR4670-TB3 product. The information provided in this manual was checked before publication, but the actual product specifications may have changed before shipping; Latest product specifications and updates can be found at www.RAIDON.com.tw. No separate notifications will be provided by our company. If you would like to receive the latest RAIDON product information, manuals, and firmware, or have any questions regarding RAIDON products, please contact your local supplier or visit www.RAIDON.com.tw for more information.
All product-related content in this manual are copyrighted by RAIDON TECHNOLOGY, INC.
1. Environmental Requirements
Operating temperature: 0 ~ 40°C (32 ~ 104°F)Storage temperature : -20 ~ 47°C (-4 ~ 116°F )Operating voltage: 100 ~ 240V AC
2. Product Appearance and Packaging Content
The following items should be inside the package upon opening:
|
GR4670-TB3 |
|
GR4670-TB3 product x 1 (containing HDD enclosure x 4) |
|
Thunderbolt™ cable x 1 |
|
Power cable x 1 |
|
Quick Setup Guide x 1 |
|
Screws and key |
- Please check the product and accessories for any defect or missing parts. If you have any questions, please contact your product supplier.
- Please visit the official website – Download page (http://www.RAIDON.com.tw/RAIDON2016/download.php) to download drivers and other related resources.
1
Front and rear view
Front View Rear View

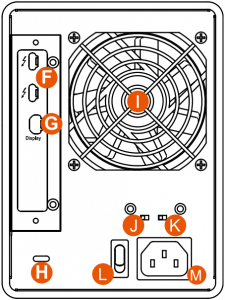
Note: A hard disk must be installed at HDD location 0
A. HDD access light H. Anti-theft lockB. HDD enclosure key lock I. FanC. HDD enclosure button J. Fan speed switchD. Power status light K. Mute switchE. System status light L. Power switchF. Thunderbolt™ port M. Power socketG. Mini DisplayPort
3. Hardware Requirements and Precautions
- This system can only transfer data to one computer through one interface at a time.
- The capacity of RAID 5 is the size of capacity of the smallest hard disk multiplied by 3 while RAID 0 is multiplied by 4. The result will be treated as one single high-capacity drive. A hard disk must therefore be installed in every bay before this system can be used. We also recommend using brand new hard disks with identical specifications from the same brand. If a hard disk needs to be changed, please be sure to buy a hard disk with the same specifications, capacity, and brand. If this is not possible, then the capacity of the new hard disk should be at least 20GB larger than the existing hard disk.
- After the hard disk is formatted, the actual total capacity of the GR4670-TB3 detected by the computer operating system will vary from the sum of all hard disk capacities stated by the manufacturer.
- All existing data will be deleted when this product is set up for the first time. Please ensure that all data on the hard disk has been backed up before installation to avoid data loss.
- Before a new HDD is installed in the GR4670-TB3, please make sure that there are no bad tracks or defects to avoid data loss.
- If the GR4670-TB3 needs to be shut down or disconnected, please ensure the HDD is safely removed through your operating system before turning off the power.
- To prevent data loss, do not remove any of the hard disks while the system is running.
- Once the system has been initialized, do not switch hard disks around during use. Doing so may prevent the RAID from being recognized by the system.
- Once RAID mode has been set up, the switching of hard drives will lead to the removal of data from the hard disks. Please be sure to backup the data on the hard disk before making any switches.
- Under RAID 5 mode, the system can only tolerate the failure of one hard disk. If the system shows that two or more of your hard disks have failed, your stored data may already be damaged or lost. In RAID 0 mode, If the system shows that one of your hard disks has failed, your stored data may already be damaged or lost.
- If the GR4670-TB3 needs to be shut down or disconnected, please ensure the HDD is safely removed through your operating system before turning off the power.
- While the In-chassis temperature reaches up to 55 degree-C (131 degree-F), in order to get rid of the heat efficiently, your DR8-TB3 will turn fan parts to full speed automatically. And once the Inchassis temperature drops down to 50 degree-C (122 degree-F), you could then set fan speed at Fan Speed Switch manually to reduce its fan noise for a better green environment at both of a lower fan noise and the power saving.
- We strongly recommend backing up important data stored on the GR4670-TB3 to another storage device or a remote site. RAIDON will not be held liable for the damage or loss of data you stored on the GR4670-TB3.
4. Hardware Installation
Please follow the steps below to complete the hardware installation process:
Step 1 When you open the package, please immediately check the product and included parts for any damage or missing parts. If there is a problem with the product or included parts please contact your supplier immediately.
Step 2 Place the device on a flat, even surface. Make sure that the cooling fan is not blocked and there is sufficient surrounding space for cooling. (Keep away from water or other environments that may cause product damage)
Step 3 Please insert the key included with the parts pack into the keyhole to release the HDD enclosure handle and remove the HDD enclosure.
Step 4 Place the hard disk in the HDD enclosure and secure it in place with the included screws; this will prevent damage to the hard disk from external vibration.
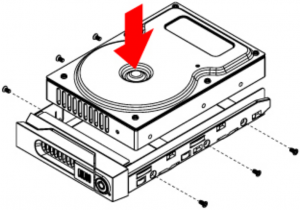

Note: Please avoid using hard disk drives from different manufacturers or different models from the same manufacturer as this may impact system performance.
Step 5 Once the hard disk is installed, slide the enclosure into the system and close the handle.
Step 6 Select the appropriate cable from the accessories pack depending on the interface. Connect the GR4670-TB3 backplate connection port to the corresponding port on the computer.
Step 7 Connect the AC Power cable to the GR4670-TB3. Plug the connector into the power socket then start the system.
Step 8 Your operating system will automatically detect available capacity once the device finishes booting. Once the device has been detected, please follow instructions given by the operating system and format the system. Once the hard disk has been formatted, the GR4670-TB3 system can be used.
Step 9 If the computer is unable to detect the system, please install the drivers from official website Download page (http://www.RAIDON.com.tw/RAIDON2016/download.php).
5. Troubleshooting Fan Errors
The GR4670-TB3 includes a fan failure warning function. When the fan of the GR4670-TB3 fails, the built-in buzzer will sound. The red warning light on the front plate will also light up; If this happens, press the mute switch at the back of the system to turn off the buzzer. Next, turn off power to the GR4670-TB3 as soon as possible to let the machine cool down. Check to make sure that the machine is placed in a well-ventilated location with nothing obstructing the fan, also check to see if the GR4670-TB3’s fan has stopped turning. Once the above checks have been completed, turn the power back on to continue using this system. If this doesn’t solve the problem, please contact the product supplier or RAIDON for further technical assistance.
6. The MSU, and easy RAID configurator
Please visit the official website – Download page (http://www.RAIDON.com.tw/RAIDON2016/download.php) to download Marvell Storage Utility (MSU). After GR4670-TB3 connected to the computer and install the MSU, multiple RAID modes can be set up through the MSU.
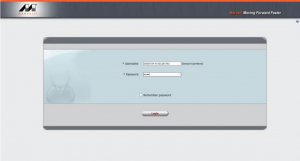
A. Set up RAID Mode:1. Use your Windows username and password to log into the MSU. If you have a username but no password, then leave the password field blank.
4
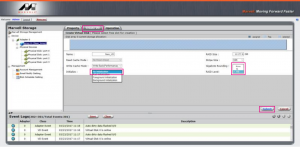
2. Click [Operation] and [Create Array].

3. Click at the selected HDDs.

4. Select [RAID 5] (or other RAID).

5
5. Setup Stripe Size.

- The more Stripe Sizes helps a better data transfer for large data files which is good for video and audio editing works.
- The less Stripe Sizes helps a better efficiency at randon files which is good for daily word processing, frequent read-&-write works.
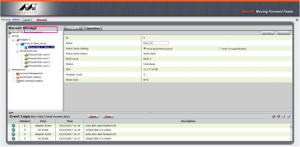
6. Type Storage Name and Submit RAID setting.

7. After submitting RAID setting:

6
8. Click [Create VD], [Initialize] option is set to [No Initialization]; [Gigabyte Rounding] options set to [10G], then click [Submit].
9. After submit, you get a New_VD.
P.S. VD is the abbreviation of Virture Disk.
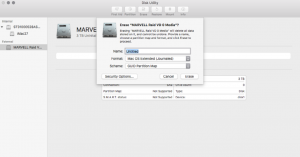
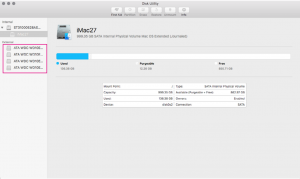
10.To initiate and format HDD/SSD at OS level.
7
11. After completing the format, you could start using your GR4670-TB3.

8
B. Delete a RAID for a new RAID setting
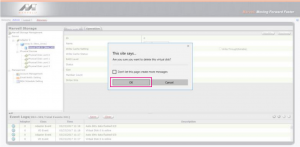
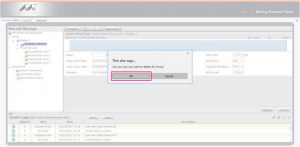
1. Click [Operation] and [Delete VD].

2. Click [OK] at first warning message.

3. Click [OK] at the second warning message.
9
4. Click [Operation], [Delete Array] and [Submit].
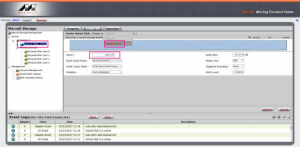
5. Click [OK] at warning message.
6. It returns to JBOD mode, you just have to format every individual HDD or just to set up another RAID.
Please refer to “RAIDON All TB2&TB3 RAID 5 Storage MSU User Manual.pdf” for the RAID setting.
10
7. Description of HDD Indicators
| Status | Power status light | System indicator Light | HDD Status Light | Buzzer |
| No HDD detected | Blue light always on | N/A | Red light always on | N/A |
| HDD failed | Blue light always on | Red light flashing | Red light always on | YES |
| Data access | Blue light always on | N/A | Blue light flashing | N/A |
| HDD idle | Blue light always on | N/A | Blue light always on | N/A |
| Rebuilding data – Source HDD | Blue light always on | N/A | Blue light flashing | N/A |
| Rebuilding data – Target HDD | Blue light always on | N/A | Purple light flashing | N/A |
| Fan failure | Blue light always on | Red light flashing | Blue light always on | YES |
| Overheat | Blue light always on | Red light flashing | Blue light always on | YES |
8. Connect with other devices
- TB port: Thunderbolt™ 3 ports can be connected to TB3, USB3.1 and Display port device. It is downward to support USB3.0 / USB2.0. This product can connect with different USB devices by USB Type C to Type A/B cable. It supports TB port power delivery (PD) function, which can provide 15W (5V / 3A) power output to support 5V / 3A rechargeable notebook computer use. There is no additional power supply need.
- Mini Display port: configured with Mini Display Port connection port to provide additional screen output.
Two System Connections:
A. GR4670-TB3: Let its TB A port connect to Host (PC/Workstation/Server), TB B port to other Device (USB or TB), and mDP (Mini Display) port to monitor.
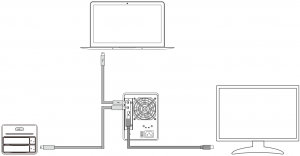
11
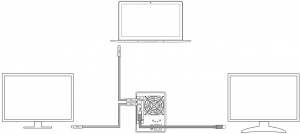
B. GR4670-TB3: Let its TB A port connect to Host (PC/Workstation/Server), TB B port to a monitor, and mDP port to the second monitor.
9. Frequently Asked Questions
1. If the GR4670-TB3 is turned on, but the Thunderbolt™ cable is not connected, the fan and power status lights will both be in stopped/hibernation mode. The fan and power status light will not come on until the Thunderbolt™ cable is connected to the computer.
2. When the computer enters hibernation mode, the fan and power status lights will both be in stopped/ hibernation mode. The fan and power status light will not come on until the computer is awake.
3. If a hard disk already contains data from another RAID product or RAID mode has already been set, we recommend reverting back to JBOD mode before the drive is used with the GR4670-TB3 again to avoid problems accessing the hard drive.
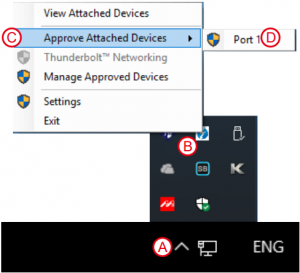
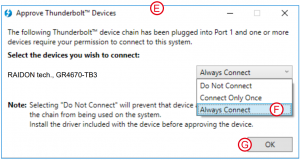
4. If the DR8M-TB3 is installed on the Windows OS but can not be connected, refer to the following steps:A. Open the Windows Taskbar.B. right-click the Thunderbolt™ icon.C. Select “Approve Attached Devices”.D. Select the port to which the device is connected.E. Wait for the dialog box “Approve Thunderbolt™ ™ Devices” to appear.F. Select “Always Connect”G. Press “OK”
12
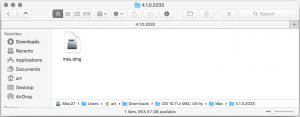
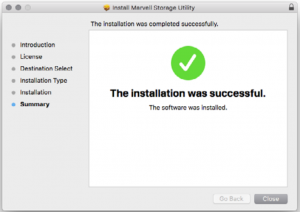
5. How to install software on macOS:A. Unzip the downloaded tarball and execute msu.dmg.
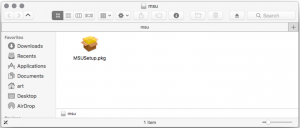
B. Get the installation program MSUSetup.pkg, execute the program, and enter the installation process.
C. Follow the flow instructions and actual conditions to complete the installation.

13
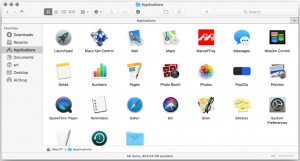
6. There are three ways to start the program:A. Find MarvellTray in the folder “Applications”, hit the point and execute the program.
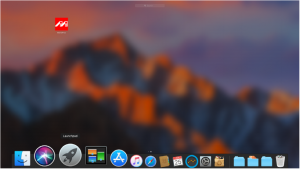
B. Hit the Launchpad on the Dock and hit the MarvellTray icon to execute the program.
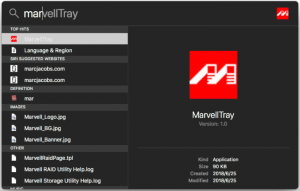
C. Using Spotlight’s search function, type MarvellTray to find the program and press Enter to execute the program.
14
7. The new macOS 10.13 (High Sierra) requires user approval before loading new, third-party kernel extensions:A. Execute MarvellMvumi.pkg.B. Appear from an unidentified developer warning, click on the lower right corner of the “OK.”C. Open System Preferences, and go to Security & Privacy.D. Click on the “Allow” button.
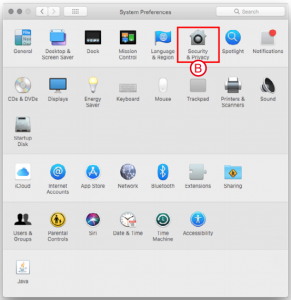
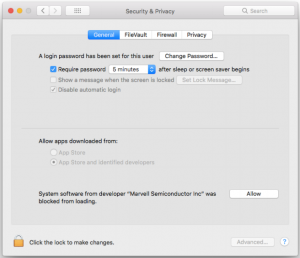
Note: If you can not click the allow button, click the lower left corner of the lock icon, and enter the administrator password.
15
![]()

References
[xyz-ips snippet=”download-snippet”]