
RainPoint 2-Zone Digital Tap Timer User Manual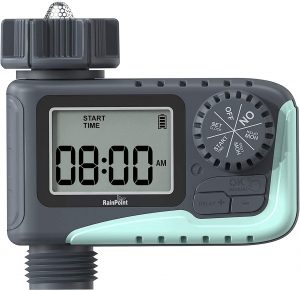
IMPORTANT! PLEASE READ!
- IF THE VALVE FAILS TO SHUTOFF WATER WHEN IS USED FOR THE FIRST TIME OR PLACED MORE THAN 3 MONTHS TO USE AGAIN (THAT’S BECAUSE THE WATER IN THE VALVE IS EVAPORATED, WHICH CAUSES IT TO STICK TOGETHER WITH THE SILICONE DIAPHRAGM), PLEASE PRESS ‘OK’ BUTTON FOR 5 SECONDS AND REPEAT 7-10 TIMES TO ACTIVATE THE VALVE, THEN THE DEVICE WILL GET BACK TO NORMAL.
- ONLY USE WITH CLEAN COLD WATER.
- FILTER TRAPS DIRT PARTICLES PROLONGING THE LIFE OF THE PRODUCT. CLEAN FILTER REGULARLY AND REPLACE IF WORN.
- WHEN EXPECTING FREEZING TEMPERATURES, TIMERS SHOULD BE REMOVED FROM THE HOSE FAUCET AND STORED INDOORS TO AVOID POTENTIAL FREEZE DAMAGE.
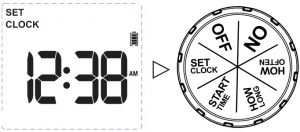
PRODUCT OVERVIEW
AT A GLANCE

- DIAL: Rotate To customize your Watering Schedule.
- OK/manul button: confirm Setup or water manually
- Delay/Button : Adjust Time and system setup or delay watering program.
- Button: Adjust timer and system setup
- Zone button: press to select the zone you want to program
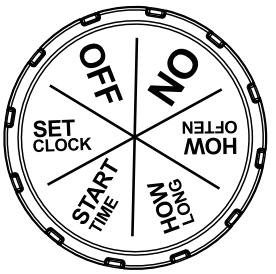
Dial position Function
| Set Clock | Set the current time |
| Start Time | Select what time you would like each Zone to start |
| How long | Determine how long to water each zone |
| How Often | Choose how often long to water each Zone |
| ON | Timer waters according to your customized schedule for both Zones |
| OFF | Turn off all watering |
SPECIFICATION
| Min/Max Operating Pressure | 0.5bar-8bar (7.25 psi-116 psi) |
| Max Flow Rate | 10 Gal/Min (35L/Min) |
| Waterproof Rate | IP54 |
| Working Temperature | 3 C -50 C (37.4 T -122 T ) |
| Working Voltage | DC 2.3V-DC 3.3V |
| Watering Frequency | Every 4 -12hrs or Every 1-7days |
| Watering Duration | From 1 minute to 3 hours 59 minutes
(4 hours) |
| Inlet/Outlet Thread | 3/4″ GHT |
| Time Format | 12H or 24H |
| Power By | 2 AAA alkaline batteries(Excluded) |
PRODUCT INSTALLATION
INSTALLING THE BATTERY
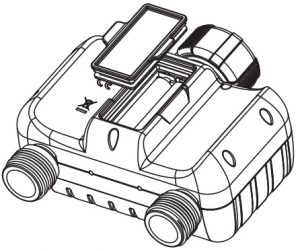
- Remove the battery tray back of the time
- Install 2 new AAA alkaline batteries (not included)
- Firmly reinstall the battery tray back into the
& Note:
- Firmly restore the battery tray to ensure water
- Removed old batteries at the end of the watering season and disposed of properly.
- Used up or dead batteries must be removed from the timer and disposed of properly.
- Do not dispose of batteries in fire. Batteries may explode or leak. Replace batteries when the low battery indicatorg appears on
INSTALLING THE BATTERIES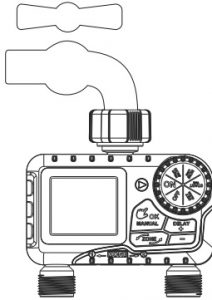
- Attach the timer to an outdoor hose
- Please turn on the tap after programming the& Note:When programming the timer, please turn off the tap to avoid getting wet.Do not use tools on the timer. Hand tightens only.Keep away from freezing. Timer should be removed to avoid freezing damage.To prolonging the life of the timer, keep the filter clean and in place when using the timer
PROGRAMMING YOUR TIMER
UNDERSTANDING ZONESThis is a two-zone timer allowing you to water two different areas from the same faucet. Each zone can be programmed with independent start times, how long, and how often.Please design the program separately for each ZONE:
- When you finish setting the following steps 1-4 for ZONE 1, turn the dial to ”ON” to save the
- Then press the ZONE button to select ZONE 2 and repeat the following steps 2-4 again, finally turn the dial to “ON” to save the
- Turn dial to “SET CLOCK”, select 24 hours or 12 hours by using the “+” or “-” button and press “OK” button to save
- Then use the “+” and”-“buttons, set the current
- Using the “OK” button to switch time ( Hours or Minutes).
- Turn dial to save
Tips: At the end of setting, please turn dial to save changes. If you press ”OK” at the end, it will go back to the previous step.
START TIME
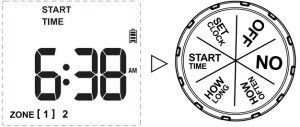
- Turn dial to “START TIME”
- Using the”+”and “-” buttons, set your start
- Using the “OK” button to switch time ( Hours or Minutes).
- Turn dial to save Changes.
Tips: At the end of setting, please turn dial to save changes. If you press “OK” at the end, it will go back to the previous step.
HOW LONG
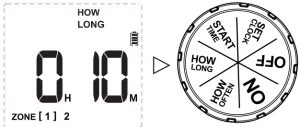
- Turn the dial to “HOW LONG”.
- Using the “+” and” -”buttons, select watering duration from 1 minute to 3 hours 59
- Using the “OK” button to switch time ( Hours or Minutes).
- Turn the dial to save Changes.
Tips: At the end of the setting, please turn the dial to save changes. If you press “OK”at the end, it will go back to the previous step.
HOW OFTEN
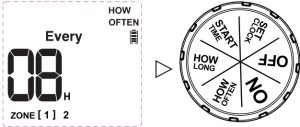
- Turn the dial to “HOW OFTEN”.
- Using the “+” and” -”buttons, set your watering You can choose to water from every 4 to 12 hours, or from 1 to 7 days. (NOTE: 1 is every day, 2 is every other day, etc.)
- Turn the dial to save changes
Tips: At the end of the setting, please turn the dial to save changes. If you press “OK” at the end, it will go back to the previous step.Congratulations! The ZONE 1 is now programmed. Turn the dial to “ON” to save the changes, then press the ZONE button to select ZONE 2 and repeat steps 2-4 above again to set your program for ZONE 2.
ADDITIONAL FEATURES
RAIN DELAY WATERING
Rain delay allows you to postpone watering on both zones for a set period of time without interrupting your set watering schedule. To access the rain delay, follow the steps below.
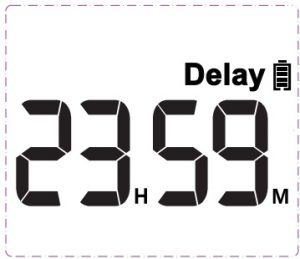
- With the dial in the “ON” position, press the”DELAY/+”button for 3-5s to start the delay watering
- Screen will display the remaining 23 hours and 59 minutes before programmed
- Hold the “DELAY/+” button for 3-5s to remove rain
Note:Delay watering function will last 24 hours then auto-resume your original irrigation plans , the countdown is shown on the screen.
MANUAL/HAND WATERING
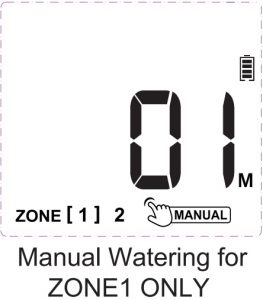
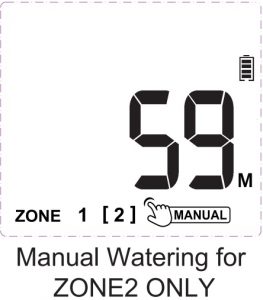
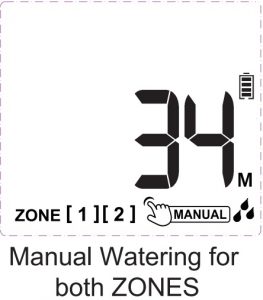
This feature allows you to water without interrupting your set watering schedule. To access this feature, please follow the steps below.
- With the dial in the “ON” position, press the “OK/MANUAL” button for 3-5s.
- Select the ZONE which you would like to program by pressing the ZONE button:Press the MANUAL button for the first time to select only ZONE1.Press the MANUAL button a second time to select only ZONE2.Press the MANUAL button a third time to select ZONE1 and ZONE2.
- Use the “+” and ” —” buttons to select watering time, from 1 to 59 minutes. (The default watering plan is 10 )
- The set time will automatically start watering after flashing 6-8
- 2 ways to stop watering:Hold the “OK/MANUAL” button for 3-5s.
- Turn the dial to “OFF” and then back to “ON”.
OFF MODE
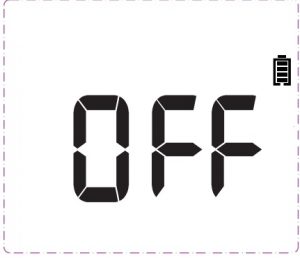
- If you wish to stop all watering plan for an extended period, turn the dial to “OFF”. (Your settings are saved)
- The timer will not water automatically while in OFF (The screen will display the word OFF in large letters)
- To start watering automatically again, turn the dial back to “ON” to resume your programmed watering
BATTERY STATUS
Battery status will be displayed as following

Note: When the low battery indicator appears on display, the valve will close automatically to avoid leakage. Please replace the battery in time in case of interrupting the normal operation
WARNINGS
- Intended for outdoor use
- Using tools to tighten your timer is too tight, easy to to avoid damaging the timer, please tighten it with your hand instead of a tool
- Please ensure a washer is well set in the top connector before installation to prevent , add rubber washer and thread seal tape if necessary.
- Mesh filter prevents dirt particles, prolonging the life of the hose timer. Clean filter regularly and replace if
- When the power is low, please replace the batteries in time to avoid the interruption of the normal operation; when replacing the batteries, please make sure that the battery compartment is
- When not in use, remove batteries, drain and store indoors to away from
- Do not use water more than 120°F(50 C), or less than 38°F(3 C).
- Do not subject the product to extreme force and
- Severe electrical shock could result if water is sprayed into outlets or sources of electrical Never immerse the product in water.
WARRANTY
Rain point provides a 1-year worry-free warranty against manufacturing defects in materials and workmanship from the date of purchase.During the warranty period, we’ll replace free of charge the product found to be defective under reasonable use and service as determined solely by Rain Point.To place a warranty request, please email your order ID to [email protected] and we’ll respond within 24 hours.
CUSTOMER SERVICE
Still have trouble with setup, please search for “Rain Point” on YouTube for installation videos!If the user manual doesn’t have what you’re looking for or need some help, please prepare the LOT NO. of your device and contact us before returning the product to the store.Phone:1-833-3815659 (US Office) E-mail:[email protected]LOT NO.: xxxxxx (On the back of the timer)
[xyz-ips snippet=”download-snippet”]