RainPoint Tap Digital Water Timer User Manual
Thank you for purchasing our products. If you have any questions, please contact us.
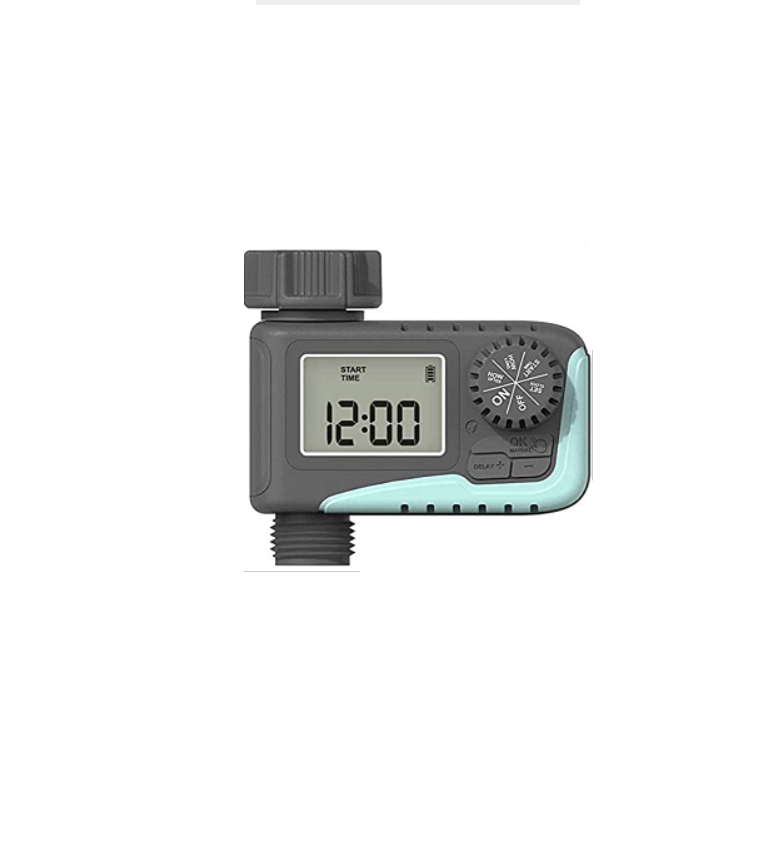
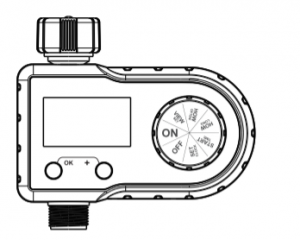
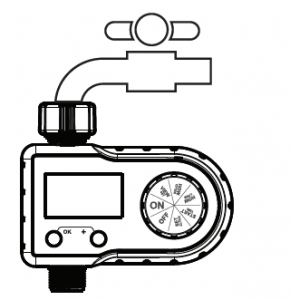
PRODUCT OVERVIEW At A GLANCE
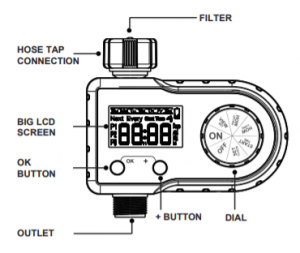
- IAL—Rotate the dial to set your watering schedule and confirm the change.
- OK BUTTON—Press to confirm or cancel time and system setup.
- BUTTON—Press to adjust time and system setup
- LCD SCREEN
 |
Low battery indicator |
| |
Flashing during watering |
 |
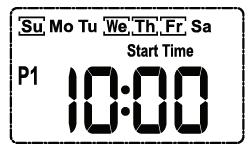
The selected day of the week |
| Every _ Days | Interval watering days |
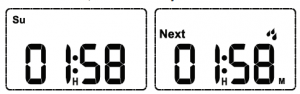
| Next | The time left to the next watering |
| Start Time | The start time of watering |
| P1/P2/P3 | Watering plans for one day |
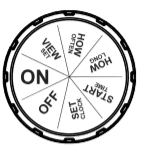
| DIAL POSITION FUNCTION | |
| SET CLOCK | Set current time |
| START TIME | Set the time of start watering(Every watering plan has its ownstart time) |
| HOW LONG | Set watering duration (1 minute to3 hours 59 minutes) (Every wateringplan has its own watering duration) |
| HOW OFTEN | Set watering frequency of the week(3 watering plans share 1 wateringfrequency) |
| VIEW SET | View all your settings of 3 plans |
| ON | Start automatic watering based onyour programs |
| OFF | Turn off all watering programs andshut off the valve |
| Min/Max Operating Pressure | 0.5bar-8bar (10 psi-100 psi) |
| Working Temperature | Flashing when the timer is watering |
| Power By | 2 AA (1.5V) alkaline batteries |
| Working Voltage | DC 2.3V~DC 3.3V |
| Watering Times Per Day | 1 to 3 times a day (Up to 3 watering plans a day) |
| Watering Days | Monday to Sunday OR Every 2/3/4/5/6 days |
| Watering Duration | From 1 minute to 3 hours 59 minutes (4 hours) |
PRODUCT INSTALLATION INSTALLING THE BATTERIES
- Remove the battery compartment on back of the timer.
- Install 2 new AA (1.5V) alkaline batteries (not included).
- Firmly reinstall the battery back into the timer.
Note:

- Firmly restore the battery to ensure water resistance.
- Removed old batteries at the end of the watering
- season and disposed of them properly.
- Used or dead batteries must be removed from the
- timer and disposed of them properly.
- Do not dispose of batteries in fire. Batteries may
- explode or leak.
- Replace batteries when the low battery indicator
- appears on displayer.
INSTALLING THE TIMER
- Attach the timer to an outdoor hose faucet.
- Please turn on the tap after programming the timer.
Note:
- When programming the timer, please turn off the tap
- to avoid getting wet.
- Do not install the timer with tools. Hand tighten only.
- Keep away from freezing. Timer should be removed
- to avoid freezing damage.
- To prolonging life of timer, keep the filter clean and in
- place when using the timer
PROGRAMMING YOUR TIMER
STEP 1: SET CLOCK
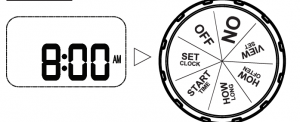
- Turn dial to SET CLOCK.
- Hold the “OK” button to switch time display of12H or 24H mode. 12H mode: with “AM” and “PM” 24H mode: without “AM” and “PM”
- “ ” flash: Using the “+” button to set the day of a week and press “OK” to confirm.
- “ 00: ” flash: Using the “+” button to set hour and press “OK” to confirm.
- “ :00 ” flash: Using the “+” button to set minute and turn dial to save changes.
Tips:
Hold the “+” button can increase the time quickly.
- At the end of setting, please turn dial to save changes. If you press “OK” at the
- end, it will go back to the first setting.
STEP 2: START TIME

- Turn the dial to START TIME.
- Using the “+” button to set the start time and press “OK” to confirm.
- After confirmed the previous plan, press “OK” again to switch to the next plan.
- Turn dial to confirm the changes.
- To turn off the start time of certain plan, please press the “+” button when setting that plan to set the start time to “24 : xx” (24H mode) or “12 : xx PM “ (12H mode).At the same time, a flashing “OFF” will appear on the screen. Then, press “OK” to confirm turn off that plan.
Tips:
- Hold the “+” button can increase the time quickly.
- If you want to reactivate the “OFF” plan, please press the “+” button again at
- that plan to set its start time.
- At the end of setting, please turn dial to save changes. If you press “OK” at the end, it will go back to the first setting.
STEP 3: HOW LONG

- Turn the dial to HOW LONG. ( will display on the screen)
- Using the “+” button to set the watering duration press “OK” to confirm. (Watering Duration: from 00 hour 1 minute to 03 hour 59 minutes)
- After confirming the previous plan, press “OK” again to turn to set the next plan.
- Turn dial to confirm the changes.
- To turn off the watering duration of a certain plan, please press the “+” button at that plan to set the duration to “00 H 00 M”. At the same time, a flashing “OFF”will appear on the screen. Then, press “OK” to confirm turn off that plan.
Tips:
- Hold the “+” button to increase the time quickly.
- If you want to reactivate the “OFF” plan, please press the “+” button again at that
- plan to set its start time.
- At the end of setting, please turn dial to save changes. If you press “OK” at the end, it will go back to the first setting.
STEP 4: HOW OFTEN
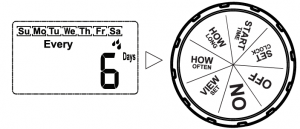
- Turn the dial to HOW OFTEN.
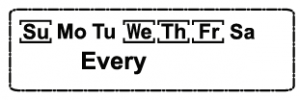
- There are 2 setting modes for watering frequency.a. Monday to Sunday (the day of the week)(Watering plans will run every Sunday, Wednesday, Thursday and Friday)b. Every 2/3/4/5/6 days(Watering plans will run every 2 days)
- Weekday Modea. When “ ”is flashingUsing the “+” button to selet the day of the week, press “OK” to confirm.b. When “ ” always thereThe day has been selected. Press “OK” again can cancel the selection.c. Turn dial to confirm the changes.
- Every 2/3/4/5/6 Days Modea. Switch to Every 2/3/4/5/6 Days ModePress “+” button to select, press “OK” to confirm.(“ ” will flash from “Su” to “Sa” first, and then go to “Every” mode)b. Using the “+” button to select the interval watering days of 2/3/4/5/6.c. Turn dial to confirm the changes.
 (Watering plans will run every Sunday, Wednesday, Thursday and Friday)b. Every 2/3/4/5/6 days
 (Watering plans will run every 2 days)
Note:
- You can only choose one of the 2 setting modes of watering frequency. Once confirm one of the two, the other will be eliminated.
- At the end of setting, please turn dial to save changes. If you press “OK” at the end, it will go back to the first setting.
STEP 5: VIEW SET
- Turn the dial to VIEW SET.
- Press “OK” button to check the START TIME, HOW LONG and HOW OFTEN settings of the 3 watering plans. (The start time of P1)(The watering duration of P1)(Watering frequency)
 (The start time of P1)
 (The watering duration of P1)
 (Watering frequency)
STEP 6: AUTO WATERING
- Turn the dial to ON.(All watering plans being set will run automatically)
- During watering:a. Display the remaining watering time and will flash.b. Press the “+” button, and then the current day and time will be displayed.
- When not watering:a. If there is no watering plans being set, it will only display the current day and time.b. If there are plans being set but not running yet, it will display the current day and time, and followed by how much time is left to the next watering plan..

Note:
- There is no watering plans being set, which means the start time or watering duration of all 3 watering plans are truned off.
- To turn off a certain plan, please turn off the start time or watering duration of that plan. (About how to turn off the start time or watering duration, please refer to the section [STEP 2: START TIME] and [STEP 3: HOW LONG] of Chapter [PROGRAMMINGYOUR TIMER])
ADDITIONAL FEATURES MANUAL/HAND WATERING

This feature allows you to water without interrupting your set watering schedule. Please follow the steps below to start manual watering.
- With the dial in the “ON” position, and hold the “OK” button to start watering manually.The default duration of manual watering is 10 minutes and it can not be changed.
- 2 ways to stop manual watering:a. Hold the “OK” button again;Orb. Turn the dial to “OFF” and then back to “ON”.
Note:
There will be a slight delay between the time the “OK” button is pressed and when watering begins.
OFF MODE
- If you wish to stop all 3 watering plans for an extended period, turn the dial to OFF. (Your settings will be saved)
- The timer will not run automatically while in OFF mode. (The screen will display OFF )
- To start watering again, turn the dial back to ON to resume your programmed watering schedule.
TROUBLESHOOTING
PROBLEM |
CHECK IF |
| Timer does not workat desired time |
|
| Timer does not wateror has low water flow |
|
| Water won’t turn off |
|
| Timer is leaking |
|
| If your Rainpoint product does not operate properly after trying the troubleshootingsteps, please contact us by phone or email : 1-833-3815659 | |
WARNINGS
- For outdoor use ONLY.
- Clean the filter regularly and replace if it is worn in order to extend the working life of timer.
- Do not use water over 120°F(50℃), or less than 38°F(3℃).
- In winter, please remove batteries, drain and store it indoor to away from freezing.
- Do not install the timer with tools. Hand tighten ONLY. Use of tools may damage the timer.
- Do not subject the product to extreme force and shock.
- Severe electrical shock could result if water is sprayed into outlets or sources of electrical current. Never immerse the product into water.
WARRANTY
Rainpoint provides a 1-year limited warranty on this product against manufacturingdefects in materials and workmanship.
- Warranty service can only be performed by our authorized service center. The original dated bill of sale must be presented upon request as proof of purchase to us,or our authorized service center.
- To receive warranty service, the purchaser must contact with Rainpoint nominated service center for the problem determination and service procedure.Thank you for your choice of Rainpoint products!
CUSTOMER SERVICE
If you find it difficult to set up and want to watch the setting tutorial videos, welcome to visit and subscribe our channel on YouTube by searching Rainpoint.If the user manual don’t have what you’re looking for, or you need other help of the product, please check the LOT NO. of your device and contact us before returning theRainpoint products to the store.
Read More About This Manual & Download PDF:
References
[xyz-ips snippet=”download-snippet”]