
RANE Twelve MKII Desk Controller

Introduction
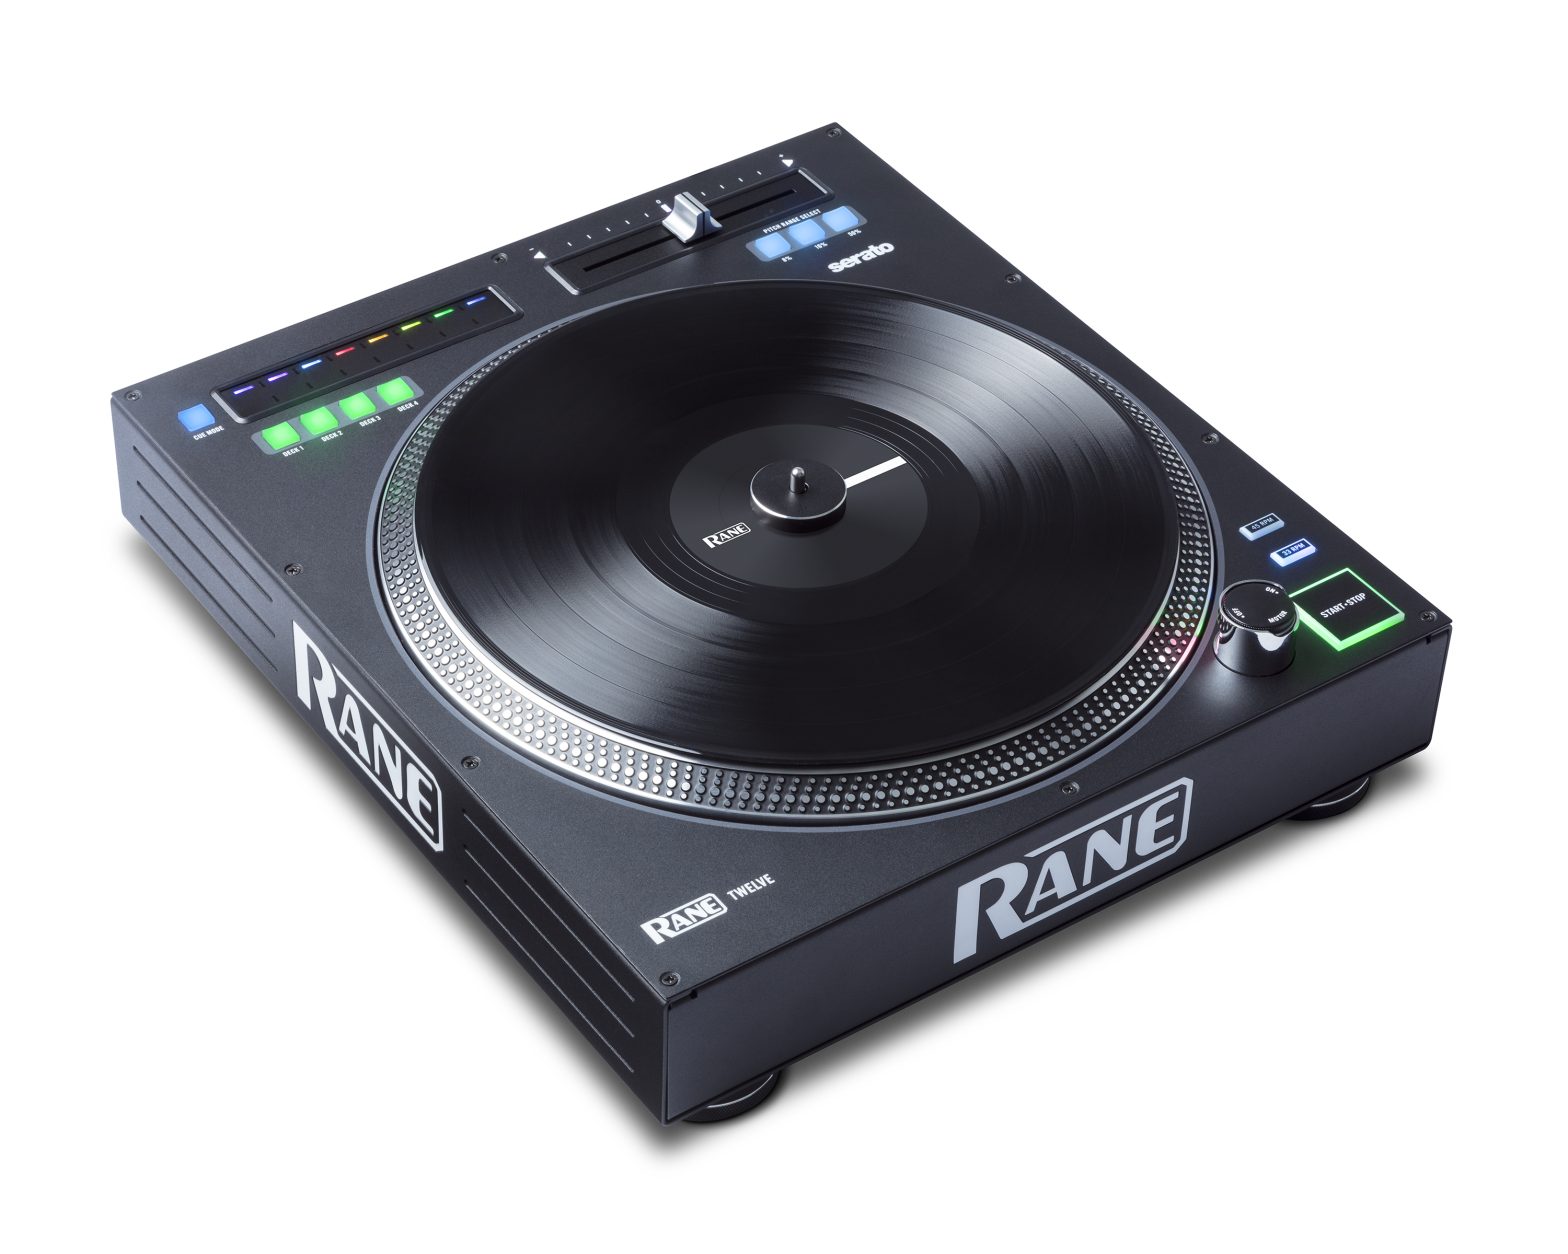
Thank you for purchasing the Twelve MKII. At Rane DJ, we know how serious music is to you. That’s why we design our equipment with only one thing in mind—to make your performance the best it can be.The Twelve MKII is a pure and powerful motorized DJ control system. Keeping things consistent with a familiar turntable layout and size in an all-metal body, the only clear differentiator is a precision, multi-function touch strip for track searching and setting or triggering hot cues in place of the tone arm.Designed with the DJ in mind, the Twelve MKII lets you scratch and play with the feel of a traditional turntable, but with the precision, repeatability and durability of the best digitally-based solutions.
Box Contents
Twelve MKII BasePlatter Assembly
- Aluminum Platter
- Slipmat
- Control Disc with Quick Release Adapter (attached)
- Spacers (4)
Power CableUSB CableStereo RCA CablesUser GuideSafety & Warranty ManualNote: Twelve MKII was designed in collaboration with Serato, making it an Official Serato Accessory. Twelve MKII requires a supported Serato DJ Pro interface, controller, mixer, or compatible Serato Club Kit solution to control Serato DJ Pro.
Support
For the latest information about this product (documentation, technical specifications, system requirements, compatibility information, etc.) and product registration, visit rane.comFor additional product support, visit rane.com/support
Setup
Before getting started:
- Read the Safety & Warranty Manual before using Twelve MKII.
- Make sure all items listed in Introduction > Box Contents are included. Items not listed are sold separately.
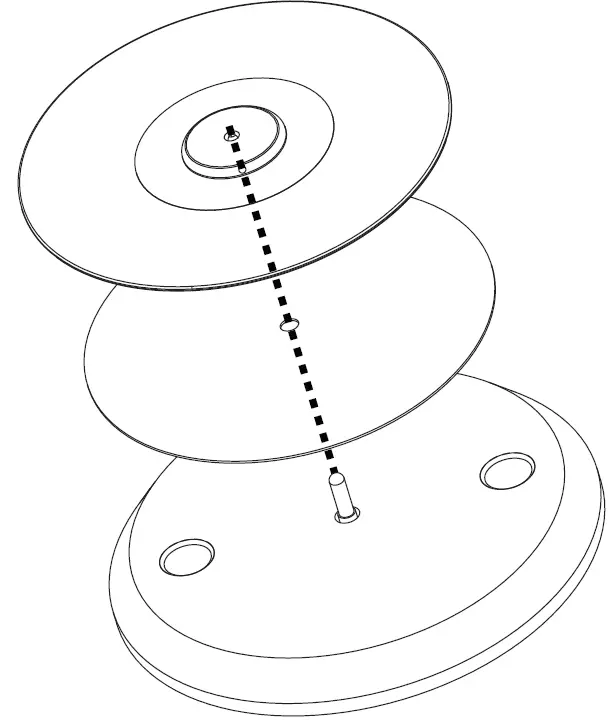
Assemble the Platter System
- Remove the Twelve MKII base from the packaging. Remove the platter assembly from the package (underneath Twelve MKII). Place Twelve MKII on a flat, stable surface for assembly and operation.
- Place the platter onto the Twelve MKII base by aligning the pins in the bottom of the platter with the holes in Twelve MKII’s motor. Press it down firmly. Check to make sure that it rotates uniformly and does not wobble excessively.

- Place the slipmat onto the platter. Then place the Control Disc over the spindle (with the attached Quick Release Adapter on top). To lock the Control Disc to the spindle, pinch the top of the spindle while slowly rotating the disc until you hear it click. It locks when the groove in the spindle lines up directly opposite to the button on the side of the Quick Release Adapter.Note: If you would like to adjust the slip friction of the disc, consider placing 1-4 of the included spacers over the spindle, underneath the slipmat. The more you elevate the Control Disc with the spacers, the more spinback you will get.

Connect and Start DJing
- Make sure you have downloaded and installed the latest version of your DJ software.
- Place Twelve MKII on a flat, stable surface.
- While the power is switched off, plug the included power cable into Twelve MKII first, then plug the cable into a power outlet.
- Power on Twelve MKII using the power switch.
- Use a standard USB cable (included) to connect the USB Port to one of the following:
- If you are using Twelve MKII with the Rane Seventy-Two mixer (sold separately), connect the USB cable to the Deck 1 or Deck 2 USB ports labeled Twelve MKII/Controller.
- If you are using another mixing interface, connect the USB cable to an available USB port on your computer or a powered hub connected to the computer.
- Alternatively, connect standard RCA stereo cables from the Audio Output to the input of a compatible mixer or other DVS-enabled device for timecode control.
- Open Serato DJ Pro. The Twelve MKII works with Serato DJ Pro using two modes:
- Serato USB: This mode is identical to the operation of the original Rane Twelve, where the software is controlled through a USB connection. When using this mode, the software should be set to Internal Mode.
- Serato DVS: This mode will send DVS audio signal through the Audio Out (RCA) ports to control the platter. When using this mode, the software should be set to Relative Mode.
It is recommended to connect your Twelve MKII using both the Audio Out (RCA) ports (for DVS platter control) and USB (for MIDI controls such as Browse, Load/Instant Doubles, Hot Cues, etc.).For more information on how to use Serato DJ Pro with the Twelve MKII, please visit support.serato.com
Connection Diagram, Example 1 (Battle Style):
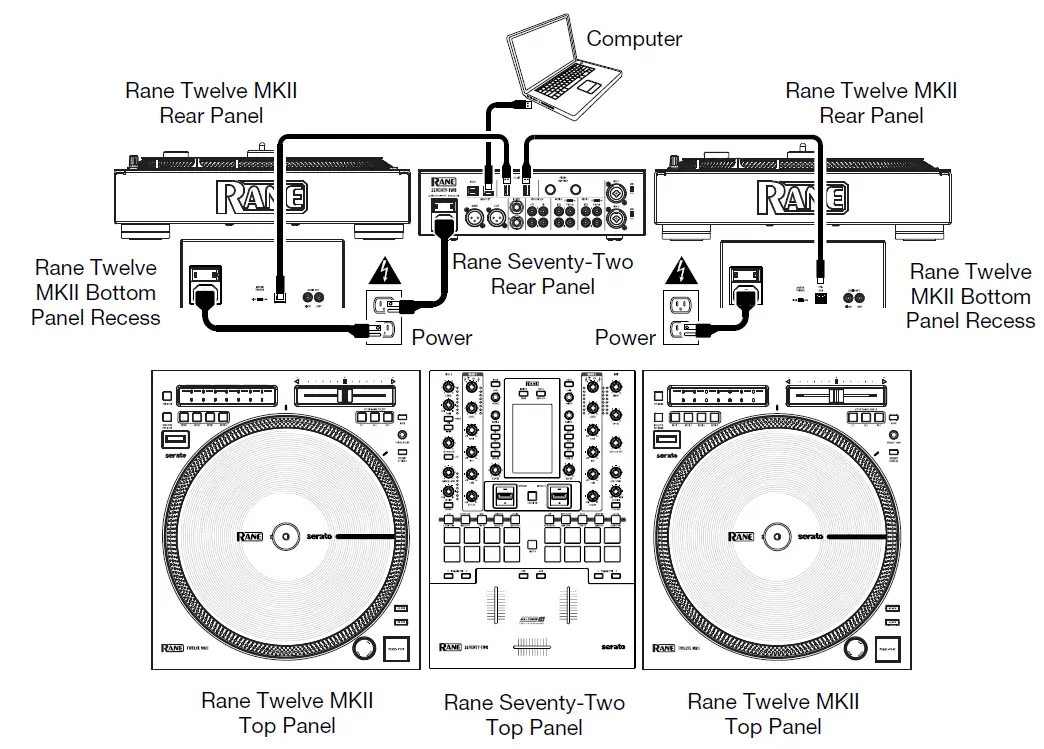
Connection Diagram, Example 2 (Club Style):

Connection Diagram, Example 3:
Features
Top Panel 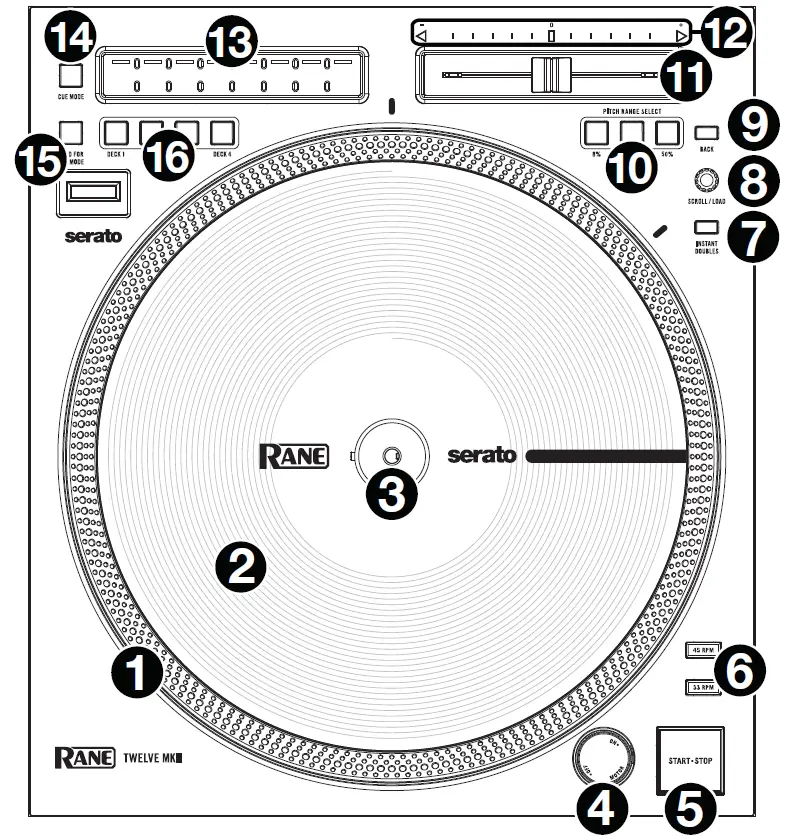
- High Torque Direct Drive Platter: A 5.0 kgf-cm motor turns this aluminum platter with speed position dots.Note: The platter itself should not be held in position for sustained periods while powered to rotate.
- Control Disc with Slipmat: This full-size 12″ (30.5 cm) disc controls the audio playhead in your DJ software. Place the included slipmat under the Control Disc (or a different slipmat can be used, if preferred). To get a looser feel with more spinback on your Control Disc, place 1-4 of the included spacers over the spindle, underneath the slipmat.Note: The Control Disc can be user replaced by attaching the Quick Release Adapter to your own modified disc. The replacement disc must have three 6 mm holes, and the included disc should be used as a reference.
- Quick Release Adapter: This secures the Control Disc to the platter. It comes attached to the top of the Control Disc. To remove the Control Disc or slipmat from the platter, hold in the button on the side of the Quick Release Adapter while lifting the disc off the spindle. After placing the disc back on the spindle, pinch the top of the spindle while slowly rotating the disc until you hear it click. It locks when the groove in the spindle lines up directly opposite to the button on the side of the Quick Release Adapter.
- Motor On/Off & Strobe Light: Turn this dial at the top of the strobe light to turn the platter motor on or off. The unit will remain powered on, allowing for wind down effects.The strobe light illuminates the edge of the platter, which indicates whether or not the phase of the platter’s rotation is constant. As the platter rotates, look at the dots on its edge under the light’s strobing. If the phase is constant, the dots will appear to be still. If the rotation is out of phase, the dots will appear to move or “drift.”
- Start/Stop: Press this button to start and stop the platter. The LED around this button will be dim when power is on and no track is playing, bright when a track is playing, and flashing red when the track is near its end.
- 33 & 45 RPM: Press one of these buttons to set the rotation speed (RPM) of the platter. The lit button indicates the current selection.
- Instant Doubles: Press this button to load the currently playing song to the active deck.
- Scroll/Load: Turn this knob to browse through lists and press it to select an item or load the currently selected track to the deck.Tip: Press this knob twice quickly to load the same track to both decks (“instant doubles”).
- Back: Press this button to view the previous screen in the software.
- Pitch Range: Press one of these buttons to adjust the range of the Pitch Fader to ±8%,±16%, and ±50%.
- Pitch Fader: Move this fader to adjust the speed (pitch) of the track. You can adjust its total range with the Pitch Range buttons.
- Takeover LEDs: When you select another Deck with the Deck Select buttons, the position of the Twelve MKII’s Pitch Fader may not match the Pitch setting for that Deck in the software. Slowly move the Pitch Fader in the direction indicated by the Takeover LED arrow until it turns off. At this point, the Pitch Fader matches the Pitch setting in the software and can control it again.
- Touch Strip: This pressure sensitive strip replaces the tone arm and allows the user to set track position depending on the Touch Strip Mode setting.
- Cue Mode: Press this button to toggle the Touch Strip between Needle Drop and Hot Cue modes. When Needle Drop is selected (default when Twelve MKII is powered on), the button will be dimly lit. When Hot Cue is selected, the button will be brightly lit.
- Needle Drop Modei. Press the Cue Mode button so it is dimly lit. (This is the default mode when Twelve MKII is first powered on.)ii. The length of the Touch Strip represents the length of the entire track. Place your finger on a point along this sensor to jump to that point in the track. White LEDs on the Touch Strip will give a visual representation of the position of the needle in the track.
- Hot Cue Modei. Press the Cue Mode button so it is brightly lit.ii. When a section of the Touch Strip is unlit, you can assign a Hot Cue Point by pressing it at the desired point in your track. Once it is assigned, the section will light. The software determines the color of the Hot Cue Point.iii. While the track is playing, press the Hot Cue Point to return the track to that point.iv. To delete a Hot Cue Point, press and hold the Cue Mode button and press the section you would like to delete.
- DVS Mode: Press and hold this button to enable changing of the active DVS mode. Once the button begins to flash, tap this button to cycle through the available timecode signal options, which will be shown in the OLED screen below this button. Once the desired mode is shown in the display, wait three seconds to confirm the selection. Shortly after a selection is made and the button stops flashing, the OLED screen will also turn off. Quickly tap the DVS Mode button again to show the active mode.
- Deck Select: Selects which deck in the software is controlled by Twelve MKII. Up to four Twelve MKII controllers can be connected with a Serato DJ Pro-enabled device provided the device has enough channels. For instance, if you are using a two-channel mixer such as the Rane Seventy-Two, only up to two Twelve MKII controllers can be connected and only the first 2 channels will be available for selection. When you are using more than one Twelve MKII controller at a time, you will need to determine which deck each controller is assigned to:
- Power on each controller. The available Deck Select buttons on all connected Twelve MKII controllers will flash.
- Press the Deck Select button that corresponds to which deck you would like to assign each Twelve MKII to. Once a Deck is selected and in use, the button LED will be fully lit, and buttons for other available decks will enter a dim state.
- To switch to another available deck, press the corresponding Deck Select button.
- To unselect a deck, press and hold the corresponding Deck Select button for 2 seconds. When buttons for the available decks start flashing, you are ready to select a new deck.
Bottom Panel Recess
 report this ad
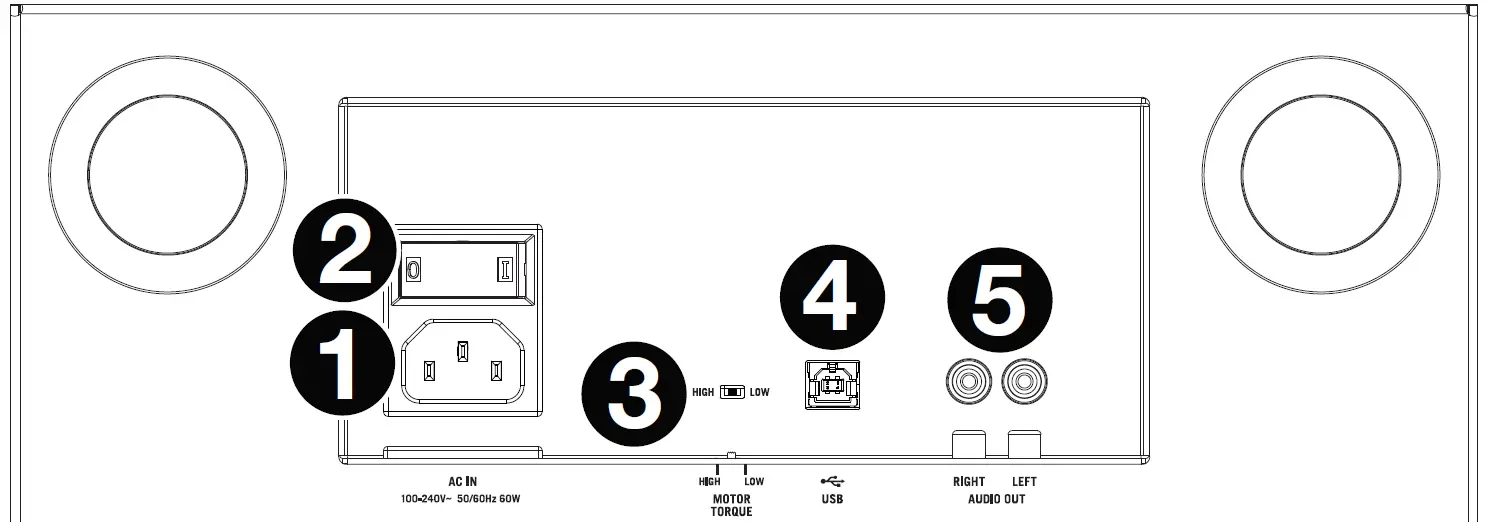
1. Power Input: Use a standard IEC power cable (included) to connect Twelve MKII to a power outlet. While the power is switched off, plug the cable into Twelve MKII first, then plug the cable into a power outlet.2. Power Switch: Use this switch to power Twelve MKII on and off.3. Motor Torque: Flip this switch to adjust the torque of the platter. At the high setting, the platter will have the heavier, stronger feel of “modern” turntables. At the low setting, it is lighter and more graceful—the feel of a “classic” turntable.4. USB Port: Use a standard USB cable (included) to connect this USB port to an available USB port on the Rane Seventy-Two (sold separately) or your computer.5. Audio Out (RCA): Connect stereo RCA cables to this output to send the internal timecode signals to the input of a compatible mixer or another DVS-enabled device.
References
[xyz-ips snippet=”download-snippet”]