RAVE Walk the Plank Attachment
Introduction
Thank you for purchasing a RAVE Sports® Walk the Plank attachment for the RAVE Sports water trampolines. This Owner’s Manual is presented to enhance your enjoyment of the sport and is intended to alert you to some of the potentially dangerous conditions that can arise in all water sports. It also contains important safety instructions and information about how to assemble, use and care for your product.
Please take a few minutes to read this manual before assembling and using the product. Although the product is simple to use, this manual contains important safety information that you and all users must understand to safely enjoy the Rope Swing.
Make sure that everyone who uses the product also receives proper education and supervision and understands the safety instructions and warnings presented in this manual. Be sure to save this manual for future reference.
IMPORTANT: Walk the Plank is designed to be used with the following RAVE water trampoline products only:
- Aqua Jump Eclipse™ 150 or 200
- Class Aqua Jump 15, 20, or 25
- Bongo 15 or 20
DO NOT attempt to use Walk the Plank with any other product.If you have any questions regarding this product, please call RAVE Sports at 1-800-659-0790 or visit www.ravesports.com. Please have your serial number available.
W A R N I N GUNSAFE USE OF THE WALK THE PLANK CAN RESULT IN PERSONAL INJURY OR DEATH.To reduce the risk of injury, read and follow all instructions and warnings in this manual. Do not use this product unless you understand and accept the risk of injury involved with this activity.
Safety Rules and Information
- Always inspect the areas around and under the product before each use to ensure the water is deep enough and free of all rocks, logs, sand bars, and underwater obstructions and that the product is a safe distance from above water hard objects. Ask about local water conditions before using the product in unfamiliar water.
- Allow only ONE person (250lb max.) on Walk the Plank at a time.
- To avoid the possibility of a collision, make sure the swing path and landing area is clear of obstructions and other swimmers before each use.
- Do not attempt to climb support base underneath Walk the Plank.
- Never swim or play under or around the Walk the Plank while product is in use.
- Do not use if safety pads of water trampoline are not in place.
- Never use the product while tired or fatigued. Use extreme caution while swimming between the shore and the product. Do not attempt to swim this distance if you are tired or fatigued.
- Inspect your product for any worn, defective, or missing parts. Do not use if there are any signs of damage, wear or deterioration.
- Do not attempt flips, somersaults or other acrobatic maneuvers on the product. Always enter the water feet first.
- Not recommended for children under the age of six.
- Use Walk the Plank only under mature, knowledgeable adult supervision.
- Always exercise caution and common sense while using the Walk the Plank. Reckless behavior may result in serious injury.
- When not in use, secure the product against unauthorized or unsupervised use.
- Read and understand all of the information contained in this owner’s manual before assembling and using your product.
- Make sure that everyone who uses the product is provided with and understands these safety rules and information.
- Walk the Plank is designed to be used only while secured to RAVE Sports trampolines in large bodies of water with depths of at least 10 feet of water. Do not use or allow anyone else to use the product on land or any other hard surface or in swimming pools.
- Do not attempt to use Walk the Plank as a stand-alone device. It MUST be attached to a RAVE Sports water trampoline.
- Choose a location for your product that is most protected from wind, of sufficient water depth, and free of obstructions.
- Always anchor the trampolines securely before it is used.
- Always make sure the Walk the Plank is attached securely to the trampoline.
- Always wear a U.S. Coast Guard approved Type III (PFD) vest when using Walk the Plank.
- Never use the product after sunset, before dawn, or any other time in poor lighting conditions.
- Never use the product in rough surface water conditions, during storms, or when there is lightning. If an unexpected storm arises while using the product, seek shelter on shore. Do not stay on the product.
- Never use the product under the influence of alcohol or drugs.
- To avoid the possibility of a collision, make sure the path and around area is clear of obstructions and other swimmers before each use.
LiabilityWhile every attempt is made to embody the highest degree of protection in all equipment, we cannot guarantee freedom from injury.The user assumes all risk of injury due to use. All merchandise is sold on this condition, which no representative of the company can waiver or change.
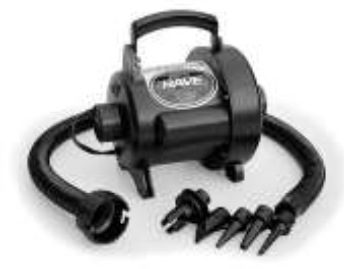
Inflating any RAVE Aqua Attachment
We highly recommend using the RAVE High Speed Inflator/Deflator. It will provide rapid inflation/deflation and will achieve optimum air pressure in your RAVE product. (Part #01083 not included).
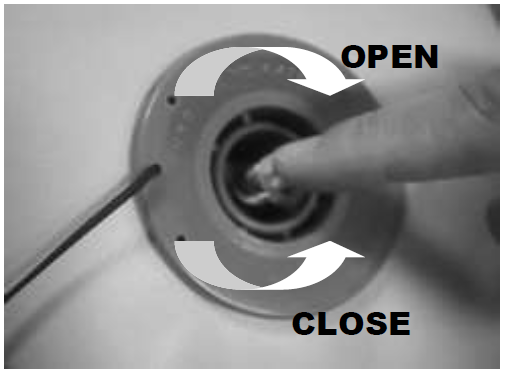
To lock open valve, depress the stem and rotate ¼ turn clockwise. To close valve, depress the stem and rotate ¼ turn counterclockwise.The valve stem should be in the depressed position while inflating. Replace cap on valve after inflation to ensure air tight seal.
If you are using the RAVE Sports High Speed Inflator (Part #01083), simply lock the adaptor onto the end of the inflation hose and insert into the valve body. Turn ¼ turn to lock in place.
NOTE: This inflation adaptor will automatically open the valve when inserted and will close the valve when removed. You do not need to manually open/close the valve when using this special adaptor.
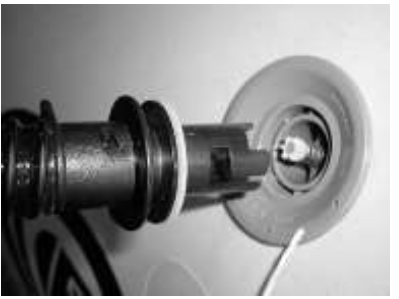
IMPORTANT: A PROPERLY INFLATED TUBE WILL FEEL LIKE A FIRMLY INFLATED BASKETBALL.
To Deflate:Rapid deflation can be achieved using the “deflate” side of the motor housing. Attach the hose to the deflate side of the motor housing and lock the valve adaptor into the valve. Turn on deflator and let run until all air is evacuated from the tube.
C A U T I O NDO NOT USE AN AIR COMPRESSOR TO INFLATE THIS PRODUCT. USE OF AN AIR COMPRESSOR MAY CAUSE OVER-INFLATION, WHICH CAN DAMAGE OR RUPTURE SEAMS, THUS VOIDING THE WARRANTY.
IMPORTANT:It is normal for the air pressure within air filled tubes to fluctuate depending on air and water temperatures. It may be necessary to increase or decrease the air pressure in your product accordingly. To avoid damage on extremely hot days it may be necessary to check and release the air pressure from your product throughout the day.
ASSEMBLY INSTRUCTIONS
Step 1- Inflation Lay the inflatable base tube on a flat surface. Make sure there are no sharp objects under the product that might puncture the material.
Step 2- Once inflated, carry it to the water, base tube to the water’s edge. DO NOT DRAG. After in the water, add air if necessary. Then float it out to the trampoline and position it right.
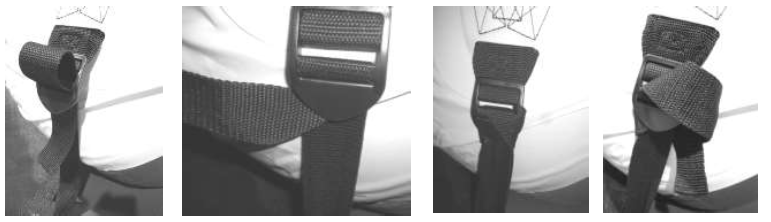
Step 3- Attaching separate straps to the trampoline
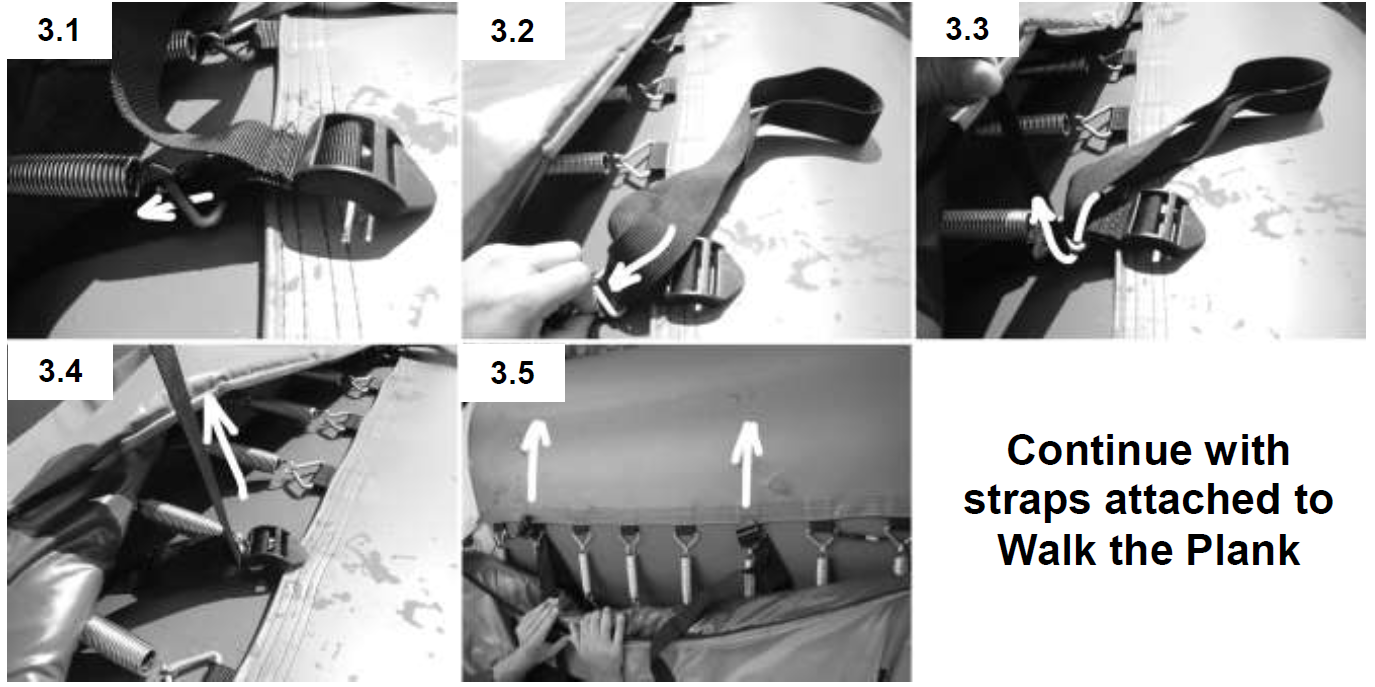
3.1-2: Take the separate straps included with Walk the Plank and determine the preferred location on the tube. Then make sure buckles are facing the correct direction before feeding it through the triangle ring. IMPORTANT: Straps will need to be 36” apart.
3.3-4: Feed both straps into the triangle ring and pull the short end upward and the long strap downward. (Do this for both sides)
3.5: Wrap the extra-long strap around tube and back up to the buckle.Then cinch down taut the long strap and make one knot with excess.
Place Walk the Plank on top of the tube, so it is centered between the straps already installed. Strap it down before securing side straps.

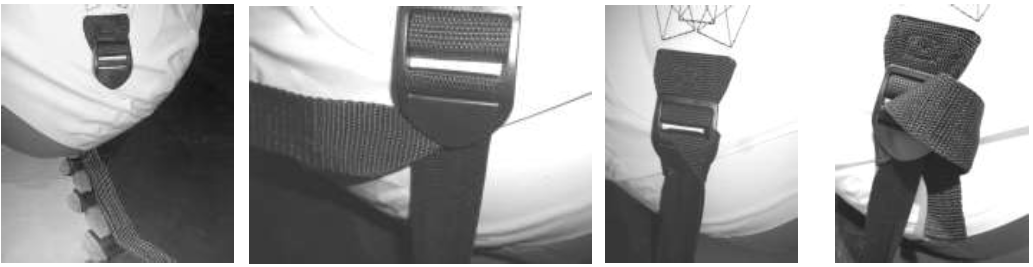
Step 4- Attach side straps
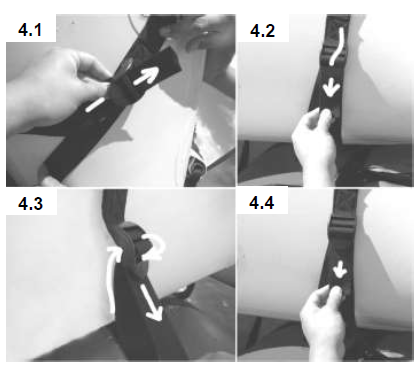 4.1: Feed the short strap from step 3 upward through the buckle on the side of Walk the Plank tube.4.2: Feed through the bottom opening slot and pull down, tightening the strap taut. This will prevent it from coming loose because of slack.4.3: Side straps are pulled tight. This prevents side to side movement of the product.4.4: Make sure the side straps are cinched tight. Take the free end of each strap and tie a known adjacent to the buckle to prevent slippage.
To attach to Classic Aqua Jump™ (with steel frame), see p. 10To attach to Aqua Jump™ Eclipse (without steel frame), see p. 11To attach to Bongo™, see p. 13
Attaching to Aqua Jump Eclipse
Step 3Determine the preferred location on the Aqua Jump Eclipse. Make sure the pad is oriented so the one section with slots is oriented to match the preferred Walk the Plank location on the Aqua Jump Eclipse tube.
Step 4Starting from the inside of the tube, feed both ends of one buckle strap through the Δ-ring closest to the corner of the tube on the section you want Walk the Plank to be attached. Wrap the long strap around the outside of the inflated tube and fasten to the buckle on the inside. Pull the strap tight, ensuring the buckle is up tight to the Δ-ring.
IMPORTANT: Rotate the strap around the tube until the buckle is touching the backside of the Δ-ring as shown.
Step 5Repeat procedure for the second strap. Properly positioned, both attachment straps for Walk the Plank will be on the same colored panel on the Aqua Jump tube Eclipse and running through the outermost triangle rings on that panel.
Step 6Feed the short strap up through corresponding slots in the pad. Set Walk the Plank on top of the pad between the straps.
Step 7Feed the short strap through the buckle on the side of Walk the Plank.Loosely fasten. Repeat for other side of Walk the Plank Center Walk the Plank nicely between the straps then tighten both straps.
NOTE: Check Walk the Plank attachment straps periodically to ensure they are tightly fastened and Walk the Plank is secure and stable.As an added safeguard to prevent movement of the straps, fold the loose end of the strap 90° to the side, wrap around the back side, down through the buckle opening and back through itself on the back side. Pull tight to lock.
Step 8Make sure the straps are tight and the pad is adjusted to fully cover the springs and frame. Walk the Plank is now ready to use! Please read and follow all safety instructions before enjoying Walk the Plank.
Attaching to the Bongo™
Follow steps 1 and 2 for inflating Walk the Plank from page 7
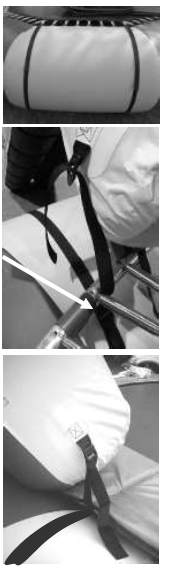
Step 3Attach the product while both the Bongo and Walk the Plank are in shallow water. Center the Walk the Plank on the desired panel location with Walk the Plank buckles directly above the lacing of the Bongo as shown.
Step 4Using the separate straps, feed the end of the long strap down between the jump mat and the tube at the point nearest the tube corner. Bring the free end of the strap around the tube and loosely fasten in the buckle.
Step 5Wrap the short strap under itself and through the jump mat lacing as shown. Now feed the strap through the side buckle on Walk the Plank and fasten loosely.
Repeat for other side of Walk the Plank. Center Walk the Plank between the straps then tighten all straps.

DO NOT SKIP THIS STEP! It is critically important and prevents Walk the Plank from slipping off the Bongo.
NOTE: Check Walk the Plank attachment straps periodically to ensure they are tightly fastened and Walk the Plank is secure and stable.
As an added safeguard to prevent movement of the straps, fold the loose end of the strap 90° to the side, wrap around the back side, down through the buckle opening and back through itself on the back side. Pull tight to lock.
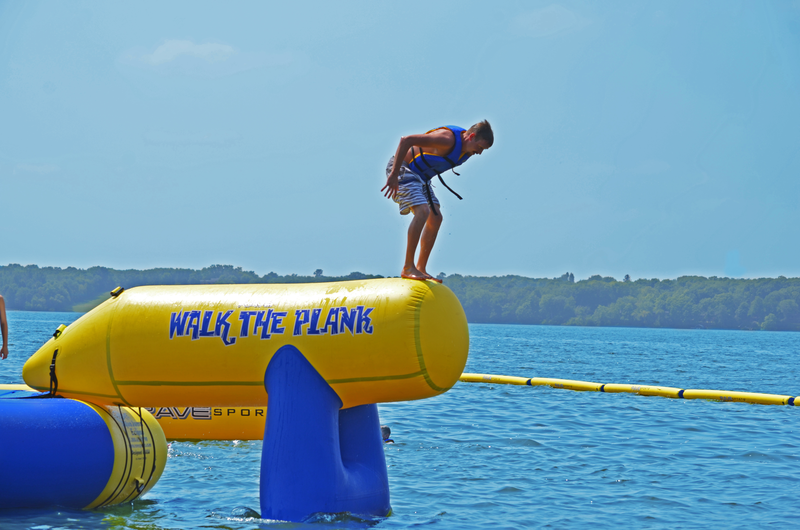
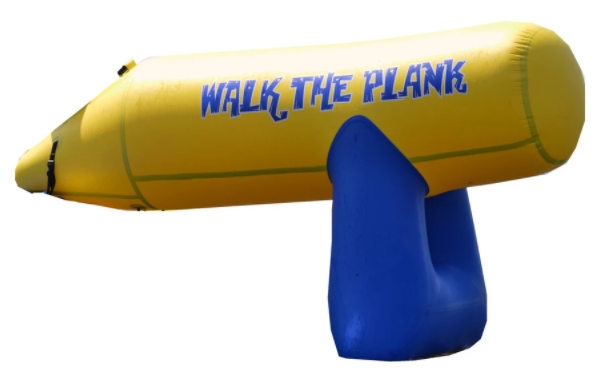
Walk the Plank Overview
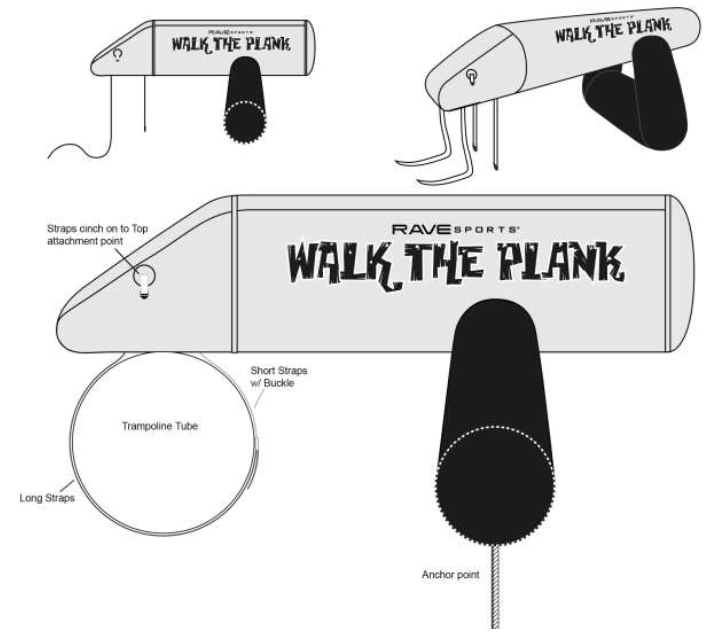
AnchoringAnchor is located under the blue base. There is a heavy duty D-ring that an anchor can be attached to. This will add more stability and balance to Walk the Plank. Recommend our Anchor connector kit with shock cord; this will absorb the bounce of someone jumping off Walk the Plank.
Using the Walk the PlankClimb on top and Walk the Plank. Challenge your friends and try to get to the end. Feel the thrill of jumping off into the water.
Cleaning and Storage
- When the inflatable product is not being used, store it in a covered, shaded area. This will help protect it against ultraviolet (UV) rays and extend the life of the product.
- Clean the inflatable completely with a mild soap and fresh water.NEVER USE PETROLEUM BASED PRODUCTS OR SOLVENTS FOR CLEANING. NEVER USE A POWER WASHER SINCE THE HIGH PRESSURE WATER JET WILL DAMAGE THE TUBE BEYOND REPAIR.
- Product should be completely dry and remain dry while stored.
- Ensure the protective caps are installed onto the frame posts. Roll the product loosely and place in a container, preferably one that rodents can’t chew through.
- Disassemble entire frame and store separately from the tube.
- Secure against unauthorized or unsupervised use.
- Store in a cool, dry location. Do not store product directly on concrete surface. Place mothballs around stored inflatable to keep mice and insects away.
ImportantRodents like muskrats may be attracted to the PVC vinyl of your product.When your product is on the water, maintaining full air pressure during periods of non-use will discourage them from chewing the vinyl.Another way to ease the problem of nuisance rodents is to remove the temptation by taking the product out of the water at night. You can also make the whole area unattractive to rodents by changing the environment, making the area less hospitable for rodents. Removing any food source from the shoreline can also be a good deterrent. Check with your local DNR for additional guidance or possible restrictions.
Repairs
For large holes, tears or seam failures, contact RAVE Sports at 1-800- 659-0790. Replacement patches can be purchased at www.ravesports.com. For minor holes or tears:
- Inflate the product and locate the leak by spraying the tube with mild soapy water.
- Determine the hole size and cut a patch 1-2 inches wider than the diameter of the hole. Make sure all corners of the patch are rounded.
- Deflate the product and clean the patch and area around the hole with rubbing alcohol. Let dry.
- READ AND UNDERSTAND THE WARNINGS ON THE GLUE CONTAINER.
- Apply glue to the patch and the area around the hole. Let the glue dry until it is tacky to the touch.
- Lay the product on a flat, hard surface and apply the patch. Working from the center to the outer edge, rub out any air bubbles between the patch and the product.
- Let patch dry for 24 hours before attempting to inflate the product.For warranty and return information, please visit www.ravesports.com
![]()
References
[xyz-ips snippet=”download-snippet”]