![]()
![]()
 CR1009 meets the NWS evaluation criteria for NWR All Hazards logo useCR1009Emergency Alert Radio with AM/FM/SW/NOAA weather/Solar Crank
Contact our experts[email protected]

Chapter 1 LOCATION OF CONTROLS
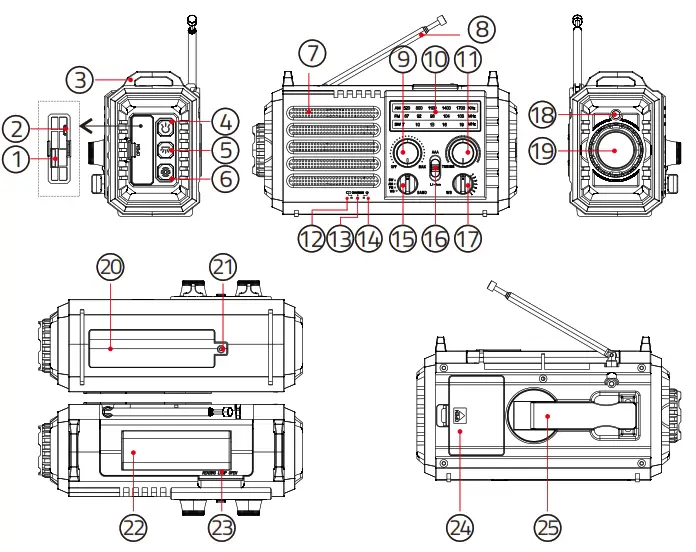
| 1. USB Output Charging Port2. Micro USB Input charging Port for Built-in Battery3. Carry Strap Holder4. Flashlight Button5. Reading Lamp Button6. SOS Control Button7. Speaker8. Telescopic Antenna9. Power ON/OFF & Volume Knob10. Frequency Display11. Turning Knob12. Battery Indicator13. Charging Indicator | 14. Power On Indicator15. Band Selector16. Power Selector17. Weather Band Selector18. SOS Flashlight19. Flashlight20. 5000mAh Rechargeable Battery (included)21. Battery Compartment Cover22. Solar Panel23. Reading Lamp24. AAA Battery Compartment Cover25. Crank Handle |
Chapter 2 POWER SUPPLY MODE
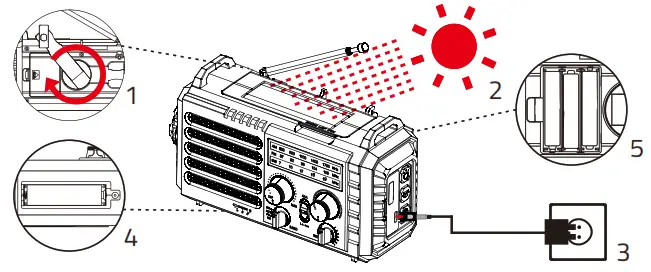
There are 5 power supplies to power the radio:
- Hank Crank Power(1) Unfold the crank handle from the backside and rotate it in either direction.(2) Rotate the crank handle, It will generate 300-350mA electricity to charge a built-in 5000mAh rechargeable battery.Note: Rotate the crank handle at the speed of 2 laps per second.It will generate 300-350mA electricity.
- Solar Power(1) Expose the solar panel to sunlight, don’t charge indoors.(2) It will generate 30-50mA electricity to charge a built-in 5000mAh rechargeable battery.Note: Solar panels will generate 30-50mA electricity when exposed to sunlight.It is difficult to fully charge the 5000mAh battery with a solar panel, which is mostly used for maintaining the rechargeable battery.
- Micro USB Adapter Charging input(1) Connect USB Cable(included) to a regular AC power adapter(not included).(2) Plug the USB cable into the Micro USB port of the radio.(3) Plug the AC adapter to a 110-220V standard outlet.It is highly recommended to use a 5V/2A AC power adapter.
- Li-ion Rechargeable Batte
- AAA Batterie(1) Open the battery compartment on the back of the unit and insert 3pcs AAA batteries making sure the polarity is correct.(2) Set the Power Selector to AAA.Note: In AAA batteries power mode, SOS alert sound is lower than Li-ion battery power. Because the current of the AAA battery is weaker than the current of the L-ion battery.AA batteries are not included.
Chapter 3 POWER INDICATORS
 |
Li-ion battery power is LOW |
 |
Li-ion battery power is charging |
 |
The radio is on |
Chapter 4 CHARGING PHONE or PORTABLE DIGIT
Connect your phone charging cable with the USB output port on the back of the Radio.
 If the CR1009 has no power, you can rotate the crank handle for 8-15 minutes (The time depends on your speed of rotation). then your phone will get enough power to start up.Note: This feature is only for charging USB devices during emergencies.Don’t use it as a normal power bank.The supplied charging cable is only for charging Micro USB devices, Other USB devices should be charged with the original charging cable.
Chapter 5 POWER SWIT
- If you have installed a AAA battery and intend to use it, please switch the “POWER” button to the “AAA” side. Please use a little force when sliding the “POWER” button to make sure it gets to the MOST TOP to avoid the AAA power supply is not connected.
- If you plan to use a Li-ion battery, please switch the “POWER” button to the “LI-ION” side. Please use a little force when sliding the “POWER” button to make sure it gets to the VERY BOTTOM to avoid the Li-ion power supply is not connected.

Chapter 6 SOS ALERT
In an emergency, you can turn on the flashing red SOS light and Alert sound.
- Click SOS Button to turn on the SOS alert.
- Click SOS Button again, the SOS alert will be turned off.

Chapter
- Rotate up the lamp by 90 degrees for better reading as a table lamp.
- Click Reading Lamp Button to turn on the lamp.
- Click Reading Lamp Button again, the lamp will turn off.


Chapter 8 FLASHLIGHT
- Click the Flashlight Button to turn on the flashlight.
- Click the Flashlight Button again, the flashlight will turn off.

Chapter 9 RADIO OPERAT
- Turn on the radioRotate the volume control knob away from the OFF position, the radio will turn on automatically.
- Band SelectorRotate the band selector switch to choose the band you want to listen to. You can choose from the AM/FM, Shortwave, and Weather Band. Weather Band: Receives all 7 weather bands from NOAA, the U.S. National Weather Service which broadcasts in all 50 states, Puerto Rico, and the U.S. Virgin Islands.AM Band: Receives all local AM stations from 520KHz to 1710 kHz.FM band: Receives all local FM stations from 87.00Mhz – 108MHz.SW Band: Receives all Shortwave bands from 7MHz- 19MhzNote: SW band allows you to listen to overseas broadcasts from stations like the BBC, Radio Moscow, Radio, France, Radio Beijing, Voice of America, and more.
- Volume ControlTurn the volume control knob to adjust the sound volume of the radio.
- TuningSelect the band you want to listen to, then turn the tuning knob slowly until you receive the desired station.Note: (1) When listening to FM/SW1/SW2 and Weather Band, please extend the telescopic antenna to receive the best signal. When listening to the AM stations, it is better to use it near a window or open space, in order to receive better signals.(2) Please note with regarding to the NOAAWeather Band: You need to identify which band receives your local weather band report. When you change locations either to another city or state, you may need to choose a different band to get the local report in that location.
- Weather BandSet the band selector to WB, and choose one of the 7 bands to find your local weather station.Note: NOAA Weather band is a service broadcast of the U.S. Government and available in all 50 states, Puerto Rico, and the U.S. Virgin Islands.
- NOAA Alert(1) Turn on the radio by rotating the volume control knob away from the OFF position.(2) Set the band selector to WB to turn the weather band to your local weather station.(3) When the National Weather Service issues a severe weather alert, the machine will emit an SOS alarm sound for 9 seconds, meanwhile, the red light flashes, and then the radio will continue to play the weather information.It is recommended to use the AC adaptor to power the radio when you turn on the NOAA Alert.
Chapter 10 SPECIFICATIONS
 report this ad
FM: 87 – 108 MHzNOAA Weather: 162.400MHz /162.425MHz / 162.450MHz /162.475MHz / 162.50MHz /162.525MHz / 162.55MHzAM (MW): 520 -1710 KHzSW: 7- 19.00 MHzSolar Panel Power: 30-50mACrank power: 300-350mARechargeable battery: 5000mAh 21700 Li-ion batteryAC power input interface: Micro USB
References
[xyz-ips snippet=”download-snippet”]