
Reacher Radio Alarm Clock

Thanks for your purchase from Reacher. Utmost care has gone into the design and manufacturing of your clock. Please read these instructions and keep the user manual in safe place for future reference.
Instructional Video
We made a instructional video on YouTube as below link and QR code, just need to scan the code or enter the video link and you can get the Intuitive operation of the alarm clock radio.Link: https://youtu.be/BYWR4jfsOiU

Features
- FM Radio
- Dual Alarm
- Alarm Volume Adjustable
- Snooze
- 12/24 Hour Switched
- 4-Level Dimmer of LCD Display
- Sleep Timer(In FM mode)
- USB Ports for Charging Your Phones
Getting Started
Plug in the adapter into a standard household outlet to get the clock working.Insert 3 “AAA” batteries(Not Included) to preserve the ALARM and TIME settings in case of power interruption.
Quick Getting Start
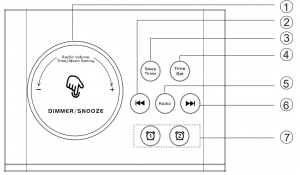
① Rotate – FM volume, time setting and alarm setting adjust; Press – adjust brightness/Snooze when alarm goes off② Short Press – Enter Previous Memory Station, Long Hold – Scan Previous Station③ Sleep Timer④ Time Set(Enter Time Setting)⑤ Short Press – Turn Radio ON/OFF, Long Hold – Scan and Memory Station when FM is on⑥ Short Press – Enter Next Memory Station, Long Hold – Scan Next Station⑦ Short Press – Enter alarm 1 or alarm 2 Setting, End today’s alarm when alarm goes off, it will go off next day. Long Hold – Turn ON/OFF alarm 1 or alarm 2
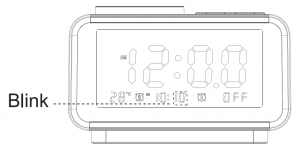
FRONT PANEL

⑧ AM/PM Appear in 12H Mode⑨ Appear when Snoozing⑩ Apear when sleep timer is on⑪ Temperature⑫ Alarm 1 and Alarm 2⑬ Appear when FM is ON
BACK PANEL

⑭ Temperature Probe Hole⑮ Adjust Alarm Volume⑯ Temperature Switch(℃/℉)⑰ 12H/24H Mode Switched⑱ Charge Your Phones
Setting The Time
- Short press the
 button to enter the time setting. Revolve the biggest button to set the right hour.
 - Short press or button to confirm the HOUR setting and begin to set the MINUTES.
- Revolve the biggest button to adjust MINUTES.
- Short press the or button to confirm and exit the time setting.
 button to enter the time setting. Revolve the biggest
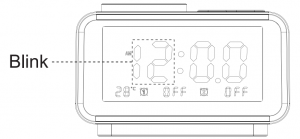
Note:
- Press the “12/24H” time mode button in the back, to change the time mode.
- In 12H format, the “AM” will appear in the morning and the “PM” will appear in the afternoon.
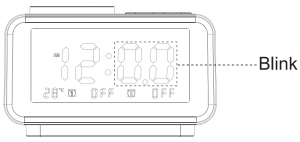
Setting The Alarm
- Short press to enter Alarm 1 HOUR setting. Revolve the to set the alarm hour you want.
- Short press or to confirm the HOUR setting.Revolve the to set the alarm minutes you want.
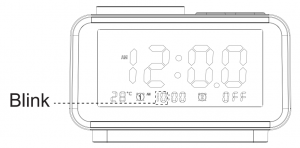
- Short press or to confirm the MINUTE setting and enter ring tone setting, revolve the to choose ringtone. (Note: Total 1-6 ringtone optional, 1- 5 for default ringtone, 6 for FM radio which is the last station you listened)
- Short press or to confirm the Alarm 1 Setting.
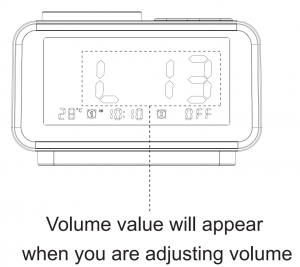
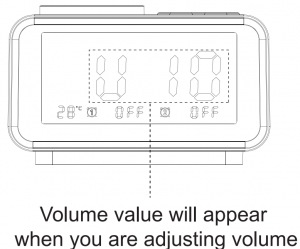
- The volume “+” “-” buttons on the back are used to adjust the alarm volume, 0-16 levels are adjustable.
Note:ALARM 1 and ALARM 2 are set in the same way.
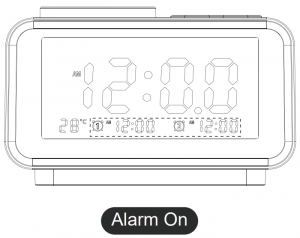
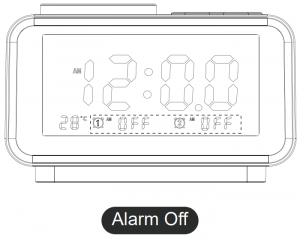
Alarm ON / Alarm OFF
Alarm will be turned on after you set the alarm time. Long hold the  or
or  to turn OFF the Alarm 1 / Alarm 2
Stop Alarm:
Short press or button to stop the alarm when it’s ringing. Alarm will go off on the next day.
SNOOZE/DIMMER
Dimmer: Press the 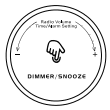 continuously to adjust or turn off the backlight.When the alarm goes off, press the to snooze for a while, the alarm will go off again 9 minutes later.

Note:
- The alarm can snooze 7 times. After the last snooze, the alarm will go silent.
- Stop Alarm: It will ring 1 hour and 45 minutes with no action; or press any / button to stop ringing. It will go off on the next day.
FM Radio Play
- Press the button to turn the radio mode on and off.
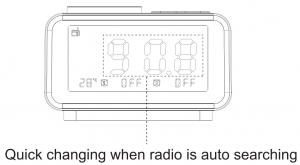
- Long press button for about 2 seconds, FM radio will scan and auto-store the scanned stations. It will stay on first station once scan is completed.
- Press to choose station, revolve the to adjust volume.
 button to turn the radio mode on and off.
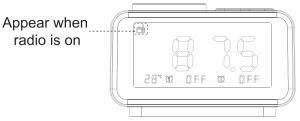
Thermometer
Short press temperature button to switch between Celsius and Fahrenheit.
Sleep Timer Setting
Use the sleep timer, which turns off the radio automatically after a preset duration. Default state is off.
Restore Factory Setting
If you want to reset factory settings, please disconnect the power supply and remove the battery(not included). Then, it will reset factory setting in next time.
Support
If you experience any problems with this clock kindly contact [email protected] Issues raised will be addressed within 24 hours
Warranty
Reacher backs 45-day money back and 18-month warranty for all products in our store.

References
[xyz-ips snippet=”download-snippet”]