 ALARM CLOCKUSER MANUALACR-WYM-186
 We, at Reacher, thank you for your purchase. The utmost care has gone into the design and manufacturing of your clock. Please read the following instructions and keep this User Manual in a safe place, for future reference.
Instructional Video
We made an instructional video on YouTube (you can find the link below) and QR code; you only need to scan the code or enter thevideo link and you will be able to access the intuitive operation of the alarm clock radio.

Features
- FM Radio 87.5-108 MHz
- 5W Wireless Charging
- 5V/1A USB Charging Port
- 2 Alarm Sounds Available: Radio, Buzzer
- 9 Minutes Snooze
- Sleep Timer: Radio Auto-off Timer
- 6-Level Display Dimmer
- 0-30 Level Volume Adjustable
- 12 Hour/24 Hour Time Display Format
- 1 Alarm Setting
- 99 FM Pre-Stored Stations
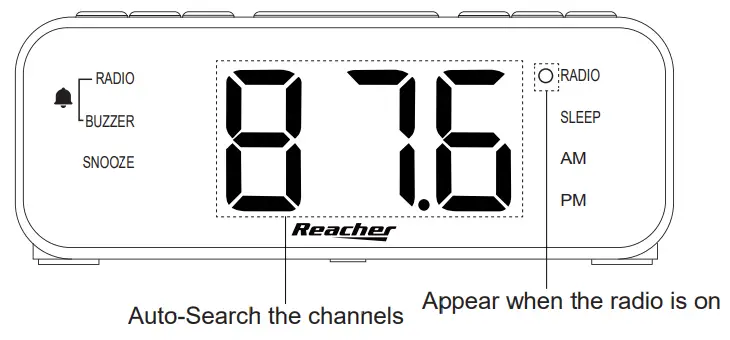
- FM Auto-Search Station
- FM Semi-Manual Search Station
- Pre-Stored Radio Stations Manually
Getting Started
Plug the adapter into a standard household outlet to get the clock working.Insert two (2) new “AAA” batteries (not included) to preserve all settings in case of power interruption.Note:
- The default TIME is 12:00 AM
- The default ALARM is 7:00 AM
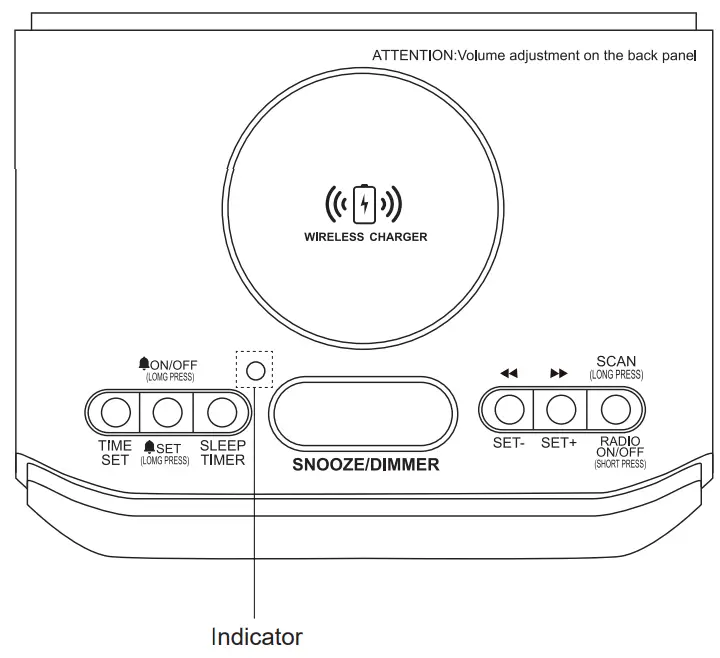
TOP PANEL
1. TIME SET: Enter the time setting2.
SET ON/OFF: Enter the alarm setting/Turn ON/OFF the alarm3. SLEEP TIMER4. Snooze/Dimmer5. SET-: Adjust the Time / Alarm / Radio Channel / Time Display Format6. SET+: Adjust the Time / Alarm / Radio Channel / Time Display Format7. RADIO ON/OFF/SCAN (Long Press)12. WIRELESS CHARGING INDICATOR:Light up = Charging Your DeviceFlashes = Charging ErrorLight out = No Device Charging
FRONT PANEL
![]()
13. RADIO INDICATOR: Light on=The Alarm Sound is Radio14. BUZZER INDICATOR: Light on= The Alarm Sound is Buzzer15. SNOOZE INDICATOR16. RADIO INDICATOR: Light on=The Radio is Turned on17. SLEEP INDICATOR: Light on=The Sleep Timer is on18. AM INDICATOR: Light on=AM19. PM INDICATOR: Light on=PM
BACK PANEL
![]()
8. VOL+: Increase the volume9. VOL-: Reduce the volume10. USB CHARGING PORT11. DC IN
BOTTOM PANEL
![]()
20. Battery Component: Install 2 AAA batteries to save all settings
Time Setting
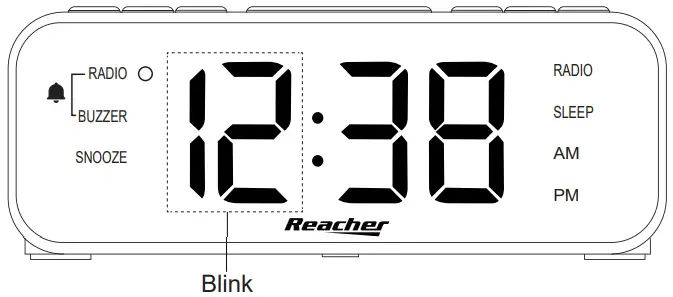
- Press the “TIME SET” button to enter the time setting, press the “SET-” or “SET+” button to set the hour.
- Press the “TIME SET” button to confirm the hour setting and enter the minute setting. Press the “SET-” or “SET+” button to set the minute.
- Press the “TIME SET” button to confirm the minute setting and enter the time display format setting (12h/24h).
- Press the “SET-” or “SET+” button to select the time display format:24h: Military time12h: 12-hour clock
- Press the “TIME SET” button to confirm and exit the time setting.

Note:
- Long press the “SET-” or “SET+” button for quick adjustment.
- If you select the time display format mode 12H, the “PM” indicator will appear in the afternoon, the “AM” indicator will appear in the morning.
- If you select the time display format 12H, please make sure you choose the correct setting, AM/PM.
Alarm Setting
- Press the “ SET ON/OFF” button to enter the alarm setting, press the “SET-” or “SET+” button to set the hour.Note:If you select the time display format 12H, please make sure you choose the correct setting, AM/PM.
- Press the “ SET ON/OFF” button to confirm the hour setting and enter the minute setting. Press the “SET-” or “SET+” button to set the minute.
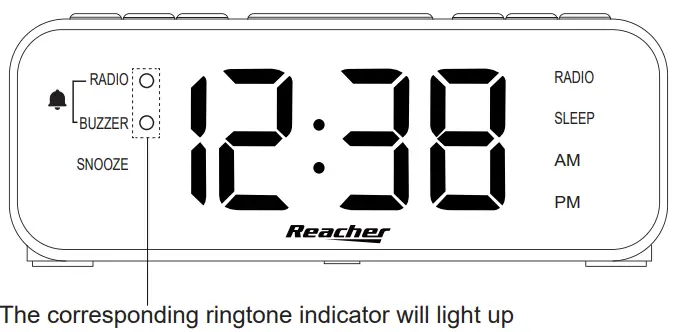
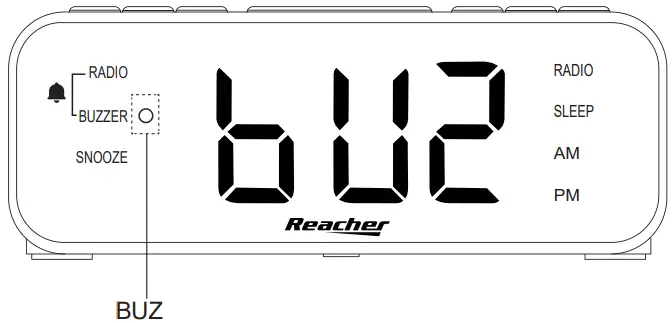
- Press the “ SET ON/OFF” button to confirm the minute setting and enter the alarm sound setting.
- Press the “SET-” or “SET+” button to select the alarm sound:RAD: The alarm sound is the radio and the “RADIO” indicator will light upNote:The default alarm sound is radio, 87.5MHz. If you choose the radio as the alarm sound, the last channel you listen to will be the ringtone.BUZ: The alarm sound is a buzzer and the “BUZZER” indicator will light up
- Press the “ SET ON/OFF” button to confirm and exit the alarm setting.Note:When you select the alarm sound, if there is no other operation, the alarm sound will last for 10 seconds and then exit the alarm setting.
Alarm Volume Adjustment
- Press the “VOL+” or “VOL-” button to adjust the alarm volume, 5-30 levels are adjustable.
- Long press “VOL+” or “VOL-” for quick adjustment.
- When you adjust the volume, you can listen for 5 seconds to confirm whether the volume is at the preferred level.Note:You can adjust and save the alarm volume in any mode except radio mode.
Turn on/off Alarm
- Press and hold the “ SET ON/OFF” button for 2 seconds to turn on/off the alarm.
- When the alarm is turned on, the corresponding indicator (RADIO/ BUZZER) will be light up. The alarm will go off on the set alarm time.
- When the alarm is turned off, the corresponding indicator (RADIO/ BUZZER) will not appear. The alarm will not go off.
Stop Alarm
- When the alarm goes off, press any top panel button except the “SNOOZE/ DIMMER” button to stop the alarm. It will ring the next day at the same time.
- If there is no other operation, the alarm will stop after 30 minutes.
SNOOZE
When the alarm goes off, you can press the “SNOOZE/DIMMER” button to snooze for a while. After 9 minutes, the alarm will go off again.
- The alarm can snooze 6 times. After the seventh snooze, the alarm will go silent.
- If no action is taken when the alarm goes off, the alarm will stop after 30 minutes.
FM Radio Feature
Set up FM antenna
Extend the FM wire antenna fully and vary the direction for the best FM reception.

AUTO Search FM Channel
- Press and hold the “RADIO ON / OFF / SCAN (long press)” button for 2 seconds to turn on the radio.
- It will automatically start searching for radio stations from 87.5MHz to 108MHz. The searched radio channels will be stored automatically; up to 99 channels can be stored.
Manually Search FM Channel
- Short press the “RADIO ON / OFF / SCAN (long press)” button to turn on the radio.
- Press and hold the “SET-/SET+” button for 2 seconds to search the channel, when a radio station is found, stop searching and play the searched radio channel.
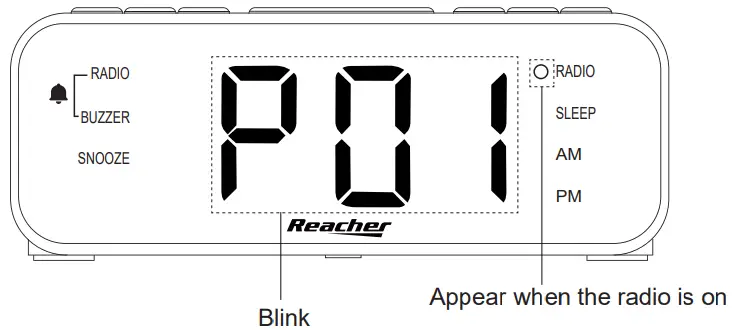
Radio Memory
The clock radio can save up to 99 radio stations, allowing for quick access.
- Press and hold the “SLEEP TIMER” button for 2 seconds until “P01” flashes. Press the “SLEEP TIMER” button again to store Station 1.
- Search the second desired station, long-press the “SLEEP TIMER” button until “P01” flashes. Then, press the “SET+” button, when “P02” appears and flashed, press the “SLEEP TIMER” button once again to store Station 2.
- Repeat the above procedure to store more radio stations.
Play the Pre-Stored Stations
In radio mode, short press the SET-/SET+” button once to select the radio station from the list.
Radio Volume Adjustment
- Press the “VOL+” or “VOL-” button to adjust the radio volume, 0-30 levels are adjustable.
- Long press the “VOL+” or “VOL-” for quick adjustment.
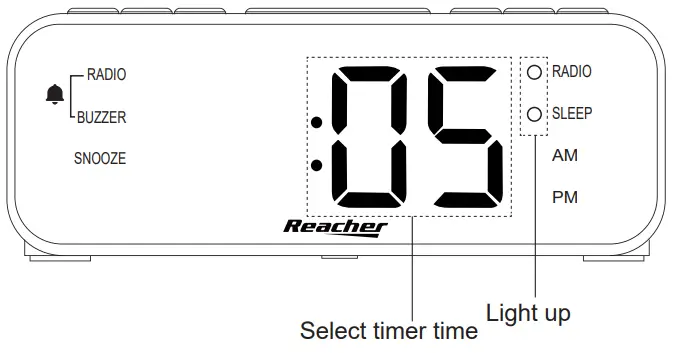
Automatic off Timer
- When the radio turns on, short press the “SLEEP TIMER” button to enable the automatic off timer. The “SLEEP” indicator and the sleep time will appear (The default sleep time is 5 minutes with “05” on the LED display).
- By pressing again the “SLEEP TIMER” button to cycle select 5, 30, 45, 60, 75, 90, 105, 120 minutes or OFF. (“OFF” means the timer is disabled.)
Using the Dimmer
Press the “SNOOZE/DIMMER” button to set the display brightness to Bright/30% Dim/50% Dim/75% Dim/90% Dim/OFF.Note:When the alarm is triggered, this button plays the role of “snooze” instead of “dimmer”.
Wireless charging
Place your phone in the “WIRELESS CHARGER” position and the top panel indicator will light up if the phone has been placed correctly. When fully charged, the light will go out.
USB Phone Charging Port
USB charging port for charging your mobile phone.
Battery Backup
The battery will maintain all settings if the power is interrupted. There will be no display and the ALARM will not sound under battery power. If there is no battery and the power is interrupted, the ALARM/TIME/RADIO will need to be reset.
Care of Your Clock
Replace the backup battery annually or store the clock without a battery when not in use. A soft cloth or a paper towel may be used to clean your clock. Do not use any corrosive cleaner or chemical solutions on the clock.Keep the clock clean and dry to avoid problems.
Support
report this adContact [email protected]. We will respond to your email within 24 hours.
![]() Made in China
Made in China
References
[xyz-ips snippet=”download-snippet”]