![]()

LOT#________PO#_________

Natural GasConversion Kit Manual
!NOTE: This conversion kit is for changing a liquefied petroleum (LP) gas fireplace into a natural gas (NG) fireplace.![]() DANGERCARBON MONOXIDE HAZARDThis appliance can produce carbon monoxide which has no odor.Using it in an enclosed space can kill you.Never use this appliance in an enclosed space such as a camper, tent, car or home.
DANGERCARBON MONOXIDE HAZARDThis appliance can produce carbon monoxide which has no odor.Using it in an enclosed space can kill you.Never use this appliance in an enclosed space such as a camper, tent, car or home.

![]() DANGERFIRE OR EXPLOSION HAZARD If you smell gas:
DANGERFIRE OR EXPLOSION HAZARD If you smell gas:
- Shut off gas to the appliance.
- Extinguish any open flame.
- If odor continues, leave the area immediately.
- After leaving the area, call your gas supplier or fire department.Failure to follow these instructions could result in fire or explosion, which could cause property damage personal injury, or death.

![]() WARNING: FOR OUTDOOR USE ONLY.Installation and service must be performed by a qualified installer, service agency, or the gas supplier.INSTALLER: Leave this manual with the appliance.CONSUMER: Retain this manual for future reference.
WARNING: FOR OUTDOOR USE ONLY.Installation and service must be performed by a qualified installer, service agency, or the gas supplier.INSTALLER: Leave this manual with the appliance.CONSUMER: Retain this manual for future reference.![]() WARNING: If the information in this manual is not followed exactly, a fire or explosion may result causing property damage, serious injury, or loss of life.
WARNING: If the information in this manual is not followed exactly, a fire or explosion may result causing property damage, serious injury, or loss of life.![]() WARNING: Do not store or use gasoline or other flammable vapors and liquids in the vicinity of this or any other appliance.An LP gas tank not connected for use shall not be stored in the vicinity of this or any other appliance.
WARNING: Do not store or use gasoline or other flammable vapors and liquids in the vicinity of this or any other appliance.An LP gas tank not connected for use shall not be stored in the vicinity of this or any other appliance.
NOTE: In addition to these instructions, read and understand all warnings included with the fireplace owner’s manual.
![]() WARNING
WARNING
- The qualified service agency is responsible for the proper installation of this kit. The installation is not proper and complete until the operation of the converted fireplace is checked as specified in the manufacturer’s instructions supplied with this kit.
- This conversion kit shall be installed by a qualified service agency in accordance with Real Flame’s instructions and all applicable codes and requirements of the authority having jurisdiction.
- If the information in these instructions is not followed exactly, a fire, explosion or production of carbon monoxide may result causing property damage, personal injury or death.
SPECIFICATIONS
Type of Gas: natural gas (NG)Normal Hourly Input: 50,000 BTUs/hr (14.65 kW)Manifold Pressure: 7.0” water column (1.74 kPa)Minimum Inlet Pressure: 3.5” water column (0.87 kPa)Maximum Inlet Pressure: 10.5” water column (2.61 kPa)This fireplace was converted on _________________ (DD/MM/YY)to natural gas with kit no._______________________ (Found on box.)by___________________________________________,(Name and address of organization making this conversion.) which accepts the responsibility that this conversion has been properly made.Notes: ___________________
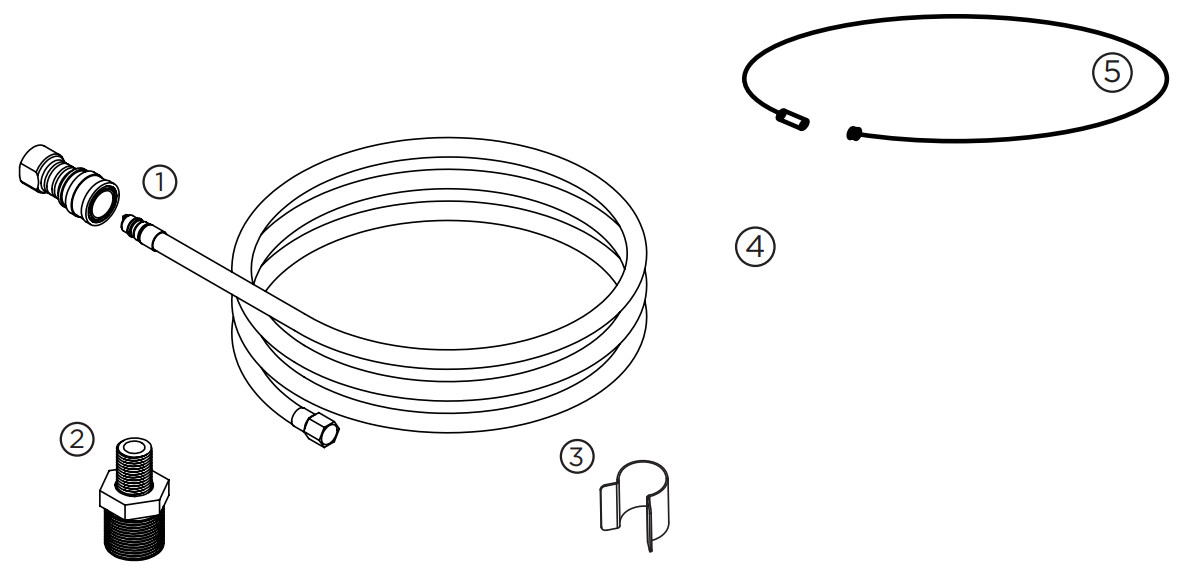
PARTS LIST
Natural Gas Conversion Kit: 00023109GFor use with Real Flame fireplaces: C9811LP, 1680LP
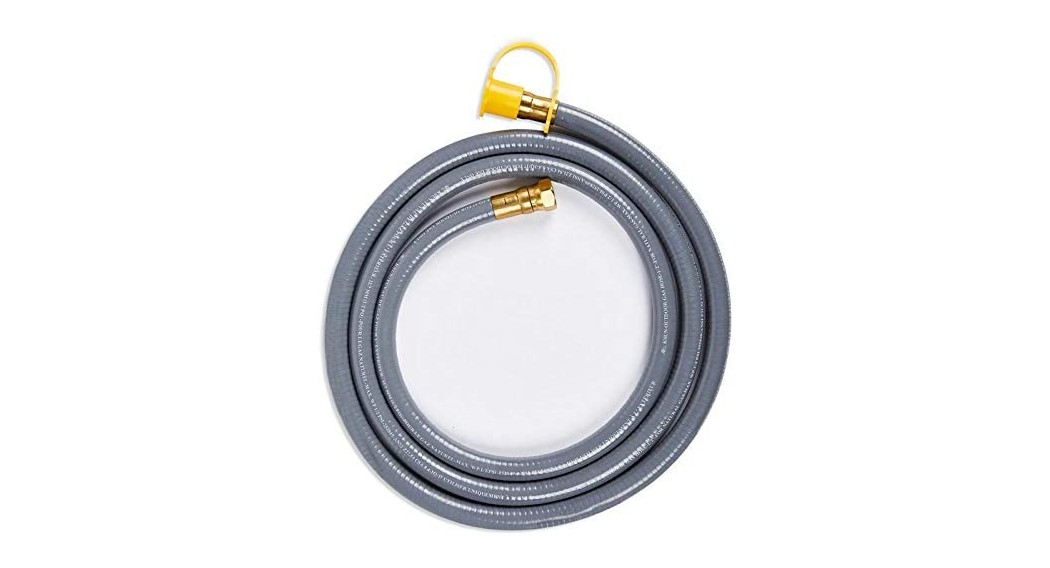
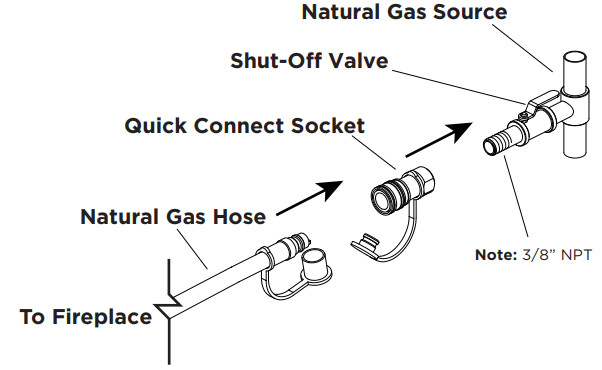
- Natural Gas Hose and Quick Connect (3/8” NPT)
- NG Orifice Spud 3.9mm Cable Kit
- Primary Air Mixer Sleeve
- Conversion Plaque
- Cable Kit
This appliance has been converted to use Natural Gas.For technical support call: 1-800-654-1704NG Orifice # 3.9CSA MC# No. :251993Type of Gas / Type de gas: Natural Gas/Gaz Naturel50,000 BTU/Hr. (14.65 kW)Manifold Pressure/Pression d’admission: 7.0” water column (1.74 kPa)The minimum inlet pressure : 3.5” water column (0.87 kPa)The maximum inlet pressure : 10.5” water column (2.61 kPa)This appliance was converted on _________________ (DD/MM/YY)to Natural Gas with Kit No._______________________ (Found on Box)en gaz naturel avec le kit no.by___________________________________________, par(Name and address of organization making this conversion) which accepts the responsibility that this conversion has been properly made.08-50KNG-V04
CONVERSION INSTRUCTIONS
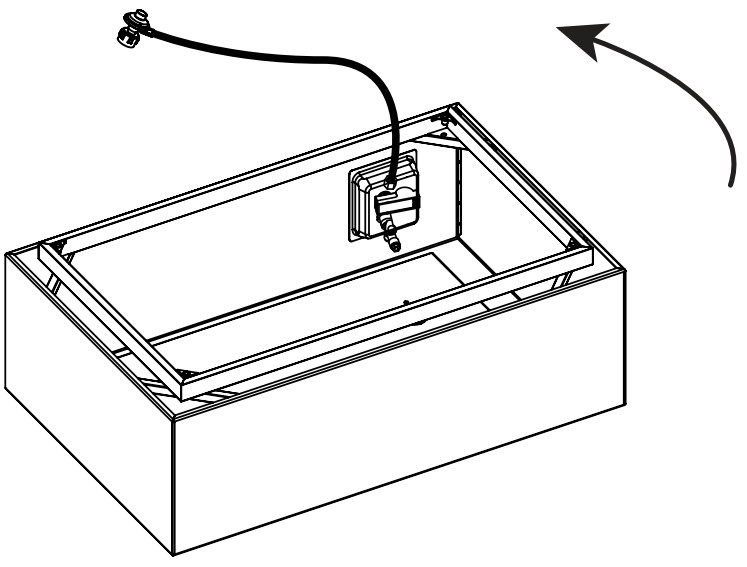
- Disconnect the black LP gas hose from the LP gas tank. Flip the fireplace upside down, placing it on a soft surface to avoid damaging the finish.

- Disconnect the black LP gas hose from the input valve on the body of the fireplace.
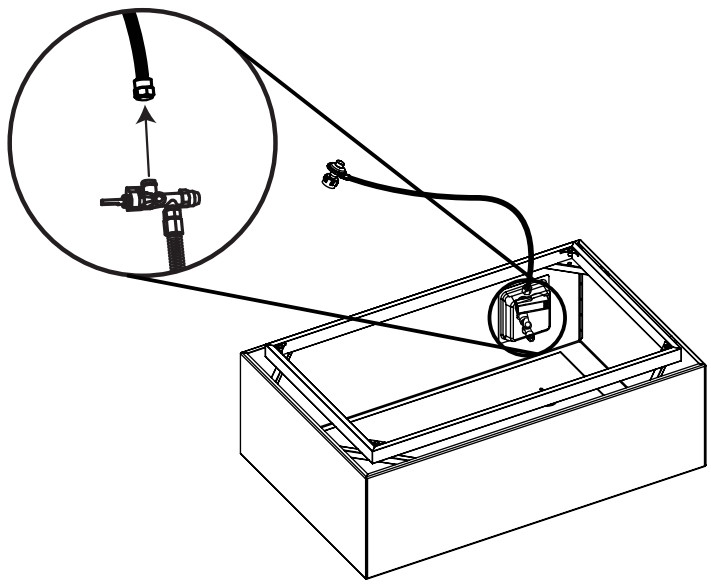
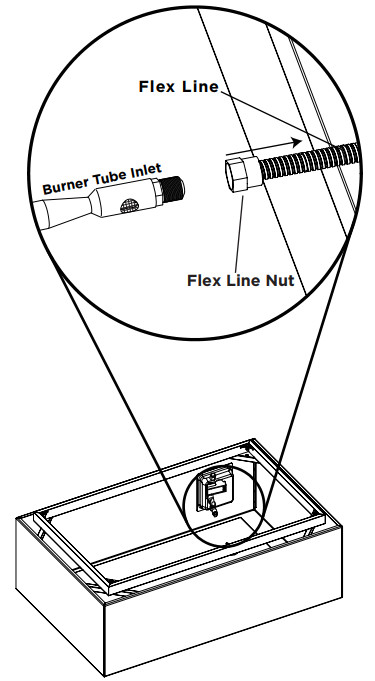
- Disconnect the flex line from the burner tube inlet by unscrewing the nut at the end of the flex line.
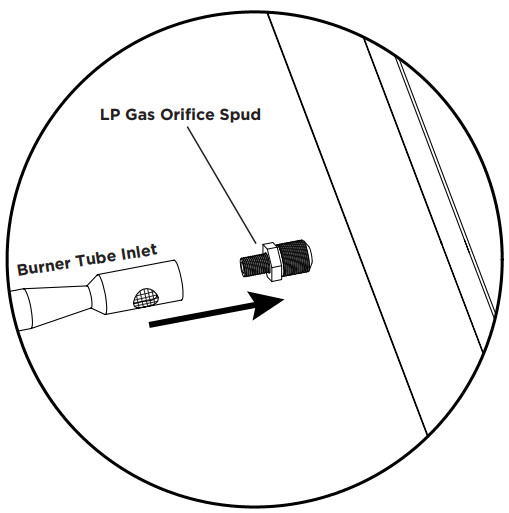
- Remove the LP gas orifice spud from the burner tube inlet.
- Locate the new NG orifice spud. Verify it is the correct number. The sign 3.9 mm should be on the orifice spud.
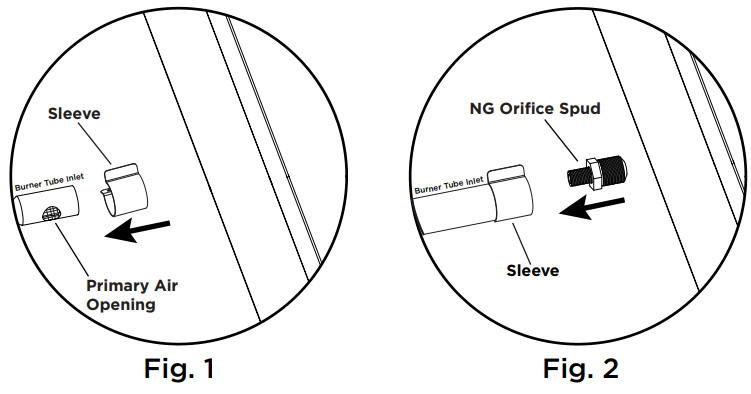
- Slip the sleeve over the primary air opening (see Fig. 1). Next, screw the new NG orifice spud into the burner tube inlet (see Fig. 2).
- Reattach the flex line to the burner tube inlet.
- Attach the gray NG hose to the input side of the valve on the body of the fireplace.
- Attach the quick-connect socket to the natural gas source.
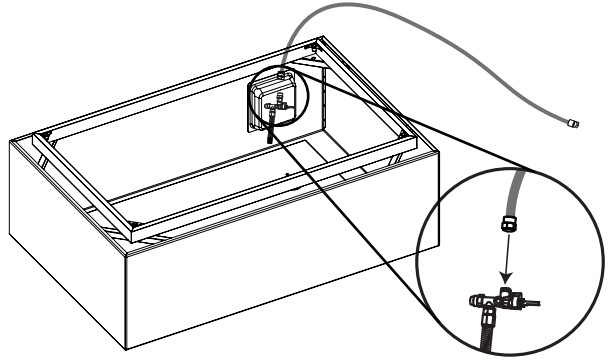
- After installing the conversion kit, verify that the components are still correctly positioned (see diagram below).


PRE-USE INSTRUCTIONS
Notes to Installation TechnicianVerify the manifold pressure by using a 3/8” flared T-junction at the location marked in the diagram below. Then, using a digital manometer, verify that the pressure before the orifice is 7 W.C. (1.74 kPa). Also verify that the orifice spud has the 3.9 mm stamp. This will allow you to verify that the input rating of the fireplace is correct.

Installing at AltitudeInstallations at elevations above 2,000 ft (609.6 m) may require adjustment. Contact Real Flame Customer Service at 1-800-654-1704 for further information.NOTE: The normal manifold pressure for this converted appliance is 7” water column.NOTE: The maximum inlet gas pressure for this unit is 10.5 in W.C. (2.61 kPa).The minimum inlet gas pressure for this unit is 3.5 in W.C. (0.87 kPa).
Checking For Leaks
- Make a leak check solution by mixing 1 part dishwashing soap with 3 parts water in a spray bottle.
- Make sure the control knob on the fireplace is in the “OFF” position, then connect your fireplace to the gas supply line and turn the gas on.
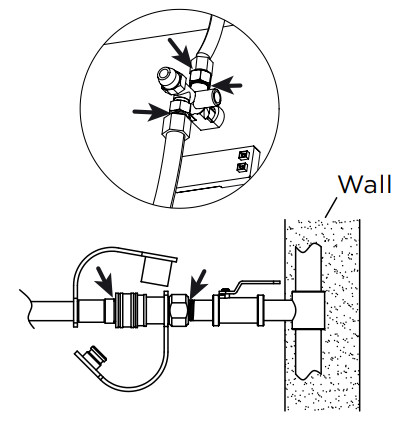
- Spray the leak solution on the valve connections, paying particular attention to the areas indicated by arrows in the diagrams.
- If bubbles appear, shut off the gas supply, disconnect the hose and inspect all connections making sure threads are clear of debris.Reconnect the hose, turn the gas supply on and retest. If you continue to see bubbles, turn the gas supply off, disconnect the hoseand call Real Flame Customer Service at 1-800-654-1704 for assistance.
- If no bubbles appear after 1 minute, wipe away excess leak solution and proceed to “Lighting Instructions.”
Conversion PlaqueUsing a wire cutter remove the French NG conversion plaque that is hanging from the control panel. Use the included cable kit to string both the French and English NG conversion plaques together and reattach them to the control panel.
LIGHTING INSTRUCTIONS
Using the Igniter
- Read and understand all operating instructions before lighting.
- Before beginning, make sure the control knob is in the “OFF” position.
- Connect the quick-connect socket to the gas supply (see previous pages).
- Slowly turn the gas on.
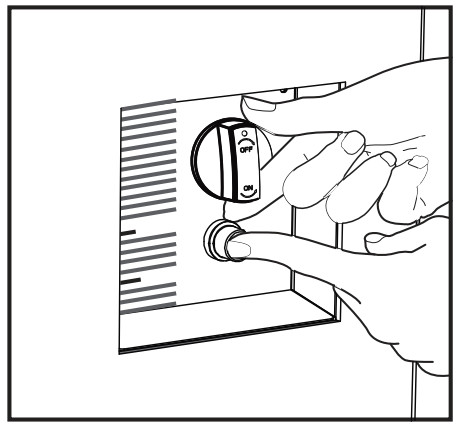
- Prepare to ignite your fireplace by placing one hand on the control knob and one hand on the igniter button (see diagram). DO NOTlean over any part of the burner. Verify that the area around the burner is free of hazards.
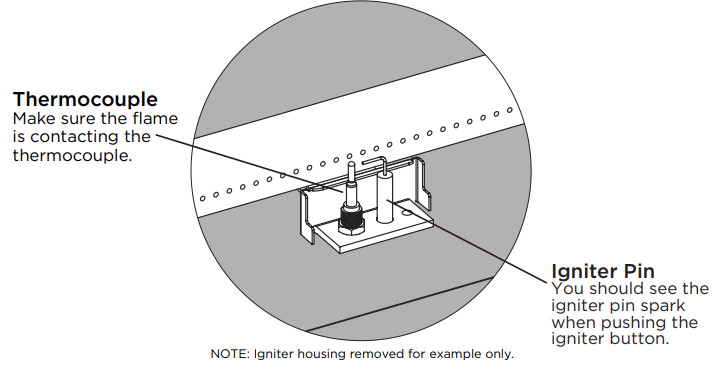
- Push and hold the igniter button. You should hear a clicking sound.
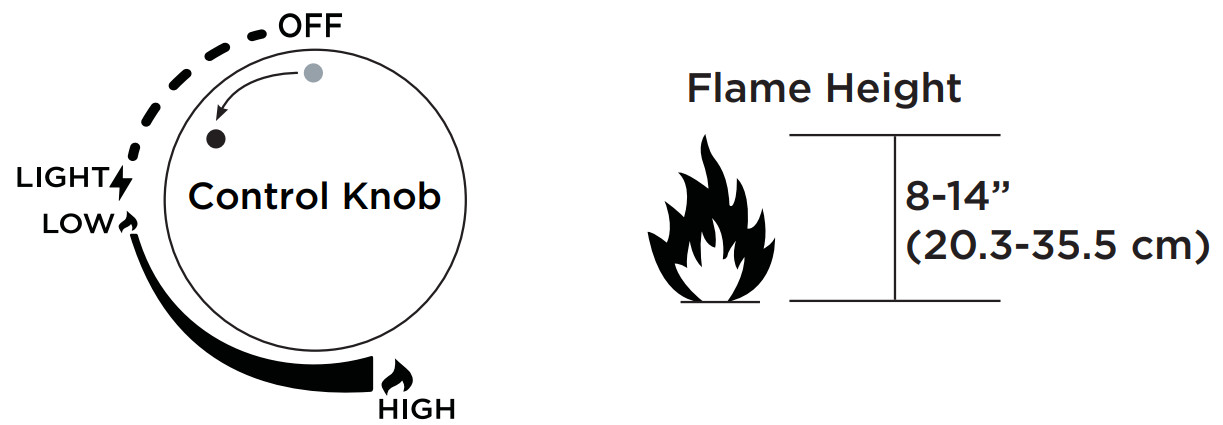
- While keeping the ignition button depressed, use your other hand to push in and turn the control knob counter-clockwise to the “LIGHT” position.
- Once the burner ignites, release the igniter button, but continue to keep the control knob pushed in for 15-30 seconds.WARNING: If ignition does not occur in 15 seconds, turn the control knob to the “OFF” position and turn the gas off at its source. Make sure there is no source of ignition around the fireplace and wait at least 5 minutes until the gas has cleared to repeat the lighting procedure. Failure to do so could result in a large flashback of pooled gas, causing property damage, serious injury, or death.
- After successfully lighting the fireplace, release the control knob and turn it to the “LOW” setting.Observe the flame and make sure that all the burner ports are lit.
- Adjust the flame to the desired height using the control knob.
Shut-Off Instructions
- Push and turn the control knob clockwise to the “OFF” position.
- Turn the gas off at its source (LP tank or shut off valve).For additional technical support callReal Flame Customer Service at 1-800-654-1704.v
WARRANTY
Limited WarrantyReal Flame® warrants that the following components of this Real Flame® fireplace (“the Product”) will be free from manufacturing defects in material and workmanship after correct assembly and under normal use and proper maintenance for the periods indicated below, commencing with the date of purchase of the Product:
- The body – 1-year limited warranty.
- The internal components – 1-year limited warranty.
This non-transferable warranty extends to the original purchaser only, provided that the purchase was made through an authorized Real Flame dealer. The warranty is also subject to the following conditions and limitations:This warranty does not extend to damages caused by shipping, improper assembly, installation or storage, an installation that does not comply with building codes and ordinances, installation or operation not in accordance with the included manual, abuse, lack of maintenance, hostile environments, accident, natural weather, or unworkmanlike repairs. Modification of the Product, use of fuels other than what is approved by Real Flame, or use of parts installed from other manufactures will nullify this warranty.
This warranty applies to the functionality of the Product only and does not cover cosmetic issues such as scratches, dents, rust, oxidation, corrosion, areas discolored or cracked due to prolonged exposure to extreme heat, or damage caused by abrasive or chemical cleaners. However, should deterioration of parts occur to the degree of non-performance within the duration of the warranty period, Real Flame will provide a replacement part.
Real Flame requires reasonable proof of your date of purchase. Therefore, you should retain your sales receipt and/or invoice. Defective parts subject to this warranty will not be replaced without proof of purchase.Real Flame must have the opportunity to verify the alleged defect. In order for any internal components to be covered under warranty, Real Flame requires the user to troubleshoot with a Real Flame Customer Service member to ensure proper operation and diagnosis of issue.
In the event of covered defects in warrantied items, Real Flame will, at its sole option and discretion, replace the defective component, replace the Product or refund the purchase price. Real Flame is not responsible for the installation, labor or any other costs associated with the reinstallation. The foregoing is the exclusive remedy under the terms of this limited warranty. Real Flame will not be responsible for any incidental or consequential damages caused by defects in the Product. Some states do not allow the exclusion or limitation of incidental or consequential damages, so the above limitation or exclusion may not apply to you.This limited warranty is the sole express warranty given by Real Flame. The duration of any implied warranty arising under the laws of any state, including implied warranty of merchantability or fitness for a particular purpose or use, is limited to the duration of the warranty specified above. Some states do not allow limitations on how long an implied warranty lasts, so this limitation may not apply to you.This warranty gives you specific legal rights, and you may also have other rights which vary from State to State.
For warranty service:
- Call Real Flame Customer Service at 1-800-654-1704 for technical support and troubleshooting.
- If experiencing issues with finish, please fill out the ‘Outdoor Warranty Claim’ form at www.realflame.com.
RETURN POLICY
Return PolicyYou may return your purchase within 90 days of receipt. No refunds will be issued for incomplete or unauthorized returns. All returned products must be 100% complete, adequately packaged in original packaging, and in a resalable condition. Products that have been assembled or modified will not be eligible for return. All items must be returned in their entirety, meaning all items included must be returned together. No returns or exchanges on discontinued items. Please begin the return process by contacting the store or company where you bought your Real Flame® item.
Replacement PartsIn the event that an item has been lost or damaged, either by the manufacturer or in shipping, you may request a replacement. Replacement parts are not available for all units and are only given at Real Flame’s discretion. We will assess any damage and find a solution, which could include shipping you a replacement.No replacements are available for discontinued items or repackaged (open box) products. Please call Real Flame Customer Service at 1-800-654-1704 for replacement parts before returning the damaged item. Please have the following information (which can be found in your instruction manual) ready before you call Customer Service:
- The model number of the item
- 4-8 digit part number
- Lot code number
- Shipping address
- A picture of the damaged item may be requested. Pictures should be sent to [email protected].
Incorrect Order ReceivedIf you received something other than what you ordered, please contact Real Flame Customer Service at 1-800-654-1704 within 48 hours of receiving the item.Refer to www.realflame.com for our complete return guidelines and policies.Please register your fireplace for recall notifications, proof of ownership and quality assurance at https://www.realflame.com/registration.
Real Flame®7800 Northwestern Ave.Racine, WI 53406USACustomer Service: 1-800-654-1704 in USA
[xyz-ips snippet=”download-snippet”]