
Instruction for upgrading FW of XR series receiver
Latest firmware version: V2.0 (as of 2019.10.29)
Upgrade project for V2.0
- Fixed the problem of reconnection after signal interruption of A-type (compatible with FLYSKY AFHDS-2) and optimized the protocol; Fixed BIND errorin in V2.00 version; The URL in the BOOT information has been modified; Firmware version code: XR401-A-V2.01,XR601T-A-V2.01,XR602T-A-V2.01;
- Fixed the problem of reconnection after signal interruption of F1-type (compatiblewith FRSKY-D8) and optimized the protocol;The URL in the BOOT information has been modified;Firmware version code: XR401-F1-V2.00,XR601T-F1-V V2.00,XR602T-F1-V V2.00;
- Fixed the problem of reconnection after signal interruption of F2-type (compatiblewith FRSKY-D16) and optimized the protocol;The URL in the BOOT information has been modified;Firmware version code: XR401-F2-V2.00,XR601T-F2-V V2.00,XR602T-F2-V V2.00;
- The calculation method of address pointer of frequency table of S-type(compatiblewith SFHSS) is optimized.The URL in the BOOT information has been modified;Firmware version code: XR401-S-V2.00,XR601T-S-V2.00,XR602T-S-V2.00;
- Improved algorithm for BIND in D-type (compatible with DSMX/2) ;The URL in the BOOT information has been modified;Firmware version code: XR401-D-V2.00,XR601T-D-V2.00,XR602T-D-V2.00;
Upgrade project for V1.26
- Solved the problem of signal interruption of Model A (compatible with FLYSKYAFHDS-2A) and the excessive jump amplitude of RSSI;Improve the calculation method of RSSI for OPENTX and part of their radio controller warning at the lowest required RSSI value;Fixed the checksum and overflow problem of FPORT data.Fixed the travel of data for FPORT and SBUS;Fixed the problem of the contents of FPORT packets conflicting with frames Head;Firmware version code: XR401-A-V1.26,XR601T-A-V1.26,XR602T-A-V1.26;
- Solved the problem of signal interruption of F1-type (compatible with FRSKY-D8) and the excessive jump amplitude of RSSI;Increased frequency calibration software in order to fix the offset of the radio ‘s baseline frequency (frequency offset can be reduced under 5, the blue LED on theXR602T-F1 at frequency indicates that frequency calibration is in progress);Improve the calculation method of RSSI for OPENTX and part of their radio controller warning at the lowest required RSSI value;Fixed the checksum and overflow problem of FPORT data.Fixed the travel of data for FPORT and SBUS;Fixed the problem of the contents of FPORT packets conflicting with frames Head;Firmware version code: XR401-F1-V1.26,XR601T-F1-V1.26,XR602T-F1-V1.26;
- Solved the problem of signal interruption of F2-type (compatible with FRSKY-D16) and the excessive jump amplitude of RSSI;Increased frequency calibration software in order to fix the offset of the radio ‘sbaseline frequency (frequency offset can be reduced under 5, the blue LED on theXR602T-F1 at frequency indicates that frequency calibration is in progress);Improve the calculation method of RSSI for OPENTX and part of their radio controller warning at the lowest required RSSI value;Fixed the checksum and overflow problem of FPORT data.Fixed the travel of data for FPORT and SBUS;Fixed the problem of the contents of FPORT packets conflicting with frames Head;Firmware version code: XR401-F2-V1.26,XR601T-F2-V1.26,XR602T-F2-V1.26;
- Solved the problem of signal interruption of S-type (compatible with SFHSS) and the excessive jump amplitude of RSSI;Improve the calculation method of RSSI for OPENTX and part of their radio controller warning at the lowest required RSSI value;Fixed the checksum and overflow problem of FPORT data.Fixed the travel of data for FPORT and SBUS;Fixed the problem of the contents of FPORT packets conflicting with frames Head;Firmware version code: XR401-S-V1.26,XR601T-S-V1.26,XR602T-S-V1.26;
- Solved the problem of signal interruption of D-type (compatible with DSMX/2) and the excessive jump amplitude of RSSI;Improve the calculation method of RSSI for OPENTX and part of their radio controller warning at the lowest required RSSI value;Fixed the checksum and overflow problem of FPORT data.Fixed the travel of data for FPORT and SBUS;Fixed the problem of the contents of FPORT packets conflicting with frames Head;Firmware version code: XR401-D-V1.26,XR601T-D-V1.26,XR602T-D-V1.26;
Please contact us if you have any feedback or suggestions.
Website: www.crossover-rx.comE-mail: [email protected]
Please read the instruction carefully before upgrading the firmware of XR series receivers!
Two ways of upgrade:
- Using the USB to UART bridge tool (CP2102 is recommended, and any other TTL level is 3.3V of USB to UART bridge tool that also does), this method is simple to operate (RX automatically enters BOOT mode, XR400 can only use this method);
- Using FPV flight control to UART, this method to configure the flight control, so the operation is more complex (RX manual lym into BOOT mode).
Ways to upgrade the XR receiver firmware using the USB to UART bridge tool:
- Please have the USB to UART bridge tool (CP2102) ready before upgrading and the driver is already installed;
- Turn off the radio to prevent the XR receiver from receiving a signal (Note: If the receiver receives a signal, it will not enter BOOT mode);
- Press the diagram to connect the USB to UART bridge tool and the XR receive:

- Plug the USB to UART bridge tool into the USB port of the computer;
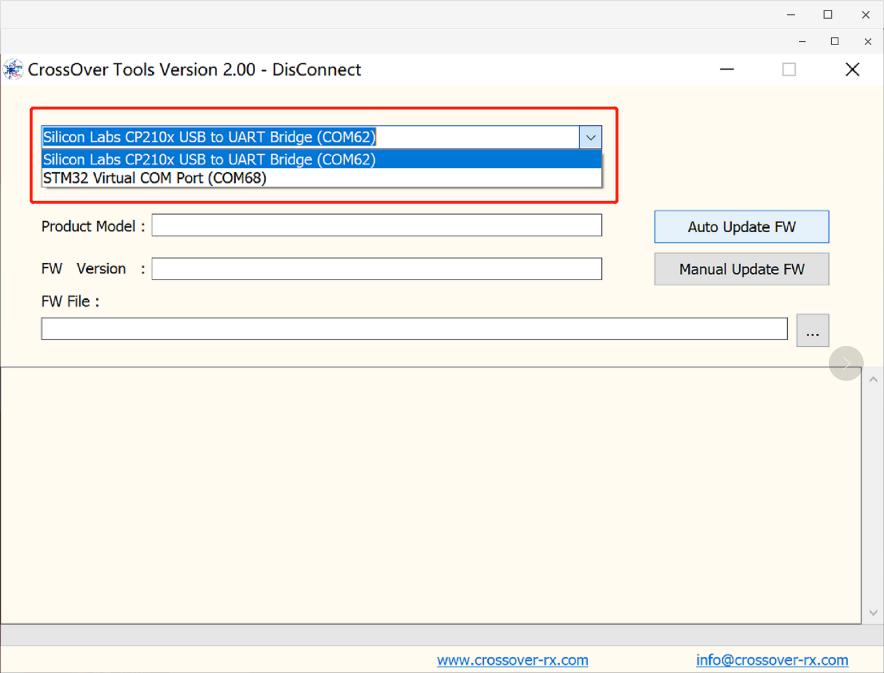
- Start the CROSSOVER Tool V2.00 and select the correct serial port (as shown in the red box below):
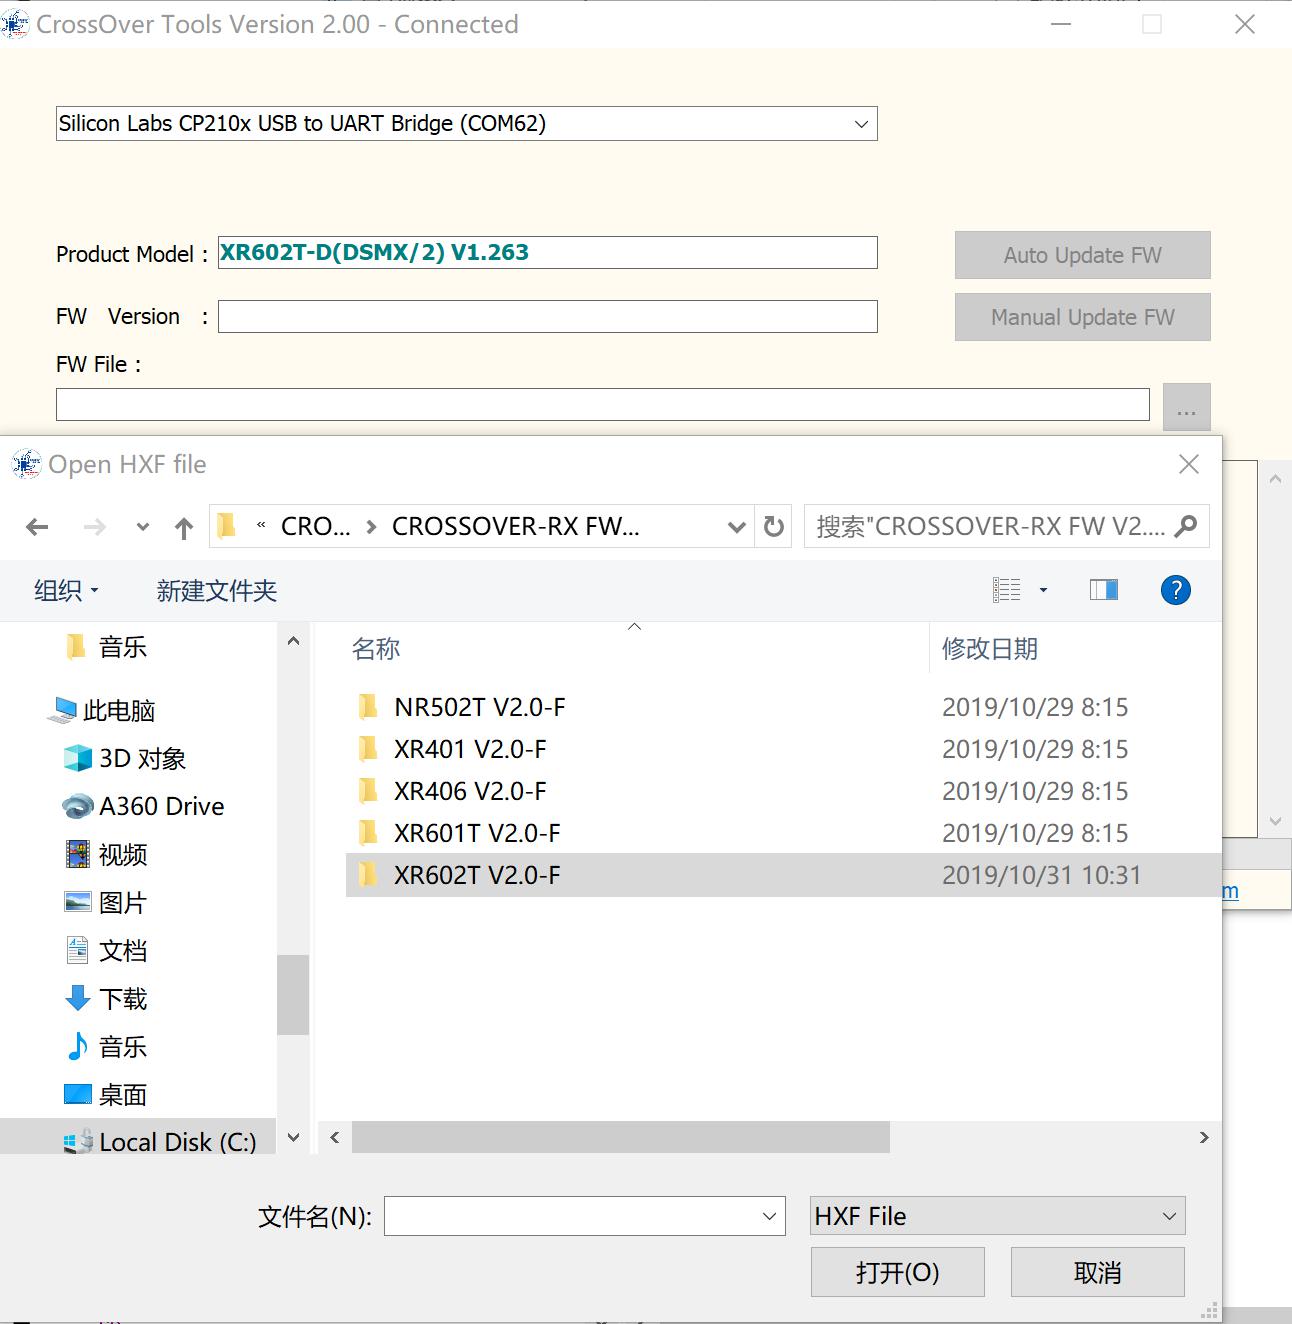
- After clicking “Auto Update FW” on the GUI, the RX version number will appear on the GUI (please check the connection if NOT shows the RX version), and the firmware selection interface will appear (select the path where the firmware is located) as shown in the following image. Choose your receiver family after entering the firmware packages, double-click the firmware corresponding to your receiver after entering (if the firmware does not match your receiver GUI will prompt, point “OK” after reselecting the firmware).(Note: please carefully determine which series your receiver is: XR400,601T or 602T–this is very important, otherwise your receiver will become an useless brick!!!)The GUI will then automatically run the firmware upgrade and receiver will enter normal operation mode after the upgrade is complete.(Note:The LED light will flash if firmware is inconsistent with hardware,then you have to upgrade it again from the start).


Ways to upgrade the XR receiver firmware with the FPV flight control to UART:
- Turn off the radio to prevent the XR receiver from receiving a signal (Note: If the receiver receives a signal, it will not enter firmware upgrade mode);
- Press the diagram to connect the receiver and FPV flight control (choose the flight control board one of the UART interface, two signal lines to be connected and can not use the SBUS interface on the flight control, otherwise the firmware can not be upgraded);
- Connect the flight control to the computer via USB cable (press the BIND switch on receiver before power on, otherwise receiver cannot enter BOOT mode, release the BIND switch after power on— this operation is to manually let RX into BOOT mode), Start BetaFlight and set up the UART interface used above, and then click the Save and Restart button, as shown in the following image:
- After the flight control restart, re-enter the BetaFlight interface and then go to the CLI interface;
- Input the” serialpassthrough 1 57600″ (where ‘1’ is the UART ID; remember, UART 3 is actually ID 2, UART 2 would be 1, and UART 1 would be 0)instruction at “1” in the figure below, and point the “2” below (Note: Do not disconnect the USB and the flight control connection) , as shown in the following image:
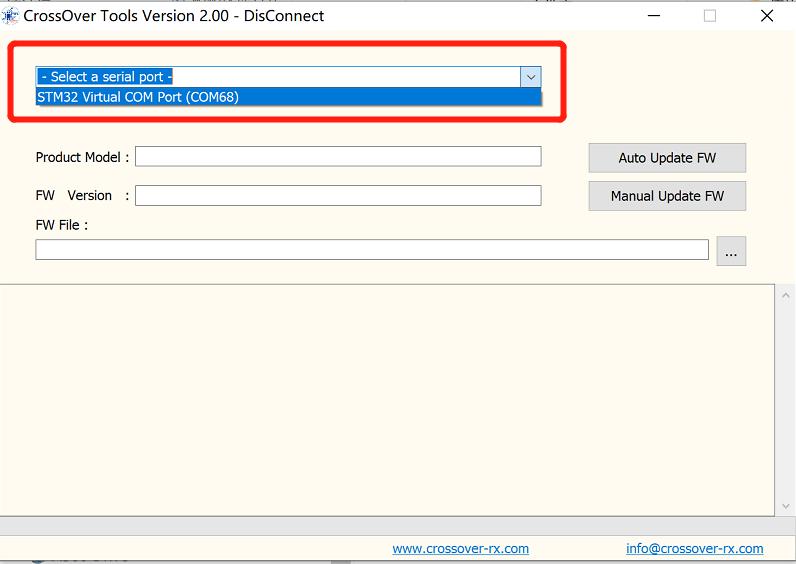
- Start CROSSOVER Tool V2.00 and select the correct serial port;
- Click “Manual Update FW” on the GUI and the firmware selection interface(select the path where the firmware is located) will be shown as follows:Choose your receiver family after entering the firmware packages,double-click the firmware corresponding to your receiver after entering (if the firmware does not match your receiver GUI will prompt, point “OK” after reselecting the firmware),at which point the RX version number is displayed on the GUI (if no RX version number is displayed, please check the connection and flight control settings), as shown in the following image:(Note: please carefully determine which series your receiver is: XR400,601T or 602T–this is very important, otherwise your receiver will become an useless brick!!!) The GUI will then automatically run the firmware upgrade and receiver will enter normal operation mode after the upgrade is complete.(Note: The LED light will flash if firmware is inconsistent with hardware, then you have to upgrade it again from the start)
- Disconnect USB and flight controller;
- Connect on USB and flight control into the Beta Flight, restore the flight control on the relevant settings with the receiver—now XR receiver firmware upgrade completed.


 Choose your receiver family after entering the firmware packages,double-click the firmware corresponding to your receiver after entering (if the firmware does not match your receiver GUI will prompt, point “OK” after reselecting the firmware),at which point the RX version number is displayed on the GUI (if no RX version number is displayed, please check the connection and flight control settings), as shown in the following image:(Note: please carefully determine which series your receiver is: XR400,601T or 602T–this is very important, otherwise your receiver will become an useless brick!!!)
 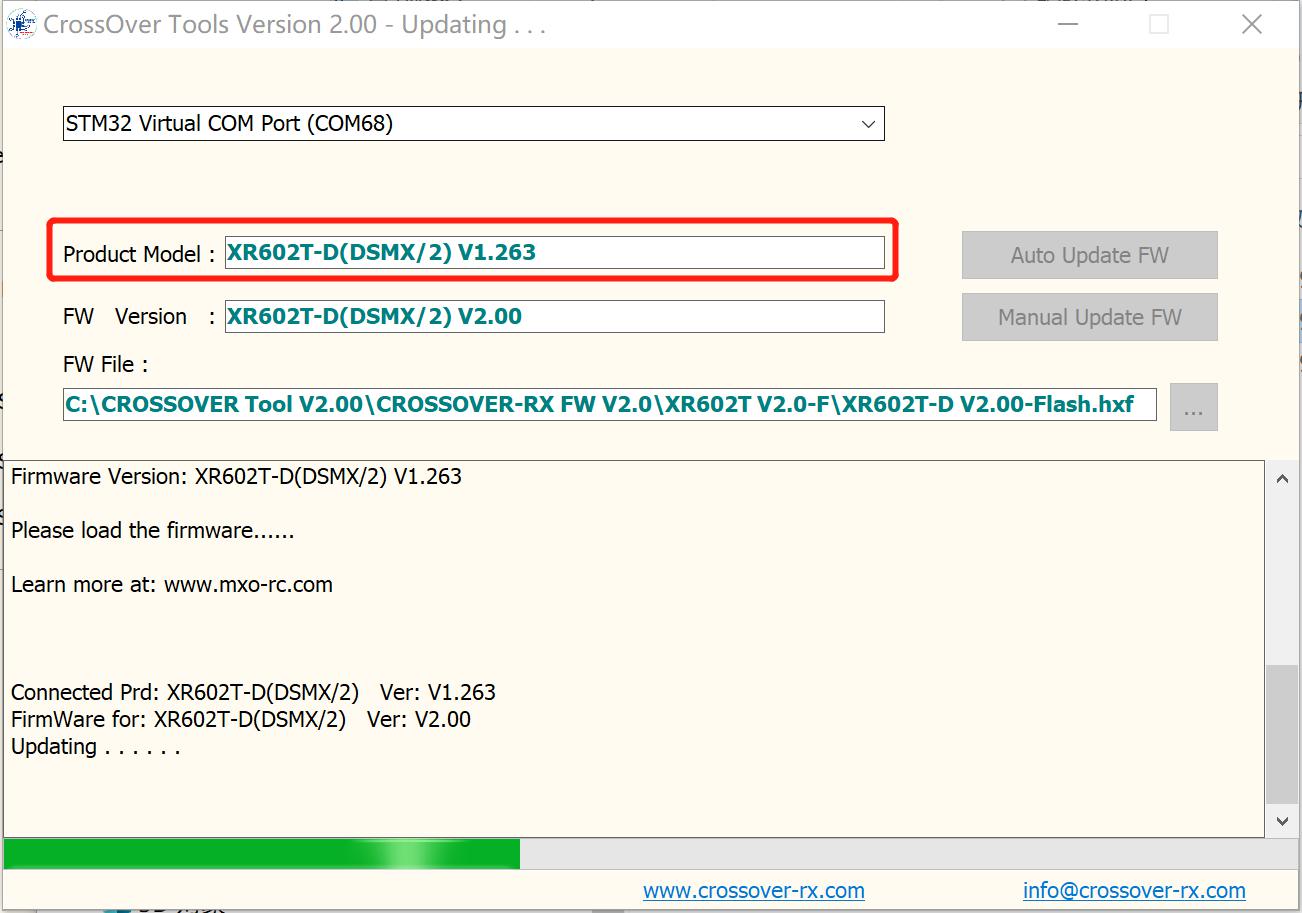 The GUI will then automatically run the firmware upgrade and receiver will enter normal operation mode after the upgrade is complete.(Note: The LED light will flash if firmware is inconsistent with hardware, then you have to upgrade it again from the start)
Upgrading FW of XR Series Receiver V2.0 Instruction Manual – Upgrading FW of XR Series Receiver V2.0 Instruction Manual –
[xyz-ips snippet=”download-snippet”]