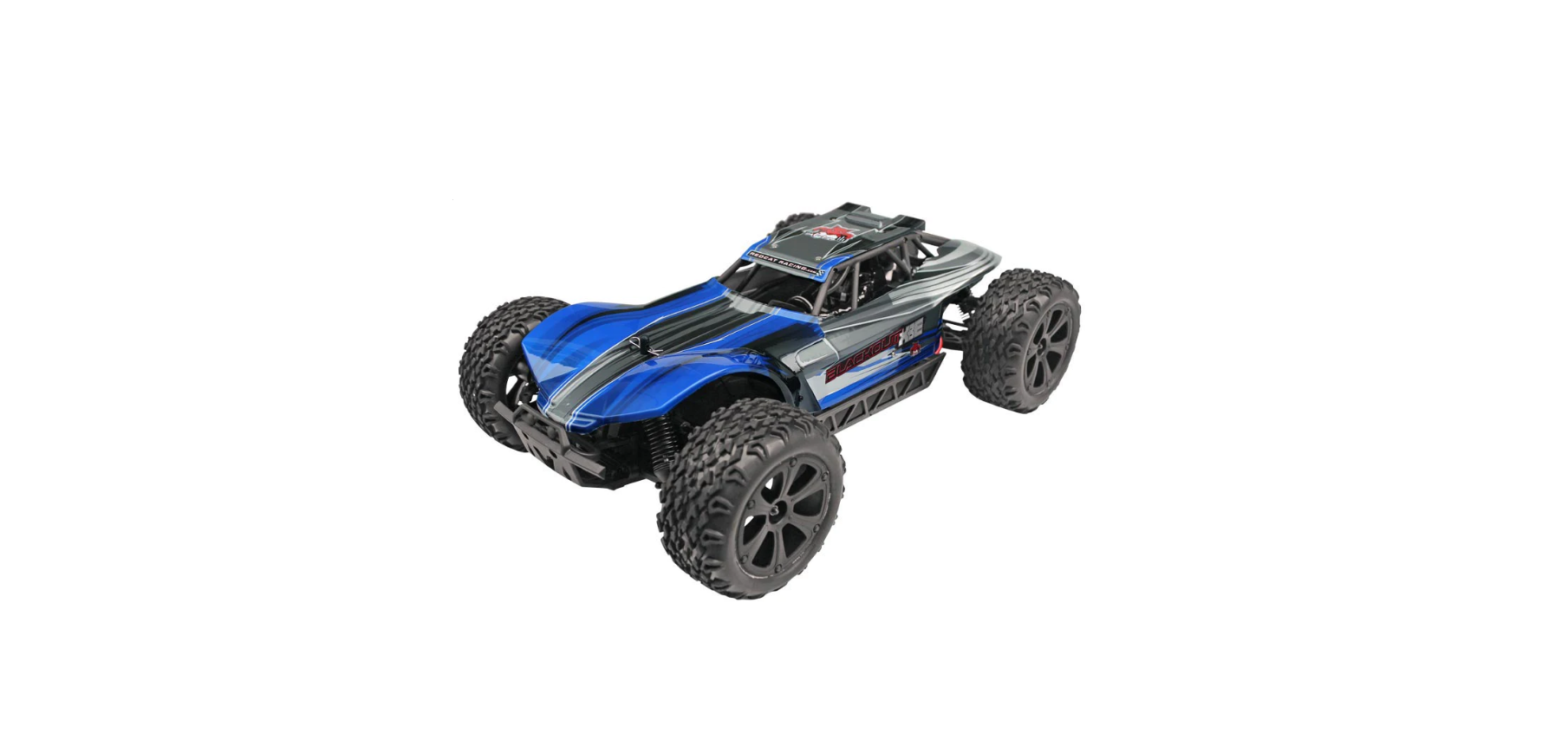
REDCAT Blackout XBE Pro 1/10 Scale Trail Buggy

WARNING!READ ALL INSTRUCTIONS INCLUDED WITH THE VEHICLE BEFORE OPERATING.
AGE WARNING!This radio-controlled (RC) vehicle is not a toy! You must be 14 years of age or older to operate this vehicle. Adult supervision is required.
RISK OF RUNAWAY VEHICLE OR INJURY!Never turn on the vehicle or plug in the battery pack without first having the controller turned on.
RISK OF FIRE!/ RISK OF EXPLOSION!There is a risk of fire and explosion when dealing with batteries. Rechargeable batteries may become hot and catch fire it left unattended or charged to0 quickly. Use extra caution when charging LiPO batteries. Use only LIPO Specific chargers. Use a LiPO sare charging pouch when charging LIPOS. Charge away from flammable materials. Never charge at a rate higher than 10. 2000Mah pack= 2amps charge rate). Overcharging can lead to fire and explosion. Always store battery packs in a cool dry place.
RISK OF BURNS!The batteries, electronic speed controller (ESC), electric motor, and other areas of the vehicle can get hot. Burns can occur if touched after vehicle operation. Allow adequate time to cool before handling.
RISK OF ELECTRICAL SHOCK!Use caution when charging batteries. Do not touch positive and negative leads together. Do not lay the battery on metal. Use only chargers specified for the battery type being charged. Keep batteries and chargers away from water.
RISK OF INJURY!Hobby-grade RC vehicles can cause serious injury or death if not operated correctly. Never use vehicles in crowds. Never chase people or animals. Drive in safe open areas only. Keep body parts away from moving parts.
RISK OF DAMAGE!Never operate RC vehicles on public roads. Damage to vehicles and property can occur. Only operate on open private property. Never charge the battery pack while it is still plugged into the RC vehicle. Always unplug the battery pack from the electronic speed controller (ESC) and remove the battery from the RC vehicle before charging. Failure to do so Will result in damage to the vehicle s electronics.
WARNING!Do not mix old and new batteries. Do not mix alkaline, lithium, standard (carbon-zinc), or rechargeable (nickel-cadmium) batteries. Do not change or charge batteries in a hazardous location.
FCC Compliance Statement
The radio included with your vehicle complies with part 15 of the FCC Rules.
Operation is subject to the following two conditions:
- This device may not cause harmful interference, and
- This device must accept any interference received, including interference that may cause undesired operations.
Note:This equipment has been tested and found to comply with the limits for a Class B digital device, pursuant to Part 15 of the FCC Rules.
These limits are designed to provide reasonable protection against harmful interference in a residential installation. This equipment generates, uses, and can radiate radio frequency energy and, if not installed and used in accordance with the instructions, may cause harmful interference to radio communications. However, there is no guarantee that interference will not occur in a particular installation. If this equipment does cause harmful interference to radio or television reception, which can be determined by turning the equipment off and on, the user is encouraged to try to correct the interference by one of the following measures:
- Reorient or relocate the receiving antenna.
- Increase the separation between the equipment and the receiver.
- Connect the equipment to an outlet on a circuit different from that to which the receiver is connected.
- Consult the dealer or an experienced radio/TV technician for help.
WARNING:
- Any changes or modifications not expressly approved by the party responsible for compliance. This could void the user’s authority to operate this equipment.
- While operating the Radio, a separation distance of at least 20 centimeters must be maintained between the radiating antenna and the body of the user or nearby persons in order to meet the FCC RE exposure guidelines.
FEATURES
- Brushless Electric Motor
- Waterproof Brushless ESC LIPO Ready
- Forward & Reverse
- 4 Wheel Drive
- Oil Filled Shocks
- 7.4v LIPO Battery
- LIPO Battery Charger
- 2.4GHz Radio System
- Waterproof Steering Servo
SPECIFICATIONS
- Scale: 1/10
- Length: 427mm
- Width: 280mm
- Height: 140mm (Without Body)
- Wheelbase: 290mm
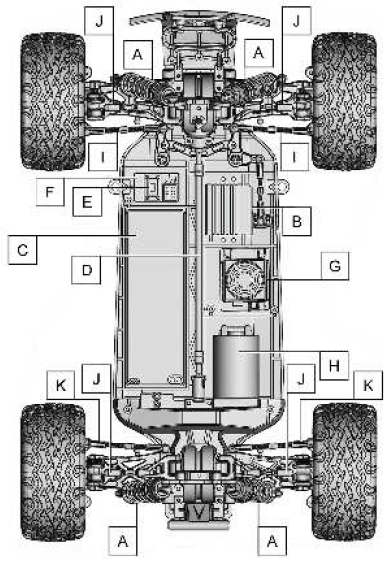
VEHICLE OVERVIEW
- A: Oil Filled Shocks
- B: Steering Servo
- C: Battery
- D: Center Drive Shaft
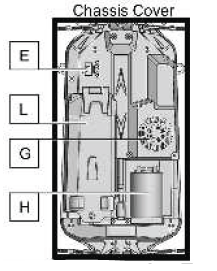
- E: On/Off Switch
- F: 2.4GHz Receiver
- G: ESC
- H: Electric Motor
- I: Steering Linkage
- J: Upper Suspension Link
- K: Rear Toe In/Out Link
- L: Battery Door

HINGED BODY
Accessing the ON/OFF Switch:To access the ON/OFF switch, remove a single body clip (A) found on the hood of the vehicle. The ON/OFF switch (B) is accessible without removing the dust cover.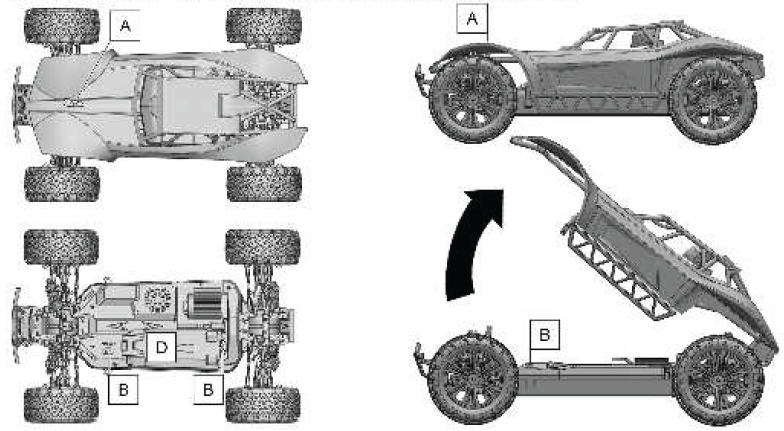
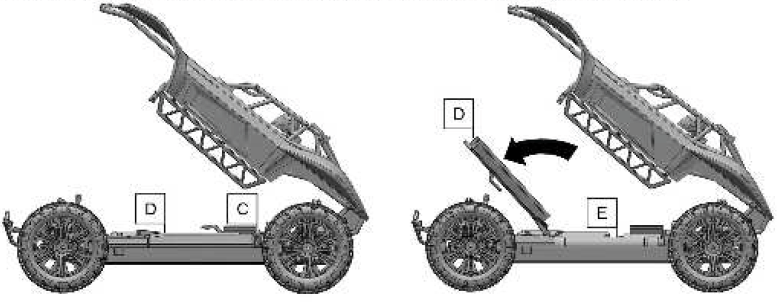
Accessing the Battery:
- Remove the clip (C) at the rear of the battery door (D).
- Raise the rear of the battery cover (D) to swivel it upward, revealing the battery (E).
Chassis Dust Cover:If you would like to access all the electronics and main chassis, removing the dust cover is easy. Just remove the body clips holding it down, it is now ready for removal.
RADIO GUIDE
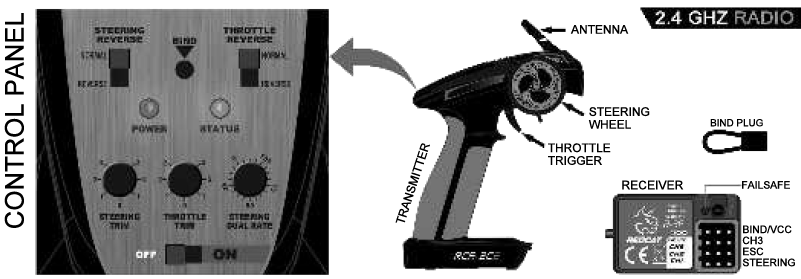
RADIO:
Steering Reverse Switch:Top left switch. Used to change steering orientation. If the car turns right when you steer left, flip this switch.
Throttle Reverse Switch:Top right switch. Used to change throttle trigger orientation. If the car goes in reverse while you pull the throttle trigger, flip this switch.
Power LED:Left LED light. Lights up when the transmitter is turned on.
Status LED:Right LED light. Lights up green when transmitter batteries are full. Flashes when transmitter batteries are low and need replacing.
Bind Button:Used to bind the transmitter to the receiver. See binding instructions.
Steering Trim:Left knob. Used to set the steering neutral point. If the vehicle veers in one direction while the steering wheel is cen- tired, turn this knob in the opposite direction until the car drives straight.
Throttle Trim:Middle knob. Used to set the throttle to the neutral point. If the vehicle moves forward or reverses while the throttle trigger is centered, turn this knob until the vehicle re- mains still. For maximum setting, turn slowly until the vehicle creeps forward, then turn the knob in the opposite direction until the car stops.
Steering Dual Rate:Right knob. Used to limit the amount of steering. 0= little/no steering& 100= maximum steering. Set the knob to the amount of steering you feel comfortable with. If the vehicle has a tendency to spin out, lower the steering rate.
On/Off Switch:Bottom switch. Turns transmitter On and Off.
RECEIVER:
- BIND/VCC: Used when binding to transmit.
- Ch3: Used for 3rd channel when needed.
- Ch2: Used for electronic speed controller ESC).
- Ch1: Used for steering servo.
- Failsafe Button: Used to set failsafe.
BINDINGS:
- Insert the BIND PLUG into the receiver BIND port.
- Make sure your ESC is plugged into CH2, and insert the bind plug into BINDVCC. Now, power the vehicle on, and the receiver light should begin to blink red.
- Press the BIND button in the center of the transmitter’s Control Panel and turn on the radio.
- Release the bind button when you see the green light on the radio flashing. At this point, your receiver’s LED light should pause for approximately 1 second and then blink slowly. Turn off the power to your vehicle, as well as the radio.
- Remove the BIND PLUG from the receiver. Make sure the servos and ESC are attached as described above.
- First, turn your radio on, then your vehicle as normal. Your radio and receiver should be bound together and communicate with each other.
CHARGING BATTERIES
ATTENTION:It is important to read all instructions included before attempting to charge a battery. Follow all instructions and warnings included with your battery and charger when using batteries.
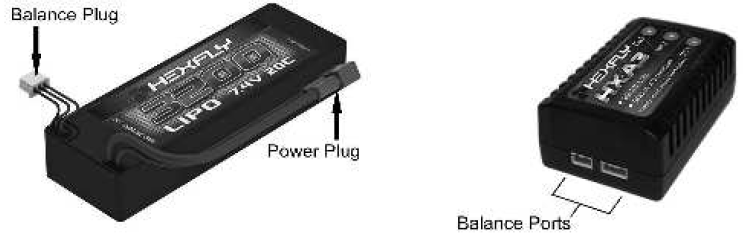
LIPO Balance Plug:This plug MUST be plugged into a LIPO balance charger to charge your LIPO battery. Never attempt to quickly charge LIPO batteries using the power plug.
Power Plug:This plug is used to power the vehicle and gets plugged into the ESC. On a LIPO battery, Make sure to unplug this plug from the ESC BEFORE plugging the Balance Plug into a charger.
Battery Connection Instructions:Make sure battery connectors are fully pushed in when connecting the battery to the vehicle and chargers like Hexfly batteries and chargers in Redcat vehicles.
Recommended Charger Upgrade:HX-403 – LIPO balance charger
Recommended Battery Upgrade:HX-580030C-D Hexfly 580OMAH 7.4V 30C LIPO battery.
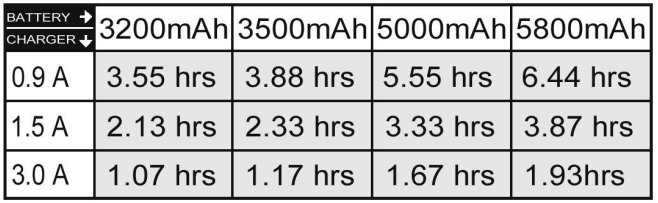
Charge Times:Charge times vary according to charger current and battery mAh. Battery mAh + Charger mA = Approximate charge time Ex. 2000mAh battery +500 mA charger = 4 hours charge time.
To convert milliamps (mA) to amps (A):
- Divide the mA number by 1000.
- ex. 900mA 1000 = 0.9A
WARNING
UNPLUG THE BATTERY PACK FROM THE VEHICLE!BEFORE CHARGING YOUR BATTERY PACK, YOU MUST FIRST UNPLUG IT FROM THE ESC. FAILURE TO UNPLUG THE BATTERY FROM THE VEHICLE’S ESC BEFORE CHARGING MAY PERMANENTLY DAMAGE SOME OR ALL ELECTRONICS IN THE VEHICLE.
NEVER LEAVE BATTERY PACKS UNATTENDED WHILE CHARGING!Leaving a battery unattended while charging may result in fire and damage/ injury.
NEVER ALLOW A BATTERY PACK TO GET HOT!It’s normal for the battery pack to get warm, but it should never get hot! Monitor batteries during charging and unplug to let cool if the battery gets hot.
WHEN CHARGING LIPOs, A LIPO SAFE CHARGING BAG SHOULD BE USED TO HELP PREVENT FIRES.
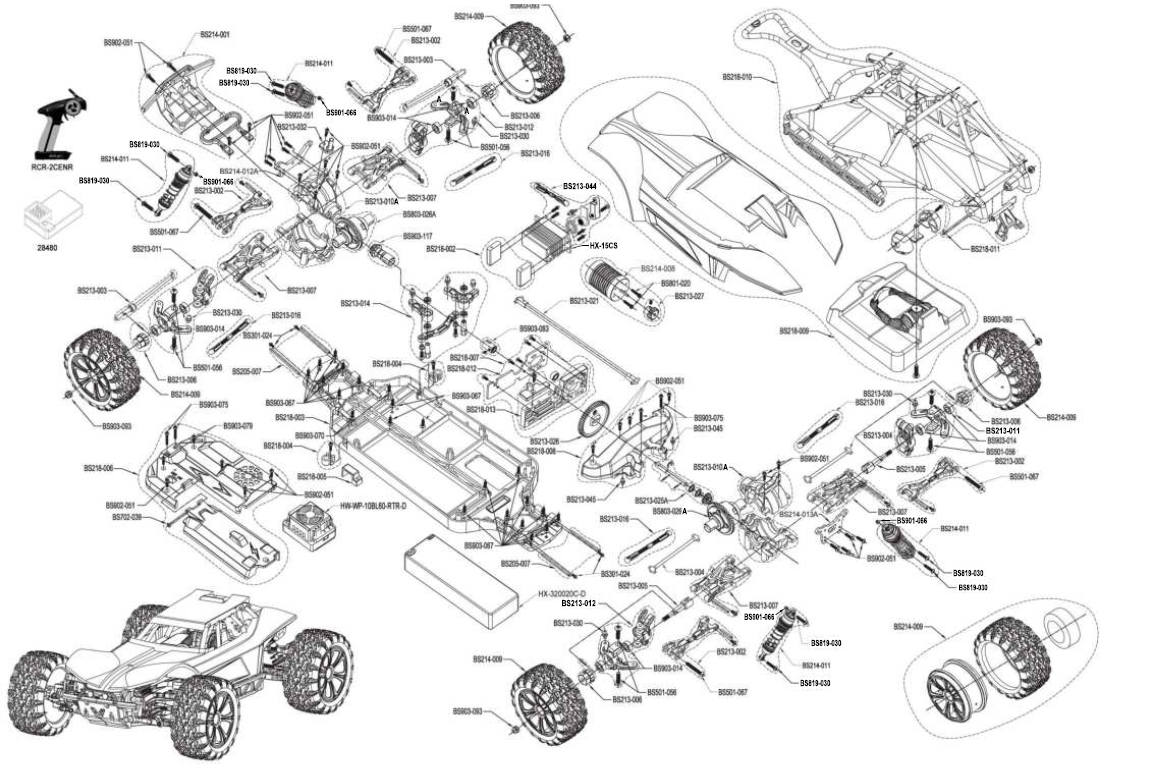
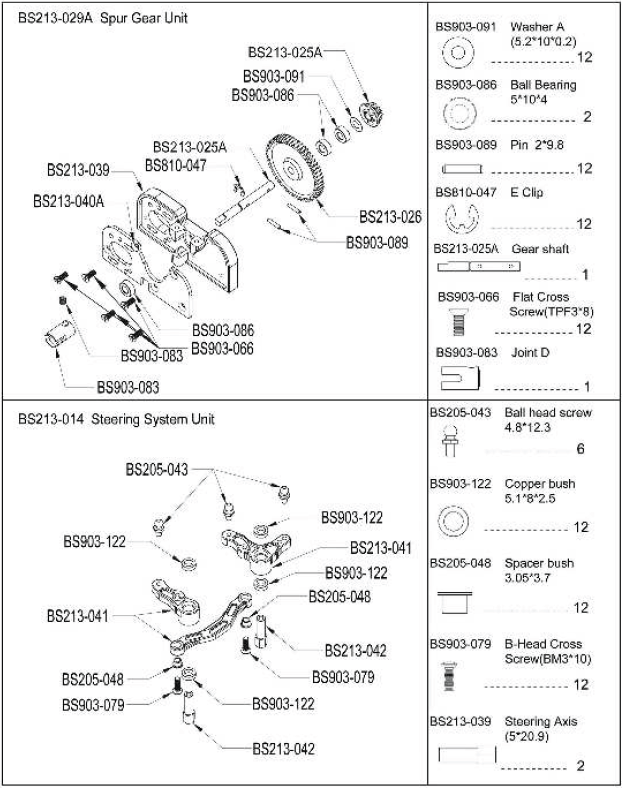
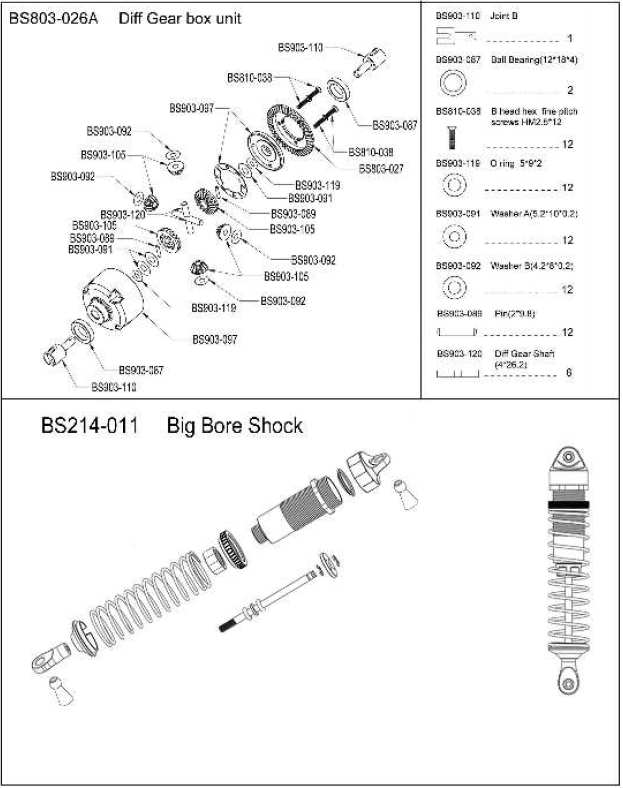
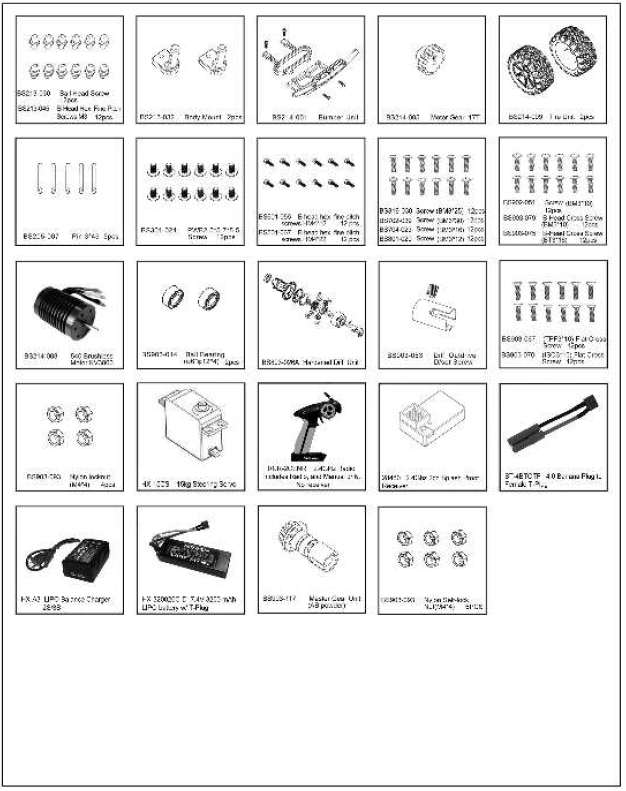
PARTS IDENTIFICATION

Follow us on social mediaTake a photo, create a video, post, and share your Redcat experience Stay up to date on the latest Redcat news, products, and creative content. while these profiles are not Customer service channels, you might find that one of our subject experts or another member of the community is able to assist you. If you have an issue or need technical and or product support, please reach out to Redcat directly through our website.
IMPORTANT LINKS:Link to the most recent version of this manual with exploded views and parts lists: www.redcatracing.com/pages/manuals.
Lin TO electric vehicles manual:www.redcatracing.com/manuals/ELECTRIC-MANUALPdf.
References
twitter.com/RedcatRacing
Redcat Racing – YouTube
Redcat Vehicle Manuals – Redcat Racing Close Search Search shopping-cart angle-down angle-down Search angle-down angle-down angle-down angle-down angle-down Facebook YouTube Instagram Twitter LinkedIn Pinterest Amazon American Express Apple Pay Mastercar
Facebook
Redcat Racing Close Search Search shopping-cart angle-down angle-down Search angle-down angle-down angle-down angle-down angle-down Facebook YouTube Instagram Twitter LinkedIn Pinterest Amazon American Express Apple Pay Mastercard PayPal Venmo Visa
[xyz-ips snippet=”download-snippet”]