
MAN-LANDSLIDEXTE-2020-12-10
![]()

![]()
IMPORTANT LINKS:
Link to the most recent version of this manual with exploded views and parts lists: https://www.redcatracing.com/pages/manualsLink to electric vehicles manual: www.redcatracing.com/manuals/ELECTRIC-MANUALpdf
FEATURES & SPECIFICATIONS
|
|
Warning: Exceeding the maximum battery voltage may cause damage to the motor and electronic components of this vehicle and will void the vehicle warranty.
VEHICLE OVERVIEW
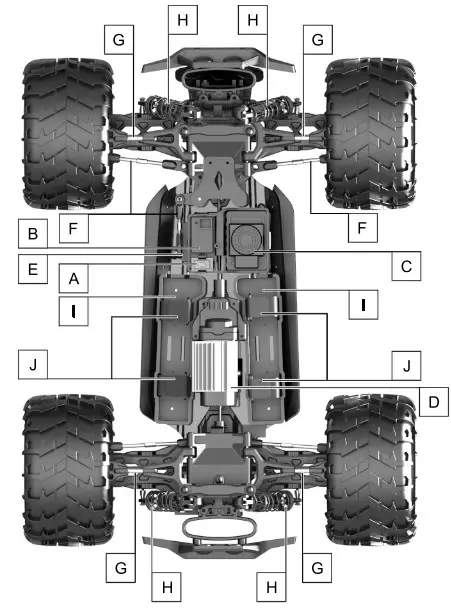
| A: On/Off Switch | F: Steering Linkage |
| B: 2.4GHz Receiver | G: Upper Suspension Link |
| C: ESC | H: Oil Filled Shocks |
| D: Electric Motor | I: Battery Boxes |
| E: Steering Servo | J: Battery Straps |
RADIO GUIDE
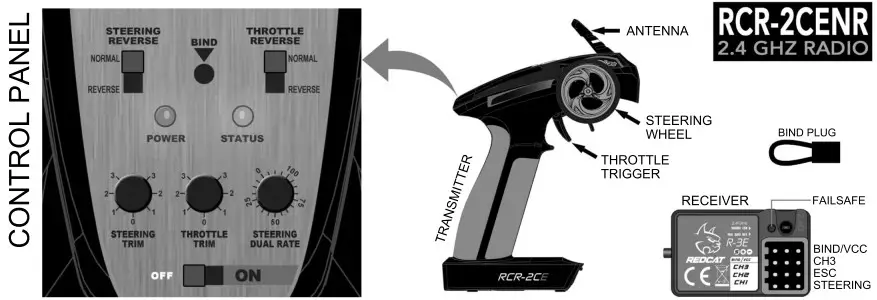
RADIO:Steering Reverse Switch: Top left switch. Used to change steering orientation. If the car turns right when you steer left, flip this switch.
Throttle Reverse Switch: Top right switch. Used to change throttle trigger orientation. If the car goes in reverse while you pull the throttle trigger, flip this switch,
Power LED: Left LED light. Lights up when the transmitter is turned on.
Status LED: Right LED light. Lights up green when transmitter batteries are full. Flashes when transmitter batteries are low and need replacing.
Bind Button: Used to bind the transmitter to the receiver. See binding instructions.Steering Trim: Left knob. Used to set the steering neutral point. If the vehicle veers in one direction while the steering whee! is centered, turn this knob in the opposite direction until the car drives straight.
Throttle Trim: Middle knob. Used to set the throtile neutral point. if the vehicle moves forward or reverse while the throttle trigger is centered, turn this knob until the vehicle remains still. For maximum setting, turn siowly until the vehicle creeps forward. then turn the knob the opposite direction until the car stops.
Steering Dual Rate: Right knob. Used to limit the amount of steering. O= little/no steering & 100= maximum steering. Set the knob to the amount of steering you feel comfortable with. If the vehicle has a tendency to spin out, lower the steering rate.
On/Off Switch: Bottom switch. Turns transmitter On and Off.
RECEIVER:BIND/VCC: Used when binding to transmitter.Ch3: Used for 3rd channel when needed.Ch2: Used for electronic speed controller (ESC).Ch1: Used for steering servo.Failsafe Button: Used to set failsafe.
BINDING:
- Insert the BIND PLUG into the receiver BIND port.
- Make sure your ESC is plugged into CH2, and insert the bind plug into BIND/VCC. Now, power the vehicle on and the receiver light should begin to blink red.
- Press the BIND button in the center of the transmitter’s Control Panel and turn on radio.
- Release the bind button when you see the green light on the radio flashing. At this point, your receiver’s LED should now be solid red. Turn off the power to your vehicle, as well as the radio.
- Remove the BIND PLUG from the receiver.Make sure the servos and ESC are attached as described above.
- First turn your radio on, then your vehicle as normal. Your radio and receiver should be bound together and communicating with each other.
CHARGING BATTERIES
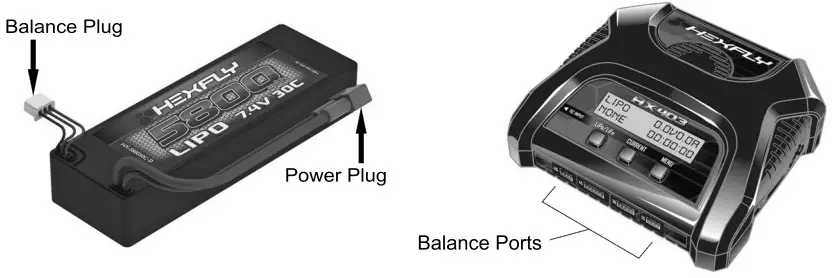
Batteries and charger not included
ATTENTION:It is important to read all instructions included with your battery and charger before attempting to charge a battery. Follow all instructions and warnings included with your battery and charger when using batteries.
LIPO Balance Plug: This plug MUST be plugged into a LIPO balance charger to charge your LIPO battery. Never attempt to quick charge LIPO bailleries using Lhe power plug.
Power Plug: This plug is used to power the vehicle and gets piugged into the ESC. Ona LIPO battery, Make sure to unplug this plugfrom the ESC BEFORE plugging the Balance Plug into a charger.
Battery Connection Instructions:Make sure battery connectors are fully pushed in when connecting the battery to the vehicle.
ATTENTION:We recommend you only use quality batteries and chargers like Hexfly batteries and chargers in Redcat vehicles.
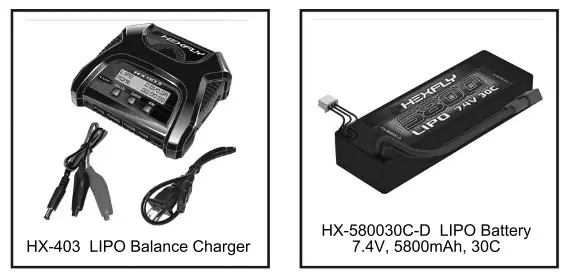
Recommended Charger:HX-403 – LIPO balance charger
Recommended Batteries:HX-580030C-D – Hexfly 5800MAH 7.4V 30CLIPO battery.
Charge Times:Charge times vary according to charger current and battery mAh. Battery mAh + Charger mA = Approximate charge time Ex. 2000mAh battery + 500 mA charger = ~4 hours charge time.
To convert milliamps (mA) to amps (A): Divide the mA number by 1000. ex. 900mA + 1000 = 0.9A
 |
3200mAh | 3500mAh | 5000mAh | 5800mAh |
| 0.9 A | 3.55 hrs | 3.88 hrs | 5.55 hrs | 6.44 hrs |
| 1.5 A | 2.13 hrs | 2.33 hrs | 3.33 hrs | 3.87 hrs |
| 3.0 A | 1.07 hrs | 1.17 hrs | 1.67 hrs | 1.93hrs |

UNPLUG THE BATTERY PACK FROM THE VEHICLE!BEFORE CHARGING YOUR BATTERY PACK, YOU MUST FIRST UNPLUG IT FROM THE ESC. FAILURE TO UNPLUG THE BATTERY FROM THE VEHICLE’S ESC BEFORE CHARGING MAY PERMANENTLY OAMAGE SOME OR ALL ELECTRONICS IN THE VEHICLE.
NEVER LEAVE BATTERY PACKS UNATTENDED WHILE CHARGING! Leaving a battery unattended while charging may result in fire and damage / injury.
NEVER ALLOW A BATTERY PACK TO GET HOT! It’s normal for the battery pack to get warm. but it should never get hot! Monitor batteries during charging and unplug to let cool if the battery gets hof.
WHEN CHARGING LIPOs, A LIPO SAFE CHARGING BAG SHOULD BE USED TO HELP PREVENT FIRES.
EXPLODED VIEW
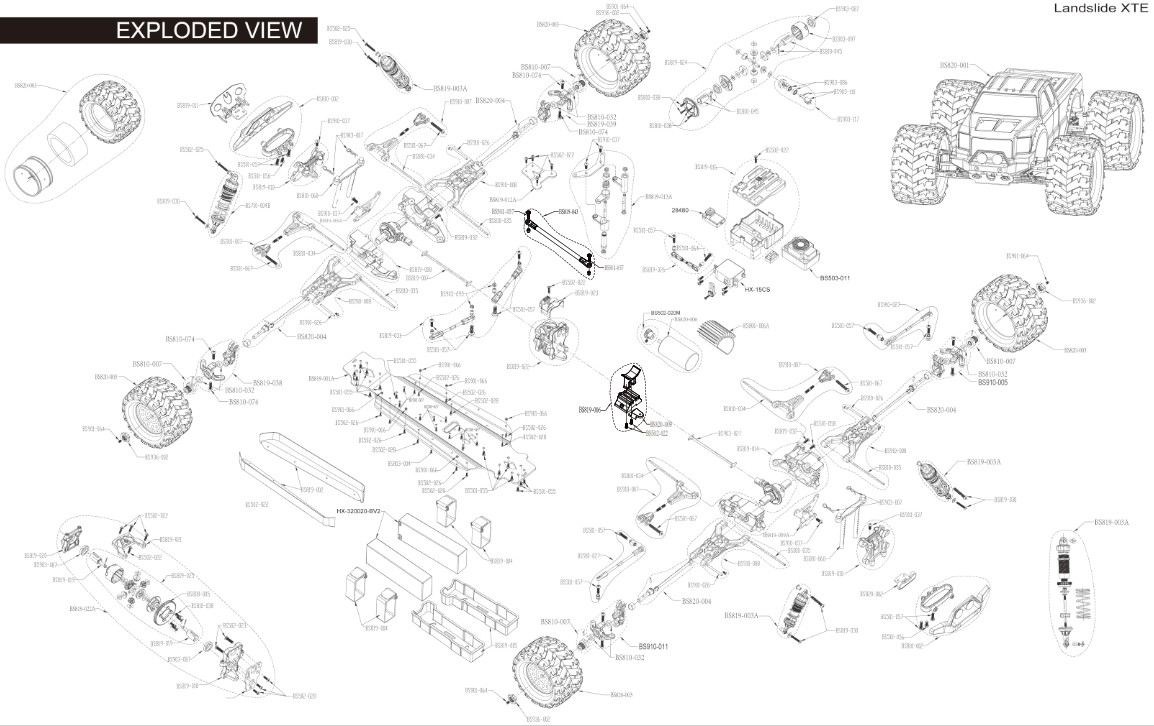
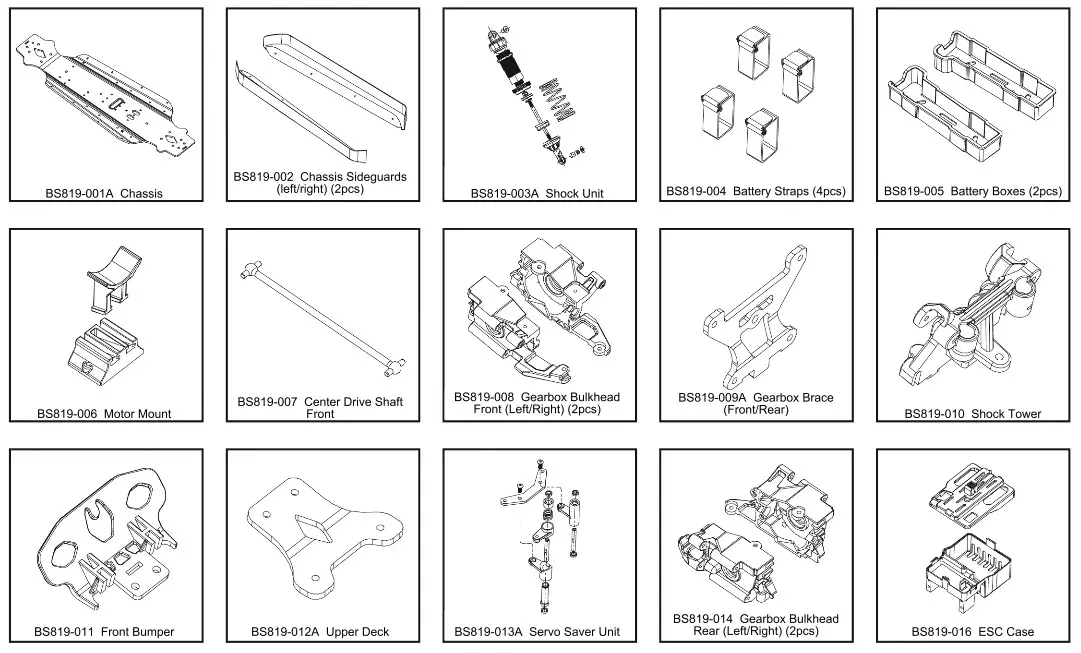
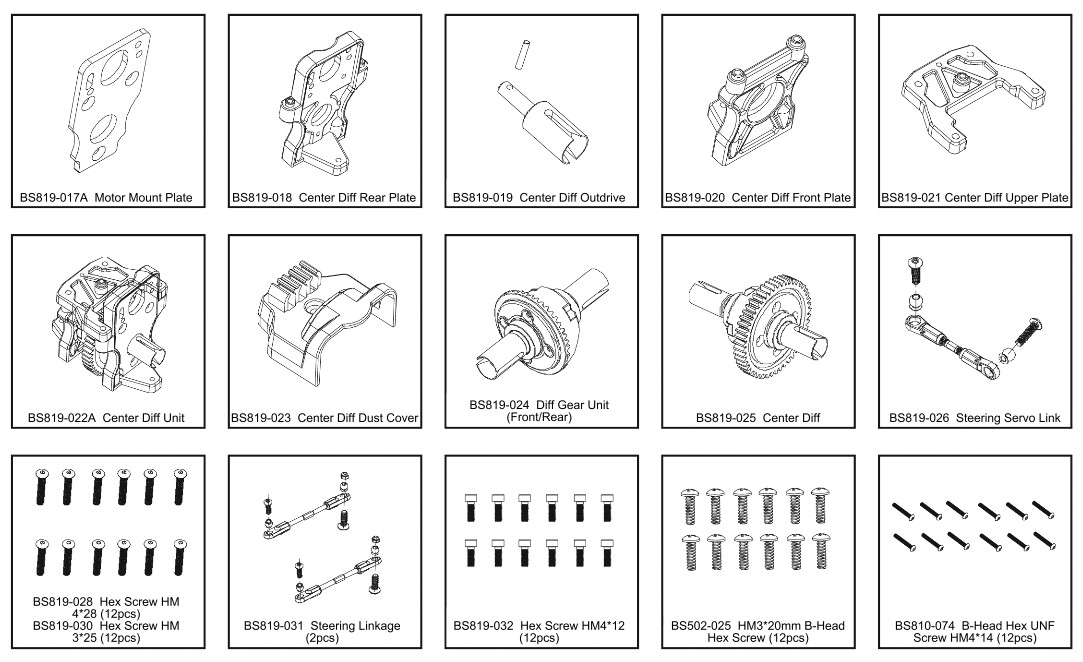
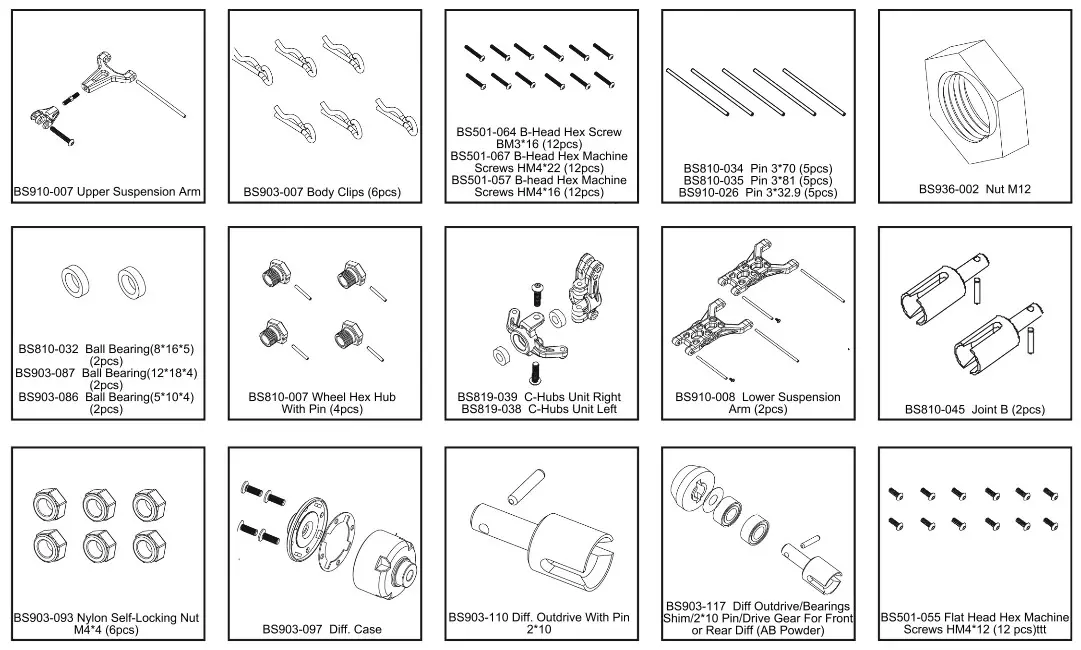
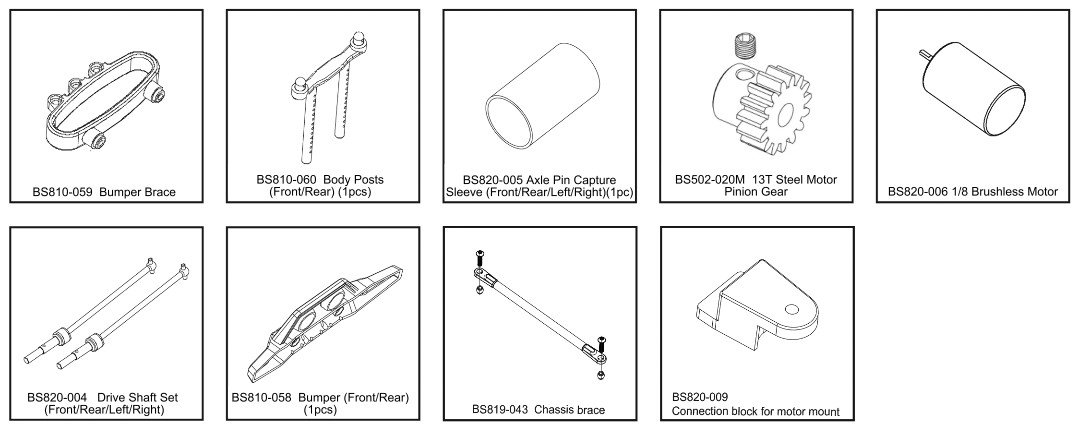
PARTS IDENTIFICATION

PERFORMANCE UPGRADES
![]()
www.REDCATRACING.comFollow us on social mediaTake a photo, create a video, post and share your Redcat experience
Stay up to date on the latest Redcat news, products, and creative content. While these profiles are not customer service channels, you might find that one of our subject experts or another member of the community is able to assist you. If you have an issue or need technical and or product support, please reach out to Redcat directly through our website.
![]() https://wwwfacebook.com/RedcatRacing
https://wwwfacebook.com/RedcatRacing![]() https://www.instagram.com/RedcatRacing
https://www.instagram.com/RedcatRacing![]() https://wwwyoutube.com/RedcatRacing
https://wwwyoutube.com/RedcatRacing![]() https://www-twitter.com/RedcatRacing
https://www-twitter.com/RedcatRacing![]() https://www.pintrest.com/RedcatRacing
https://www.pintrest.com/RedcatRacing
IMPORTANT LINKS:Link to the most recent version of this manual with exploded views and parts lists: www.redcatracing.com/pages/manualsLink to electric vehicles manual: www.redcatracing.com/manuals/ELECTRIC-MANUAL.pdf
[xyz-ips snippet=”download-snippet”]