
Planar 1 Plus
WORLD CLASS HI-FI MADE IN ENGLAND
For user instructions in your language, please visit www. rega.co.uk and go to the download section of your chosen product page.
PLANAR 1 PLUS

SETTING UP YOUR PLANAR 1 PLUS
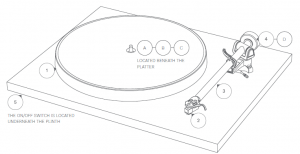
Carefully unpack the turntable, always keeping it upright.
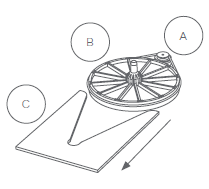
- Check the belt is fitted around the drive pulley (A) and sub-platter (B).
- Remove the packing card (C) from beneath the sub-platter (B) and fit the platter (1) and mat.
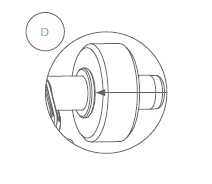
- Push the balance weight (4) fully onto the rear of the tonearm (3) until it reaches the stop point as shown (D).
- Connect the phono output to an appropriate line level input (see page 2).
- Connect the power supply to the rear of the turntable (see page 2).
- Carefully remove the stylus guard from the cartridge (2).
- Turn on the Planar 1 Plus via the on/off switch located on the underside of the plinth (5).
- Change the speed by moving the drive belt from the 331/3 and 45 steps of the pulley (A).
- The RB110 tonearm (3) is preset for bias adjustment, no other set-up is required.
BUILT-IN PHONO STAGE
The built-in phono stage is a high specification pre-amplifier. It is designed to amplify the signal from a moving magnet cartridge to a suitable level for all line level inputs of an appropriate system or audio amplifier. This allows simple connection to a wide variety of products using either the standard twin phono to phono lead (supplied) or phono to 3.5 mm plug (not supplied).Note: A 3.5 mm to phono lead must only be plugged into an appropriate input. DO NOT CONNECT TO A
HEADPHONE OUTPUT SOCKET
(as found on a mobile device or similar), as this could damage both the device and player.
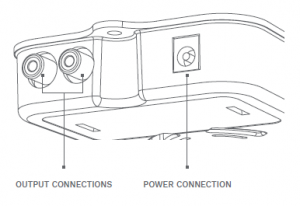
OUTPUT CONNECTIONS
Connect the output sockets of the built-in phono stage to a suitable `line level’ input on your amplifier using the appropriate phono leads.
IMPORTANT: Many amplifiers have a built-in phono stage. Never connect the P1 Plus to an integrated phono stage. These are usually marked `Phono’ or `Disk’ input.IMPORTANT: Please turn down the volume on the amplifier before switching the unit on or off.
POWER CONNECTION
Plug in the Rega PS1 350 mA power supply in to the wall socket. Set-up is now complete. Simply switch on, sit back and enjoy!
WARNING
Only use the supplied mains adaptors with this product.
SERVICE
With the unit disconnected from the mains, only clean with a micro fibre cloth (lightly damp if necessary). Do not remove any coverings; there are no user serviceable parts inside. If the unit performs erratically or emits smoke or odour, disconnect from the power supply and take it to a qualified service technician.
WARRANTY
All Rega products are covered by a lifetime warranty against manufacture defects. This warranty does not cover wear and tear. Any unauthorised modifications or failure to follow the Rega recommended guidelines may invalidate the warranty. If returning goods for inspection to your retailer, the original packaging must be used to preserve the warranty. Damage caused during transport due to incorrect packaging may invalidate your warranty. Replacement packaging is available from any Rega retailer. Your statutory rights are not affected.
Note: Some amplifiers and all in one systems offer adjustable gain settings. If this option is available, we recommend that the connection used for the turntable is set to the lowest gain setting to avoid any unnecessary background noise.Note: When switching the P1 Plus on or off, a noise may be heard through the speakers. This is the phono stage powering up momentarily after the turntable. This is perfectly normal.
POSITIONING
As with any turntable, take care when positioning. Always place it on a firm level surface. Never place the turntable on the same surface as desktop or bookshelf loudspeakers as the energy created by the loudspeakers can distort the music and affect performance. To optimise performance, the turntable should be mounted on a hi-fi rack or the dedicated Rega wallbracket.
PS1 (USA) – INPUT OUTPUT NPUT 115 V AC 60 Hz OUTPUT 24 V AC 350 mA AC
This symbol indicates that the electronic equipment bearing it should not be disposed of as general household waste at the end of its life. The equipment should be disposed of at a collection point for waste electrical and electronic equipment in accordance with national legislation and Directive 2012/19/EU. For more information about how to dispose of your waste electronic equipment, please contact your local authority or retailer where you purchased the product. In the UK, please return your product to the retailer.
SAFETY INSTRUCTIONS
Do not use this unit near liquids or expose to moisture. Do not use near sources of heat such as radiators, vents, stoves, or candles. Ensure adequate ventilation around the product, at least 10 cm in all directions, and avoid placing the unit on soft surfaces such as long carpet and fabric. Do not open the product enclosure or force objects into openings in the unit. Place the unit on a fixed level surface where it will not fall or tip. The unit should only be used in moderate climates between 5 °C (41 °F) and 35 °C (95 °F). Keep packaging material and small pieces out of reach of children. Use only with a Rega PS1 350 mA power supply. Unplug the power supply if the unit is unused for extended periods of time.
www.rega.co.uk
MADE IN ENGLAND
PLANAR 1 PLUS USER GUIDE v4www.rega.co.uk MADE IN ENGLAND
References
[xyz-ips snippet=”download-snippet”]