RehabMartMODEL# 9720010
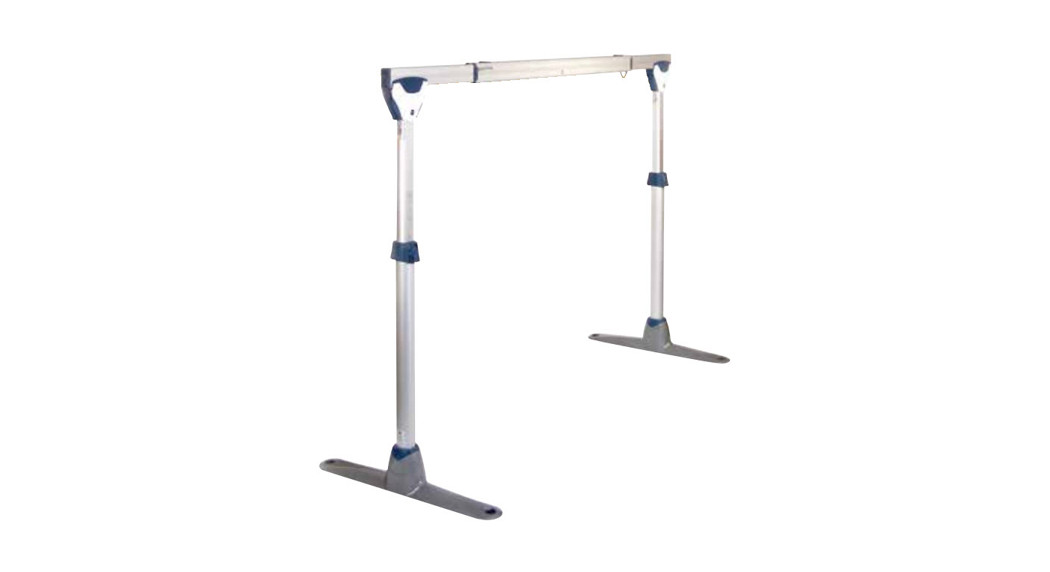
AASSSSEEMMBBLLYY IINNSSTTRRUUCCTTIIOONNSSEASYTRACK FS
©BHM MEDICAL INC 2004 All rights reservedWARNING! CONFIDENTIAL. Any reproduction of this document or the transmittal in any form of any information contained herein, without the written permission of an officer of the manufacturer is prohibited.TECHNICAL SPECIFICATIONS AND DESIGN ARE SUBJECT TO CHANGE WITHOUT NOTICE.
SAFETY INSTRUCTIONS AND WARNINGS
Symbols
| WARNING! Notices apply to hazardous or unsafe practices, which could result in serious bodily harm. | |
| CAUTION! Notices apply to hazardous or unsafe practices, which could result in minor personal injury or property damage. | |
| Highlights procedures that will assist the operator in understanding the information contained in this manual. |
![]() WARNING!
WARNING!
Please read and understand these installation procedures entirely before assembling the Easytrack FS. Information in this manual is important to the proper operation of this equipment. It will help protect you from possible injury and ensure that the equipment will perform to your satisfaction.
![]() ALWAYS KEEP THESE INSTRUCTIONS with the Easytrack FS .
ALWAYS KEEP THESE INSTRUCTIONS with the Easytrack FS .
![]() FAILURE TO MEET THE REQUIREMENTS LISTED BELOW COULD RESULT IN SERIOUS BODILY HARM.
FAILURE TO MEET THE REQUIREMENTS LISTED BELOW COULD RESULT IN SERIOUS BODILY HARM.
- Maintenance MUST be performed ONLY by qualified personnel. This equipment should never be used by a patient on their own.
- The Easytrack FS System and its accessories are intended to be used as an assistive device for transferring a person between the posts.
- The Easytrack FS is only to be used with BHM portable lifts .
- Ensure floor is clear of any dust, grease, water or any foreign substances prior to the transferring of a patient.
- If you are unsure of the strength or stability of your floor, do not assemble the equipment.
- The floor must be level. Do not install on a sloped floor.
- Ensure posts are straight prior to use with a patient.
- Do not drop the product, it may cause breakage.
- Do not submerge in water.
- Do not attempt to over-extend the rail past the locking point.
- Protect the Easytrack FS and its accessories during transport.
- Prior to each use of the equipment, complete a visual inspection.
- A monthly maintenance inspection must be done in order to assure the good operating condition of the Easytrack FS
When the Easytrack FS is in use
- Do not bump the posts This might cause the unit to become unstable. If posts are bumped, reassemble the Easytrack FS system to ensure the posts are straight.
- If you use a power wheelchair use extreme care bumping posts may cause the unit to become unstable. If posts are bumped, reinstall the Easytrack FS system to ensure the posts are straight.
- Do not lean against posts.
- Do not use the Easytrack FS system as a swing.
- Do not allow the patient to swing in any direction while being lifted.
SPECIFICATIONS
MAX. CAPACITY: 200 kg (440 lbs)
What s included?
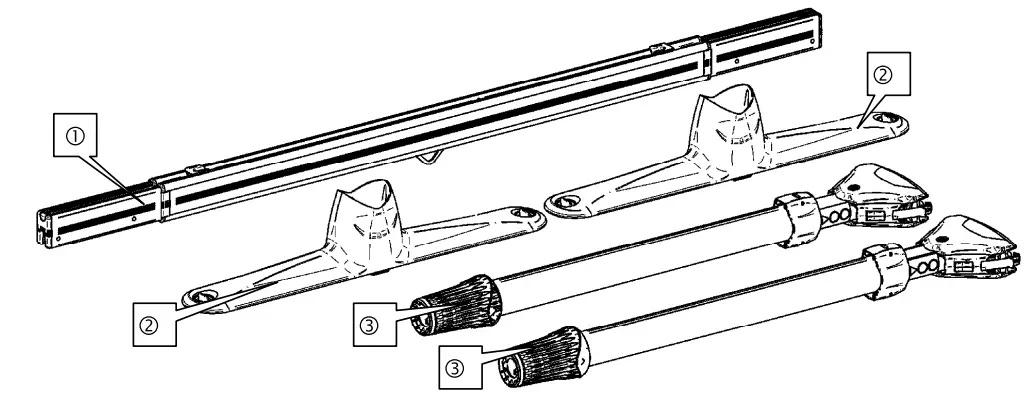
| Legend | Parts # |
| 1. Easytrack FS extendable rail with trolley 1 piece | 700.17250 |
| 2. Easytrack FS base 2 pieces | 700.17100 |
| 3. Easytrack FS post – 2 pieces | 700.17000 |
PRIOR TO THE INSTALLATION
![]() WARNING: Read the section Safety instructions and warnings” before attempting to assemble the Easytrack FS system.
WARNING: Read the section Safety instructions and warnings” before attempting to assemble the Easytrack FS system.
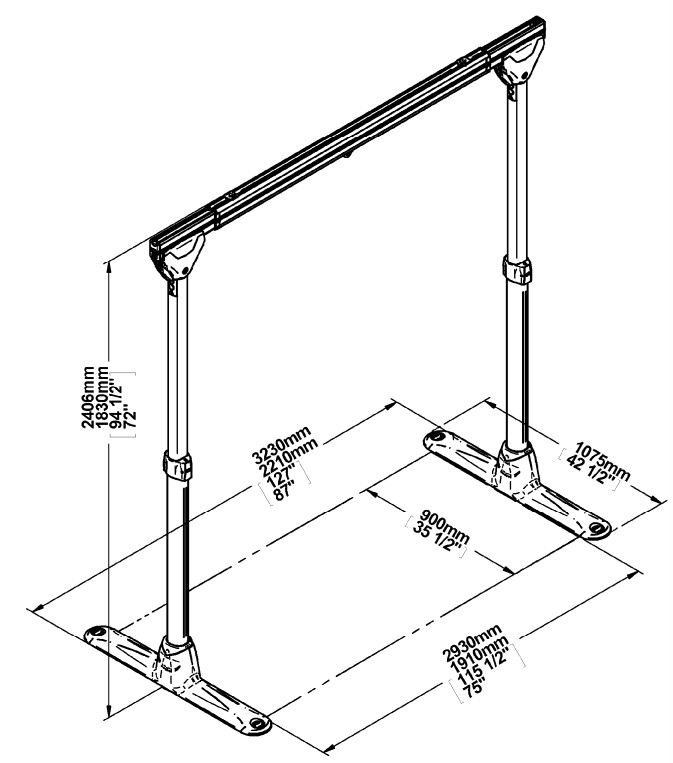
- Survey the room, where you plan to install the Easytrack FS system.
- Make sure the room meets the requirements specified below.
- Use the measurements below to determine the best place to put the Easytrack FS system :
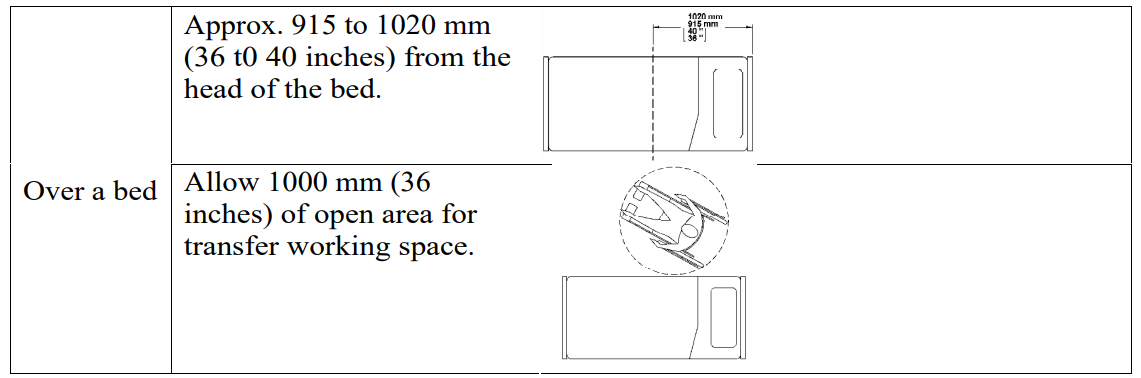
![]() The transfer should only take place between the Easytrack FS posts.
The transfer should only take place between the Easytrack FS posts.
![]()
Step 1. Post to Base Assembly
Note: The assembly can be performed by one person
- Remove all parts from the boxes. Before assembling make sure that all parts are present and in good condition.
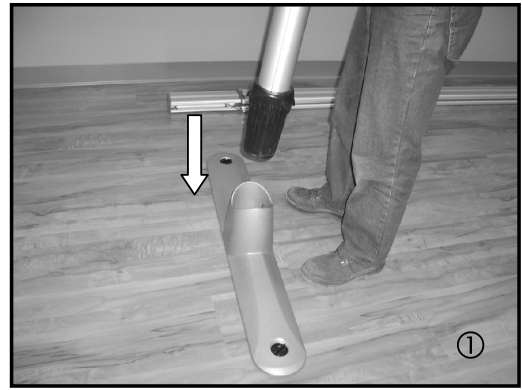
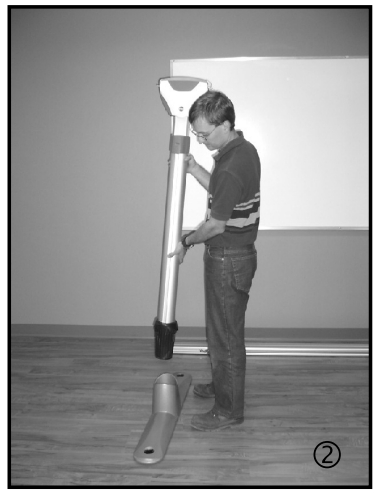
- Layout the bases on a level and clean floor at the desired distance.
- Insert the posts in the bases. The design of the base will ensure the post lines up in the correct position.
![]() Make sure posts are correctly inserted in both bases.
Make sure posts are correctly inserted in both bases.
Step 2. Installation of the rail
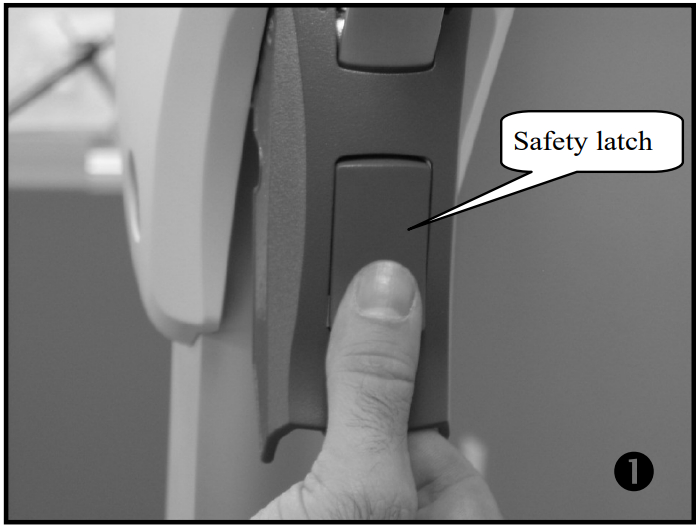
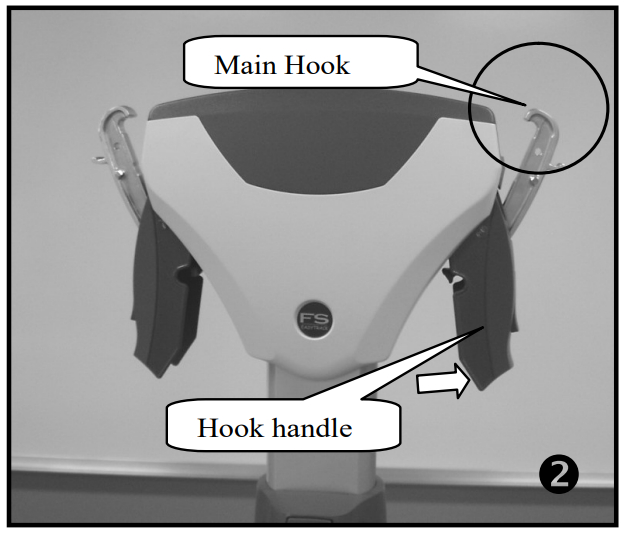
- Prior to the installation of the rail, unlock the hook handle by pressing on the safety latch and pulling outward (located on the blue-colored component on the side of the post head).
- Gently pull out the handle until the red stripe of the main rail hook mechanism is visible.

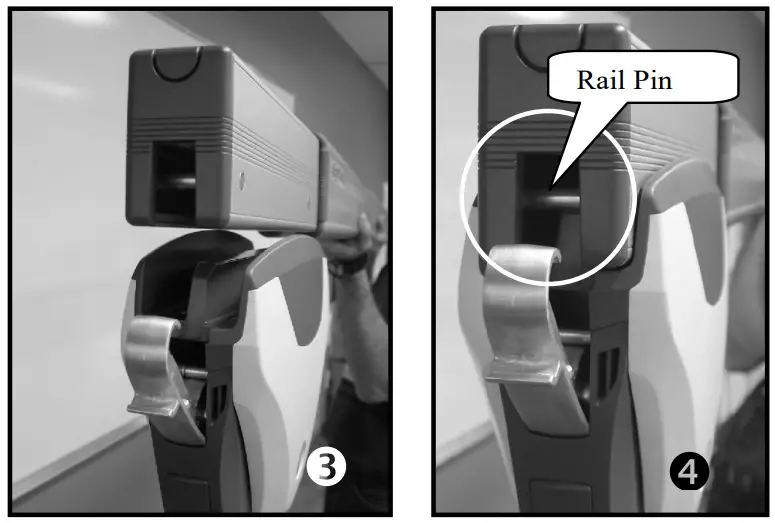
- Insert the rail in place on top of both posts. 3When placing the rail on the post, extend the inner rail 3 inches out from the main outer rail in order to allow enough space for the safety latch to properly engage the rail.
- Secure both ends of the rail by engaging the main hooks over the rail pins. 4
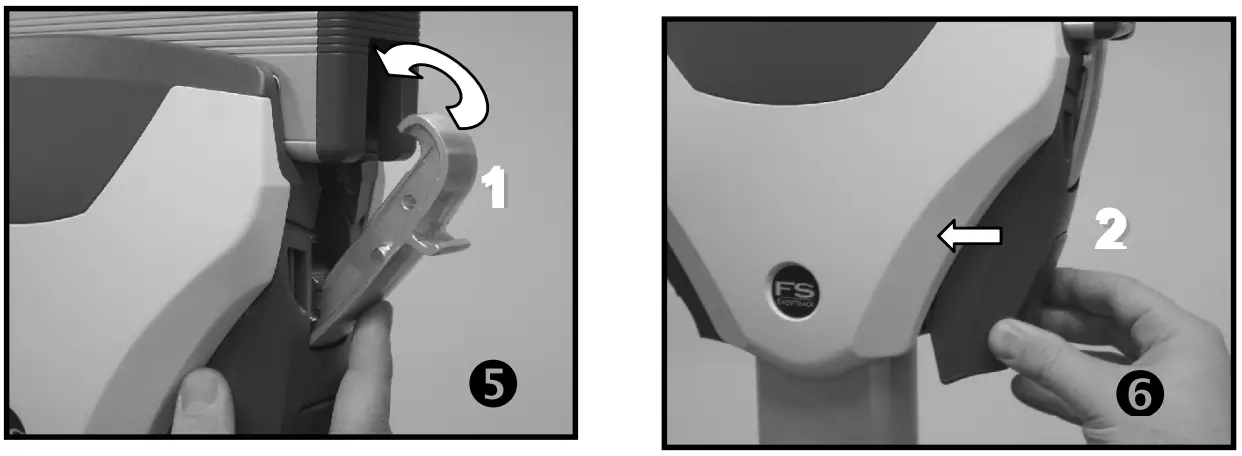
- Lock the rail to the post by closing the hook handle while pushing the main hook over the rail pin. The red stripe on the hook handle should no longer be visible. You should feel a slight tension when closing the hook handle.
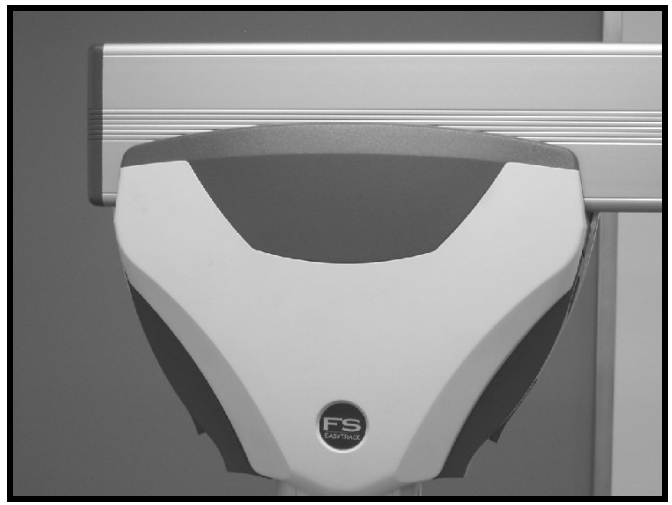
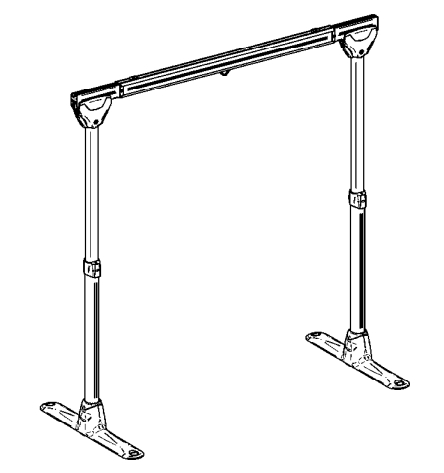
 View of the rail when properly installed and locked in place
![]() Make sure the main hooks are well engaged.
Make sure the main hooks are well engaged.
Step 3. Rail width adjustment
- To adjust the rail width, pull the inner rail away from the main outer rail until the desired width is achieved.
- The trolley position should be as shown in the picture. If not, make sure that the inner rail is extended. The trolley will become free of its transportation slot. If it does not, shake the trolley lightly left and right to release it. The trolley should move freely at this point.
![]() This step can also be done after adjusting the height
This step can also be done after adjusting the height
Step 4. Height adjustment
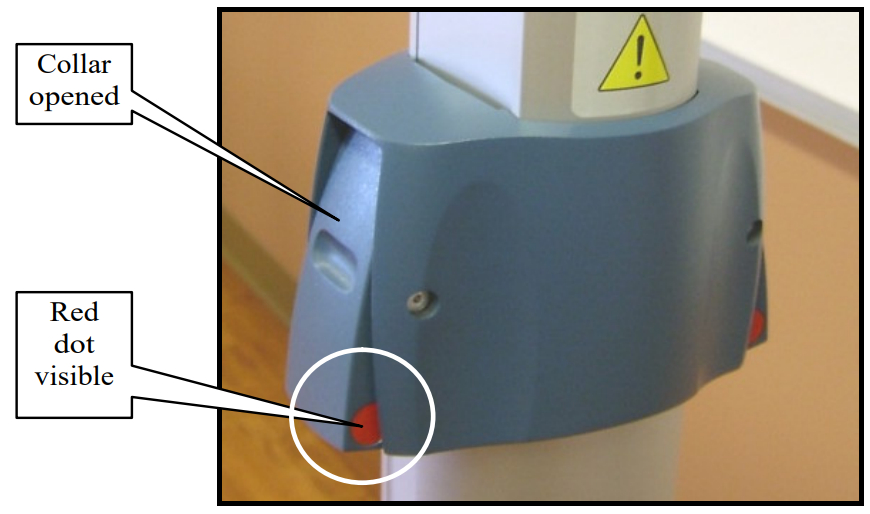
- The height adjustment of the posts is accomplished by starting with the blue locking collar clamp located in the centre of each post.
- Pull-on the lower portions of both sides of each locking collar to release the collar mechanisms and allow the inside section of the post to extend upwards. When the collars are in the open position red dots are visible.
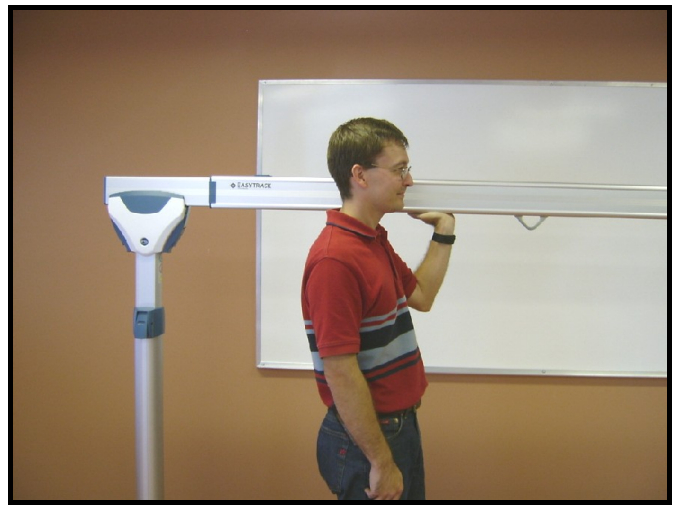
- Position yourself in the center of the rail between the two posts and gently push upwards until the desired height is achieved.
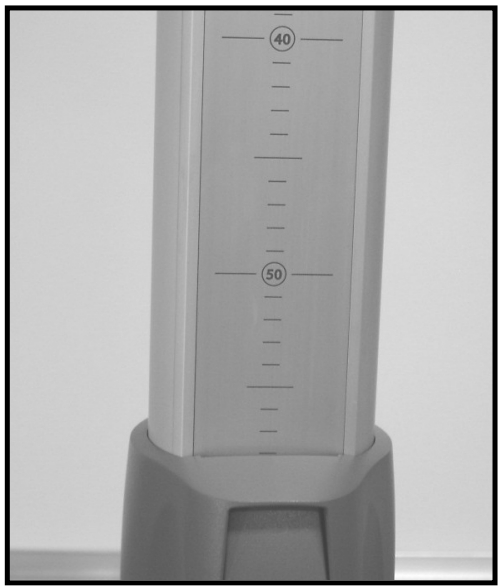
- To ensure the rail is level use the measurement reference marks on the front of each post.Adjustments: To lower the post, consult the section Disassembling the Easytrack FS System (further in this manual).
- Re-lock the clamping collars on both posts to secure the assembly. When the collars are in the locked position red dots are no longer visible.
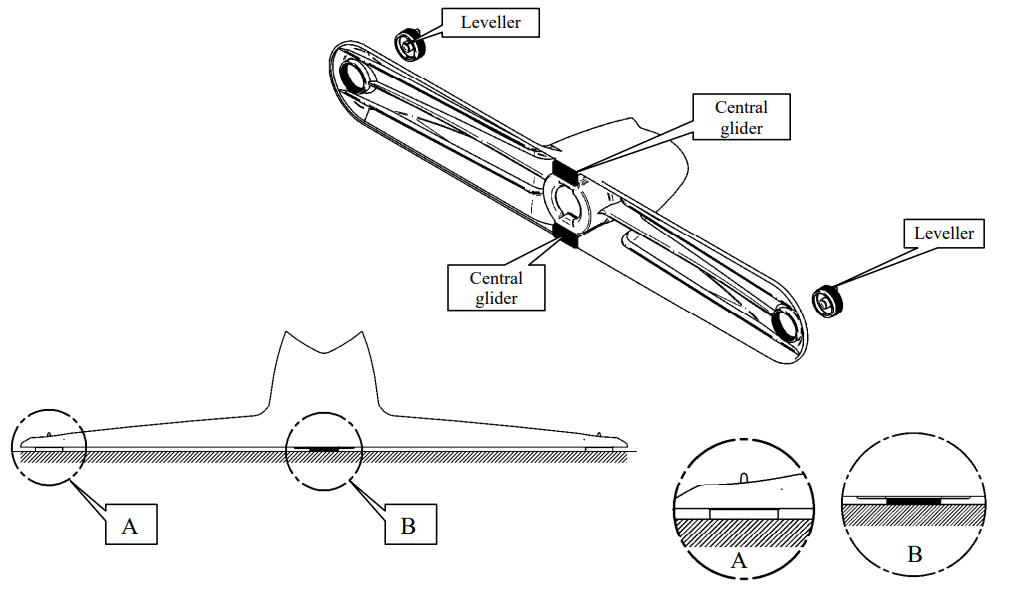
- Fine-tune the level of each base using the two blue floor levelers located at each end of both bases.The central glider of the base must touch the floor.
- Your Easytrack FS™ is now ready to use with your BHM portable lift (not included with this kit.)

Step 5. Disassembling the Easytrack FS
![]() ENSURE THERE IS NOBODY IN THE LIFT AND REMOVE THE LIFT FROM THE TROLLEY BEFORE ADJUSTING OR DISASSEMBLING THE EASYTRACK FS™ SYSTEM.
ENSURE THERE IS NOBODY IN THE LIFT AND REMOVE THE LIFT FROM THE TROLLEY BEFORE ADJUSTING OR DISASSEMBLING THE EASYTRACK FS™ SYSTEM.
To disassemble the Easy track FS™ reverse the assembly sequence.
- Remove the portable lift from the rail trolley.
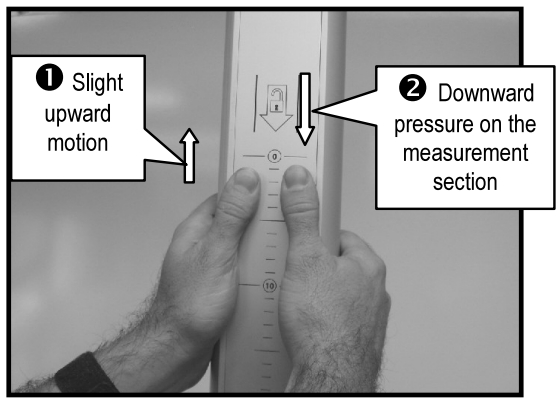
- Unlock the clamping collars on both posts (See Height adjustment section). The posts are retracted by first releasing the pressure on the internal lock mechanism using a slightly upwards motion on the post, and then applying downward pressure to the section of the post where the measurement reference marks are located.
- Remove rail from posts. To do so, unlock the safety latches in order to release the main hook from the rail pin. (See the Installation of the rail sections).
- Collapse the extended rail (See Rail width adjustment section).
![]() Place all pieces into a box or bag to protect them from the dust and from damages
Place all pieces into a box or bag to protect them from the dust and from damages
![]() FAILURE TO FOLLOW MAINTENANCE INSTRUCTIONS COULD RESULT IN INJURY OR DAMAGE.
FAILURE TO FOLLOW MAINTENANCE INSTRUCTIONS COULD RESULT IN INJURY OR DAMAGE.
![]() PERIODIC INSPECTION SHOULD BE PERFORMED BY A PERSON WHO IS PROPERLY QUALIFIED AND WELL ACQUAINTED WITH THE DESIGN, USE, AND CARE OF THE EASYTRACK FS™ SYSTEM. CONTACT YOUR LOCAL DEALER/DISTRIBUTOR.
PERIODIC INSPECTION SHOULD BE PERFORMED BY A PERSON WHO IS PROPERLY QUALIFIED AND WELL ACQUAINTED WITH THE DESIGN, USE, AND CARE OF THE EASYTRACK FS™ SYSTEM. CONTACT YOUR LOCAL DEALER/DISTRIBUTOR.
INSPECTION SHOULD BE CARRIED OUT ROUTINELY. ANY DAMAGE THAT HAS TO LEAD TO CORRECTIVE ACTIONS SHOULD BE NOTED, SIGNED, AND DATED BY THE INSPECTOR. DEFECTS AND RESULTING ACTIONS SHOULD BE REPORTED IN WRITING TO YOUR SUPPLIER.
EASY TRACK FS™ VISUAL INSPECTION
![]() Conduct a visual inspection before each use of the equipment
Conduct a visual inspection before each use of the equipment
- Make sure posts are straight. If they do not appear straight, verify with a level. If posts are not straight, remove rail and re-install posts (refer to assembly instructions).
- Make sure the rail is secured in place. Press up on the rail to make sure that the rail is locked onto the post.
- Make sure there is no visual damage. If so, DO NOT USE THE EASY TRACK FS SYSTEM.
- Make sure that bases are properly adjusted (see assembly instructions).
MMAAIINNTTEENNAANNCCEE
MONTHLY MAINTENANCE
- Clean inside rail with a damp cloth to ensure there is no dust or grease build-up.
- Check to ensure all original parts are present. If any parts are missing they should be replaced BEFORE USING THE EASY TRACK FS SYSTEM.
- Make sure that the trolley in the rail moves freely. It may need to be cleaned or replaced on occasion.
- Examine all joints and pieces for wear and fatigue. Replace any part that looks damaged or worn.
- Document inspections and repairs.
IF EQUIPMENT IS MOVED ON A REGULAR BASIS:
- Make sure all components are accounted for (see What s included section).
- Check Safety instructions and warnings and As s e m bly instruction s sections before re-installing the Easytrack FS System.
- Make sure the bases are clear of any debris and are not damaged. If they appear to be damaged, replace bases.
- Make sure there is no debris in the base post sockets.
- Look for signs of wear or breakage on all parts. Replace any parts that appear worn or damaged.
![]() FOLLOW GUIDELINES IN YOUR PORTABLE LIFT MANUAL FOR OPERATING AND MAINTENANCE PROCEDURES OF THE LIFT.
FOLLOW GUIDELINES IN YOUR PORTABLE LIFT MANUAL FOR OPERATING AND MAINTENANCE PROCEDURES OF THE LIFT.
TTRROOUUBBLLEESSHH OOOOTTIINNGG
| PROBLEM | CORRECTION |
| The trolley moves substantially on its own when the Easytrack system is fully assembled. | Is the rail leveled? Is the floor leveled? Is the rail secured to the posts? Press up on the rail to make sure that it is latched onto posts. |
| Extendable rail comes completely apart during assembly. | Rail has been extended too quickly/ forcefully. Rail was pulled past the locking device.• Check locking device inside rail (top of rail above the trolley) to make sure it is not damaged. Replace the trolley if damaged. See Easytrack FS system content.• Put rail back together at a slight angle and slide together.• Slowly extend rail out again to ensure the locking device clicks into place.• Slowly compress the rail again. |
| The trolley does not roll in rail smoothly. | • Is rail clean? Clean rail with a damp cloth.• Is the trolley centered in rail? Re-center trolley.• Is the trolley damaged? Replace trolley |
| Posts and bases rock back and forth | • Check the integrity of the floor.• Are the levelers properly adjusted?• Are the posts properly inserted in the base?• Are the collar clamps closed? |
| It is impossible to retract posts | • Did you release the collar clamps?• Did you follow the disassembling instructions?• Did you remove lift from trolley? |
| The trolley does not move | • Did you extend the inner rail in order to release it from the rail slot (transportation)?• Is there debris on the rail? |
| The main hook does not engage on the rail pin | • Is there debris in the rail?• Is the rail well seated on the posts? |
WARRANTY
WARRANTYThis warranty is extended only to the original purchaser/user of BHM products.
BHM Medical Inc. warrants its products to be free from defects in material under normal use and service, within the periods stated below from the date of purchase. If within such warranty period any such product shall be proven to be defective, such product shall be repaired or replaced at BHM Medical s option. This warranty does not include any labor or shipping charges incurred in replacement part installation or repair of any such product. BHM Medical s sole obligation and your exclusive remedy under this warranty shall be limited to such repair and/or replacement.
For warranty service, please contact the dealer from whom you purchased the BHM Medical product. [In the event that you do not receive satisfactory warranty service, please contact BHM Medical 1 800 868-0441].
Do not return products to our factory without prior authorization. BHM Medical will issue a return Merchandise Authorization (RMA) Number. C.O.D. shipments will be refused; all shipments to BHM Medical must be prepaid. For this warranty to be valid, the purchaser must present its original proof of purchase at the moment of the claim. The defective unit, assembly or part must be returned to BHM Medical for inspection. The part or components repaired or replaced are guaranteed for the remaining period of the initial warranty.
Limitations and Exclusions:The warranty above does not apply to serial numbered products if the serial number has been removed or defaced.
No warranty claim shall apply where the product or any other part thereof has been altered, varied, modified, or damaged; either accidentally or through improper or negligent use and storage. Warranty does not apply to products modified without BHM Medical s express written consent (including but not limited to products modified with unauthorized parts or attachments), products damaged by reason of repairs made to any component without the specific consent of BHM Medical, or to products damaged by circumstances beyond BHM Medical s control. BHM Medical will solely determine the evaluation of the warranty claim. The warranty does not apply to problems arising from normal wear or failure to adhere to the instructions in this manual. BHM Medical Inc. slings are void of warranty if not laundered as per instructions on the Sling Label.
BHM Medical Inc. shall not be liable for damages, losses or inconveniences caused by a carrier.This warranty replaces any other warranty expressed or implicit and constitutes BHM Medical Inc. s only obligation towards the purchaser. BHM Medical shall not be liable for any consequential or incidental damages whatsoever.
[xyz-ips snippet=”download-snippet”]