
REL Acoustics Tzero Mkiii Sub-Bass System

Caution Marking Explanation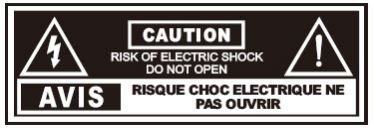
![]() The lightning flash with an arrowhead symbol within an equilateral triangle is intended to alert the user to the presence of uninsulated dangerous voltage within the product’s enclosure that may be of sufficient magnitude to constitute a risk of electric shock to persons.
The lightning flash with an arrowhead symbol within an equilateral triangle is intended to alert the user to the presence of uninsulated dangerous voltage within the product’s enclosure that may be of sufficient magnitude to constitute a risk of electric shock to persons.
![]() The exclamation point within an equilateral triangle is intended to alert the user to the presence of important operating and maintenance (servicing) instructions in the literature accompanying the appliance.
The exclamation point within an equilateral triangle is intended to alert the user to the presence of important operating and maintenance (servicing) instructions in the literature accompanying the appliance.
Important Safeguards
- Read all of these instructions.
- Save these instructions for future use.
- Heed all warnings.
- Follow all instructions.
- Do not use this apparatus near water.
- Clean only with automotive polish and microfiber cloth.
- Install in accordance with the manufacturer’s instructions.
- Do not install near any heat sources such as radiators, heat registers, stoves or other apparatus (including amplifiers) that produce heat.
- Do not defeat the safety purpose of the grounding-type plug. A grounding-type plug has two blades and a third grounding prong. The third prong is provided for your safety. If the provided plug does not fit into your outlet, consult an electrician for the replacement of the obsolete outlet.
- Protect the power cord from being walked on or pinched particularly at plugs, convenience receptacles, and the point where they exit from the apparatus.
- Only use attachments/accessories specified by the manufacturer.
- use only with a cart, stand, tripod, bracket, or table specified by the manufacturer, or sold with the apparatus. When a cart is used, use caution when moving the cart/apparatus combination to avoid injury from tip-over.

- Unplug this apparatus during lightning storms or when unused for long periods of time.
- Refer all servicing to qualified service personnel. Servicing is required when the apparatus has been damaged in any way, such as power-supply cord or plug is damaged, liquid has been spilled or objects have fallen into the apparatus, the apparatus has been exposed to rain or moisture, does not operate normally, or has been dropped.
- minimum distances 10cm around the apparatus for sufficient ventilation;
- the ventilation should not be impeded by covering the ventilation openings with items, such as newspapers, table-cloths, curtains, etc.;
- no naked flame sources, such as lighted candles, should be placed on the apparatus;
- attention should be drawn to the environmental aspects of battery disposal;
- the use of apparatus in moderate climates.
- Batteries shall not be exposed to excessive heat such as sunshine, fire, or the like.
Caution: Any changes or modifications not expressly approved by the party responsible for compliance could void the user’s authority to operate this equipment.
WarningAvertissementTo reduce the risk of fire or electric shock, do not expose this apparatus to rain or moisture.Cet article est lourd . Pour éviter tout risque de blessure , prendre soin lors de la manipulation.The apparatus shall not be exposed to dripping or splashing and no objects filled with liquids, such as vases, shall be placed on the apparatus.
The mains plug is used as a disconnect device. The mains plug of the apparatus should not be obstructed OR should be easily accessed during intended use. To be completely disconnected from the power input, the mains plug of the apparatus shall be disconnected from the mains.An appliance with a protective earth terminal should be connected to a mains outlet with a protective earth connection.
Design SafetyThis apparatus is supplied with a detachable mains cord. A 2A fuse is fitted in the socket. Should the fuse need to be replaced using a similar rated fuse approved to ASTA or BSI 362 standards. Do not use without the fuse cover in place. Replacement fuse covers are available from your distributor.
Welcome to the REL FamilyCongratulations on your purchase of a new REL Tzero MkIII. While the Tzero MkIII is one of our most affordable models, it possesses a great deal of the character, unique features, and sound quality of our larger and costlier models. While its size suggests something, not unlike a multimedia subwoofer designed to, at best, suffer connection to a shoddy computer-based Bluetooth or similar system, the reality is that this is a full, proper REL.
Significantly, it is the least expensive model that includes our High-Level circuit which is key to obtaining a perfect blend with one’s speakers as it attaches to your amplifier’s or receiver’s speaker outputs, thus allowing the entire sonic signature of your system to be built forward ensuring that REL and system speak as one.
The primary upgrade on the MKIII lies in the upgrades brought to the down-firing active driver. MKIII uses a damped aluminum driver to achieve exceptional rigidity which goes a very long way toward producing a sound that is far more impactful than its diminutive stature would suggest. The damping on the rear of the cone ensures that the driver does not ring and result in a lightweight presentation. Compared with earlier models of the Tzero MkIII, the MKIII is far more powerful and impactful.
Thank you for your support and should you have any questions, please reach out to our world-class support team via our website. Our team is always eager to help and full of suggestions and solutions.
Overview
TZERO MKIII Sub-Bass SystemMany or most loudspeakers emphasize the mid-bass. This is the range from 50 to 90 Hz. We at REL believe this is an incomplete approach and that loudspeakers need to be extended in the lower frequencies for true full-range reproduction. All of our designs are true Sub-Bass Systems, meaning they are designed to reproduce very low frequencies (below 30 Hz) that are felt rather than heard. This is because we understand that music is full-range, as are sound effects on movies, and we intend for our products to reproduce all of these sounds, not just a narrow band.
TZERO MKIII is equipped to allow you to take full advantage of Dolby Digital AC3, DTS, MPEG 2, and any other digital sound format that includes a dedicated Low-Frequency Effects (LFE) channel.
The dedicated LFE input meets the tough specification laid down for digital 5/2.1 channels, usually known as 7.1. The output is nominally flat from 35 Hz 90 Hz. It has a dedicated input level control which enables users to set the LFE level independently of the processor. This is important because not all processors offer control over this significant parameter. The LFE channel is frequently output at 10 dB higher levels than the other channels.
The TZERO MKIII also has a HIGH LEVEL (speaker level) input with dedicated input level control. Uniquely, both the speaker level and the LFE input can be used simultaneously. This means you may set it up for the best possible 2-channel performance sound with your CDs or other stereo signals and instantly revert to using the Sub-Bass System as the dedicated LFE component when watching movies. This is a feature of real benefit if you wish to play music in stereo mode in the purist audiophile way and also in REL Theater Reference mode with no switching necessary. By connecting BOTH High Level and .1 concurrently and setting your processor to “Large” or “Full Range”, the best possible performance will be obtained. Consult the owner’s manual of your loudspeakers or consult with your dealer before setting too large as a few speakers cannot handle the bass that is then directed through to the main speakers.
REL TZERO MKIII Rear Panel Connection Legend
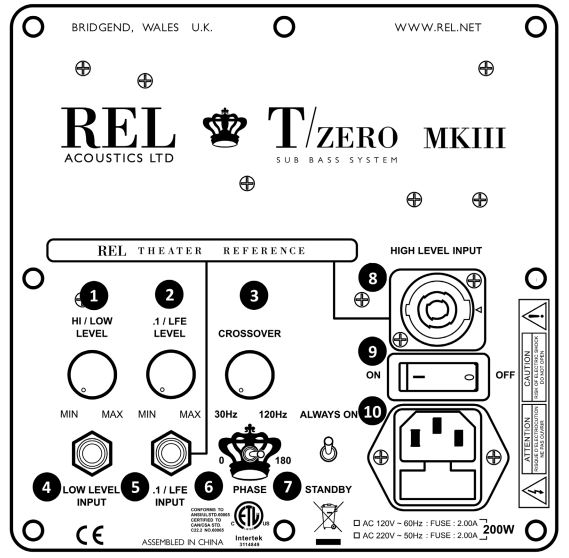
- Volume Control for HI/LOW-LEVEL INPUT: Use to adjust output when using either HIGH LEVEL or LOW-LEVEL input. Do not use both simultaneously.
- Volume Control for .1/LFE INPUT: Use to adjust output level when using .1/LFE input from a 5.1/ 7.1 amplifier or processor.
- Crossover Control: Used to select crossover frequency. Variable between 30Hz and 120Hz.
- LOW-LEVEL INPUT: Used to connect LOW LEVEL to the output of a preamplifier, integrated amplifier, or receiver ONLY when HIGH-LEVEL INPUT cannot be properly connected. (For home cinema, use.1/LFE INPUT).
- 1/LFE INPUT: Used to connect to the .1/LFE output from a theatre processor. Should be used in conjunction with REL HIGH-LEVEL connection for the ultimate theater experience.
- Phase Switch: Used to set phase 0-180 degrees.
- Power Mode Switch: Used to set power mode. Set to “STANDBY” to enable automatic standby function or to “ALWAYS ON” to disable standby function.
- HIGH-LEVEL INPUT (Neutrik® Speakon® Socket): Use to connect HIGH LEVEL to the amplifier speaker terminals.
- Power ON/OFF Switch: Use to turn the unit on or off.
- IEC Mains Socket: Fused mains (AC) input socket that accepts a detachable power cord.
Connecting UpAlways switch your system off before disconnecting any wires.
ALWAYS connect using the REL HIGH-LEVEL input, unless your system simply cannot accommodate this. While rare, a few esoteric systems, such as those that deliver a pure digital signal to active speakers, preclude this possibility. To increase the versatility of connecting up, the TZERO MKIII has three separate inputs: A Neutrik Speakon socket and two phono sockets. This is to facilitate use with both two-channel stereo systems and AV surround sound systems.
The HIGH LEVEL, unbalanced, dual-channel (stereo) input is via a Neutrik Speakon connector which is connected to the power amplifier’s left and right channel speaker terminals. This has the advantage of ensuring that the REL receives exactly the same signal as the main speakers. This means that the character of the bass from the main system is carried forward into the sub-bass. This is a very important point and together with the REL’s Active Bass Controller (ABC) ensures far superior system integration of the sub-bass with the main system.
The LOW-LEVEL input is via a phono jack that connects to either the .1/LFE output of a home cinema amplifier/processor or to the output of a stereo preamplifier.
HIGH LEVEL and .1/LFE inputs can be used simultaneously. The benefits are two-fold when used with a home cinema system. The .1 Input reproduces the .1/LFE channel and the HIGH-LEVEL connection underpins the main front speakers. The main front speakers should be set to the “large” option on the processor. See “Home Cinema Applications” for more information.
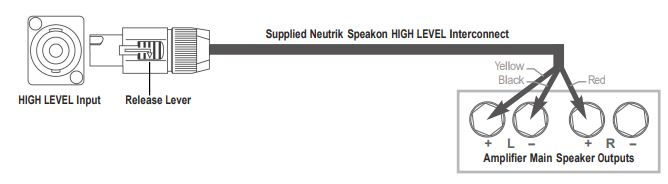
Connecting to the Power Amplifier Using the Speakon HIGH-LEVEL INPUTTo engage the Neutrik Speakon plug, insert fully into the socket and rotate clockwise until locked.
To remove the Neutrik Speakon plug, grip body of plug, place thumb on chrome lever, move lever backward, rotate plug anticlockwise quarter turn and withdraw.
The HIGH-LEVEL input is designed to accept the stereo (two-channel) signals from the speaker terminals of your receiver, integrated amplifier, or basic amplifier. This has the advantage of ensuring that your subwoofer receives exactly the same signal as the main speakers, which means that the character of the bass from the main system is carried forward into the Sub-Bass System. This is a very important point and together with REL’s Natural RollOffTM circuitry, ensures far superior system integration of the Sub-Bass System with the main system.
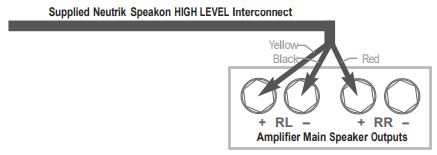
HIGH-LEVEL INPUT: Connections should be made to the same binding post on the main amplifier as the main speakers. Red to amplifier main right speaker red terminal, yellow to amplifier main left speaker red terminal. Depending on the design of the amplifier, the black to amplifier main speaker black terminal, right or left but not both. Please see a complete description of connecting to Class-D and differential/balanced amplifier output designs in the following pages. Plug the Neutrik Speakon plug into the HIGH-LEVEL Speakon socket. Note: This connection does not draw power from the power amplifier and, yes, your REL is a powered sub-bass system. However, by deriving its signal from the main power amplifier, better sound quality is achieved.
.1/LFE INPUT: This requires a phono-to-phono cable and is a dedicated true .1 channel. This circuit, therefore, eliminates the normal Natural RollOffTM Crossover and passes the .1 LOW-LEVEL signal through with only the required 120Hz fourth-order filter.
LOW-LEVEL INPUT: This single-channel phono input allows for a conventional connection to a preamplifier and should be used in the rare event that a HIGH-LEVEL connection proves incompatible. Plug one end of a single phono-phono cable into the LOW-LEVEL input jack of the REL and the other end into either the left or right channel output of your preamplifier. Because much sub-50Hz bass information is mono, there is little need to connect both left and right channels. Should your system require this style of connection HIGH LEVEL is preferred additional performance is available by purchasing a second, matching REL, and running each as separate stereo subs.
PHASE SWITCH Used to set the phasePosition 0 / HIGH LEVEL, LOW LEVEL or LFE: 0 degrees phasePosition 180 / HIGH LEVEL, LOW LEVEL or LFE: 180 degrees phase
PHASE SELECTION AFFECTS BOTH HIGH- AND LOW-LEVEL INPUTS Crossover is always engaged for HIGH-LEVEL INPUT. The .1/LFE signal does not pass through the crossover circuit.
REL Set-Up Made SimpleREL products are not traditional subwoofers but are true Sub-Bass Systems. A REL is designed to augment the performance of “full range” speaker systems in order to provide, in certain cases, the linear response below 12 Hz. Therefore, for the moment, set aside everything you’ve been taught about subwoofers and how they are integrated into a stereo or home cinema system. The setup and positioning of REL Sub-Bass Systems differ from that of conventional subwoofers. A REL will take advantage of physics and room acoustics to provide deep pressurization as no traditional subwoofer can. It is important that you bring to the set-up process a willingness to do things a little differently in order to obtain these superior results. The end result of your labors will be an utterly seamless integration of truly deep bass to a sound system, regardless of the main speakers’ low bass capability.The basic setup should take no more than ten to fifteen minutes to accomplish once connected.Before You Begin
- It is helpful to know that you will almost always connect the REL to the input on the rear panel labeled”HIGH-LEVEL INPUT.” This connection is made using the supplied 34′, 10″ (10 meters) cable, the bare leads of which connect to the speaker output terminals of the power amplifier. The easy and foolproof connection at the REL is done with a Neutrik Speakon connector. The purpose of connecting to the speaker output terminals is one of the unique secrets of REL’s success. By connecting to the HIGH-LEVEL input on the REL from the amplifier, you build forward the sonic signature of your main system, including the tonal balance and timing cues of the entire electronics chain. In this way, the REL is fed the exact signal that is fed to the main speakers.
- When possible, the REL should be placed in one of the corners behind the speakers. Remember, we are dealing with true LOW bass pressurization with RELs. Low bass pressurization below 40Hz is best derived from corner placement, where the most linear and efficient low bass can be produced.
Connecting and Setting UpHIGH-LEVEL connection, using the enclosed cable with the Neutrik Speakon connector, is always the first choice. This connection can be made without affecting the performance of the amplifier because the REL’s amplifier input impedance is 150,000 ohms, in effect not producing any additional demand whatsoever on the rest of your system.
- The standard HIGH LEVEL hook up procedure is: attach the red wire to the amplifier’s right positive speaker output terminal; attach the yellow wire to the amplifier’s left positive speaker output terminal; attach the black wire to whichever of the amplifier’s ground output terminals is convenient; plug the Speakon connector into the Sub-Bass System’s HIGH-LEVEL input.
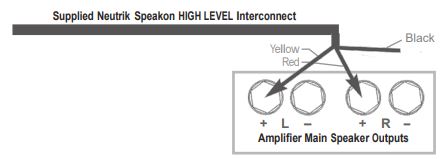
- For differential (i.e. fully balanced) amplifiers using one REL, simply use the standard connecting scheme with the exception of NOT connecting the black wire to a negative speaker terminal. Instead, it should first be allowed to “float” or hang down without connection to ANY terminal. Should hum occur using this method, please try connecting to an unused RCA connector on the rear of a preamp or amplifier. Please contact your dealer should there be any questions concerning this or any other hookup procedure.NOTE: The TZERO MKIII is equipped with internal circuitry to allow seamless connection to Class-D (digital) main amplifiers. If connecting to a Class-D amplifier, follow the above connection procedure for differential amplifiers.
- If connecting a single REL as a dedicated center channel sub, an insider tip is to consider connecting to the rear of the speaker, rather than routing the REL High Level enable all the way back to the amplifier (unless the amplifier is of Class-D or Differential output design). Connect the black wire of the REL to the negative center channel speaker terminal; twist together the red and yellow wires and connect this paired cable (red/yellow paired together) to the positive center channel speaker terminal.
- If connecting a REL as a dedicated rear channel sub, connect the black wire of the REL to either the left rear or right rear negative speaker terminal; connect the yellow wire to the left rear positive speaker terminal; connect the red wire to the right rear positive speaker terminal. If the amplifier is of a balanced differential design, please follow the instructions in the section above labeled Differential Connection.
 NOTE: The TZERO MKIII is equipped with internal circuitry to allow seamless connection to Class-D (digital) main amplifiers. If connecting to a Class-D amplifier, follow the above connection procedure for differential amplifiers.
LOW-LEVEL connection (via phono connector) is always an option if the HIGH-LEVEL connection is not possible. When connecting to the LOW-LEVEL inputs in a system in which HIGH-LEVEL connection is not possible, such as if using internally-amplified speakers, connect a single phono cable between the LOW-LEVEL input jack of the REL and either the left or right channel output of your preamplifier. Because virtually all sub-50Hz bass information is mono, there is no need to connect both left and right channels.
When connecting to a home cinema system where a .1/LFE channel output is present, connect a single phono cable between the sub output of the processor/receiver and the .1/LFE input jack on the REL.
Positioning: The optimal position for a REL is in one of the corners behind the main speakers. This position provides 9 dB of acoustic amplification and allows for the most linear true low bass wave launch, owing to the ability to tune the REL to the longest distance in the room in order to produce the longest, therefore lowest, bass waves.
The Process: To begin the set-up process, choose a piece of music that has a repetitive bass line that is very low in frequency. We suggest track four from the soundtrack to Sneakers (Columbia CK 53146). This has a repetitive bass drum throughout that gives you plenty of time to move the woofer around, but more importantly, the venue was quite large for this recording, and therefore it has a very deep and large-scale bass signature. This type of track is perfect for the set-up process and should be played at the highest reasonable level expected for system playback.
Working with a partner, one in the listening position and one at the REL manipulating the controls, is the most effective and efficient way to set up the REL. If working alone, the initial steps in the set-up can be very effectively carried out from the location of the REL. Trying to ignore all other music in the track, listen for the bass drum and its effect on the listening room.
Phase Orientation: Once in the corner phase can be adjusted. This may be the single most critical step, and because it really is quite simple, it is often over-thought. Keep in mind; the right phase is whichever position is the loudest or fullest. While playing music with true low bass, adjust the crossover to a point where the REL and the speaker are sure to share frequencies (about halfway up, or at 12 o’clock on the crossover control, or slightly higher for smaller speakers). At this point turn the HI/LOW-LEVEL control up so that both the REL and speaker are roughly equal in volume and then switch, using the phase switch, from “0” to “180” phase positions. Again, whichever position is loudest or fullest is the correct position. That is when the position is working in harmony with your main speakers, reinforcing bass, not canceling it.
Placement: The next step is to determine precisely how far from the corner the sub should be placed to achieve the most efficient output, as well as the lowest frequency extension. With the REL fully into the corner, and continuing to play the music, slowly pull the REL from the corner on the diagonal, equidistant from both side and rear wall. At a certain point (sometimes a matter of only a few inches, in rare cases a foot or more) the REL will audibly go lower, play louder, and, if it truly locks on to the room and is fully pressurizing it, the air around the REL will seem to be energized, stop right there! This is the correct position from the corner for the REL.
Crossover and Level Settings: To determine the crossover point, take the volume of the REL (using the HI/LOW-LEVEL control) all the way down, and put the crossover to 30 Hz. At this point, bring the REL’s volume back up slowly to the point where you have achieved a subtle balance, i.e. the point at which you can hear the REL even with the main speakers playing. Now, bring the crossover point up until it is obviously too high; at this point bring it down to the appropriate lower setting. For all intents and purposes, this is the correct crossover point. Once this stage has been reached, subtle changes to volume and crossover can be made to provide the last bit of complete and seamless integration. With that, the set-up is complete.
Hint: There may be a tendency to set the crossover point too high and the volume of the Sub-Bass System too low when first learning how to integrate a REL with the system, the fear being one of overwhelming the main speakers with bass. But in doing so, the resulting set-up will be lacking in bass depth and dynamics. The proper crossover point and volume setting will increase overall dynamics, allow for extended bass frequencies, and improve soundstage properties. Note, volume must be adjusted in conjunction with crossover changes. In general, when selecting a lower crossover point, more volume may need to be applied.
REL Theater ReferenceTM Home Cinema ApplicationsFor Dolby Digital AC3 or other 5.1 theater systems, once the standard set-up for the two-channel outlined above is complete, the LFE output from the processor or receiver should be connected to the .1/LFE input and appropriate volume adjustments made using the .1/LFE LEVEL control. For this configuration, you must set the processor to the “large” or “full range” setting for the left and right speakers in order for the REL to receive the bass signal via the HIGH-LEVEL cable. In this configuration, the REL provides support for both the left and right speakers for two-channel listening, and support for the LFE when movies are playing. Most processors will allow you to defeat the subwoofer output when listening in the two-channel mode. The effect of this set-up is one of greatly increased dynamics in the mid-bass range, no bass bloat, and a greater degree of space and timing from the special audio effects.
REL Theater Reference 3D Bass™While slightly more complicated than the basic REL Theater Reference scheme, the use of three RELs produces a number of noteworthy benefits and proves the most cost-effective method of achieving professional Dolby 5.1 standard bass performance. REL Theater Reference 3D BassTM produces true full-range performance from the three primary zones of reproduction in theater sound resulting in a far more natural and immersive experience than ANY single sub can produce.
- The main L/R speakers should be connected to the primary REL using the REL Theater Reference connection. This unit forms the foundation of your theater system’s performance and so should be perfectly matched to one’s main speakers.
- In the rear corner (ideally that which is opposite the primary sub), connect a second REL to the rear speakers using REL Theater Reference connectivity. The purpose of the rear channel REL is to ensure proper front-to-rear balance and weight; too often virtually ALL the power and weight in a theater comes from the front and it produces unnatural weighting as well as hot spots. By placing a rear REL diagonally opposite, bass transects the room on a tangent and has the effect of greatly smoothing the overall in-room response of your RELs. This unit need not be a duplicate of your primary REL; instead, it should match well with your surround speakers
- Connect to the center channel a third REL using ONLY the HIGH-LEVEL connection. This may be easily accomplished by connecting directly to the connection terminals on the rear of the center channel speaker. To do so, first, twist the red and yellow leads together and connect to the positive terminal, then connect the remaining black lead to the negative (black) terminal on the rear of the speaker. The purpose of the third “center” REL is to ensure the center channel can keep up with the scale, weight, and dynamics the main system now has. The location should be anywhere from the opposite corner of the front wall to somewhere in the middle of the front wall, listen for the best integration with the center channel speaker. Some people prefer to use the REL as an actual pediment or stand for their center channel, the choice is yours. Again, this unit need NOT be an exact duplicate of the primary REL but should be chosen for its acoustic ability to mate seamlessly with your center channel.
First, carefully set up and dial in the primary REL, then move to the rear REL and balance this against the main REL. Care must be taken to ensure the phase is identical on both RELs as accidentally reversing the phase of one relative to the other will result in a dramatic reduction in bass output. Finally, carefully dial in the performance of the center channel sub. Hint: To make this easier, once the primary REL has been dialed in, unplug it using the Speakon connection from the system and dial in the rear, followed by the center channel REL.
Genuine sticklers for perfection find it easiest to tune in sections. For example, connect ONLY the L/R mains and the primary REL. Next, tune ONLY the rear surrounds and the rear REL. Finally, listen to and tune ONLY the center channel with the center REL.
When you have accomplished this task, plug all three units in and re-check your gain settings as the cumulative effect of hooking all three up will usually result in, temporarily, excessive output. Work carefully and methodically to reduce the settings on primary, then rear, and finally center channel RELs and in a few minutes balance should be restored. However, the net result of all your tuning will be a sound that utterly immerses the theater owner in a rich natural wash of bass that suffuses the room effortlessly, rather than what is often experienced as too loud a bass balance pushing uncomfortably at the listener.
Running InCare taken over running in will be rewarded by many years of pleasurable use. Both the electronics and the drive unit will benefit from an initial period of carefully controlled use. Possible damage may be sustained by running in the unit at too high a volume setting over an extended period. On the other hand, by taking a little care over this initial period, about 24 hours of actual use, a longer life with an eventual higher potential performance is assured.
Care and PolishingThe cabinets are best maintained by using a light automotive spray-on wax and a microfiber cloth. (Our favorites are those made by Meguiars and Mother’s. While these may not be available in all markets, you can use a similar product.) Take care not to spray the aluminum badge. Do not place objects, such as drinks on top of your REL TZERO MKIII. Never use a dry cloth on this finish.
TechnicalTZERO MKIII uses a very fast, gentle, and transparent filter intended to allow excellent impulse response and a natural sound. We refer to this circuit as Natural RollOffTM. Most subs use slow, very steep filters that lend an unnatural, machine-like quality to the sound. The TZERO MKIII employs a highly refined Class-D amplifier that combines high performance and high efficiency. The TZERO MKIII includes an automatic power-saving mode which ensures that, when not in use, the unit consumes as little power as possible. The driver is simple, rugged, and relatively light, and yet offers excellent self-damping so we are better able to reproduce the nuance of music and preserve the explosiveness of transients. Finally, the cabinets, apart from being physically beautiful, are like finely tuned instruments that are largely responsible for the sonic virtue with which the TZERO MKIII is imbued.
Power Saving EfficiencyAll REL Sub-Bass Systems are designed for maximum power efficiency, both when passing a signal through to its resultant output sound into the room and also when silent.
In addition to the low power draw exhibited by all REL models, the TZERO MKIII also features an automatic standby mode that is enabled when the power mode switch on the rear of the unit is set to the “STANDBY” position. In this mode, the input signal is constantly monitored for activity (audio information). If no audio information is detected over a period of fifteen minutes, the unit will enter a low power standby mode in which less than 0.5 watts of power is consumed. When input signal activity is detected, the unit resumes normal operation. By using the standby mode, you can ensure that there is no unnecessary power draw when the unit is not in use.
Alternatively, the user has the option to leave the unit in the normal operating mode at all times by selecting the “ALWAYS ON” position of the power mode switch. In this mode, the unit will not enter standby regardless of whether or not there is activity on the input signal. Using this setting ensures that the TZERO MKIII is ready to react instantaneously to bass transients, whether in music or movies, and is, therefore, the recommended setting to achieve the highest performance.
Specifications
TZERO MKIII
Type: Sealed, down-firing active wooferDrive Unit: 6.5in., 165mm long-throw aluminum cone, steel chassisLower Frequency Response: 37 Hz at -6 dB in roomInput Connectors: HIGH-LEVEL Neutrik Speakon, LOW-LEVEL single phono, LFE phonoInput Impedance: HIGH LEVEL: 150k, Low Level: 10k, .1/LFE: 10k ohmsGain Control Range: 80 dBPower Output: 100 Watts (RMS)Phase Switch: Yes, 0 or 180 degreesAmplifier Type: Class DProtection System Fully Electronic SET-SAFE: YesD.C. Fault: YesOutput Short: YesMains Input Voltage: 100-240 voltsFuse: 2.00 Amp semi delayDimensions (WHD): 8.5 x 9.5 x 10.25 in., (216 x 241 x 260 mm) Including Feet and Rear Panel ControlsNet Weight: 15 lbs. (6.8 kg)Finish: Gloss Piano Black or White Lacquer![]()
Supplied Accessories Mains Lead: YesNeutrik Speakon Interconnect: Yes (10 Meters Nominal)User Manual: Yes
In the interest of product improvement, REL Acoustics Limited reserves the right to alter these specifications without notice.
REL Acoustics LimitedNorth Road, Bridgend industrial Estate. Bridgend, CF31 3TP . United KingdomTelephone: +44 (0)1 656 768 777 . Fax: +44 (0) 1 656 766 093Web: www.rel.net
References
[xyz-ips snippet=”download-snippet”]