RELIABLE Brio Pro 1000cc Steam Cleaning System
IMPORTANT SAFETY INSTRUCTIONS
- When using your Reliable steam cleaner, basic safety precautions should always be followed. Please read the following instructions carefully as they provide important information concerning how to install, use and care for this steam cleaner.
- Use the steam cleaner only for its intended use.
- To protect against a risk of electric shock, do not immerse the steam cleaner in water or any other liquids.
- The steam cleaner should always be turned OFF before plugging it into or unplugging from a wall outlet. Never pull the power cord to disconnect from the outlet; instead grasp the plug and pull to disconnect.
- Do not let the power cord touch hot surfaces. Let the steam cleaner cool completely before putting it away. Wrap the power cord around the posts that are positioned in the rear of the steam cleaner when not in use.
- Do not operate the steam cleaner with a damaged cord, plug, or if the steam cleaner has been dropped or damaged. This will void any and all warranties. Please contact the place of purchase for repair procedure.
- Close supervision is necessary for any appliance being used by or near children. Do not leave the steam cleaner on while unattended.
- Do not use this unit in the presence of explosive and/or flammable fumes.
- Keep ventilation slots free from dust.
- Never drop or insert any object into ventilation slots
- To prevent overheating, unravel the electrical cord completely.
- Do not operate where aerosol (spray) products are being used or where oxygen is being administered.
- To disconnect, turn all controls to the off position, then remove plug from the main power.
- Never put away your steam cleaner while it is still hot. There is no need for emptying the tank unless you intend to leave it unused for a long period of time.
- This product is intended for household or commercial use.
- Before turning on the steam cleaner, please ensure that the water tank is full.
- This product is grounded for your safety. If you must use an extension cord, make sure it is rated at least 15 amps, and is grounded.
- Never store the appliance in an area that is likely to freeze.
- A hydraulically operated safety pressure relief valve is fitted inside the appliance, it MUST only be replaced by authorized service personnel with an identical valve to prevent a safety hazard.
- The steam generator is fitted with a safety overload cut-out that MUST only be reset or replaced with an identical component by authorized service personnel to prevent a safety hazard
- Every time the steam generator heats up from cold, the air inside the appliance prevents steam from being delivered immediately. After one minute of heating up set the steam regulation knob to maximum position and push button under pistol grip, to expel this air
- Never put detergents, perfumes or any other chemical substances in the water tank
ELECTRICAL INSTRUCTIONS
To avoid a circuit overload, do not operate another high-wattage appliance on the same circuit simultaneously with the steam cleaner. If an extension cord is necessary, a 15-amp rated cord with a polarized plug should be used. Cords rated for less may overheat and cause damage.
WATER INSTRUCTIONS
Your steam cleaner has been planned for use with normal tap water. In order to extend the life of this product, if where you are living the level of water hardness is very high, we recommend using 50% of normal water with 50% of distilled water.
TEST FIRST, THEN CLEAN
Prior to cleaning, test the surfaces to be steam cleaned.
DESCRIPTION OF THE STEAM CLEANER
- Main switch
- Main panel
- Electrical cord
- Water tank cap
- Carrying Handle
- Wheels
- Flexible hose connecting outlet
- Ready steam light
- Low water control light
- 1 steam regulation light
- 2 steam regulation light
- Hot water injection light
- Pressure gauge
*Product color may vary from image shown
ACCESSORIES WITH STEAM CLEANER
- Rectangular floor brush
- Triangular brush with black polyester bristles
- Black upholstery scraper
- Funnel
- (2) 30 mm small brush with black polyester bristles
- 30 mm small brush with brass bristles
- 30 mm small brush with stainless steel bristles
- Extension pipes
- Nozzle with brass tip
- 2,45m flexible hose
- Pad for triangular brush
- Drain opener key
- Pad for rectangular brush
- Towel
HOW TO USE YOUR STEAM CLEANER
- Remove the water tank cap (4) and fill the water tank (4) up to the maximum of 3L (10 to 11 cups) of water. Secure the cap until snug.
- Connect the electrical cord to the main power outlet.
- Plug the flexible steam hose to the steamer (7), and slide on appropriate accessories to the other end of the steam hose.
- Turn the main power switch (1) from the “O” position to the “|” position. The switch light will come on. The steam generator will be supplied water from the water tank via an electronically controlled pump and the heating of the water begins. It is normal to hear a buzzing noise from the pump when it is in operation.
When the unit has reached proper pressure, the steam ready light (A) will come on, indicating that it is now ready for use. The steam ready light (A) will go on and off during use, indicating the change of pressure in the boiler unit.Note: When calling for steam at the beginning of each use, you may notice a rapid decrease in the pressure to the unit. This is normal as the air in the unit is being voided, and should only last for a short period of time at the beginning of each use.Note: The steam volume being used may be regulated from a dial on the hose handle – See the following Features section on HOW TO CHANGE STEAM VOLUME.
HANDLE CONTROL
- When the water level is low in the water tank, a red low water light (B) will light up. Remove the tank cap (4) and refill the water tank at this time.
- When finished use, turn the main power switch (1) back to position O, and unplug from wall. Please allow the unit to cool down prior to storage. If not using the unit for an extended period of time (more than 3 months), it is advised to drain the steam generator tank.
To drain the steam generator tank:Drain the tank only when the unit is cold. Make sure unit is unplugged from wall and the hose is not connected to the unit. Carefully turn unit upside down so that the bottom is facing upwards. Unscrew the drainage cap at the bottom of the machine, then open the boiler drain-age plug using the 20mm hexagonal drain nut opener (provided with the accessory kit (19)). Once the tank is open, carefully turn the machine around and empty steam generator tank. Once emptied, replace the drain nut and cap.Note: Do not store unit where the temperatures may fall below freezing. Water freezing inside the unit may cause damage to components.
HOW TO CHANGE STEAM VOLUME
- The steam volume can be controlled by the steam regulator knob located on the steam hose handle.
Positions 1 to 3 are for steam only. Each successive number provides a higher volume than the last. (1. Low. 2. Medium. 3. High.)
Position 4 activates the hot water injection function. This feature mixes steam and hot water to produce a strong cleaning jet. **Please note in this position, the steam pressure and water level will go down much more quickly than if steam only is being used.
THIS MODEL IS PROVIDED WITH THE FOLLOWING FEATURES
STEAM READY LIGHT (A)
A green light signals that the steam has reached the maximum working pressure and the unit is ready to be used.
LOW WATER CONTROL LIGHT (B)
A red low water warning light signals that the water tank needs to be refilled. If you wish to continue steam cleaning, unscrew the water tank cap (4) and refill the tank.
STEAM REGULATIONS LIGHTS AND HANDLE CONTROL
The two yellow lights signal the three possible regulations of steam quantity/strength. The first steam regulation on-light (C) corresponds to the minimum steam quantity, position 1 on the handle (G). The second regulation on- light (D) corresponds to a medium steam quantity, position 2 on the handle (H). Both the first and second regulation on-lights (C + D) correspond to the maximum steam quantity, position 3 on the handle (I).
HOT WATER INJECTION LIGHT AND HANDLE CONTROL
This yellow light signals the activation of the hot water Injection feature. When this light (E) is on (position 4 on the handle (J), the steam is blended with hot water, making it ideal for rinsing applications.
USING THE ACCESSORIES
CONNECTING THE ACCESSORIES
Lift the hinged cover (7) on the lower front of the steam generator and fit the hose plug con-nector (16) by depressing the red button and pushing firmly in until a ‘click’ is heard indicating that the hose plug is inserted all the way. The hose MUST be properly connected, otherwise the solenoid valve will not function and steam will not be delivered through the hose or attachments. To deliver steam, activate the button situated on the underside of the handle.
LARGE RECTANGULAR FLOOR BRUSH
For cleaning hard floors, attach the extension tubes (15) to the angle adapter to use the large rectangular brush (8). Attach a dry cloth to the brush for the most effective cleaning of hard floors or carpet surface cleaning.
TRIANGULAR/UPHOLSTERY BRUSH
The triangular brush (9) is used where it is impossible or awkward to use the large brush.
UPHOLSTERY, DRAPERY, BEDDING, ETC.
Cover the brush with a clean dry cloth fixing it through the spring. Use a rapid back and forth motion, making sure that you do not over saturate the material with steam.IMPORTANT: Prior to cleaning, do a patch test in an area that is not easily seen before you begin. Steam and moisture may cause damage to some surfaces.
HIGH PRESSURE NOZZLE WITH SMALL ROUND BRUSH (NYLON, BRASS, STAINLESS STEEL)
The high-pressure nozzle can be used with or without one of the small round brushes sup-plied with the steam cleaner. For items that are particularly prone to scratches, it is best to use the nozzle without a brush. For all other areas, start with the nylon brush (least abrasive) and carefully work your way up to the brass, then the stainless steel brush (optional). It is always better to use care when using the brushes to prevent damage or scratching.The use of the steam nozzle alone is particularly good for cleaning and degreasing many working surfaces, ventilation hoods, see through oven doors, ventilation grating, kitchen furniture, stainless steel or enamel sinks, hand-basins, bath-tubs, water taps (to remove scale and water residue), doors, metal frames, car wheel rims, pet areas etc.
The nylon brush, because of its softness, is ideal for removing the dirt in grout, sinks and other surfaces where you need some light scrubbing action, but care must be taken not to scratch the surface.Tougher cleaning jobs may require the use of the brass brush that is supplied. Please make sure you are careful that it does not scratch the surface with this tool. Brass is tougher than nylon, but softer than stainless steel. For surfaces (grout for example) where the dirt is not being properly lifted with the nylon brush, carefully using the brass brush may give the best results.
For the toughest cleaning assignments (very caked on grease, rust, barbecue grills, very dirty grout), we recommend that you purchase the optional stainless steel brush that is available through your dealer, or at www.reliablecorporation.com
When using the steam nozzle with or without the brushes, you will need a cloth to wipe up the moisture and dirt that has been lifted through cleaning.
ATTACHMENT COUPLINGS
If the attachment connections dry up after intensive use, put a small amount of lubricant (Vaseline) around the O-rings on the male attachment.
FILLING THE TANK
If on the main panel (2), the water level control light (B) comes on during use and you would like to continue using the steam cleaner, you will need to follow these steps:
- Unscrew the black water tank cap (4)
- Fill the tank with water (see water instructions for details).
- Place the tank cap (4) back on.
If you’re using the trolley with the external water bottle connected to the water tank cap, follow the same steps listed above but directed to the water bottle.
MAINTENANCE OF THE BOILER
To maintain your steam cleaner in good condition and to ensure consistent performance, we recommend that you clean the boiler once or twice a year depending on the hardness of the water.
CLEANING INSTRUCTIONS
ATTENTION: Before draining the boiler, please make sure that the machine is depressurized and cool. Ensure that it is also disconnected from the power source.
- Take off the drainage cap at the bottom of the machine using a coin.
- Completely unscrew the boiler brass drainage nut from the boiler, using a 20 mm hexagonal key (19).
- To clean the boiler, we recommend using a descaling powder that can be purchased from www.reliablecorporation.com
- Add the descaling powder with a mixture of warm water through the bottom of the boiler.
- Let the mixture of warm water and powder sit for 24 hours.
- Rinse thoroughly to ensure that all of the descaling powder has been removed
- After cleaning, twist close the drainage nut and replace the cap.
NOTE: if you see that the water that is coming out from the boiler is full of dirt/limestone, we suggest that you repeat this operation more frequently, perhaps three to four times per year.
TECHNICAL DESCRIPTION
- 120V ~ Power – 1750W
- Cold water tank capacity – 3,1L
- Boiler capacity – 1,6L
- Working pressure – 6 bar
- Continuous steam system (CSS) – Yes
- Steam Regulations – 3
- Safety valve – Yes
- Hot water injection – Yes
- Limestone Magnetic Filter – Yes
- Certifications – cETLus
TROUBLESHOOTING
Do not operate the steam cleaner with a damaged electrical cord, plug or if the steam cleaner has been dropped or damaged. To avoid risk of electric shock, do not disassemble or attempt to repair the unit on your own. Return the unit to Reliable Corporation (see warranty) for examination repair.
|
PROBLEM |
POSSIBLE CAUSES |
REMEDY |
| No steam is released through the steam fittings. |
|
|
| Water drops leak from the attachments. |
|
|
| Dirty water is coming out. |
|
|
| Not enough steam pressure. |
|
|
| Pump works continuously. |
|
|
| Rapid drop in pressure. |
|
|
| (PROBLEM) There is no steam, all the lights remain on and the pump is continuously running. (POSSIBLE CAUSES) 1. You’re using too much steam (pos. 4). 2. Water pump is broken. (REMEDY) 1. Turn off main switch (1) wait 1 minute then turn back and wait for green light (A) to turn on. 2) Contact Reliable Corporation for service. |
1000CC TROLLEY ASSEMBLY INSTRUCTIONS
- Trolley base unit
- Tray to carry accessories
- Trolley handle
- Rotating wheels (2)
- Back wheels (2)
- Chrome back wheel cover (4)
- Self locking nuts (2)
- Washers (4)
- Brass wheel cover (2)
- Fixing cap (4)
- Water bottle with tap
- Transparent silicone hose
- Cap
- Wrench
- Turn the trolley upside down in order to easily screw the rotating back wheels into the threaded holes.
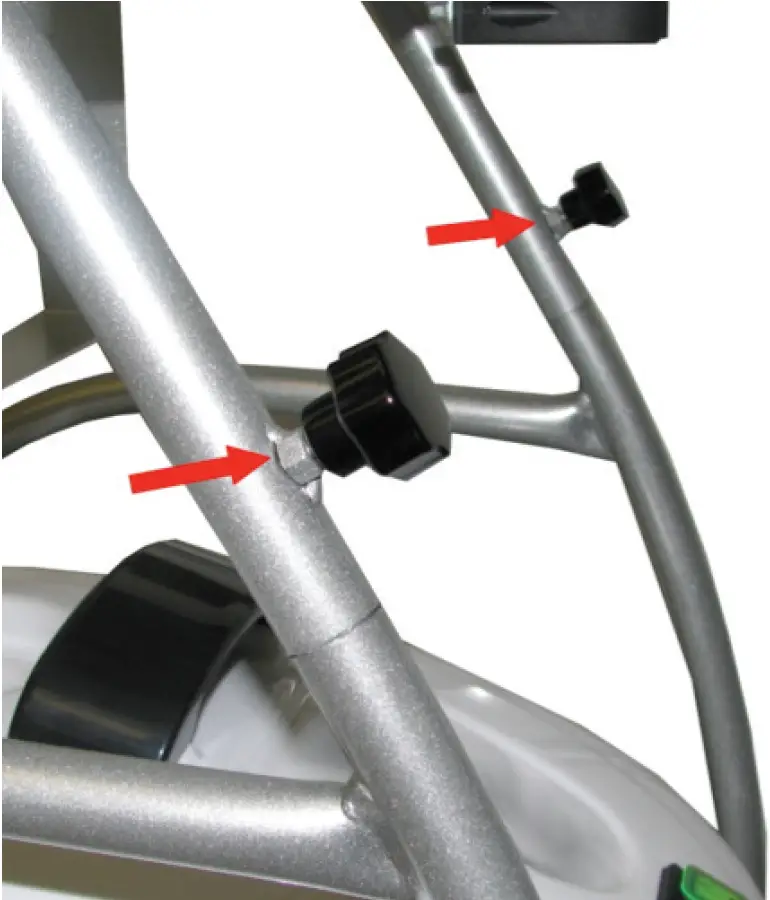
- Assemble the wheel in the following order: washer, chrome back wheel cover, back wheel, brass wheel cover, chrome back wheel cover, washer and fix them with a self-locking nut on the shaft. Screw using the spanner, please be careful not to close them too tightly.
- Hold the trolley up and put the steam cleaner in it. Tilt the machine forward in order to position the front wheels in their place. This will allow a correct positioning of the back wheels also.* Be sure that the electrical cord support is not attached to the Brio Pro before installing onto the trolley.
- Put the accessory tray on the trolley base unit and screw the fixing caps.

- The fixing caps should be tightened until the trolley structure is secure.
- Screw the cap to the steam cleaner tank.
- Put the water tank on the accessory tray and connect the silicone hose to the machine valve cap, ensuring that it is well connected to avoid water leakage. Turn the water tap to the OFF position and fill the tank with water.
- Open the tap to begin using the water.NOTE: It is important to close the tap when the machine is turned off.
ADDITIONAL INFORMATION
THE WATER TROLLEY SYSTEM DOES NOT REQUIRE THE BOTTLE TO BE REMOVED FOR FILLING.During use do NOT pull the steam hose with force, it could move the machine on the trolley.If you need to put the WATER BOTTLE on a FLAT surface, rotate the tap to a horizontal position.
Steam cleaning is a proven method of disinfection. The Reliable Brio Pro 1000CC (EnviroMate PRO EP1000), and the Reliable Tandem Pro 2000CV (EnviroMate FLEX EF700) have been certified to kill the following microorganisms:
|
Organism |
Organism Type |
Exposure Time |
Percentage of Organisms Killed* |
| VRE (vancomycin-resistant enterococcus) |
bacteria |
2 seconds |
>99.9997 |
| staphylococcus aureus |
bacteria |
2 seconds |
>99.9995 |
| pseudomonas aeruginosa |
bacteria |
2 seconds |
>99.99 |
| listeria monocytogenes |
bacteria |
2 seconds |
>99.999 |
| e coli |
bacteria |
2 seconds |
>99.999 |
| salmonella enterica serovar chlorosis |
bacteria |
2 seconds |
>99.999999 |
| MRSA (methicillin resistant staphylococcus aureus) |
bacteria |
2 seconds |
>99.9999 |
| klebsiella pneumonia |
bacteria |
2 seconds |
>99.99999 |
| shigella flexneri |
bacteria |
2 seconds |
>99.9999 |
| clostridium difficile (vegetative and endospores) |
bacteria |
2 seconds |
>99.9999 |
| candida albicans |
fungus |
2 seconds |
>99.999 |
| trichophyton mentagrophyte |
fungus |
2 seconds |
>99.998 |
| aspergillus Niger |
fungus |
2 seconds |
>99.999 |
Reliable Corporation100 Wingold Avenue, Unit 5Toronto, Ontario Canada M6B 4K7www.reliablecorporation.com
 report this ad
References
[xyz-ips snippet=”download-snippet”]