Relief Band Premier RB2.0 Instruction Manual

INTRODUCTION
Nausea and vomiting are probably some of the worst sensations you can feel – the combination of dizziness, lightheadedness, heightened sensitivity to smells, bloated abdominal discomfort, retching and the ultimate involuntary evacuation of the stomach.
Drug-free, Reliefband® Premier uses clinically-proven technology to quickly and effectively relieve nausea and vomiting. Reliefband® Premier is the result of many years of clinical research and development and millions of dollars of investment. It is the first of a new class of Digital Wearable Technologies.
– it’s a Wearable that does something other than measure things– a “Digital Wearable Treatable”
Reliefband® Premier uses patented technology that leverages the body’s natural neural pathways to block signals to the center in the brain responsible for the sensation of nausea. It has been used to treat nausea and vomiting in clinical settings and hospitals for many years. Now it is available over-the-counter for the treatment of nausea and vomiting associated with physician-diagnosed migraine, hangover, anxiety, motion sickness, chemotherapy and morning sickness from pregnancy. Reliefband is also an adjunct to antiemetic therapy in reducing postoperative nausea.
INDICATIONS FOR USE
Reliefband® Premier is indicated for use in the treatment of nausea and vomiting associated with physician-diagnosed migraine, hangover, anxiety, motion sickness, chemotherapy and morning sickness from pregnancy.
Reliefband® Premier is also indicated as an adjunct to antiemetics in reducing postoperative nausea. For over the counter use.
DESCRIPTION OF THE PREMIER:
Reliefband® Premier is a rechargeable, digital wearable device that is worn on the wrist. It consists of a hypoallergenic band with a control panel on top and two electrical contacts underneath. The two contacts must be placed firmly against the underside of your wrist at the P6 location. It provides relief from nausea and vomiting associated with physician-diagnosed migraine, hangover, anxiety, motion sickness, chemotherapy and morning sickness from pregnancy.
Reliefband® Premier is also indicated as an adjunct to antiemetics in reducing postoperative nausea.
A fully charged battery will last for approximately 18 hours of continuous use at the mid-power level or below.
GET TO KNOW RELIEFBAND® PREMIER
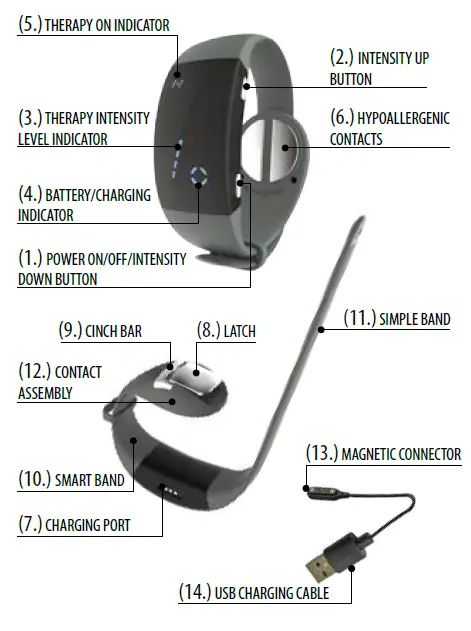
- Power On/Off/Intensity Down Button – press and hold for 1.5 seconds to power on the device. During active therapy, briefly pressing this button will decrease the intensity. Press and hold for 1.5 seconds to turn the device off.
- Intensity Up Button – Once the device has been turned on, press this button to increase the intensity.
- Therapy Intensity Level Indicator – 10 levels indicated by blue illuminated LEDs.
- Battery/Charging Indicator – four blue illuminated LED segments indicate charge level. A single flashing red segment indicates 15% or less battery life remaining.
- Therapy On Indicator – pulsing blue LEDs indicate the device is delivering therapy.
- Hypoallergenic Contacts – 316L Stainless Steel, therapy is delivered here.
- Charging Port – attach the magnetic charging cable here to recharge the device.
- Latch – locks the Simple Band (11) tight to hold the device in position.
- Cinch Bar – gently pull the Simple Band (11) against the Cinch Bar to achieve a snug fit on the wrist.
- Smart Band – unique shape holds the device in place and makes it easy to put on and take off.
- Simple Band – slide through the latch to adjust the fit to your wrist.
- Contact Assembly – houses the contacts that deliver therapy.
- Magnetic Connector – attaches charging cable to the device.
- USB Charging Cable
- UL Approved (5V) USB Charging Port
CHARGING THE DEVICE
- Ensure Reliefband Premier is turned off prior to charging. Do not wear while charging.
- Plug the USB Charging Cable (14) into any standard UL approved 5 Volt USB charging port (15).
- Attach the Magnetic Connector (13) end of the USB Charging Cable (14) to the Charging Port (7) on the body of the Reliefband® Premier device.
- Blue LEDs segment(s) will flash when in charging mode:
- 1 LED segment = 1% – 25% charged
- 2 LED segments = 26% – 50% charged
- 3 LED segments = 51% – 75% charged
- 4 LED segments = 76% – 100% charged
- Full charge is indicated when all four blue LED segments remain constantly illuminated. Typically, it takes about 75 minutes to reach full charge. A 15-minute charge will give about 6 hours of continuous use at the mid-power level or below
- When not connected to the Reliefband, unplug the USB Charging Cable (14) from the standard UL approved 5 Volt USB charging port (15).
- When turning the device on, the Battery Charge Indicator (4) will indicate how much charge is left in the device.
- A single flashing red LED segment indicates 15% or less battery life remaining.
PACKAGE CONTENTS
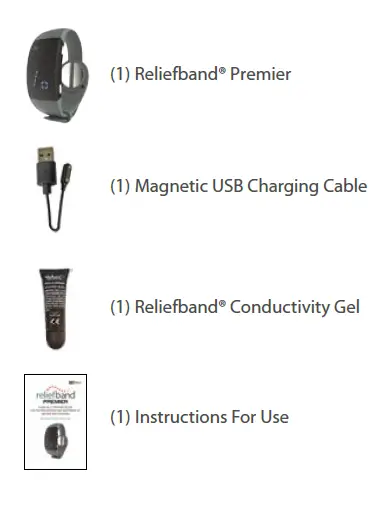
Positioning Reliefband® Premier properly on your wrist is essential for relief of your nausea and vomiting symptoms. Before you start using Reliefband® Premier, please read this Instructions For Use carefully. You must feel a “tingling” sensation in your palm and/or middle fingers for Reliefband® Premier to work.
Reliefband Premier must be charged before use.
APPLYING RELIEFBAND® CONDUCTIVITY GEL
Reliefband® Conductivity Gel is an essential component for use and therapy. Hypoallergenic Reliefband® Conductivity Gel makes the delivery of pulses much more efficient.
Note: Reliefband® Conductivity Gel should be re-applied every 2-3 hours, or any time after washing, or if stimulation decreases.
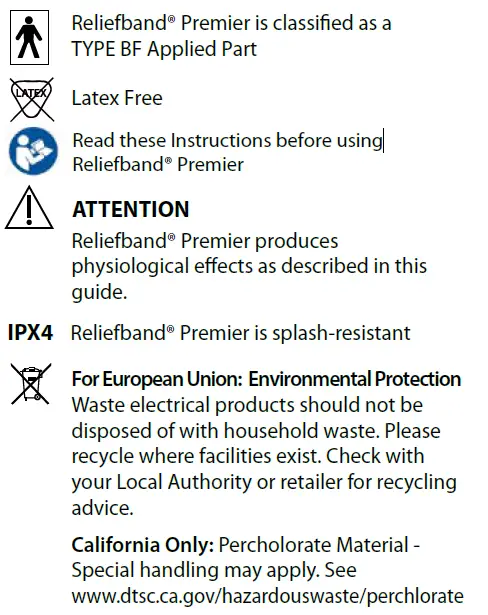
SAFETY INFORMATION
![]()
- No modification of this device is allowed.
- Charging cord must be unplugged from power source when not in use.
- Charging Cord:Voltage Rating: 5±0.25VCurrent Rating: 500mA Max
![]()
- Pacemaker users – Use this device on the wrist and only as directed to prevent possible interference with your pacemaker. Avoid placing the electrical contacts directly on your chest or near the pacemaker. Consult your doctor before using device.
- Nausea and vomiting may be signs of a serious health problem. Contact a doctor if your nausea and vomiting persists.
- Reliefband® Premier should only be used on the wrist. Do not use it on any other area of the body.
- Reliefband® Premier does not cure the underlying causes of nausea and vomiting.
- The relief you get may vary depending on your body’s individual characteristics, and any medications that you may be taking could cause your body to respond differently.
- Reliefband® Premier should be kept out of reach of young children.
- If you are unable to tolerate any food or liquids or are experiencing weight loss you should contact your doctor.
- Reliefband® Premier is IPX4 splash-resistant. This product is resistant to splashing water (rain, waves).
- Avoid splashing water while charging.
- Do not immerse Reliefband® Premier in water or wear while bathing, showering or swimming.
SIDE EFFECTS
- There are no known side effects for Reliefband® Premier.
- There are no contraindications for Reliefband® Premier.
HOW RELIEFBAND® PREMIER WORKS
![]()

Reliefband® Premier delivers proprietary pulses from the contacts on the Smart Band that signal the median nerve at the P6 location on the underside of the wrist.
![]()
These signals travel through the body’s nervous system to the part of the brain which controls nausea and vomiting.
![]()
The signals have a rebalancing effect, normalizing nerve messages from the brain to the stomach and reducing symptoms of nausea and vomiting.
QUICK REFERENCE

Find the starting area (P6) on the wrist.Using either wrist, the correct area is in-between the two tendons on the underside of the wrist – about two finger widths above the wrist crease.
Clean the area first.Apply a small drop of gel and spread in a circle about the size of a large coin with an even sheen (i.e., a thin layer with a shiny appearance).
Holding the device by the Contact Assembly, place the contacts onto the gel over the P6 location on the underside of the wrist. Fasten device snugly.

Press and hold the Power ON/OFF/Intensity DownButton (-) for 1.5 seconds to turn on or off.Press the intensity Up Button (+) once to set stimulation to level 1. Increase intensity until tingling is felt in palm and middle fingers.Set to the highest comfortable setting for maximum benefit.
**Please charge for at least 1.5 hours before initial use.
DETAILED OPERATION
- Turn the product to ON by pressing and holding the Power On/Off/Intensity Down Button (1) for 1.5 seconds
- Upon powering on, the Intensity Level Indicator LEDs (3) will illuminate in sequence of 1-10, then back down to level 0.
- The current battery charge is displayed for 1.5 seconds before fading away.
- Press the Intensity Up Button (2) once to set stimulation to the first level. At this point therapy is being delivered. If intensity level is not set, Reliefband Premier will turn off.
- Blue LED intensity lights will indicate intensity level:
- No LEDs illuminated = Level 0 = Power ON but no therapy
- 1 LED illuminated = Level 1 Therapy
- 10 LED’s illuminated = Level 10 Therapy
- The Therapy On Indicator (5) will pulse on and off indicating that the device is delivering therapy.
- Blue LED intensity lights will indicate intensity level:
- Adjust intensity level using the Intensity Up Button (2) until a “tingling” sensation is felt in the palm or middle fingers of your hand.
- If no “tingling” is felt, increase the intensity using the Intensity Up Button (2).
- If “tingling” is still not felt, check the position of the Hypoallergenic Contacts (6) and adjust until you feel “tingling” in your palm and middle fingers.
- Press and hold the Power On/Off/Intensity Down Button (1) for 1.5 seconds to turn the device off.
- If the battery charge has depleted, recharge the device according to “Charging The Device” instructions.
- Once battery level registers 15% or below, the single LED will switch from static blue to flashing red.
- A flashing red LED indicates the device will require charging as soon as possible.
STORAGE AND USAGE TROUBLESHOOTING INFORMATION
FCC INFORMATION:
This device complies with Part 15 of the FCC Rules. Operation is subject to the following conditions: (1) This device may not cause harmful interference, and (2) this device must accept any interference received, including interference that may cause undesired operation.
MAINTENANCE:
Keep the contacts area clean. Periodically examine the contacts for gel build-up around the perimeter of the contacts, which may interfere with or decrease the delivery of therapy. A moist cloth or cotton swab may be used to remove any gel build-up. Avoid immersion of the device in liquid. Reliefband® Premier must not be opened or altered in any way.
ENVIRONMENTAL USE INFORMATION:
Reliefband® Premier should only be used within the environmental ranges of 0°C to 38°C (32°F to 100°F) and 20% to 90% relative humidity (noncondensing).

ENVIRONMENTAL STORAGE INFORMATION:
The device can be stored and transported in the environmental ranges of 0°C to 27°C (32°F to 80°F) and 20% to 80% relative humidity (noncondensing). If the device has been stored or transported in conditions outside this range, keep it within the normal ranges for at least 30 minutes before using.
DISPOSAL INFORMATION
Reliefband Premier is not regulated as hazardous goods. It can be recycled or disposed with normal household trash.
TECHNICAL INFORMATION
Reliefband complies with:
- IEC 60601-1:2005+A1:2012/EN 60601-1:2006 Medical electrical equipment – Part 1: General requirements for basic safety and essential performance
- IEC 60601-1-2:2007/EN 60601-1-2:2007 Medical electrical equipment – Part 1-2: General requirements for safety – Collateral standard: Electromagnetic compatibility – Requirements and tests
- IEC 60601-2-10:2012/EN 60601-2-10:2000+A1:2001 Medical electrical equipment – Part 2-10: Particular requirements for the safety of nerve and muscle stimulators
TECHNICAL DATA
TROUBLESHOOTING
The Troubleshooting Chart below will help to assist you in handling situations that may arise while you use the product.
TIPS FOR EFFECTIVE USE
- Reliefband® Premier can be worn on either wrist provided tingling is felt in the palm and/or middle fingers.
- For some people, applying and rubbing in the gel twice assists in nerve stimulation.
- Reliefband® Conductivity Gel should be re-applied every 2-3 hours during use, any time after washing, or if stimulation decreases.
- Contact with skin for prolonged periods may contribute to skin irritation particularly for users who have allergies. To reduce irritation, follow three simple wear and care tips: (1) Keep it clean; (2) keep it dry; and (3) after extended wear, give your wrist a rest by removing the band for an hour.
- Regularly clean your Reliefband Premier and wrist—especially if perspiring, or before reapplying conductivity gel – before returning the Reliefband Premier to your wrist. Wipe the band and contacts with a clean, damp wipe using water or a small amount of rubbing alcohol. Do NOT use hand soap, body soap, dish soap, hand sanitizers, cleaning wipes or household cleaners which could get trapped beneath the band and irritate skin. Always dry the band well before putting it back on.
- To remove build-up of lotions and oils (such as sunscreen, insect repellent and moisturizers) that can be trapped beneath the band, we recommend that you use a soap-free cleanser like Cetaphil Gentle Skin Cleanser or Aquanil; wipe off thoroughly, and dry well.
- While still on the wrist, turn Reliefband® Premier off periodically to determine if you still have nausea and vomiting symptoms. If you still have symptoms, then turn it back on immediately.
- When finished using Reliefband® Premier take it off your wrist. Remove the gel from your wrist and the device with a tissue.
- When not using Reliefband® Premier be sure to turn the power off to extend battery life.
- Store Reliefband® Premier in a safe, dry place. Keep it away from young children.
- Avoid an excessive amount of gel; it could decrease the efficacy of the device.
 report this ad
Relief Band Premier RB2.0 Instruction Manual – Relief Band Premier RB2.0 Instruction Manual –
[xyz-ips snippet=”download-snippet”]