
REMINGTON Haircut Kit

IMPORTANT SAFETY INSTRUCTIONS
When using an electric appliance, basic safety precautions should always be observed, including the following. Read all instructions before using this hair clipper.KEEP POWER ADAPTOR AWAY FROM WATERWARNING – TO REDUCE THE RISK OF BURNS, FIRE, ELECTRIC SHOCK OR INJURY TO PERSONS:
- Do not reach for an appliance that has fallen into water.Unplug it immediately.
- Do not use while bathing or in the shower.
- Do not place or drop into water or other liquid.
- Do not place or store this appliance where it can fall or be pulled into a bath or sink.
- Except when charging, always unplug this appliance from the electrical outlet immediately after using.
- This appliance is for household use only.
- This appliance is not intended for use by persons (including children) with reduced physical, sensory or mental capabilities, or lack of experience and knowledge, unless they have been given supervision or instruction concerning use of the appliance by a person responsible for their safety. Keep the appliance and the power cord away from the edge of table or countertops and out of reach of children and persons with reduced physical, sensory or mental capabilities.
- This appliance is not a toy. Children shall be supervised to ensure they do not play with this appliance.
- Use this appliance only for its intended use as described in this manual.
- Do not use attachments not recommended by Remington.
- Keep the cord away from heated surfaces.
- Never operate this appliance if it has a damaged cord or plug, if it isnot working properly, if it has been dropped or damaged, or if it has been dropped into water. If any of these things happen, return the appliance to an authorised service centre for examination and repair.
- Never drop or insert any object into any of the appliance’s openings.
- Do not use outdoors or operate where aerosol (spray) products are being used, or where oxygen is being administered.
- Make sure the cord is disconnected from the hair clipper while storing this appliance and cord in a moisture-free area. Do not store it in temperatures exceeding 60°C (140°F)
- Do not use this appliance with a damaged or broken cutter unit, as injury may occur. Always make sure blades are aligned properly.
- Always attach plug to appliance and then the adaptor to the outlet. Todisconnect, turn all controls to OFF, then remove adaptor from outlet, then detach power cord from the hair clipper for storage.
- Do not use an extension cord or a voltage converter with this appliance.
- Do not wrap the cord around the appliance.
Remington strongly recommends that an approved Safety Switch (residual current device) be installed to protect all bathroom power outlets. Ask an electrical contractor for advice.
SAVE THESE INSTRUCTIONS
HC7110AU PRECISION HAIRCUT KIT USE & CARE INSTRUCTION MANUAL
Thank you for purchasing your new Remington® Precision Haircut Kit. Inside this manual you will find tips on using and caring for your hair clipper.
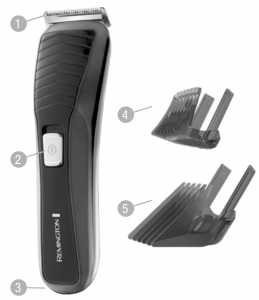
KEY PARTS
- Stainless Steel Blade
- On/Off Switch
- Charging Indicator Light
- Adjustable Comb (1-21mm)
- Adjustable Comb (24-44mm)
Also Includes:
- Barbers Scissors
- Barbers Comb
- Lubricating Oil
- Cleaning Brush
- Power Adaptor
ABOUT YOUR HAIR CLIPPER
|
HC7110AU Specifications |
|
| Power System | Cord/Cordless (Rechargeable) |
| Initial Charge Time | 24 Hours |
| Full Charge Time | 18 – 20 Hours |
| Run Time | 40 Minutes |
| Indicators | Charging |
| Voltage Type | Single |
Power System: Cord/Cordless – can be used with or without the power cord.Charging Indicator: red light that glows when the hair clipper is being charged.Voltage Type: Single – 220-240V only.
CHARGING YOUR HAIR CLIPPER
Cordless Use
- Before using your hair clipper for the first time, charge it for 24 hours.
- Ensure the product is switched off.
- Connect the charging adaptor to the product and then to the mains. The charging LED light will display on the clipper.
- If the product is not going to be used for an extended period of time (2-3 months), unplug it from the mains and store.
- Fully recharge your hair clipper when you would like to use it again.
- It is not recommended to use this hair clipper directly from the power outlet when it has been fully charged, however, while using the hair clipper in cordless mode if there is a noticeable drop in power, you can use the hair clipper directly from the power outlet.
- To preserve the life of your batteries, let them run out every six months then recharge for 24 hours.
Corded Use
- Connect the charging adaptor to the product and then to the mains.
- When the cord is connected to the mains, a charging LED light is displayed on the hair clipper.
Caution: Extended mains (corded) only use will result in the reduction of the battery life.
HOW TO USE
Before Starting to Cut
- Inspect the hair clipper making sure it is free from hair and dirt.
- Ensure that the hair is thoroughly dry and tangle free.
- The blades on your hair clipper should be oiled before every haircut.
Lubricating the Hair Clipper Blades
Simply place a few drops of oil on the teeth of the blades. Use only the lightgrade oil supplied or a suitable alternative like sewing machine oil. Only this type of oil is suitable for the blades on your Remington hair clipper. Do not use hair oil, grease or any oil mixed with kerosene or any solvent as the solvent will evaporate and leave a thick oil, slowing the blades.If oil is not applied to the blades or only a small amount of oil is applied, this may cause cutting problems. Blades will wear prematurely and not cut properly if they are not sufficiently lubricated. There may also be a pulling sensation on the hair.
Instructions for Hair Cutting
Note: For even cutting, allow the trimmer comb/blade to cut its way through the hair. Do not force it through quickly. If you are cutting for the first time, start with the maximum length trimmer comb, until you know how short you would like your hair to be.Note: The comb guide lengths described for use in the steps below are an example only, if you want a longer or shorter hair cut you will need to adjust the comb guide lengths to suit your requirements.
To Attach a Comb
- Hold the comb with its teeth upward.
- To attach a comb, align the legs of the comb with the holes in thetop of the clipper on each side of the blade and slide the legs into the trimmer until they click.
- To remove, firmly pull the comb straight up away from the clipper.
Comb Settings
- The hair clipper comes with two adjustable combs, a short length adjustable comb (indicated by 1-21mm on the back of the comb) and a longer length adjustable comb (indicated by 24-44mm on the back of the comb).
|
Shorter Length Adjustable Comb |
Longer Length Adjustable Comb |
|
1mm |
24mm |
|
3mm |
26mm |
|
6mm |
29mm |
|
9mm |
32mm |
|
12mm |
35mm |
|
15mm |
38mm |
|
18mm |
41mm |
|
21mm |
44mm |
Step 1 – Nape of the neck
- Set the comb to 3mm or 6mm.
- Hold the clipper with the blade teeth pointing upwards. Start at the centre of the head at the base of the neck.
- Slowly lift the clipper, working upwards and outwards through the hair, trimming just a little at a time.
Step 2 – Back of the head
- With the comb set at 12mm or 18mm, cut the hair at the back of the head.
Step 3 – Side of the head
- With the comb set at 3mm or 6mm, trim sideburns. Then change to the longer 9mm guide comb and continue to cut the top of the head.
Step 4 – Top of the head
- Use the longer length comb attachment and set it to 24mm or 27mm then cut hair on top of the head against the direction in which the hair normally grows.
- For longer hair on top, use the longer length comb attachment (24 – 44mm) to achieve the desired style.
- Always work from the back of the head.
Step 5 – The finishing touches
- Use the clipper without an attachment comb for close trimming around the base and sides of the neck.
- To produce a clean straight line at the sideburns, reverse the hair clipper.
- Place the reversed clipper at right angles to the head so the tips of the blades lightly touching the skin and then work downwards.
CLEANING & MAINTENANCE
- Your clipper is fitted with high quality blades.
- To ensure long lasting performance of your clipper, clean the blades and unit regularly.
- Always keep the attachment guide comb on the trimmer blade.
After Each Use
- Ensure the appliance is switched off and unplugged from the mains before cleaning.
- Brush the accumulated hair from the blades and body of the clipper.Do not submerge the clipper in water.
- To clean unit, wipe with a damp cloth and dry immediately.
- Place a few drops of cutter or sewing machine oil onto the blades. Wipe off excess oil.
Every Six Months
- Remove the 2 screws retaining the fixed blade with a screwdriver.
- Remove the blade set.
- Brush out hairs from between the blades with a soft cleaning brush.Do not remove the lubricating grease from the blades. It is not necessary to remove the small moving blade from the unit.
- If the moving blade has been removed this can be re-fitted by slotting the moving blade holder over the pin in the centre of the interior product head.
- The groove on the moving blade just below the teeth should rest on the plastic pressure arm which rides inside the groove. The fixed blade should be assembled with the bevelled edge of the 2 screw holes facing outward and fixed with screws.
- Note that if the blades are not correctly aligned then cutting efficiency will be impaired.
Storage
When not in use, unplug the hair clipper and store it out of reach of children in a safe dry place. Never wrap the cord around the hair clipper as this will cause the cord to wear prematurely and break. Handle the cord carefully for long life and avoid jerking, twisting or straining especially at the plug connections.
BATTERY DISPOSAL
Note: The battery is not intended to be removed or replaced under normal use. The only time the battery should be removed or the unit opened or disassembled, is at the end of the product’s useful life before it is discarded.
- The HC7110AU contains a nickel metal hydride battery. Once the hair clipper has reached the end of its life, to ensure proper disposal of the product, please take the appliance to a recycling centre, where the internal rechargeable battery should be removed by a professional and recycled separately.
- For more information about recycling of electrical and battery operated appliances, please contact your local council office or your household waste disposal service.
Caution: Do not put in the fire or mutilate your batteries when disposing as they may burst and release toxic materials. Do not short circuit as it may cause burns.
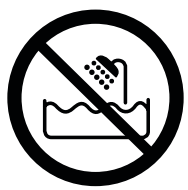 This product is not suitable to use in a bath or shower.This product conforms to radio frequency interference requirements.Any product purchased and used commercially carries a limited 90 Day Warranty.
WARRANTY AGAINST DEFECTS
Spectrum Brands Australia Pty Ltd and Spectrum Brands New Zealand Limited
In this warranty:
Australian Consumer Law means the Australian consumer law set out in Schedule 2 to the Competition and Consumer Act 2010;CGA means the New Zealand Consumer Guarantees Act 1993;Goods means the product or equipment which was accompanied by this warranty and purchased in Australia or New Zealand, as the case may be;Manufacturer, We or us means:
- for Goods purchased in Australia, Spectrum Brands Australia Pty LtdACN, 007 070 573; or
- for Goods purchased in New Zealand, Spectrum Brands New Zealand Limited, as the case may be, contact details as set out at the end of this warranty;
Supplier means the authorised distributor or retailer of the Goods that sold you the Goods in Australia or in New Zealand; and You means you, the original end-user purchaser of the Goods.
- Our goods come with guarantees that cannot be excluded under the Australian Consumer Law, or the CGA. You are entitled to a replacement or refund for a major failure and compensation for any other reasonably foreseeable loss or damage.You are also entitled to have the goods repaired or replaced if the goods fail to be of acceptable quality and the failure does not amount to a major failure.
- The benefits provided by this Warranty are in addition to all other rights and remedies in respect of the Goods which the consumer has under either theAustralian Consumer Law or the CGA. The original purchaser of the Goods isprovided with the following Warranty subject to the Warranty Conditions:
- We warrant the Goods for all parts defective in workmanship or materials for the period of two (2) years from the date of purchase (Warranty Period). If the Goods prove defective within the Warranty Period by reason of improper workmanship or material, we may, at our own discretion, repair or replace the Goods without charge.Warranty Conditions
- The Goods must be used in accordance with the manufacturer’s instructions. This Warranty does not apply should the defect in or failure of the Goods be attributable to misuse, abuse, accident or non-observance of manufacturer’s instructions on the part of the user. As far as the law permits, the manufacturer does not accept liability for any direct or consequential loss, damage or other expense caused by or arising out of any failure to use the Goods in accordance with the manufacturer’s instructions.
- Consumable parts (such as shaver heads, cutters and foils) of the Goods are included under this Warranty only where there is a defect in workmanship or materials used.
- The warranty granted under clause 3 is limited to repair or replacement only.
- Any parts of the Goods replaced during repairs or any product replaced remain the property of the manufacturer. In the event of the Goods being replaced during the Warranty Period, the warranty on the replacement Goods will expire on the same date as for the Warranty Period on the original Goods which are replaced.
- In order to claim under the warranty granted under clause 3 you must:(a) Retain this warranty with your receipt/proof of purchase; and(b) Return the Goods to us at the relevant address below or to the Supplier by prepaid freight within the Warranty Period accompanied with (i) the legible and unmodified original proof of purchase, which clearly indicates the name and address of the Supplier, the date and place of purchase, the product name or other product serial number and (ii) this warranty.
- This warranty is immediately void if:(a) Any serial number or appliance plate is removed or defaced;(b) The Goods have been serviced or otherwise repaired by a person not authorised to do so by us or where non approved replaced parts are used.
- The Goods are designed for domestic use only. A limited 90-day Warranty applies to any industrial or commercial use of the Goods. The Goods must be connected to the electrical voltage requirements as specified in the ratings label located on the Goods.
- This warranty does not cover the cost of claiming under the warranty or transport of the Goods to and from the Supplier or us.
- This warranty is only valid and enforceable in Australia against Spectrum Brands Australia Pty Ltd and in New Zealand against Spectrum Brands New Zealand Limited.
Contact us or the Supplier for further details.
Spectrum Brands Australia Pty LtdLocked Bag 3004Braeside, VIC 3195AUSTRALIACustomer service in Australia: 1800 623 118E-mail: [email protected]Website: www.remington-products.com.au
Spectrum Brands New Zealand LimitedPO Box 9817Newmarket, Auckland 1149NEW ZEALANDCustomer service in New Zealand: 0800 736 776E-mail: [email protected]Website: www.remington.co.nz

References
[xyz-ips snippet=”download-snippet”]