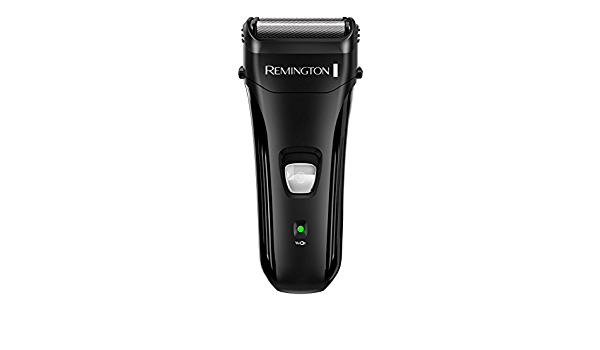
REMONGTON Foil Shaver

 Thank you for buying your new Remington® product. Please read these instructions carefully and keep them safe. Remove all packaging before use.IMPORTANT SAFEGUARDS
- This appliance can be used by children aged 8 years and above and persons with reduced physical, sensory or mental capabilities or lack of experience and knowledge if they have been supervised/instructed and understand the hazards involved. Children shall not play with the appliance. Cleaning and user maintenance shall not be done by children unless they are older than 8 and supervised. Keep the appliance and cable out of reach of children under 8 years.
 The shaver is suitable for cleaning under an open water tap.
 - WARNING: Detach the shaver from the charging adapter before cleaning it in water.
- Do not use the product with a damaged cord. A replacement can be obtained via our International Service Centres.
- This product should only be used with the charging adaptor supplied.
- Do not use the shaver, charging adaptor, charging stand, or any other part if it is damaged, as this may cause injury. Always replace a damaged charging adaptor or charging stand with one of the original types.
- The charging adaptor contains a transformer. Do not cut off the adaptor to replace it with another plug, as this causes a hazardous situation.
- Do not immerse the charging adaptor or charging stand in water or any other liquid, nor rinse it under the tap.
- This appliance should never be left unattended when plugged into a power outlet, except when charging.
- Keep the power plug and cord away from heated surfaces.
- Do not plug or unplug the appliance with wet hands.
- Do not twist or kink the cable, or wrap it around the appliance.
- This appliance is not intended for commercial or salon use.
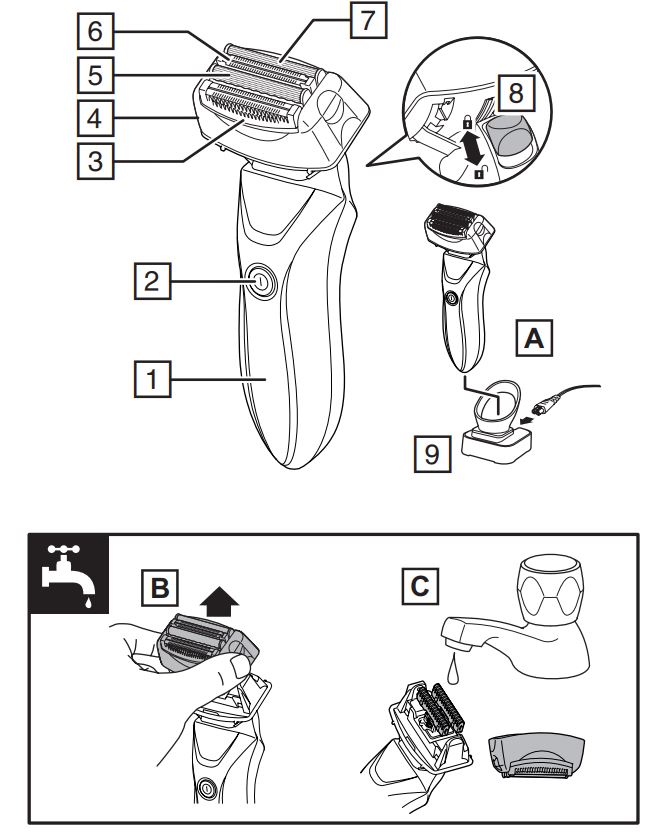
PARTS
- Display
- On/off switch
- Pop-up intercept trimmer
- Hair pocket
- Foil
- Intercept trimmer
- Foil
- Headlock button
- Charging stand
- Charging adapter (not shown)
- Cleaning brush (not shown)
CHARGING
Charge the shaver:
- Before using it for the first time.
- When only one indicator light is showing.
- After your shaver has not been used for a long time.
- Ensure the shaver is switched off.
- Connect the charging adapter to the charging stand and then to the mains power outlet.
- Place the shaver into the charging stand (FIG A). The charging adapter can also be connected directly to the shaver.
- Charge for two hours.
- During charging, the indicator lights will show the level of charge. All three lights will flash for a time and then go out when the shaver is fully charged.
- During use, the indicator lights will go out one at a time to show the level of charge remaining.
QUICK CHARGE
The quick charge feature allows you to charge your shaver for five minutes if the battery is flat. This will give you five minutes of use (enough for one shave) at the normal motor speed (without using the turbo mode).
INSTRUCTIONS FOR USEIt is recommended that you use your new shaver daily for up to four weeks to allow time for your facial hair and skin to become accustomed to the new shaving system.1. Switch the shaver on by pressing the on/off switch.2. Stretch the skin with your free hand so the hairs stand upright.3. Use short linear strokes.· Only apply light pressure on the shaving head while shaving (pressing too hard can damage the heads and make them vulnerable to breakage).
TURBO MODEDuring use, pressing the on/off button a second time increases the motor speed to provide a more powerful shave. This is ideal for shaving facial hair that is 2-3 days old, or heavier parts of the facial hair. When activated, TURBO will be shown on the display.
USING THE POP-UP INTERCEPT TRIMMERThe pop-up intercept trimmer has three positions and can be raised or lowered to suit the shaving task:
- Fully down – use this position when shaving light facial hair.
- Level (trimmer level with the foils) – in this position the trimmer acts as an extra cuttingelement.
- Fully up – use this position for detail trimming.
HEADLOCKNormally, the head pivots freely but its movement can be restricted by sliding the headlock button to the LOCK position.
SWITCHING OFFPress the on/off button (several times if required) until your shaver stops.
TRAVEL LOCKThe travel lock prevents your shaver from accidentally switching on when it is packed in luggage.To lock: Press and hold the on/off switch for three seconds. Your shaver will start for three seconds and then switch off. The L icon will flash five times. To unlock: Press and hold the on/off switch for three seconds. After three seconds your shaver will turn on.
TIPS FOR BEST RESULTS
- Always hold the shaver at right angles to the skin so that the shaved head is touching the skin with equal pressure.
- Use slow to moderate stroking movements. The use of short linear motions in stubborn areas may obtain a closer shave, especially along the neck and chin line.
- DO NOT press hard against the skin in order to avoid irritation and damage to the intercept heads.
SHAVING WITH SHAVING GEL OR FOAM
- Follow the same instructions as dry shaving if using shaving gel.
- After use with shaving gel, please ensure the head and cutters are rinsed under warmwater to clean away any excess gel and debris.
CLEANING
To ensure long-lasting performance clean after each use.
- Ensure the shaver is switched off.
- Grasp the shaver head on each side and pull it upwards (FIG B).
- Tap out any excess hair shavings.
- Rinse the cutters (underneath the shaving head) and the shaving head itself under warm running water (FIG C).
- Refit the shaving head once it is dry.
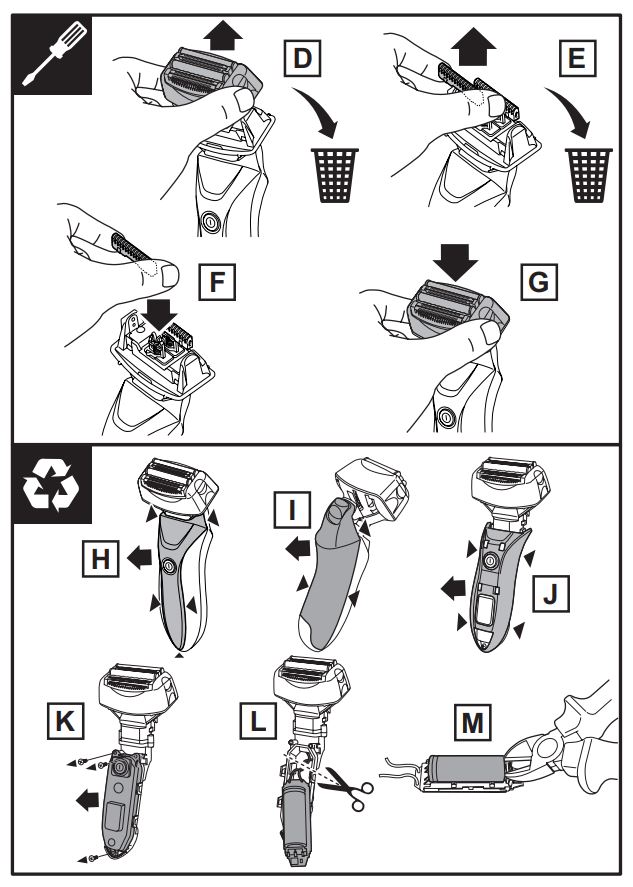
REPLACING FOILS AND CUTTERS
To ensure continued high-quality performance from your shaver, we recommend the foils and cutters are replaced every 12 months. Signs that the foils and cutters need replacing are Irritation – you may experience skin irritation.Pulling – your shave may not feel as close and you may feel the cutter pulling your hair.To replace the foils and cutters:
- Ensure the shaver is switched off.
- Grasp the shaver head on each side and pull it upwards. Discard the shaver head (FIG D).
- Grasp the cutters as shown and pull upwards. Discard the cutters (FIG E).
- Snap the new cutters into the holders (FIG F).
- Replace the new shaving head (FIG G).
REMOVING THE RECHARGEABLE BATTERY
We strongly recommend that a professional remove the rechargeable battery. Parts of the shaver case and tools have sharp edges and may cause injury if not handled correctly.
· The rechargeable battery must be removed from the appliance before it is scrapped.· Disconnect the charging adapter before removing the battery.1. Ensure that the battery is fully discharged. To do this, operate the shaver until it stops.2. Use an appropriate tool to prise off the front cover trim (FIG H) at the points indicated![]() .3. Prise off the rear part of the handle (FIG I).4. Prise off the remaining front part of the handle (FIG J).5. Remove the three screws then unclip the circuit board cover (FIG K)6. Lift out the circuit board and turn it over. Cut the two wires (FIG L).7. Cut the fixings at each end of the battery using an appropriate tool (FIG M).· Used batteries must be removed from the appliance and disposed of at an appropriate official recycling/collection point.· Do not attempt to operate the shaver once you have opened it.
.3. Prise off the rear part of the handle (FIG I).4. Prise off the remaining front part of the handle (FIG J).5. Remove the three screws then unclip the circuit board cover (FIG K)6. Lift out the circuit board and turn it over. Cut the two wires (FIG L).7. Cut the fixings at each end of the battery using an appropriate tool (FIG M).· Used batteries must be removed from the appliance and disposed of at an appropriate official recycling/collection point.· Do not attempt to operate the shaver once you have opened it.
RECYCLING
![]() To avoid environmental and health problems due to hazardous substances, appliances, and rechargeable and non-rechargeable batteries marked with one of these symbols must not be disposed of with unsorted municipal waste. Always dispose of electrical and electronic products and, where applicable, rechargeable and non-rechargeable batteries, at an appropriate official recycling/ collection point.
To avoid environmental and health problems due to hazardous substances, appliances, and rechargeable and non-rechargeable batteries marked with one of these symbols must not be disposed of with unsorted municipal waste. Always dispose of electrical and electronic products and, where applicable, rechargeable and non-rechargeable batteries, at an appropriate official recycling/ collection point.
References
[xyz-ips snippet=”download-snippet”]